
Sage Green Granny Square Bed Cover with Cream Roses Crochet Pattern
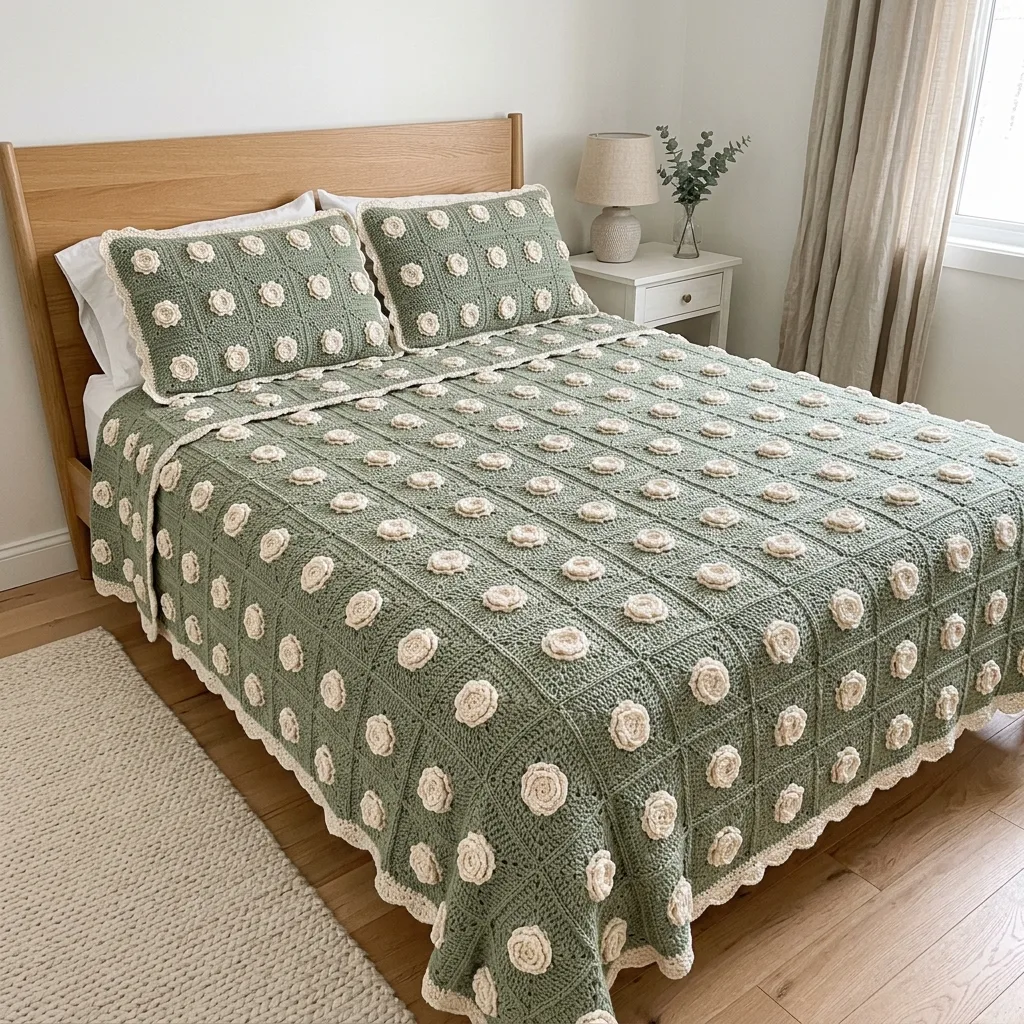
Friendly granny clusters for a confident beginner, plus a layered rose made with back post single crochet.
About an hour for each square with its rose, so a few each week finish the bed in one season.
Every soft sage square holds a full cream rose, like flowers scattered across a spring lawn.
About This Sage Green Granny Square Bed Cover with Cream Roses Crochet Pattern Pattern
This bed cover is made from one gentle square repeated across the whole bed. Each square is a soft sage green granny square, worked all in one color, with a full cream rose sewn right in the middle. When the squares are joined, the seams make a fine raised grid of sage across the bed, and the roses line up in calm, even rows. The muted green and the warm cream together feel like a spring garden after the rain. It looks rich and detailed, yet every piece is made with stitches you already know.
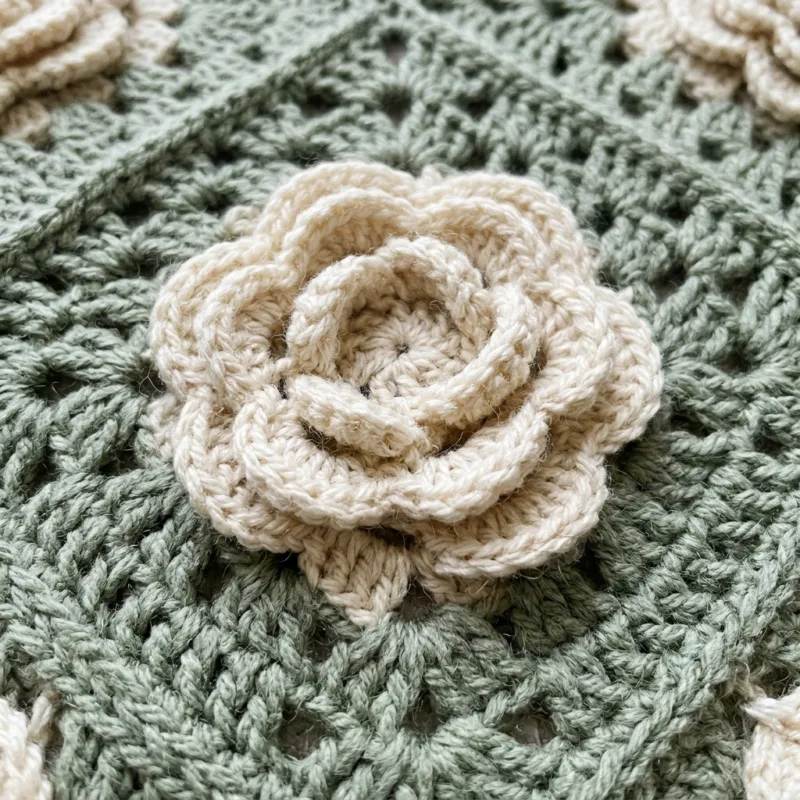
Each square is worked in the round from a magic ring. Seven rounds of granny clusters, groups of three double crochet with one chain between them, build the square and leave little windows all over it, so the fabric feels light and airy. Then two more sage rounds close it in: one round of double crochet that fills the last row of windows, and one round of single crochet for a clean, straight edge. Each square ends on 132 single crochet with four corner spaces, which makes the joining very even and easy.
The rose is made separately in cream yarn. It starts with a small ring of six chain loops, and each loop holds a little petal. Then you work chain loops behind those petals with back post single crochet, so the next layer sits underneath and peeks out around the first. After three layers you have a full, cupped rose about three and a half inches across. You sew it to the center of each sage square with its long yarn tail, anchoring it in two rings so it stays in place for years.
The queen size uses 110 squares in a grid of 10 squares across and 11 squares down. Each blocked square is about 9 inches, so the joined center measures about 90 by 99 inches. A sage border of single crochet, double crochet and a soft shell round adds about 1.25 inches on every side, for a finished size of roughly 92 by 101 inches. That covers a queen mattress and drapes well down both sides of the bed.
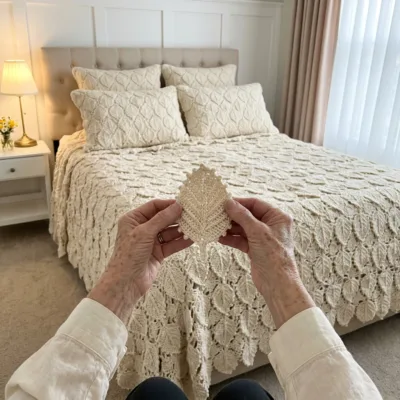
The squares are joined with single crochet worked on the right side, through both loops of both squares. This makes a neat raised ridge between the squares, and those ridges create the quiet grid you can see in the photo. Because the seams are worked in the same sage as the squares, the bed cover looks like one piece of fabric, and the roses stand out even more against it. The shell edge finishes the outside with a soft little scallop.
The finished bed cover is soft, warm and easy to love. The open granny lattice keeps it light enough for spring, while the cream roses add texture you can feel with your fingertips. I would call this an intermediate project, mostly because of its size. The stitches are friendly for a confident beginner, but 110 squares and 110 roses ask for steady tension and a good deal of patience. If you like a calm, steady project you can pick up any evening, this one will keep you happy for a whole season.
Why You'll Love This Sage Green Granny Square Bed Cover with Cream Roses Crochet Pattern Pattern
I love sage green for a bedroom. It is soft and quiet, a green with a little gray in it, like the leaves of an herb garden or an old painted cupboard. It never shouts, and it goes with almost everything: light oak furniture, white walls, gray linen, a pine headboard. Paired with cream roses, it feels fresh and peaceful, the kind of bed you want to sink into with a book on a rainy afternoon. Every time I walk past the guest room and see it, the whole room seems to breathe a little easier.
The roses are my favorite part. Cream yarn on sage shows every petal and every curl, so the flowers look almost real. I make them in batches while I watch my evening shows, and I keep them in a little basket until the squares are ready. The first time I cupped the outer petals with my fingers and saw the rose open up, I made three more before bed. Sewing one onto a finished square always feels like planting a flower in the garden.
I also love that the squares are one color. There are no color changes and no extra ends to weave in on the squares themselves, so they work up quickly and calmly. One square and a ball of sage fit in my handbag, and I can work a round at the doctor's office, in the car, or on the porch with my coffee. A square takes me about forty five minutes, and a rose about twenty, so I can finish one complete piece in a single evening.
Here are a few more reasons this one is close to my heart:
- There is only one square and one rose to learn, so your hands soon know them by heart.
- The single color squares mean fewer ends to weave in.
- The open lattice keeps it light enough to use most of the year.
- It makes a gift that feels personal and lasts for generations.
Each of these makes a big project feel calm and doable, even on busy weeks.
A handmade bed cover changes a room like nothing else. When I make the bed in the morning and smooth this cover over the mattress, the room looks finished and calm. The sage works in a farmhouse bedroom, a cottage room under the eaves, or a plain modern room with white walls and light wood. Guests always reach out to touch the roses, and they always ask how many there are. When I tell them one hundred and ten, they laugh and shake their heads.
This project taught me to enjoy the slow middle part. On a big bed cover there is always a stretch where the pile seems to stop growing. I learned to stop counting and just enjoy each square for itself, the soft yarn, the rhythm of the hook, the little rose waiting in the basket. When the last shell was done and I spread the cover across the bed, I was almost sad to be finished. That is how I know a pattern is a good one.
Switch Things Up
Try a new color pair. The design works with any soft or deep color for the squares and a light color for the roses. Dusty blue with cream feels calm and fresh, and blush pink with ivory is sweet and romantic. Warm oatmeal with white roses is gentle and timeless, and deep forest green with cream gives a cozy cabin look. Keep the roses lighter than the squares so every flower stands out clearly.
Make it for a different bed. Every square is about 9 inches, so changing the size is just a matter of changing the grid. Add or remove a column to change the width, and add or remove a row to change the length. Here is a quick guide with the border included:
- Twin: 7 across by 11 down, 77 squares, about 66 by 101 inches
- Full: 9 across by 11 down, 99 squares, about 84 by 101 inches
- Queen: 10 across by 11 down, 110 squares, about 92 by 101 inches
- King: 12 across by 11 down, 132 squares, about 110 by 101 inches
For a taller bed or a longer drape, add one more row to the length.
Make a sofa throw. A grid of 5 squares across by 7 squares down uses 35 squares and makes a throw of about 47 by 65 inches with the border. That is a lovely size for the back of a sofa or the foot of the bed. It uses about a third of the yarn of the queen size, so it is a good way to try the pattern before you commit to a full bed. If you fall in love with it, keep going and turn it into a bed cover later.
Make a baby blanket. A grid of 4 squares across by 4 squares down makes a blanket of about 38 by 38 inches. For a baby, I leave off the 3D roses, since small raised parts are not a good idea for little ones, and I use a soft, washable baby yarn. Pale mint, soft lemon or light gray all look sweet in a nursery. You can embroider a small flat flower in the center of each square if you miss the roses.
Make matching pillow shams. Six squares joined 3 across by 2 down make a sham front of about 27 by 18 inches, which fits a standard pillow. Use rose squares on the front and plain sage squares without roses on the back, so the pillow is comfortable to lean on. Join front and back on three sides with sage single crochet, slip the pillow in, and close the last side. Making the shams in the same sage and cream ties the whole bed together.
Change the edge. For a crisp look, work the shell round in cream instead of sage so the edge matches the roses. For a straight, tailored finish, skip the shells and add one more round of single crochet. For a deeper scallop, work 7 double crochet in each shell instead of 5 and keep the same spacing. Each choice changes the mood of the cover, from simple and modern to soft and vintage.
Use a different yarn weight. In DK yarn with a 4.0 mm hook, each square comes out at about 7.5 inches, so a queen needs a grid of about 12 across by 13 down. In bulky yarn with a 6.5 mm hook, each square grows to about 11 inches, and a queen needs about 8 across by 9 down. Always make and block one square first, measure it, and plan your grid from that. Weigh your first square too, so you can work out your yarn amounts.
Play with the roses. Instead of a rose on every square, put roses on every other square for a calmer checkerboard and half as many roses to make. You could also make a few roses in soft blush or butter yellow and scatter them across the bed like a wildflower meadow. Each rose uses about 8 grams of yarn, so they are a happy way to use up leftovers. Keep the squares all sage so the bed still looks planned.
Materials Needed
— Main Fabric
— Tools Required
The Free Pattern
0% complete
— Rose Square, sage granny (Make 110) :
— 3D Cream Rose (Make 110, cream) :
— Layout and Joining (10 squares across by 11 squares down) :
— Border (sage with shell edge) :
Assembly Instructions
- Make 110 Rose Squares and 110 3D Cream Roses, weaving in the ends as you go.
- Sew one rose to the center of each Rose Square with its long tail, stitching through the posts of Rose Rnds 3 and 5 so it sits firmly.
- Block every square to 9 by 9 inches and let it dry completely, without pressing the roses flat.
- Lay out the squares in 11 rows of 10 as shown in the Layout and Joining section and take a photo so you can keep track.
- With sage, join the 10 squares of each row into a strip with the raised single crochet seam, then join the 11 strips together with long seams worked the same way.
- Work the 3 Border rounds around the whole bed cover, weave in all remaining ends and give the cover a light final block.
Common Mistakes & How to Fix Them
Working into the tops of the stitches instead of the spaces. In a granny square, every new group of three double crochet goes into the chain space below it, not into the tops of the stitches. If you work into the stitches, the little windows close up, the square grows crooked, and your counts stop matching the pattern. Look for the gap under each chain before you insert the hook. After Round 4, lay the square flat and check that the windows line up in straight rows. If they do not, pull back to the round where the line breaks.
Letting the squares come out in different sizes. With 110 squares, tension drifts over the weeks, especially when you are tired or crocheting while you talk. A square that is a quarter inch smaller does not look like much, but across a row of 10 squares the seams pucker and the grid wanders. Keep your first blocked square as a measuring square and check every new square against it. If a square is more than a quarter inch off, redo the last round or two with a different hook. Blocking helps, but it cannot fix a big difference.
Sewing the roses on too loosely or off center. If you only stitch around the outer petals, the middle of the rose lifts and the flower wobbles when the bed is used or washed. A rose that sits off center makes the rows of roses look messy across the bed. Fold each square in half both ways to find the middle and pin the rose there. Sew it down in two rings, once through the posts of Round 3 and once through the posts of Round 5, going through the sage square each time, then weave the tail in well.
Making the raised seams too tight or uneven. The single crochet seam sits on the right side, so every stitch shows. If you pull it tight, the seam gets shorter than the square edges and the cover puckers; if you skip a stitch, the ridge wobbles. Work exactly 1 sc in each corner space and in each of the 33 sc between, through both loops of both squares. Keep the stitches relaxed and go up one hook size if you need to. Join the rows into strips first, then join the strips, and lay the cover flat after each long seam.

You Might Also Like
Important Notes
Gauge and square size: Rounds 1 to 4 of the granny square should measure about 4.5 inches across, and each finished, blocked square should be about 9 inches. Every square must match the others, so make one square, block it and measure it before you start the rest. If it is larger, try a 4.5 mm hook, and if it is smaller, try a 5.5 mm hook. Sizes and yarn amounts are estimates from the photo, so trust your own measuring square.
Blocking: Pin each square to 9 by 9 inches on blocking mats with rust-proof pins. For acrylic, hold a steam iron a few inches above the square without touching it, then let it cool and dry completely before you unpin it. For wool blends, mist the square lightly with water and let it dry. Never press the roses flat. Blocked squares have sharp corners and straight edges, and they make the raised seams much straighter.
Yarn amounts and dye lots: For the queen size you need about 4,700 grams of sage green and about 900 grams of cream in worsted weight yarn, including the joining and the border. These numbers depend on your tension. Buy all of each color at the same time and check that the dye lot numbers match. Sage can shift toward gray or toward green from one lot to the next, and a different lot shows up clearly on a bed cover this big.
Washing and drying: Follow your yarn label first. Most acrylic bed covers can be machine washed on a gentle cycle in cool water inside a large mesh bag, then dried flat or tumbled on low. Because the cream roses sit on green squares, add a color catcher sheet to every wash so no green dye settles on the petals. Wash wool blends by hand in cool water. Never hang the cover wet, since the water will stretch it.
Every time I look at this bed cover, I think about how it began: one sage magic ring, a few granny clusters, and one little cream rose. Nothing in it is hard on its own. It is simply one soft square made again and again until it covers a whole bed like a garden in bloom. I hope you enjoy every round of it as much as I did, and that it brings a little spring into your home all year long.
So pick up your hook, wind a ball of sage and a ball of cream, and make just one square today. Do not think about all 110 yet. Make one, then another, and before long you will have a basket of roses waiting to become something your family will keep for years. Please share your first rose square with me. Happy crocheting, my friend.
Crochet Abbreviations
You Ask, We Answer
How big is the finished bed cover?
The queen size in this pattern measures about 92 by 101 inches with the border. It is made from 110 squares in a grid of 10 squares across and 11 squares down, and each blocked square is about 9 inches. The joined center is about 90 by 99 inches, and the sage border adds about 1.25 inches on every side. On a standard queen mattress, which is 60 by 80 inches, that leaves about 16 inches to drape down each side and enough length to tuck under the pillows. If you want the cover to reach the floor on a tall bed, add one more column of squares. Your own size may be a little different, because everyone crochets with a slightly different tension. Measure your first blocked square, multiply it by your grid, and adjust the number of squares before you buy all of your yarn.
Can I use a different yarn weight or make a different size?
Yes, and the square makes it easy. The stitches stay the same, and only the size of each square changes. In DK yarn with a 4.0 mm hook, a square is about 7.5 inches, so a queen needs about 12 across by 13 down. In bulky yarn with a 6.5 mm hook, a square is about 11 inches, so a queen needs about 8 across by 9 down. For other beds in worsted yarn, use 7 squares across for a twin, 9 for a full, 10 for a queen and 12 for a king, all 11 squares down. A sofa throw is 5 across by 7 down, and a baby blanket is 4 by 4. Whatever you choose, make one square, block it and measure it, then multiply by your grid to find the finished size. Weigh that first square too, so you can work out how much yarn of each color you will need.
How do I wash and care for the bed cover?
Always start with your yarn label, because care depends on the fiber. Acrylic is the easiest choice for a bed cover. Wash it on a gentle cycle in cool water inside a large mesh laundry bag or a pillowcase tied shut, so the roses do not rub against the drum. Add a color catcher sheet to every wash, because green dye can bleed onto the cream roses, especially in the first few washes. Dry it flat on towels or tumble it on the lowest heat. For wool blends, wash by hand in cool water with a gentle wool wash, press out the water without wringing, roll the cover in towels and lay it flat to dry. Never hang it wet. Between washes, shake it outside and air it in the sun for an hour. Store it loosely folded in a cotton bag, and check the roses now and then for loose stitches.
Success!
Thanks for subscribing — check your inbox for a welcome note.
Abbreviations
- ch — chain
- sl st — slip stitch
- sc — single crochet
- hdc — half double crochet
- dc — double crochet
- sp — space
- st(s) — stitch(es)
- Rnd — round
- rep — repeat
- sk — skip
- BPsc — back post single crochet: insert the hook from back to front to back around the post of the stitch and work a sc