
Cream Leaf Motif Bed Cover Crochet Pattern
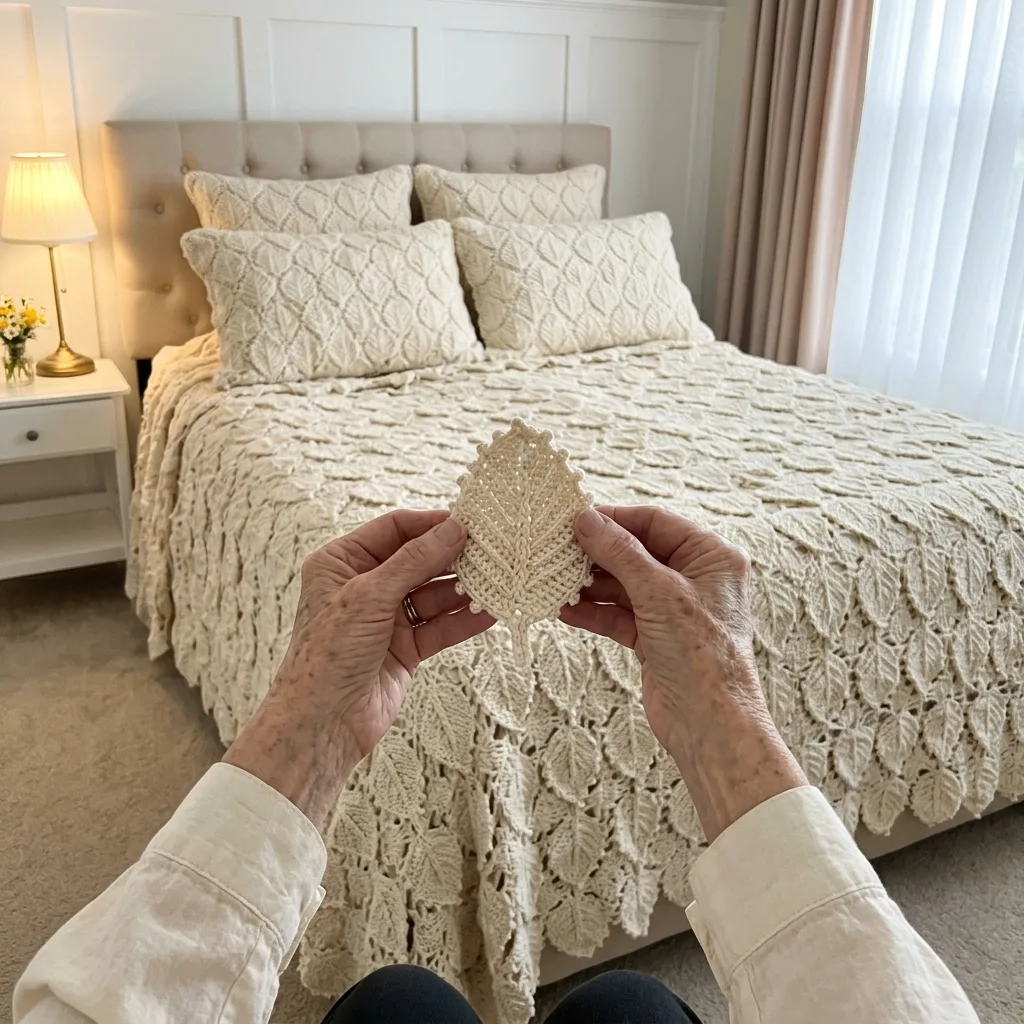
You need single crochet in the back loop, a simple picot and a join-as-you-go method at the picots.
Each leaf takes about twenty minutes, so a few leaves a day grow into a full bed cover over the seasons.
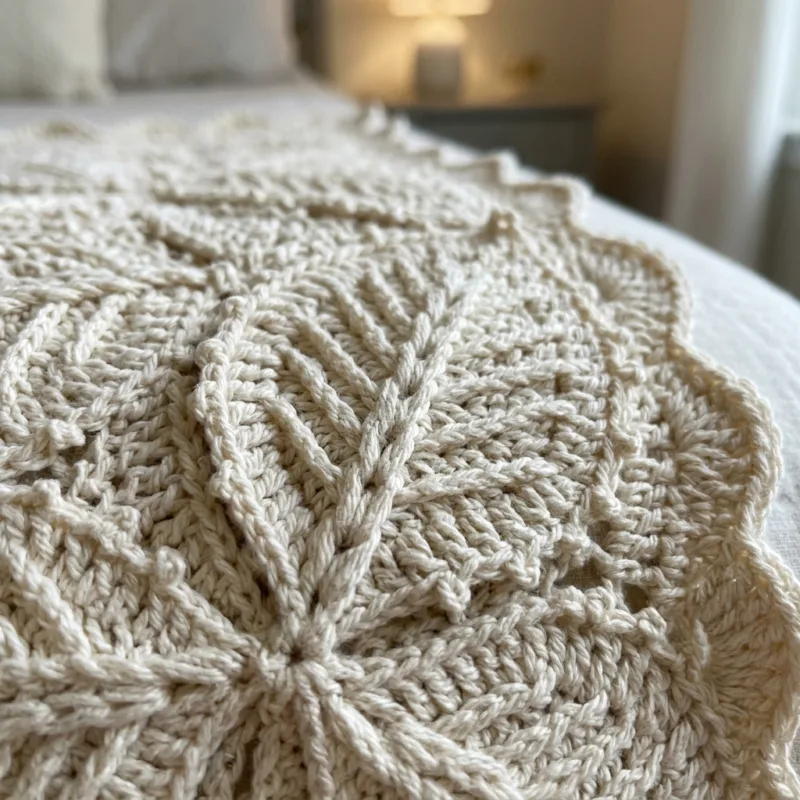
Back loop rows create a raised center vein and angled side veins, just like a real leaf.
About This Cream Leaf Motif Bed Cover Crochet Pattern Pattern
This cream bed cover is made from hundreds of small crochet leaves, and each one looks almost real. Every leaf has a raised center vein running from the stem to the tip, with angled side veins spreading out on both sides. A tiny picot edge outlines the leaf, and a short stem finishes the base. The leaves are joined at their picots in offset rows, all pointing toward the headboard, so the whole bed looks like a soft carpet of leaves drifting across it. In soft cream cotton, the effect is calm, elegant and full of quiet texture.
Each leaf is worked in rows on a short chain. You start by working single crochet up one side of the chain, three stitches at the tip and back down the other side. Then you turn and work every row in the back loop only, always putting three stitches in the center stitch of the tip and stopping three stitches short at the end of each row. That simple trick is what makes the leaf shape. The unworked front loops form ridges, and because each row stops short, those ridges angle outward from the center like real leaf veins.
After six back loop rows, you work one round of single crochet around the outer edge with a picot after every third stitch. This gives the leaf its delicate scalloped outline and creates twelve little picots, six on each side. To finish, you chain a short stem and slip stitch back down it. The picots are not only pretty, they are also how the leaves join. From the second leaf on, you join some of the picots to the neighboring leaves as you make them, so there is no sewing at the end.
The finished bed cover measures about 98 by 107 inches. It uses 638 leaves in 25 rows that alternate between 26 and 25 leaves. Each leaf is about 3.75 inches wide and 5 inches long from stem to tip. On a queen bed, the cover lies across the top and drops about 19 inches on each side and about 27 inches at the foot, reaching toward the floor on most frames. I used worsted weight matte cotton with a 4.5 mm hook. That gives clear, raised veins and leaves that hold their shape well.
The finished cover feels soft and light, with a gentle weight and lots of texture under your hand. The small gaps between the leaves keep it airy and breathable, so it is lovely in spring and summer, and it layers beautifully over a blanket in cooler months. Cream is a timeless, restful color that suits almost any bedroom, from a cozy cottage to a modern neutral space. Because the whole cover is one color, the beauty comes from the shadows of the veins and the soft scallops of the leaves.
This pattern suits an intermediate crocheter who is comfortable working in the back loop only and counting stitches in short rows. The leaf itself is small and quick, and after a handful you will be able to make them without looking at the pattern. The joining takes a little attention at first, because each leaf links to its neighbors at specific picots. Once you have joined the first two rows, the rhythm becomes natural. Every leaf is tiny and portable, so this is a wonderful project to carry with you and work on in small moments.
Why You'll Love This Cream Leaf Motif Bed Cover Crochet Pattern Pattern
I love this bed cover because it brings a little bit of nature indoors. There is something peaceful about leaves. They make me think of walks in the park, quiet mornings in the garden and the soft rustle of trees in a breeze. When I see this cover on the bed, with all those little leaves pointing toward the pillows, my bedroom feels calm and fresh. It is like resting under a gentle autumn canopy, but in soft cream.
The leaves themselves are so satisfying to make. Each one takes about twenty minutes, and the magic happens right in your hands. With every back loop row, a new pair of veins appears, and by the last row the leaf looks surprisingly real. I never get tired of that moment. I kept a little dish on my side table and dropped each finished leaf into it, and watching the pile grow kept me happy and motivated through hundreds of leaves.
I also love how relaxing this pattern is. There is only one color, so there is no switching yarn and almost no ends to weave in. The stitches are simple single crochet, and the rhythm of the rows becomes soothing very quickly. I made leaves while waiting for the kettle, during phone calls and in the car on long drives. Because each leaf is so small, I could always finish one before I had to put it down, which felt wonderful.
- Tiny, quick motifs that fit in any spare moment.
- One color only, with very few ends to weave in.
- Raised veins made with a simple back loop trick.
- Joined as you go at the picots, with no sewing.
This cover truly changes a room. My bedroom used to feel a little bare, and now it feels soft, textured and inviting. Guests always reach out to touch the leaves and ask how they were made. They are amazed to hear that every single one was crocheted by hand. A handmade bed cover gives a room a warmth that no store-bought bedding can match. It shows the time and care that went into making the space beautiful, and that feeling stays with you every day.
Making this cover also taught me a lot. I learned how much a simple back loop row can change the look of a stitch. I learned to count carefully at the tip of each leaf so every one comes out the same shape. And I learned that joining hundreds of small motifs is not scary at all when you do it one leaf at a time. If you want a peaceful, nature-inspired project that grows a little every day, I think you will love this one.
Switch Things Up
The first and easiest change is the color. Cream is soft and classic, but leaves look wonderful in many shades. Sage green and olive feel natural and fresh. Warm rust, amber and gold make a beautiful autumn bed cover. Dusty rose looks soft and romantic, and pure white feels bright and airy. You can also mix several leaf colors, such as greens in spring or reds, oranges and golds in autumn, and scatter them at random across the bed for a real falling-leaves look.
You can make this bed cover for any bed size by changing the number of leaves. Each leaf is about 3.75 inches wide, and each new row adds about 4.25 inches in length. Here are the layouts I use:
- Twin: 23 rows alternating 21 and 20 leaves, 472 leaves, about 79 by 98 inches.
- Full: 23 rows alternating 24 and 23 leaves, 541 leaves, about 90 by 98 inches.
- Queen: 25 rows alternating 26 and 25 leaves, 638 leaves, about 98 by 107 inches.
- King: 25 rows alternating 30 and 29 leaves, 738 leaves, about 113 by 107 inches.
For a sofa throw, make 13 rows that alternate 14 and 13 leaves. That uses 175 leaves and finishes at about 53 by 56 inches. A throw is a lovely way to try the pattern before committing to a whole bed cover. Draped over a chair or the back of a sofa, it looks like a little piece of the forest has settled in your living room. If you make several leaves most evenings, you can finish a throw in about two months.
A baby blanket is sweet in this pattern too. Make 9 rows that alternate 9 and 8 leaves, for 77 leaves and a blanket about 34 by 39 inches. Use a soft cotton or cotton blend in a gentle shade like pale sage or soft white. Because there are small gaps between the leaves, I see this as a decorative blanket for a stroller, a photo or a crib rail, used with a grown-up nearby. A leaf blanket makes a very special gift for a nature-loving family.
You can also use the leaves on their own. Make a single row of leaves and join them into a long garland for a mantel or a headboard. Sew a few leaves onto plain cushion covers, or make a circle of leaves and join them into a wreath for the door. A small cluster of leaves makes a pretty coaster, and a longer strip makes a table runner that matches the bed cover. These little projects are perfect for using up leftover yarn.
To make matching pillow covers, join 7 rows that alternate 7 and 6 leaves for a panel about 26 by 30 inches, which fits a standard pillow with a little overlap. Make two panels and join them around the edges with chain loops, then slip in the pillow before closing the last side. Choose a pillow insert in cream or a soft neutral so the small gaps between the leaves show a matching color. Matching leaf pillows make the whole bed look planned and finished.
Finally, try a different yarn weight. In DK cotton with a 3.5 mm hook, each leaf is about 3 inches wide, so a queen needs about 31 rows alternating 33 and 32 leaves. In bulky yarn with a 6 mm hook, a leaf grows to about 5 inches wide, and a queen needs only about 19 rows alternating 20 and 19 leaves. Bulky yarn makes thick, cozy leaves with very bold veins. Always make one test leaf in your chosen yarn and measure it before you plan your layout.
Materials Needed
— Main Fabric
— Tools Required
The Free Pattern
0% complete
— Ribbed Leaf (Make 638, cream) :
— Layout :
— Border (cream) :
Assembly Instructions
- Make one Ribbed Leaf, block it and check that it measures about 3.75 by 5 inches.
- Starting at the foot of the bed, make the leaves of Row 1 and join each one to the leaf on its left at the picots as you work its edging.
- Make each following row, joining every new leaf to the leaf beside it and to the leaves below it at the picots listed in the Layout section.
- Continue until you have 25 rows alternating 26 and 25 leaves, all pointing toward the headboard.
- Weave in the ends of every leaf as you go, hiding them inside the ribbed rows.
- Work Border Rounds 1 and 2 around the whole outer edge.
- Block the finished bed cover flat, gently shaping each leaf and pinning the scalloped edge, and let it dry completely.
Common Mistakes & How to Fix Them
The most common mistake is working in both loops instead of the back loop only in Rows 2 to 7. When you do this, the ridges disappear, and the leaf looks flat with no veins at all. It usually happens when you are relaxed and slip back into your normal habit. Look at the leaf after Row 2: you should see a clear raised line of front loops running along the center and up each side. If you do not see it, pull the row out and redo it in the back loop. That small ridge is what makes every leaf look real.
Another mistake is forgetting to stop three stitches short at the end of each row. If you work into every stitch, the leaf grows into a long rounded oval instead of a pointed leaf, and the side veins run straight instead of angling outward. Count the unworked stitches at the base after every row, or place a stitch marker three stitches from the end before you start each row. The stepped base is what gives the leaf its natural shape. Each leaf should end Row 7 with exactly 26 sc, so check the count before you begin the edging.
Many makers place the three tip stitches in the wrong stitch, and the tip slowly shifts to one side. Each row must put 3 sc into the center stitch of the previous 3-sc group, not the first or last. If the tip moves, the leaf curves like a banana and will not fit neatly into the rows of the bed cover. Keep a stitch marker in the center tip stitch and move it up every row. When you reach the marker, work your 3 sc into that exact stitch. Your tips will stay sharp and straight on every leaf.
The last common mistake is joining the wrong picots, so the rows twist or leave large gaps. Each leaf joins at picots 3 and 4 to the leaf beside it, and at picots 5, 6, 7 and 8 to the two leaves above. If you join picot 2 instead of 3, the leaf tilts and the whole row starts to lean. Before you begin a new row, lay a few finished leaves on a table and mark the picots that will join. Count the picots from the stem every time. If a join looks wrong, undo only that leaf's edging and rejoin it.

You Might Also Like

Important Notes
Gauge matters because small differences add up across 638 leaves. A blocked leaf should measure about 3.75 inches wide and 5 inches long. If yours is a quarter inch wider, the bed cover will grow by more than 6 inches across. Make one test leaf and block it before buying all of your yarn. Compare new leaves with your first one every few weeks, because tension often changes during a long project with many small pieces.
Blocking helps every leaf lie flat and shows off the raised veins. After joining, lay the bed cover on blocking mats or towels, gently shape each leaf with your fingers so the tip points straight up and the sides are smooth, and pin the scalloped outer edge. Mist with cool water and let it dry completely. Do not press the leaves flat with an iron, because heat can flatten the ridges that make the veins.
The yarn amount is for the queen size in worsted weight cotton, so adjust it for other sizes or yarns. With a single soft color like cream, dye lots matter, because cream can range from cool to warm between lots. Buy all of your yarn from the same dye lot at once, plus about 10 percent extra. If you must use two lots, alternate leaves from both lots across each row so any small difference blends in.
Wash the bed cover by hand or on a gentle cold cycle inside a large mesh laundry bag to protect the picots and joins. Use a mild detergent and no bleach, because bleach can yellow cotton and weaken the fibers. Do not hang the cover to dry, because wet cotton is heavy and will stretch the joins. Lay it flat on towels, gently reshape the leaves with your hands and let it dry completely before using it again.
I hope this cream leaf bed cover brings a little bit of nature and calm into your bedroom. It is a big project, but every leaf is a tiny, quick win that fits in your pocket and in your day. Enjoy watching the veins appear with every row, and let your little pile of leaves grow slowly into something beautiful.
You do not have to think about all 638 leaves today. Just make a short chain and finish one leaf. Then make another tomorrow and join it to the first. Before long, you will see a whole row of leaves, and then a whole bed covered in soft cream foliage. Happy crocheting, my friend.
Crochet Abbreviations
You Ask, We Answer
What is the finished size of this bed cover?
The queen version finishes at about 98 by 107 inches after blocking. It uses 638 leaves in 25 rows that alternate between 26 and 25 leaves. Each leaf is about 3.75 inches wide and 5 inches long from stem to tip, and each row adds about 4.25 inches in length because the leaves overlap slightly between rows. On a standard queen mattress, the cover lies across the top and drops about 19 inches on each side and about 27 inches at the foot, so the scalloped edge reaches toward the floor on most bed frames. If your bed is taller, add a leaf to each row and two more rows. Measure your own bed, including the mattress and frame height, and plan from your blocked leaf size before you buy yarn.
Can I use a different yarn weight or make a different size?
Yes, this pattern works in many yarn weights because the leaf is the same in every size. In DK cotton with a 3.5 mm hook, each leaf is about 3 inches wide, and in bulky yarn with a 6 mm hook it grows to about 5 inches wide. The stitch counts never change, only the leaf size and the number of leaves you need. Make one test leaf in your chosen yarn, block it and measure its width and length. Divide your bed width by the leaf width to get the leaves per long row, and divide your length by about 85 percent of the leaf length to get the number of rows. The section on switching things up lists layouts for twin, full, queen, king, a throw and a baby blanket. The border always fits, because it simply follows the open picots around the edge.
How do I wash and care for this crochet bed cover?
Wash it by hand in cool water or on a gentle cold cycle inside a large mesh laundry bag to protect the picots and joins. Use a mild detergent and never use bleach, because it can yellow cream cotton and weaken the fibers over time. Do not wring or twist the cover. Gently press out the water, then lay it flat on clean towels and reshape the leaves with your hands, making sure each tip points straight and the veins stand up. Let it dry completely before putting it back on the bed. Never hang it while wet, because the weight of the wet cotton will stretch the picot joins and pull the leaves out of shape. Between seasons, fold it loosely and store it in a breathable cotton bag, away from direct sunlight, so the soft cream color stays even for many years.
Success!
Thanks for subscribing — check your inbox for a welcome note.
Abbreviations
- ch — chain
- sc — single crochet
- blo — back loop only
- picot — ch 3, sl st in first ch
- sl st — slip stitch
- st(s) — stitch(es)
- lp(s) — loop(s)
- rep — repeat
- Rnd — round