Amanda's Creative Corner Crochet · Kitchen
Free Crochet Patterns Handmade with Love

Christmas Poinsettia Square Bed Cover Crochet Pattern
Jump to Pattern
Christmas Poinsettia Square Bed Cover Crochet Pattern
120-160 Hours 0 made this
Intermediate Level

You need basic sc, dc and tr stitches and how to change colors.

120-160 Hours

Each square takes about 35 minutes, so you can start now and finish by Christmas next year.

Christmas Heirloom

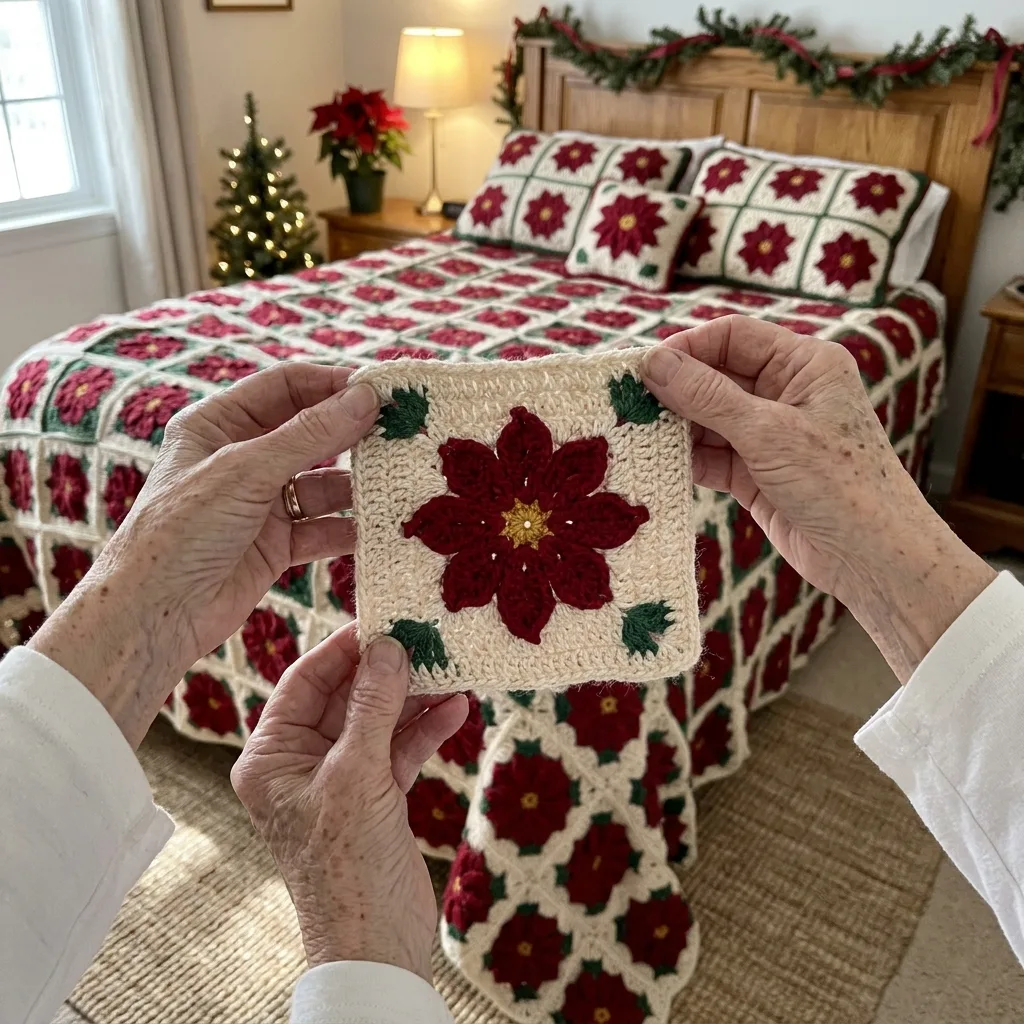
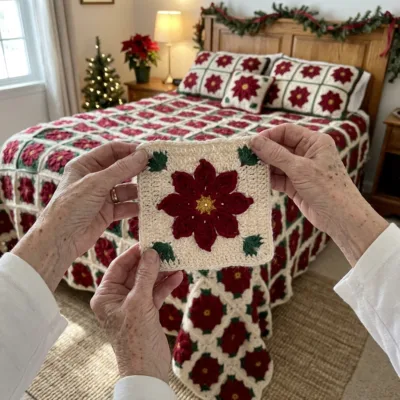
Red, cream and green poinsettias turn your bed into a holiday gift to treasure.

About This Christmas Poinsettia Square Bed Cover Crochet Pattern Pattern

This bed cover is made from 168 poinsettia squares, each about 6 inches wide. Red poinsettias on a cream background alternate with cream poinsettias on a forest green background, so the whole cover reads like a soft Christmas checkerboard. Every flower has a small gold center.

The squares are joined in 12 columns and 14 rows, then finished with a red border row and a cream shell edge. It measures about 75 by 87 inches, which covers a queen bed with a drop. You will use sc, hdc, dc and tr, change colors and join squares, so it suits a confident beginner ready for a big project.
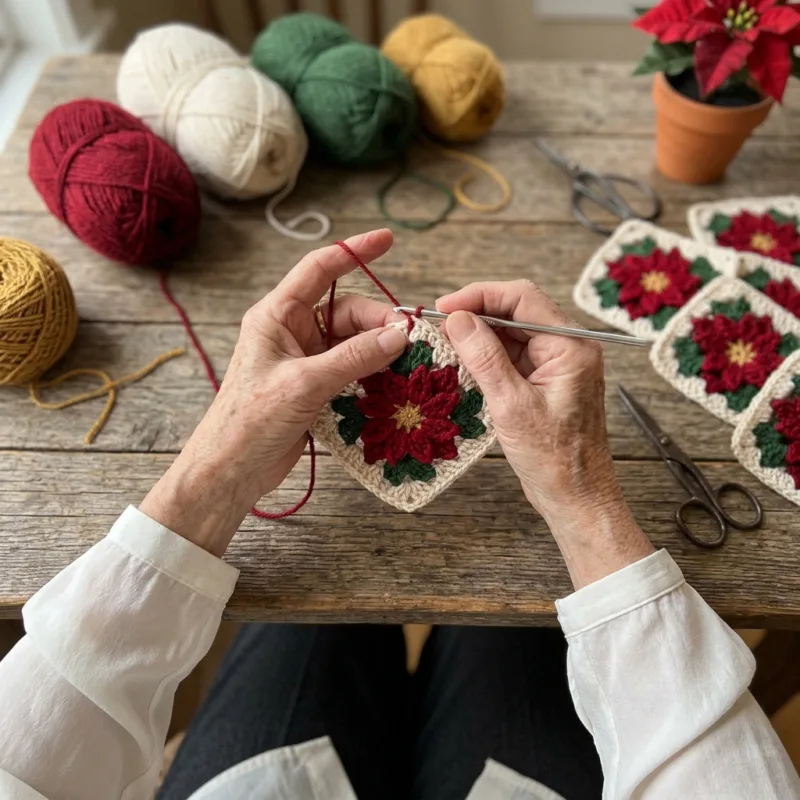
Christmas Poinsettia Square Bed Cover Crochet Pattern step detail

Why You'll Love This Christmas Poinsettia Square Bed Cover Crochet Pattern Pattern

I love this project because every square fits in a small bag. I make one at the kitchen table, in the car or by the tree, and a huge blanket never sits heavy on my lap.

It also makes the bedroom feel like Christmas morning. It is a lovely gift for a family home, and it is a good way to use up cotton yarn in the classic red, cream and green.

Switch Things Up

Make every poinsettia red on cream for a simple, traditional look, or use silver and ivory for a winter white bedroom. For a baby blanket, join 6 columns and 7 rows, which finishes at about 36 by 42 inches before the edge. For a sofa throw, join 8 columns and 10 rows. You can also make 2 or 3 extra squares and sew them onto cotton pillow covers, or swap the shell edge for a plain round of single crochet.


Materials Needed

— Main Fabric

01 Worsted weight cotton yarn (medium 4), cream: about 1,800 g (about 3,600 yards), includes the shell edge
02 Worsted weight cotton yarn, forest green: about 1,250 g (about 2,500 yards)
03 Worsted weight cotton yarn, deep Christmas red: about 550 g (about 1,100 yards), includes the first border round
04 Worsted weight cotton yarn, gold: about 100 g (about 200 yards)
05 Buy one extra ball of each color for spare squares and your test square.

— Tools Required

06 3.5 mm (E-4) crochet hook, or the size that gives a firm, flat square about 6 inches wide
07 Yarn needle for joining and weaving in ends
08 Stitch markers
09 Sharp scissors
10 Blocking mats and rustproof pins
11 Measuring tape

The Free Pattern

Intermediate 120-160 Hours

0% complete

— Poinsettia Square (Make 168: 84 red on cream, 84 cream on green) :

Red squares use gold for Rnd 1, red for Rnds 2 and 3, and cream for Rnds 4 to 8. Green squares use gold for Rnd 1, cream for Rnds 2 and 3, and forest green for Rnds 4 to 8. Finished square is about 6 inches wide. Work with the right side facing you in every round.
Rnd 1: With gold, ch 4 and join with a sl st to form a ring. Ch 1, work 16 sc in the ring. Join with a sl st to the first sc. Fasten off gold. (16 sc)
Rnd 2: Join the petal color with a sl st in any sc. Ch 1, sc in the same st. *Ch 5, skip 1 sc, sc in the next sc.* Repeat from * to * 6 more times. Ch 5, skip the last sc, join with a sl st to the first sc. (8 sc and 8 ch-5 sps)
Rnd 3 (petals): Sl st into the first ch-5 sp. In the same sp work (sc, hdc, 2 dc, tr, 2 dc, hdc, sc). Sl st in the next sc of Rnd 2. Repeat in each remaining ch-5 sp, ending with a sl st in the first sc of Rnd 2. Fasten off. (8 petals of 9 sts, 72 sts)
Rnd 4 (arches): Fold the petals toward you. Join the background color with a sl st in any sc of Rnd 2 that sits between two petals. Ch 1, sc in the same st. *Ch 5, sc in the next sc of Rnd 2 between petals.* Repeat from * to * 6 more times. Ch 5, join with a sl st to the first sc. Each arch lies behind one petal. (8 sc and 8 ch-5 sps)
Rnd 5: Sl st into the first ch-5 sp. Ch 3 (counts as dc), 2 dc, ch 2, 3 dc in the same sp for the first corner. *3 dc in the next ch-5 sp. (3 dc, ch 2, 3 dc) in the next ch-5 sp.* Repeat from * to * 2 more times. 3 dc in the last ch-5 sp. Join with a sl st to the top of the beginning ch 3. (36 dc and 4 corner ch-2 sps)
Rnd 6: Sl st in each of the next 2 dc, then sl st in the first corner ch-2 sp. Ch 3, 2 dc, ch 2, 3 dc in the same sp. *Dc in each of the next 9 dc, then (3 dc, ch 2, 3 dc) in the next corner sp.* Repeat from * to * 2 more times. Dc in each of the last 9 dc. Join with a sl st to the top of the beginning ch 3. (60 dc and 4 corner ch-2 sps)
Rnd 7: Work as Rnd 6, but dc in each of the next 15 dc along each side. (84 dc and 4 corner ch-2 sps)
Rnd 8: Work as Rnd 6, but dc in each of the next 21 dc along each side. Fasten off and weave in the end. Each side now has 27 dc plus the corner. (108 dc and 4 corner ch-2 sps)
Make one test square first. Check that it measures about 6 inches. If it is smaller, use a bigger hook. If it is larger, use a smaller hook. Block all squares to the same size before joining.

— Layout :

The cover is 12 columns by 14 rows (168 squares). Red-on-cream and cream-on-green squares alternate in both directions like a checkerboard. This gives 84 squares of each type.
Row 1: Join 12 squares side by side, starting with a red-on-cream square and alternating. (12 squares: 6 red on cream, 6 cream on green)
Row 2: Join 12 squares, starting with a cream-on-green square and alternating. Join Row 2 to Row 1 so every red square sits under a green square. (12 squares)
Rows 3 to 14: Repeat Rows 1 and 2, six times in all, until you have 14 rows. (168 squares: 84 red on cream, 84 cream on green)
Lay out all squares on the floor before joining. Take a photo and check that no two squares of the same type touch along a side.

— Border (Red, then Cream) :

Rnd 1 (red): Join red in any outer corner ch-2 sp. Ch 1. Work 3 sc in each of the 4 outer corner sps. Work 1 sc in each dc along every outer side, and 1 sc through the two touching corner ch-2 sps at each seam between squares. Along each top and bottom edge: 12 x 27 = 324 sc plus 11 seam sc = 335 sc. Along each side edge: 14 x 27 = 378 sc plus 13 seam sc = 391 sc. Join with a sl st to the first sc. Fasten off. (2 x 335 + 2 x 391 + 12 corner sc = 1,464 sc)
Rnd 2 (cream shells): Join cream in any sc. Ch 1, sc in the same st. *Skip 2 sts, 5 dc in the next st, skip 2 sts, sc in the next st.* Repeat from * to * around. Join with a sl st to the first sc. Fasten off and weave in the end. (244 shells; 1,220 dc and 244 sc, 1,464 sts)
Your Rnd 1 total must divide evenly by 6. If your count differs by a few stitches, work 2 sc in one seam or skip 1 sc at a corner until the total is 1,464.

Assembly Instructions

  1. Make 84 red-on-cream squares and 84 cream-on-green squares, plus 2 spares of each type.
  2. Block every square to about 6 inches so the corners are sharp and the petals lie flat.
  3. Lay the squares out on the floor in 12 columns and 14 rows as a checkerboard, and check the color balance.
  4. Join the squares into rows with a whip stitch through the back loops only, 27 stitches per side, using a matching yarn.
  5. Join the finished rows to each other the same way, matching corners so the seams make neat crosses.
  6. Weave in all ends, then work the red border round and the cream shell round.
  7. Block the whole cover gently on a clean floor with pins so the shells lie flat.

Common Mistakes & How to Fix Them

Skipping the test square. A loose or tight square changes the whole size, so measure the first square before you make the rest.

Working the Rnd 4 arches in front of the petals. Fold the petals toward you so each arch sits behind its petal.

Placing two squares of the same type next to each other. Lay out the checkerboard on the floor and check it before you join.

Joining with uneven tension. Keep your whip stitches loose enough to lie flat, or the cover will pucker.


Denise

Denise is a crochet designer who loves turning small portable squares into big, cozy home pieces that families keep for years.


Important Notes

Each square should measure about 6 inches after blocking, and the finished cover is about 75 by 87 inches with the border. Yarn amounts are estimates, so buy extra before you begin.

Block the squares before joining, and block the finished cover lightly. Cotton is heavy when wet, so use plenty of towels and let it dry flat.

Dye lots can differ, so buy all the cream and forest green you need at the start.

Wash on a gentle cycle in cool water and use a color catcher, because the red can bleed onto the cream. Dry flat.


I hope this cover makes your bedroom feel like Christmas. Make a few squares each evening, and by next December you will have a bedspread your family will remember.

Crochet Abbreviations

01 ch — chain
02 sl st — slip stitch
03 sc — single crochet
04 hdc — half double crochet
05 dc — double crochet
06 tr — treble crochet
07 sp — space
08 st — stitch
09 Rnd — round

You Ask, We Answer

What size is the finished bed cover?

It is about 75 by 87 inches with the border, using 12 columns and 14 rows of squares. This covers a queen bed with a drop on each side.

Can I use a different yarn weight or make it smaller?

Yes. A thinner yarn with a smaller hook gives smaller squares, so you would need more of them. For a throw, join 8 columns and 10 rows. Make one test square and measure it before you change the layout.

How do I wash and care for the cover?

Wash on a gentle cycle in cool water with a color catcher, because the red can bleed onto the cream. Dry flat and reshape the shells while the cover is damp.