Amanda's Creative Corner Crochet · Kitchen
Free Crochet Patterns Handmade with Love

Red Halloween Granny Square Bed Cover Crochet Pattern
Jump to Pattern
Red Halloween Granny Square Bed Cover Crochet Pattern
150-200 Hours 0 made this
Beginner Friendly

Only chain, slip stitch, single crochet and double crochet are used.

150 to 200 Hours

Make a few squares each week and the pile grows fast.

Spooky Statement

Rings of blood red and black turn the bed into a Halloween night.

About This Red Halloween Granny Square Bed Cover Crochet Pattern Pattern

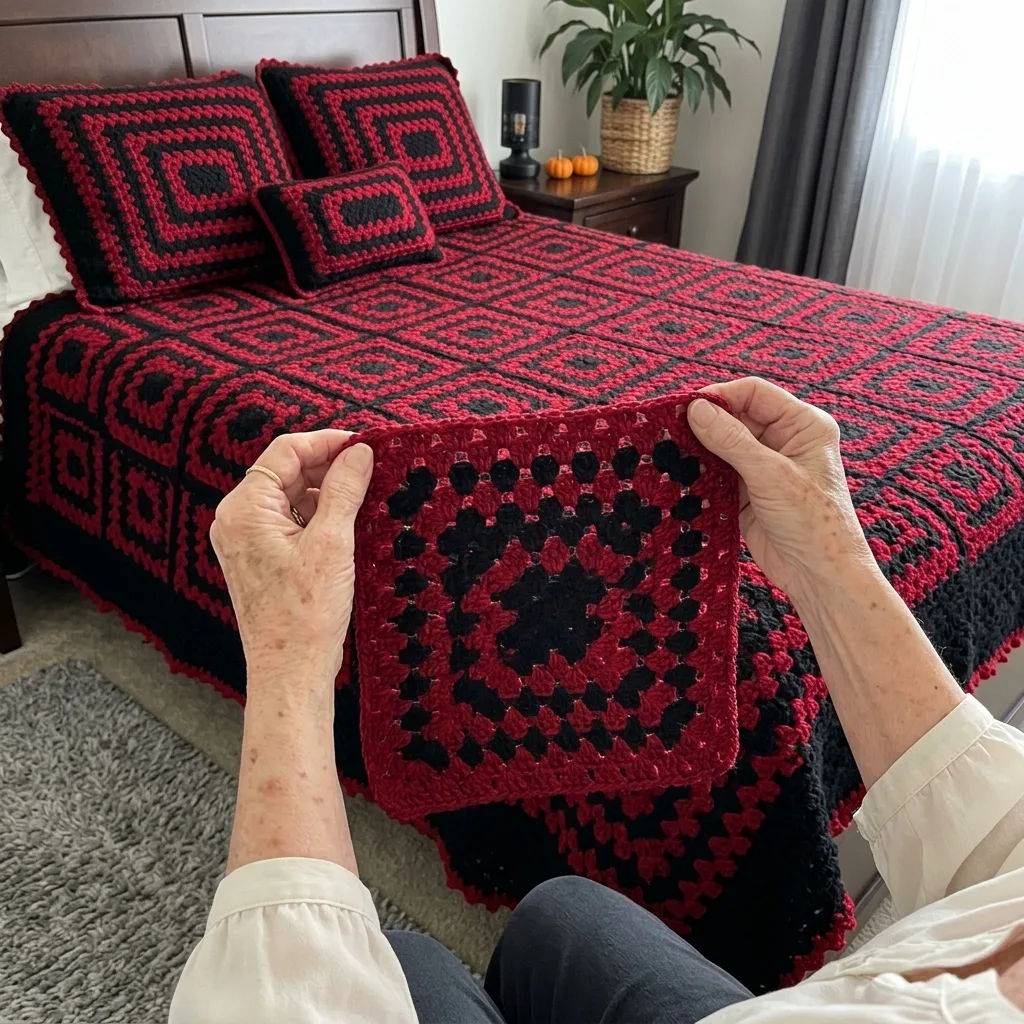
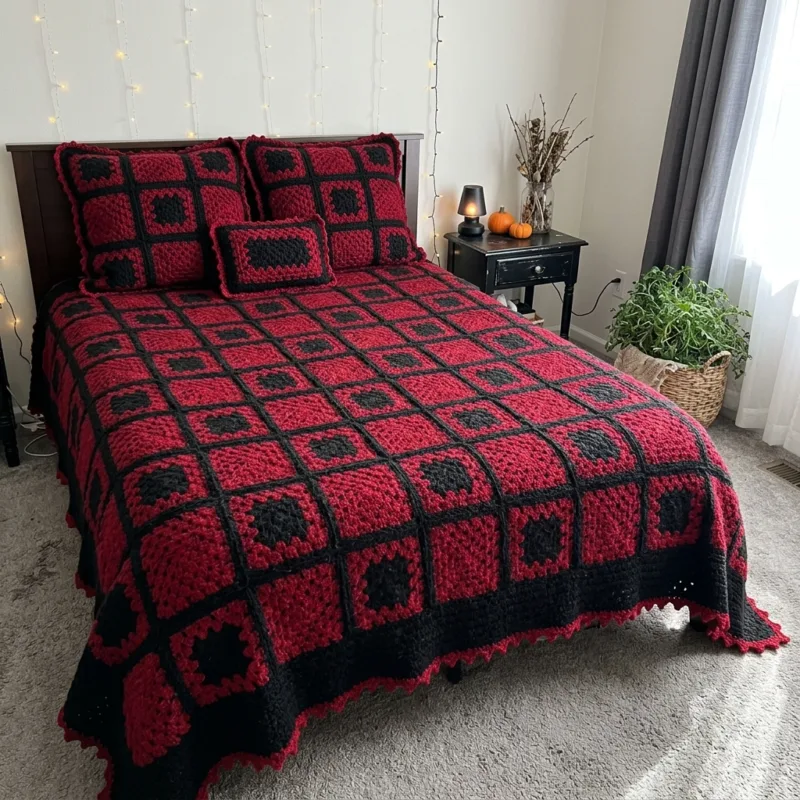
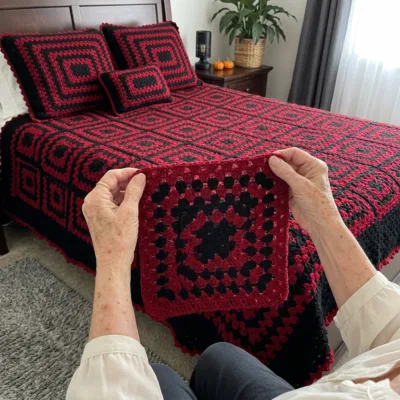
This bed cover is made from 64 granny squares, each 12 inches wide, worked in deep blood red and black. Every square is built from rings of color, so the finished cover looks like a field of spooky targets. The squares sit in a checkerboard, with a black center square next to a red center square.

It finishes at about 98 by 98 inches, a generous king size that falls well over the sides of the bed. The border is black with a row of tiny red picot points. It suits anyone who loves Halloween and wants a bold bedroom piece that is still easy to make.
Red Halloween Granny Square Bed Cover Crochet Pattern step detail

Why You'll Love This Red Halloween Granny Square Bed Cover Crochet Pattern Pattern

I love this project because every square is small and portable. I can crochet one on the sofa, in the car or at a friend's house, and the big blanket slowly appears without me noticing.

The red and black rings are so dramatic that even a plain bedroom looks ready for Halloween. It also makes a wonderful gift for someone who loves the spooky season all year long.

Switch Things Up

Try orange and black for a pumpkin look, or purple and black for a witchy feel. Make 5 columns by 6 rows (30 squares) for a throw of about 60 by 72 inches. Use 4 squares and a short border to make a matching pillow cover. For a softer edge, work the last border round in black and skip the picots.


Materials Needed

— Main Fabric

01 Worsted weight cotton yarn (medium 4)
02 Blood red: about 3,700 yards (roughly 2,100 grams)
03 Black: about 4,300 yards (roughly 2,500 grams), includes the joining and the border

— Tools Required

04 5.0 mm (H-8) crochet hook
05 Yarn needle
06 Stitch markers
07 Scissors
08 Blocking mats and pins
09 Measuring tape

The Free Pattern

Beginner 150-200 Hours

0% complete

— Granny Square (Make 64: 32 Type A and 32 Type B) :

Color plan. Type A: rounds 1 and 2 black, rounds 3 and 4 red, rounds 5 and 6 black, rounds 7 and 8 red. Type B: rounds 1 and 2 red, rounds 3 and 4 black, rounds 5 and 6 red, rounds 7 and 8 black. To change color, fasten off and join the new color in any corner sp.
Round 1: Make a magic ring. Ch 3 (counts as first dc), 2 dc in ring, ch 2. *3 dc in ring, ch 2*, repeat from * 2 more times. Join with sl st to top of beg ch-3. (12 dc, 4 corner ch-2 sps)
Round 2: Sl st in each of the next 2 dc and in the corner sp, or join the new color in any corner sp. Ch 3, 2 dc, ch 2, 3 dc in the same corner sp. *Ch 1, (3 dc, ch 2, 3 dc) in next corner sp*, repeat from * 2 more times. Ch 1, join with sl st to top of beg ch-3. (24 dc, 4 corner ch-2 sps, 4 ch-1 sps)
Round 3: Sl st to the next corner sp, or join the new color in any corner sp. Ch 3, 2 dc, ch 2, 3 dc in the same corner sp. *Ch 1, 3 dc in next ch-1 sp, ch 1, (3 dc, ch 2, 3 dc) in next corner sp*, repeat from * 2 more times. Ch 1, 3 dc in next ch-1 sp, ch 1, join with sl st to top of beg ch-3. (36 dc, 4 corner ch-2 sps, 8 ch-1 sps)
Round 4: Sl st to the next corner sp, or join the new color in any corner sp. Ch 3, 2 dc, ch 2, 3 dc in the same corner sp. *[Ch 1, 3 dc in next ch-1 sp] 2 times, ch 1, (3 dc, ch 2, 3 dc) in next corner sp*, repeat from * 2 more times. [Ch 1, 3 dc in next ch-1 sp] 2 times, ch 1, join with sl st to top of beg ch-3. (48 dc, 4 corner ch-2 sps, 12 ch-1 sps)
Round 5: Sl st to the next corner sp, or join the new color in any corner sp. Ch 3, 2 dc, ch 2, 3 dc in the same corner sp. *[Ch 1, 3 dc in next ch-1 sp] 3 times, ch 1, (3 dc, ch 2, 3 dc) in next corner sp*, repeat from * 2 more times. [Ch 1, 3 dc in next ch-1 sp] 3 times, ch 1, join with sl st to top of beg ch-3. (60 dc, 4 corner ch-2 sps, 16 ch-1 sps)
Round 6: Sl st to the next corner sp, or join the new color in any corner sp. Ch 3, 2 dc, ch 2, 3 dc in the same corner sp. *[Ch 1, 3 dc in next ch-1 sp] 4 times, ch 1, (3 dc, ch 2, 3 dc) in next corner sp*, repeat from * 2 more times. [Ch 1, 3 dc in next ch-1 sp] 4 times, ch 1, join with sl st to top of beg ch-3. (72 dc, 4 corner ch-2 sps, 20 ch-1 sps)
Round 7: Sl st to the next corner sp, or join the new color in any corner sp. Ch 3, 2 dc, ch 2, 3 dc in the same corner sp. *[Ch 1, 3 dc in next ch-1 sp] 5 times, ch 1, (3 dc, ch 2, 3 dc) in next corner sp*, repeat from * 2 more times. [Ch 1, 3 dc in next ch-1 sp] 5 times, ch 1, join with sl st to top of beg ch-3. (84 dc, 4 corner ch-2 sps, 24 ch-1 sps)
Round 8: Sl st to the next corner sp, or join the new color in any corner sp. Ch 3, 2 dc, ch 2, 3 dc in the same corner sp. *[Ch 1, 3 dc in next ch-1 sp] 6 times, ch 1, (3 dc, ch 2, 3 dc) in next corner sp*, repeat from * 2 more times. [Ch 1, 3 dc in next ch-1 sp] 6 times, ch 1, join with sl st to top of beg ch-3. Fasten off. (96 dc, 4 corner ch-2 sps, 28 ch-1 sps)
Each side of the finished square has 8 groups of 3 dc and 7 ch-1 sps. Weave in ends as you go and block every square to 12 inches. If your square is smaller, go up a hook size.

— Layout and Joining :

Lay out 8 rows of 8 squares in a checkerboard. Row 1 starts with a Type A square in the top left corner, and every square touches a square of the other type on all four sides. This uses 32 Type A and 32 Type B squares.
Rows 1, 3, 5 and 7: A, B, A, B, A, B, A, B (8 squares)
Rows 2, 4, 6 and 8: B, A, B, A, B, A, B, A (8 squares)
Join with black. Hold two squares with right sides together and sl st through the back loops only, working in each dc, ch-1 sp and corner sp. Join the squares into 8 strips of 8, then join the 8 strips.

— Border :

Round 1 (black): With right side facing, join black in any outer corner sp. Ch 1, 3 sc in the corner sp. *Sc in each dc and each ch-1 sp across the square (31 sc). At each seam, sc in the corner sp, sc in the seam, sc in the next corner sp (3 sc)*, repeat across the side. Work 3 sc in each outer corner sp. Join with sl st to first sc. (1,088 sc: 269 sc along each side plus 3 sc in each of 4 corners)
Round 2 (black): Ch 1, sc in each sc around, working 3 sc in the center sc of each corner. Join with sl st to first sc. (1,096 sc)
Round 3 (black): Ch 1, sc in each sc around, working 3 sc in the center sc of each corner. Join with sl st to first sc. (1,104 sc)
Round 4 (red): Join red in any sc. Ch 1, *sc in next 3 sc, picot (ch 3, sl st in 3rd ch from hook), sc in next sc*, repeat from * around for 276 repeats. Join with sl st to first sc. Fasten off. (1,104 sc and 276 picots)
Border check: 8 squares x 31 sc = 248, plus 7 seams x 3 sc = 21, gives 269 sc per side. 4 sides x 269 = 1,076, plus 12 corner sc = 1,088. Each corner adds 2 sc in rounds 2 and 3, giving 1,104, which divides by 4 into 276 picot repeats. If the picots do not land on the corners, shift your starting point by one or two sc.

Assembly Instructions

  1. Make 64 granny squares: 32 of Type A and 32 of Type B, following the color plan.
  2. Weave in all ends and block every square to 12 inches so the corners are sharp and the sizes match.
  3. Lay the squares out on the floor in 8 rows of 8 in a checkerboard and take a photo so you do not lose the order.
  4. Join each row into a strip with black, using a slip stitch seam through the back loops only.
  5. Join the 8 strips together the same way, matching the corners carefully.
  6. Weave in the joining ends and block the whole cover flat.
  7. Work the border: three rounds of black single crochet, then a final round of red picots.

Common Mistakes & How to Fix Them

Mixing up the two square types. Mark the color plan on a card and check the center color before you place each square.

Forgetting the ch 2 at the corners, which makes the squares curl. Count the corner sps after every round.

Pulling the seams too tight, which puckers the cover. Keep the joining stitches loose and the same tension as the squares.

Losing count in the border. Place a marker at each corner and check the stitch total after round 1.


Denise

Denise designs cozy, easy to follow crochet patterns for the home, with clear stitch counts and friendly tips.


Important Notes

Each square should measure 12 inches after blocking with a 5.0 mm hook. Make one test square before you buy all the yarn.

Yarn amounts are estimates. Buy a little extra black for the joining and the border.

Wash cold on a gentle cycle with a color catcher, because red cotton can bleed onto black. Dry flat or tumble dry on low.


I hope this red and black cover makes your Halloween nights extra cozy. Take it one square at a time and enjoy every spooky ring.

Crochet Abbreviations

01 ch — chain
02 sl st — slip stitch
03 sc — single crochet
04 dc — double crochet
05 sp — space
06 sps — spaces
07 beg — beginning

You Ask, We Answer

What size is the finished bed cover?

It measures about 98 by 98 inches with the border, which covers a king size bed with a generous drop.

Can I use a different yarn weight or make it smaller?

Yes. Lighter yarn with a smaller hook makes smaller squares, so you will need more of them. For a throw, make 5 columns by 6 rows (30 squares).

How do I wash it?

Wash cold on a gentle cycle with a color catcher, then dry flat or tumble dry on low. Wash it on its own the first time.