
Cream Lace Sunburst Bedspread with Orange Flowers Crochet Pattern
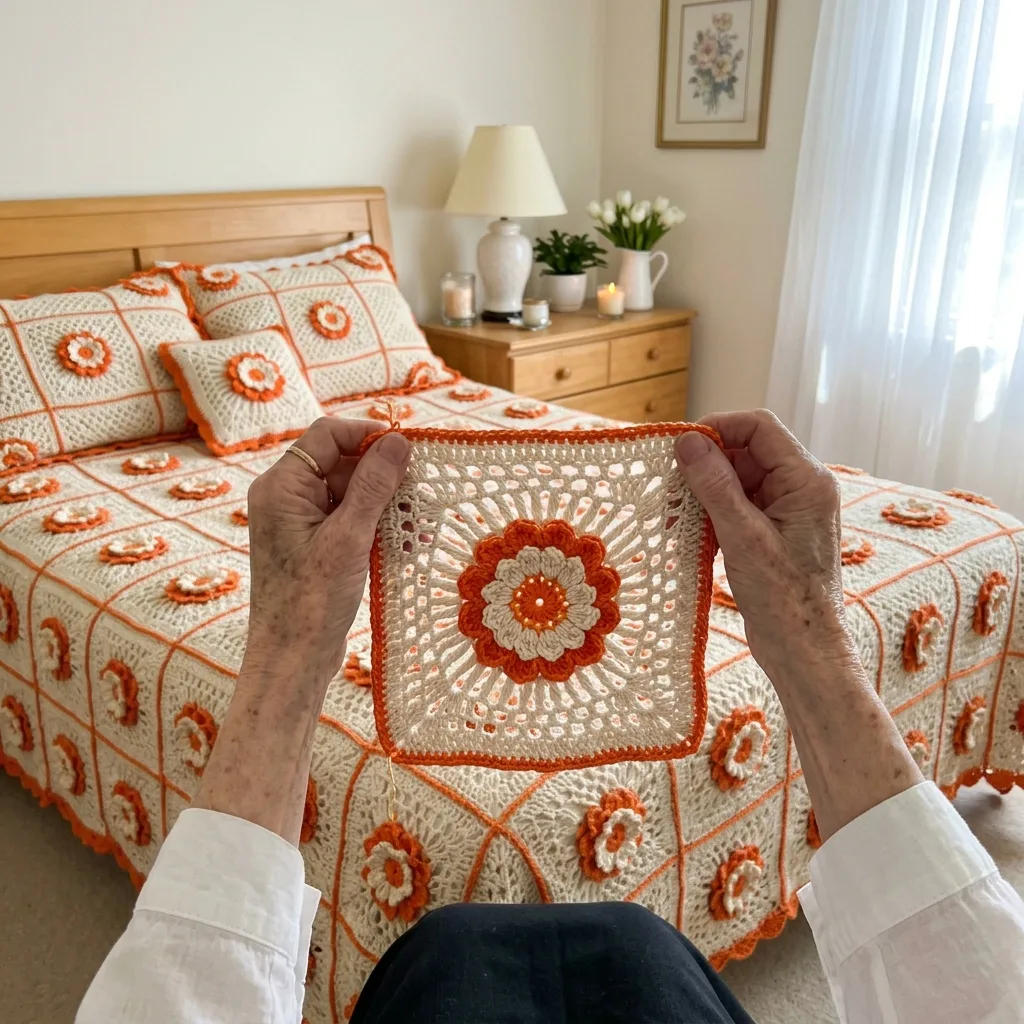
Layered petals, lace spokes and counted corners, with a stitch count on every round.
Each large square takes about two hours, and you only need fifty-six of them.
A little three-layer flower blooms right out of the lace in every square.
About This Cream Lace Sunburst Bedspread with Orange Flowers Crochet Pattern Pattern
This bedspread is made from fifty-six large lace squares in warm cream, each with a bright tangerine flower blooming in the middle. The flower is built in layers: a small orange ring at the center, eight cream inner petals, and eight bigger orange petals behind them, so it stands up from the lace like a real blossom. Behind the flower, the cream lace spreads out in long spokes of double crochet and chain, growing wider with every round until the circle looks like a burst of sunlight. Graded stitches at the corners turn the circle into a square, an open mesh round adds lightness, and a solid cream round frames it. A bright orange outline finishes each square.
The finished bedspread measures about 101 by 115 inches (257 by 292 cm) including the border. That is a grid of 7 squares across and 8 squares down, with each square measuring 14 inches after blocking, plus an orange scalloped shell edge. On a queen mattress that gives a drop of about 20 inches on the sides and at the foot, so the lace falls softly toward the floor. Because the squares are large, you need fewer of them than in most bedspreads, which makes the project feel very manageable. Every square is identical, so there is no chart to follow.
The stitches are chain, slip stitch, single crochet, half double crochet, double crochet and treble crochet, all of them familiar. The flower layers are made by working chain loops behind the petals of the round before, then filling those loops with new petals, so each layer sits a little behind the last. The sunburst grows by simply adding one more chain between the spokes on each round. Round 11 is the clever round, where the stitches step down from treble at the corners to single crochet in the middle of each side, and the circle quietly becomes a square.
The squares are joined with orange single crochet on the right side, worked through both squares at once. Together with the orange outline of each square, the seams create a cheerful orange grid that frames every sunburst like a window. After all the squares are joined, two rounds of orange single crochet go around the whole bedspread, followed by a round of five double crochet shells. The shells make the soft scalloped edge that you see hanging along the sides.
In DK cotton the bedspread is light, airy and cool, with a lovely drape over the edges of the bed. The lace lets a hint of light through, while the raised flowers add texture and a pop of color. Cream and tangerine together feel warm, sunny and happy, a bit like marigolds in a summer garden or a bowl of oranges on a kitchen table. The colors suit honey wood, white walls, linen curtains and fresh flowers, and they bring a cheerful glow to a bedroom on even the greyest morning.
I rate this pattern as intermediate. You should be comfortable working in the round, counting carefully and keeping your chain spaces even, since lace shows every uneven chain. The flower layers need a little attention the first time, but after one or two squares they become second nature. It suits a maker who loves both color and lace and enjoys a long, rewarding project. If you have made a doily or a lacy motif before, you will feel right at home, and every round here is written out with its count.
Why You'll Love This Cream Lace Sunburst Bedspread with Orange Flowers Crochet Pattern Pattern
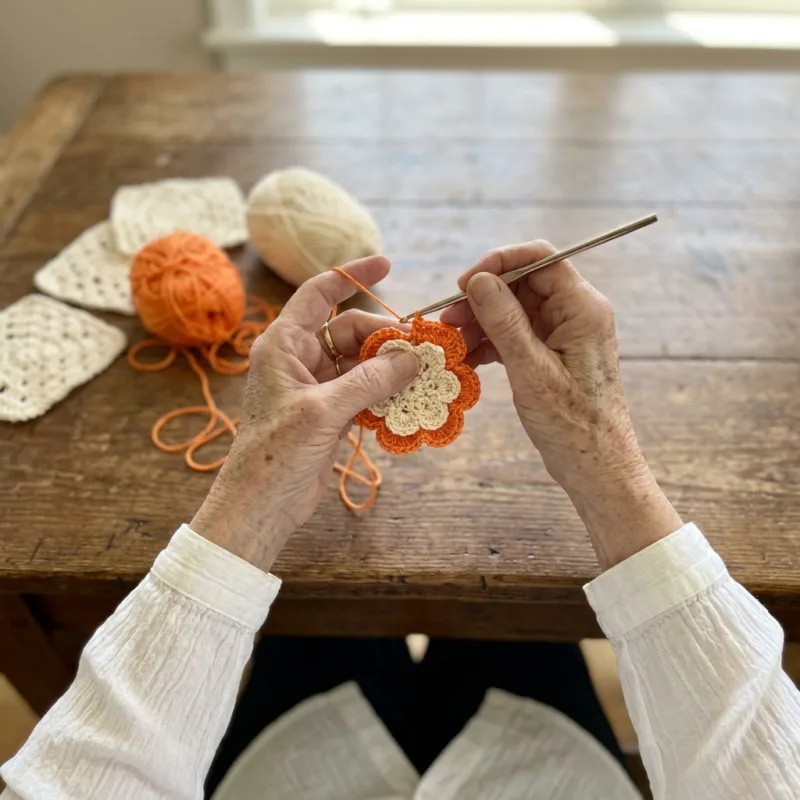
I made this bedspread on a grey winter when I needed a little sunshine, and it worked better than any holiday. Every evening I picked up a ball of tangerine yarn, and the room seemed to get brighter. The first time I finished a flower and saw the cream inner petals sitting inside the orange ones, I actually laughed out loud. It looked like a little marigold had landed on my lace. I have been smiling at it ever since.
The flower is my favorite part of each square. It is only a few small rounds, but it changes the whole piece. You make the tiny orange ring, add the cream petals, then reach behind them to make the loops for the orange petals. When the second layer goes on, the flower suddenly stands up in three dimensions. It is such a satisfying moment, and it comes right at the start of each square, so it gives me energy for the lace rounds that follow.
I also love watching the sunburst grow. Each round adds one more chain between the spokes, so the circle opens up like a flower turning toward the sun. Then the corners appear, and the circle becomes a square almost by magic. I find lace like this very peaceful to make. The rhythm of chain, double crochet, chain is soothing, and I can feel my shoulders relax as I work.
Here is why this bedspread is so dear to me:
- Only fifty-six squares, because each one is nice and large.
- The raised flowers bring color and texture to the lace.
- Orange and cream feel warm and happy in any season.
- The orange outlines and seams make the joining part of the design.
- The shell edge is quick and finishes it beautifully.
This bedspread changed our guest room completely. It used to be all white and beige, very calm but a little cold. Now the orange flowers pick up the honey wood of the furniture and the warm lamp light, and the whole room feels welcoming. My daughter stayed with us last month and told me she slept better than she had in weeks. I like to think the little flowers had something to do with it.
Making it taught me a few things too. I learned to keep my chains relaxed in the sunburst rounds, because tight chains make the circle cup instead of lying flat. I learned to mark the corner spaces before Round 11, which saved me from more than one crooked square. And I learned that blocking lace is truly magical, because a crumpled square turns into a flat, crisp sunburst once it dries on the mat.
Most of all, I love that this is a piece to keep and pass on. Cotton lace lasts for generations when it is cared for gently, and these colors will always look cheerful. I hope this bedspread will brighten bedrooms in my family long after I have put down my hook. And I hope every time someone sees those little orange flowers, they feel a bit of the sunshine I stitched into them.
Switch Things Up
The easiest change is the flower color. Keep the cream lace and swap the orange for another bright shade, and the bedspread takes on a whole new personality. Raspberry pink feels romantic, sunflower yellow is fresh and summery, and cornflower blue is calm and cottage-like. Emerald green with cream looks rich and elegant, and a deep red makes a lovely Christmas bedspread. You can even make the inner petals a third color for extra sparkle.
You can change the size by changing the number of squares. Each square is 14 inches after blocking, and the border adds about 1.5 inches on every side. Because the squares are large, a few squares make a big difference. Here are some sizes that include a drop on the sides and the foot.
- Twin: 5 by 7 squares (35), about 73 by 101 inches
- Full: 6 by 7 squares (42), about 87 by 101 inches
- Queen: 7 by 8 squares (56), about 101 by 115 inches
- King: 8 by 8 squares (64), about 115 by 115 inches
A sofa throw is a lovely smaller version. Make 3 by 4 squares, twelve in total, for a throw of about 45 by 59 inches with the border. It takes around twenty-five to thirty hours and uses about a fifth of the yarn. It is the perfect way to try the pattern before committing to a full bedspread, and it brightens up a neutral sofa wonderfully. It also makes a beautiful gift for a new home.
For a baby keepsake, make a 2 by 3 grid in soft baby cotton, with pale peach or butter yellow flowers on white lace, for a pram cover of about 31 by 45 inches. The raised flowers are sweet, but they are small parts, so sew each one down firmly at the back before you join the squares. Because the lace has open spaces, I keep this kind of piece for the pram, a christening or a keepsake, used with an adult nearby, rather than as loose bedding in a crib.
Matching pillows make the bed look finished, just like in my photos. One square makes the front of a 14 inch cushion. Make a back from a second square or a plain panel of cream double crochet, join them with orange single crochet on three sides, slip in a pillow form, and close the last side. Work the orange shell edge around it. Two squares side by side make a lovely sham for a standard pillow.
The same square makes beautiful table linens too. A single square with the shell edge becomes a cheerful centerpiece under a vase of flowers. A row of four squares makes a table runner of about 59 by 17 inches, and a 3 by 3 block makes a square tablecloth for a small table. Orange and cream look wonderful on an autumn table, and the lace lets a colored cloth show through underneath.
If you would like a different edge, there are easy options. For a deeper lace border, add a round of ch-5 loops and a round of shells in cream, then finish with an orange picot round. For a simpler look, stop after the two rounds of single crochet and work a round of reverse single crochet. For a playful finish, add a small orange tassel at each corner. Keeping the outer edge orange frames the whole bed nicely.
You can also play with the yarn weight. In size 3 crochet thread with a 2.5 mm hook, squares come out at about 10 inches and look very fine and delicate, though you will need about twice as many. In worsted cotton with a 4.5 mm hook, squares grow to about 17 inches, and 6 by 7 squares cover a queen bed. Acrylic works too and is lighter and warmer. Always make one test square in your new yarn and measure it before you buy the rest.
Materials Needed
— Main Fabric
— Tools Required
The Free Pattern
0% complete
— Orange Flower Sunburst Square (Make 56, cream and orange) :
— Layout (7 x 8 grid, 56 squares) :
— Orange Seam Join (Color B) :
— Orange Shell Border (Color B) :
Assembly Instructions
- Make 56 Orange Flower Sunburst Squares and weave in all the ends of each square as you finish it.
- Wet block every square to 14 by 14 inches, opening the spokes and fluffing the flower petals forward, and let them dry completely.
- Lay the squares out in 8 rows of 7 following the Layout section, mixing squares from different days.
- Work all the horizontal seams with the Orange Seam Join, wrong sides together, one full row at a time.
- Work all the vertical seams the same way, with a ch 1 across each place where four corners meet.
- Work Rounds 1 to 3 of the Orange Shell Border around the whole bedspread.
- Weave in the last ends, then give the finished bedspread a final light blocking on a clean floor, pinning out the scallops.
Common Mistakes & How to Fix Them
Working the petal loops in front instead of behind. Rounds 4 and 6 must be worked behind the petals of the round before, by placing each sc around the post of a stitch two rounds down. If you work in front, the new loops cover the petals and the flower loses its layered look. It is easy to do because the front of the work is more natural to reach. Fold the petals toward you with your thumb before each stitch so the post is easy to see. After each of these rounds, turn the square over and check that all chain loops sit flat on the back.
Sunburst rounds that cup or ruffle. Rounds 8 to 10 only lie flat when the chains between the spokes are relaxed and even. If you pull your chains tight, the circle cups like a bowl. If they are very loose, the circle ruffles and the corners in Round 11 will be wavy. Lay the square flat on the table after each of these rounds. If it cups, go up half a hook size for the chains. If it ruffles, go down half a size. A flat circle after Round 10 is the key to a crisp, square finished piece.
Corners in the wrong place. Round 11 needs 13 ch-3 spaces between each corner. If you miscount, one side ends up with 12 spaces and another with 14, and the square comes out slanted, with the flower off center. You might not notice until the square sits beside a straight one. Before you start the round, place markers in the 1st, 15th, 29th and 43rd spaces, and always work the corners there. After the round, count 45 stitches on every side. It takes only a minute, but it keeps every square in the grid perfectly straight.
Skipping the blocking. Cotton lace straight off the hook looks crumpled, smaller than it should and a little lopsided. If you join squares without blocking, the orange seams pull, the grid looks wavy and the sunburst never opens fully. Steam alone is not enough for cotton lace. Soak each square, press out the water, pin it to 14 by 14 inches and open each spoke with your fingers. Fluff the flower petals forward so they stand up. Let it dry completely before removing the pins. The difference is like night and day.

You Might Also Like






Important Notes
Gauge and square size matter in this pattern. With DK cotton and a 3.5 mm hook, Rounds 1 to 10 should measure about 9 inches (23 cm) across, and the finished square should block to 14 inches (36 cm). Make one square and block it before you buy all your yarn. If it is smaller, go up a hook size. If it is larger, go down a size. All the grid sizes in this pattern assume a 14 inch square.
Lace needs wet blocking. Soak each square in cool water, squeeze it gently in a towel, and pin it at 14 by 14 inches with straight sides and square corners. Open the spokes and the mesh with your fingers, and fluff the flower petals forward. Let it dry completely, usually overnight. Block the finished bedspread once more after the border, pinning out each scallop on the floor.
This bedspread uses about 3,100 grams of cream and 1,200 grams of orange DK cotton for the queen size. Buy all of it at once, and check that every ball has the same dye lot number. Bright oranges in particular can vary between lots, and a change in shade would show clearly in the grid of seams. Buy one or two extra balls of each color, so you do not run short at the border.
Wash the bedspread on a gentle cold cycle in a large machine, or by hand in a bathtub, with a mild detergent. Bright orange can release dye onto cream, so always add a color catcher sheet, especially in the first several washes. Never use bleach. Do not wring or twist the lace. Press out the water with towels and lay it flat to dry, fluffing the flowers and shaping the scallops. Avoid the dryer, which can shrink cotton lace.
I hope this bedspread brings a little sunshine into your home, the way it brought it into mine on those grey winter evenings. It is a long project, but every square starts with a happy little flower, and only fifty-six of them make a whole bed. Do not let the size of it worry you. You do not have to make them all today. You only have to make the first flower.
So pick up your cream and your tangerine, settle in with a cup of tea, and start with that tiny orange ring. Watch the petals bloom and the sunburst open around them. Block your first square, hold it up to the window, and imagine the rest of the bed. Then make another. Before you know it, you will have an heirloom full of flowers to treasure for years. Happy crocheting, my friends.
Crochet Abbreviations
You Ask, We Answer
What is the finished size of this bedspread?
The bedspread in the photos measures about 101 by 115 inches (257 by 292 cm) including the border. It is made from 56 squares in a grid of 7 across and 8 down, and each square measures 14 inches after blocking. The orange shell border adds about 1.5 inches on each side. On a standard queen mattress, which is 60 by 80 inches, this size gives a drop of about 20 inches on each side and at the foot, so the lace falls toward the floor, with extra length at the head to tuck under the pillows. If your bed is taller or lower, measure from the top of the mattress to the floor and add or remove squares to suit. Since each square is large, adding one row makes a big difference, so plan carefully. Always measure your first blocked square before buying all your yarn, because the final size depends on your gauge.
Can I use a different yarn weight or make it smaller?
Yes. The pattern works in any yarn weight, but the size of each square will change, so you need to adjust the number of squares. In size 3 crochet thread with a 2.5 mm hook, squares come out at about 10 inches, and you would need about 10 by 11 squares for the same queen size. In worsted cotton with a 4.5 mm hook, squares grow to about 17 inches, and 6 by 7 squares cover a queen bed. To make a smaller piece, simply make fewer squares: twelve squares in a 3 by 4 grid make a sofa throw, and six squares make a pram cover. The rounds and stitch counts of the square stay exactly the same in every case, and so do the join and the border method. The border is planned so the shells fit evenly on any grid, with 14 shells per square along each side, so you never need to recalculate the repeat.
How do I wash and care for the bedspread?
Cotton lace is easy to care for, but a bedspread this size is heavy when wet, so treat it gently. Wash it on a cold, gentle cycle in a large capacity machine, or by hand in the bathtub with a mild wool or baby detergent. Always add a color catcher sheet, because bright orange can release a little dye onto the cream lace, especially in the first washes. Never use bleach, as it weakens cotton and would fade the orange flowers. Do not hang it wet from a line, since the weight will stretch the lace and pull the squares out of shape. Instead, press out the water with towels and lay it flat to dry, fluffing the flower petals and shaping the scallops. Between seasons, fold it loosely and store it in a cotton bag, not plastic, with a sachet of lavender or cedar to keep moths away.
Success!
Thanks for subscribing — check your inbox for a welcome note.
Abbreviations
- A — Color A, warm cream
- B — Color B, bright tangerine orange
- ch — chain
- sl st — slip stitch
- sc — single crochet
- hdc — half double crochet
- dc — double crochet
- tr — treble crochet
- sc2tog — single crochet 2 together
- sk — skip
- st(s) — stitch(es)
- sp(s) — space(s)
- ch-3 sp — the space made by 3 chains (same for ch-1, ch-2, ch-5 and ch-6)
- rep — repeat