
Amanda's Creative Corner Crochet · Kitchen
Free Crochet Patterns Handmade with Love

Bee Gnome Amigurumi Crochet Pattern
Jump to Pattern
Bee Gnome Amigurumi Crochet Pattern
10-14 Hours 1 made this
Intermediate Level

Simple spiral rounds, with several small pieces to sew together.

Weekend Plus

About 10 to 14 hours from the first magic ring to the last bee.

Shelf Sitter

A cheerful honey colored gnome with dangly legs that makes a sweet handmade gift.

About This Bee Gnome Amigurumi Crochet Pattern Pattern

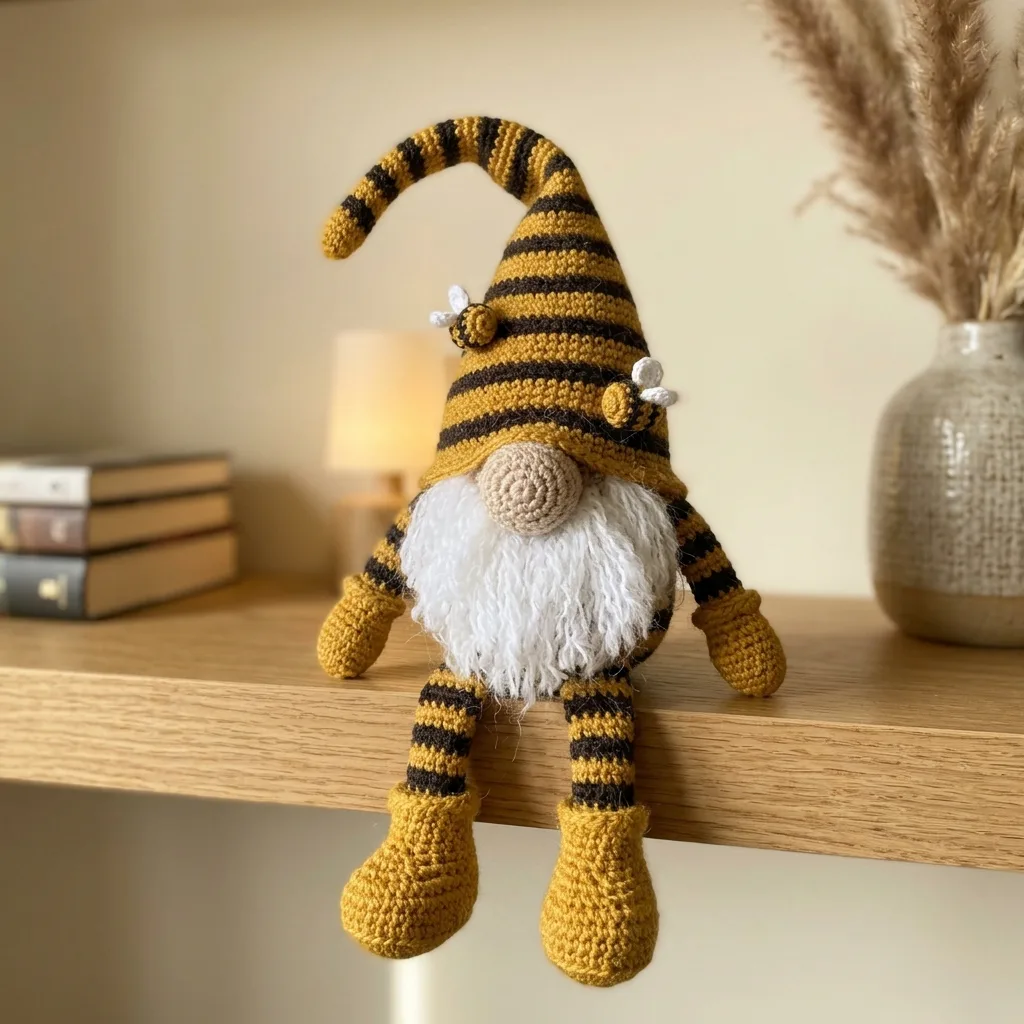
This bee gnome sits about 12 inches tall in worsted yarn, with legs that dangle about 5 inches over a shelf edge. He wears a tall striped hat with a long curved tip, a braided brim and two tiny bees with white wings.

You will work in spiral rounds with increases and decreases, plus a flat triangle for the fluffy white beard. It suits anyone who has made a few amigurumi and wants a fun seasonal project.

Bee Gnome Amigurumi Crochet Pattern step detail

Why You'll Love This Bee Gnome Amigurumi Crochet Pattern Pattern

I love how much character a round beige nose and a big white beard give him. The stripes in honey yellow and soft taupe feel warm and cozy on any shelf.

He also uses up leftover yarn, and every piece is small, so it is easy to pick up and put down between other things.


Switch Things Up

Try a red and cream version for a Christmas gnome, soft pinks and greens for spring, or navy and grey for a wintery look. You can use sport weight yarn and a 2.5 mm hook for a smaller gnome, or add a tiny scarf, a flower or a little jar of honey in his mitten.


Materials Needed

— Main Fabric

01 Worsted weight (#4) cotton or acrylic yarn: about 60 g mustard yellow, about 60 g taupe brown, about 10 g creamy beige, about 5 g black, about 5 g white
02 Fluffy white eyelash or faux fur style yarn: about 25 g for the beard
03 Polyester fiberfill stuffing
04 Optional: a small bag of plastic pellets for the base of the body
05 Black embroidery floss for the bee antennae

— Tools Required

06 3.5 mm (E) crochet hook
07 Yarn needle
08 Stitch markers
09 Scissors
10 Pins
11 Pet brush or fine comb to fluff the beard

The Free Pattern

Intermediate 10-14 Hours

0% complete

— Body (taupe) :

Round 1: 6 sc in mr (6)
Round 2: inc x6 (12)
Round 3: (sc, inc) x6 (18)
Round 4: (2 sc, inc) x6 (24)
Round 5: (3 sc, inc) x6 (30)
Round 6: (4 sc, inc) x6 (36)
Round 7: (5 sc, inc) x6 (42)
Round 8-17: sc in each st (42)
If you like, put a small bag of pellets at the bottom of the body before stuffing so he sits steadily.
Round 18: (5 sc, dec) x6 (36)
Round 19: (4 sc, dec) x6 (30)
Round 20: (3 sc, dec) x6 (24)
Stuff the body firmly now.
Round 21: (2 sc, dec) x6 (18)
Round 22: (sc, dec) x6 (12)
Round 23: dec x6 (6)
Fasten off, leave a tail, and close the hole.

— Nose (beige) :

Round 1: 6 sc in mr (6)
Round 2: inc x6 (12)
Round 3: (sc, inc) x6 (18)
Round 4-6: sc in each st (18)
Round 7: (sc, dec) x6 (12)
Stuff the nose firmly.
Round 8: dec x6 (6)
Fasten off and leave a long tail for sewing.

— Hat (striped, worked from the tail tip) :

Rounds 1-2 are taupe. From Round 3 on, work 2 rounds mustard yellow, then 1 round taupe, and repeat. Carry the unused yarn up inside the piece.
Round 1: 6 sc in mr (6)
Round 2: (sc, inc) x3 (9)
Round 3-20: sc in each st (9)
Stuff the tail lightly as you go. Stuff the cone lightly too, so the hat stays soft.
Round 21: (2 sc, inc) x3 (12)
Round 22-23: sc in each st (12)
Round 24: (sc, inc) x6 (18)
Round 25-26: sc in each st (18)
Round 27: (2 sc, inc) x6 (24)
Round 28-29: sc in each st (24)
Round 30: (3 sc, inc) x6 (30)
Round 31-32: sc in each st (30)
Round 33: (4 sc, inc) x6 (36)
Round 34-35: sc in each st (36)
Round 36: (5 sc, inc) x6 (42)
Round 37-38: sc in each st (42)
Round 39: (6 sc, inc) x6 (48)
Round 40-42: sc in each st (48)
Change to taupe for the brim and use taupe for the rest of the hat.
Round 43: (7 sc, inc) x6 (54)
Round 44: (8 sc, inc) x6 (60)
Round 45-46: sc in each st (60)
Fasten off and weave in the end.

— Arm and Mitten (Make 2) :

Start with mustard yellow for the mitten.
Round 1: 6 sc in mr (6)
Round 2: inc x6 (12)
Round 3: (sc, inc) x6 (18)
Round 4-7: sc in each st (18)
Round 8: (sc, dec) x6 (12)
Stuff the mitten. From here, work the sleeve in stripes: 2 rounds mustard yellow, 1 round taupe, repeating. Stuff the arm lightly.
Round 9-26: sc in each st (12)
Fasten off and leave a long tail for sewing.

— Thumb (Make 2, mustard yellow) :

Round 1: 6 sc in mr (6)
Round 2-4: sc in each st (6)
Fasten off and leave a long tail. Stuff with a tiny bit of fiberfill if you like.

— Boot and Leg (Make 2) :

Start with mustard yellow for the boot.
Round 1: 6 sc in mr (6)
Round 2: inc x6 (12)
Round 3: (sc, inc) x6 (18)
Round 4: (2 sc, inc) x6 (24)
Round 5-9: sc in each st (24)
Round 10: (2 sc, dec) x6 (18)
Round 11: (sc, dec) x6 (12)
Stuff the boot firmly.
Round 12-13: sc in each st (12)
Now work the leg in stripes: 2 rounds mustard yellow, 1 round taupe, repeating. Stuff lightly as you go.
Round 14-31: sc in each st (12)
Fasten off and leave a long tail for sewing. For each lace, chain 40 in mustard yellow, fasten off, and tie it in a bow on the boot.

— Beard (fluffy white yarn) :

Worked flat in rows. Use a fluffy white yarn, or hold a thin white yarn together with an eyelash yarn.
Row 1: ch 21, sc in the 2nd ch from hook and in each ch across (20)
Row 2: ch 1, turn, sc in each st (20)
Row 3: ch 1, turn, dec, sc in next 16, dec (18)
Row 4: ch 1, turn, dec, sc in next 14, dec (16)
Row 5: ch 1, turn, dec, sc in next 12, dec (14)
Row 6: ch 1, turn, dec, sc in next 10, dec (12)
Row 7: ch 1, turn, dec, sc in next 8, dec (10)
Row 8: ch 1, turn, dec, sc in next 6, dec (8)
Row 9: ch 1, turn, dec, sc in next 4, dec (6)
Row 10: ch 1, turn, dec, sc in next 2, dec (4)
Row 11: ch 1, turn, dec, dec (2)
Fasten off. Brush the beard gently with a pet brush or fine comb until it is soft and fluffy.

— Bee Body (Make 2) :

Round 1: 6 sc in mr in black (6)
Round 2: inc x6 in black (12)
Round 3: sc in each st in mustard yellow (12)
Round 4: sc in each st in black (12)
Round 5: sc in each st in mustard yellow (12)
Stuff the bee lightly.
Round 6: dec x6 in black (6)
Fasten off and close the hole.

— Bee Wing (Make 4, white) :

Round 1: 6 sc in mr (6)
Round 2: inc x6 (12)
Round 3: sc in each st (12)
Fasten off, leave a tail, and flatten the wing.

Assembly Instructions

  1. Sew the nose to the front of the body around Round 21, so it sits just under where the hat brim will rest.
  2. Place the hat on the top of the body with the brim over the nose, then sew it on all the way around through Round 43.
  3. Sew the top edge of the beard (Row 1) to the body just under the nose and let the point hang down the front, and add a few small stitches along the sides.
  4. Sew the legs to the lower front of the body around Rounds 4 to 6, with the boots pointing forward.
  5. Sew one thumb to each mitten, then sew each arm to the side of the body around Rounds 16 to 17.
  6. Sew two wings to the back of each bee body, then embroider two short antennae with black floss.
  7. Sew one bee to the hat around Round 32 and the other around Round 38.
  8. Curve the hat tip over to one side and sew it down with a few hidden stitches, then weave in all ends.

Common Mistakes & How to Fix Them

Letting the stripes pull tight: carry the unused yarn loosely up inside the hat and the legs so they do not pucker.

Stuffing the hat too much, which makes the tip stiff and heavy. Keep it soft so the tip curves nicely.

Sewing the beard too high, which hides the nose. Place the top edge just under the nose.

Skipping the stitch marker: spiral rounds are easy to lose track of, so move your marker up every round.


Denise

Designing cozy, detailed amigurumi patterns from home, one magic ring at a time.


Important Notes

Work in continuous spiral rounds without joining, and use a stitch marker in the first stitch of every round.

Keep your tension snug so the stuffing does not show through the stitches. Gauge does not need to be exact.

The bees are small sewn parts. For children under 3, leave them off or embroider them, and skip the pellets.


I hope you enjoy making your little bee gnome. Happy hooking, and tell me what colors you picked!

Crochet Abbreviations

01 mr — magic ring
02 sc — single crochet
03 inc — increase (2 sc in the same stitch)
04 dec — decrease (single crochet 2 stitches together)
05 ch — chain
06 st — stitch
07 sts — stitches

You Ask, We Answer

How big is the finished gnome?

About 12 inches tall seated, with the legs hanging about 5 inches over the edge.

Can I use a different yarn weight?

Yes. Sport weight with a 2.5 mm hook makes a smaller gnome, and chunky yarn with a 5 mm hook makes a bigger one.

Is it safe for children and can I wash it?

Leave off the bees and pellets for children under 3. Spot clean gently with a damp cloth and brush the beard once dry.





