
Amanda's Creative Corner Crochet · Kitchen
Free Crochet Patterns Handmade with Love

Butterfly Filet Crochet Bed Cover Pattern

Jump to Pattern
Butterfly Filet Crochet Bed Cover Pattern
120-160 Hours 3 made this
Intermediate Level

You need to be comfortable with double crochet and reading a simple filet chart.

120-160 Hours

Each block takes about 2 to 3 hours, so you can finish a few every week.

One Butterfly per Block

Every block is a small project you can crochet anywhere and join later.

About This Butterfly Filet Crochet Bed Cover Pattern Pattern

This bed cover is made from 42 square filet blocks in a soft dusty rose. Each block has a solid butterfly on open mesh, and the blocks are joined in a grid of 6 across and 7 down. The cover finishes with a scalloped edge, and the pattern includes two matching pillow shams with one big butterfly each.

The finished queen size is about 88 by 102 inches. You will use double crochet, chain-one mesh, a simple chart, a slip stitch join and a shell edge. It suits crocheters who want a lacy, romantic bedspread made from small pieces.
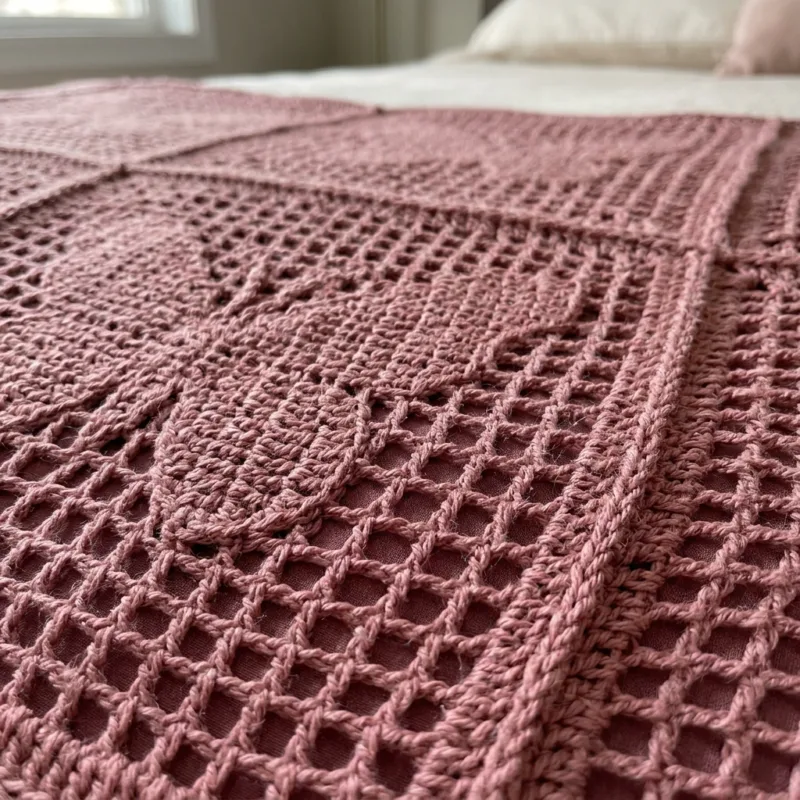
Butterfly Filet Crochet Bed Cover Pattern step detail

Why You'll Love This Butterfly Filet Crochet Bed Cover Pattern Pattern

I love that every butterfly is its own little project. You can make one on the sofa, in the car or at a friend's kitchen table, and the cover grows quietly while you do other things.

It is also a wonderful gift for a wedding or a new baby's room. A soft pink cover makes a bedroom feel gentle and warm, and the matching shams finish it beautifully.


Switch Things Up

Try sage green, cream or sky blue for a different mood. Make 4 blocks across and 5 rows long for a 20-block throw of about 57 by 71 inches. Use a lighter yarn and smaller hook for a baby blanket, or line the cover with a darker shade so the butterflies pop. You can also make a single sham for a chair.


Materials Needed

— Main Fabric

01 Worsted weight (4) yarn in dusty rose, about 6,400 yards (about 3,200 g) for the 42 blocks, joining and edge of the bed cover
02 About 1,700 yards (about 850 g) more for two pillow shams
03 Buy all the yarn from the same dye lot and add about 10 percent extra for swatching and joining
04 Optional: a deeper rose fabric lining or flat sheet, cut to size, so the bed does not show through the mesh

— Tools Required

05 4.5 mm (7) crochet hook
06 Yarn needle
07 Stitch markers
08 Scissors
09 Blocking mats and pins
10 Measuring tape

The Free Pattern

Intermediate 120-160 Hours

0% complete

— Butterfly Block (Make 42, dusty rose) :

Each block is 25 squares wide and 25 rows tall. Space = ch 1, sk 1 st, dc in next st. Block = dc in next st, dc in next st (the first dc goes in the ch-1 sp or dc below). The turning ch 3 counts as the first dc, and you skip the first st at the base. Every row has 51 sts (26 dc and 25 squares). The chart is the same from left to right, so you can work it in either direction. Gauge: 7 squares and 7 rows measure 4 inches. Each block is about 14 inches square.
Row 1: Ch 54, dc in 4th ch from hook, *ch 1, sk 1 ch, dc in next ch; repeat from * across. Turn. (25 sp)
Row 2: Ch 3, sk first st, 25 sp. Turn. (25 sp)
Row 3: Ch 3, sk first st, 25 sp. Turn. (25 sp)
Row 4: Ch 3, sk first st, 7 sp, 3 blocks, 5 sp, 3 blocks, 7 sp. Turn. (25 squares: 6 blocks, 19 sp)
Row 5: Ch 3, sk first st, 6 sp, 5 blocks, 1 sp, 1 block, 1 sp, 5 blocks, 6 sp. Turn. (25 squares: 11 blocks, 14 sp)
Row 6: Ch 3, sk first st, 5 sp, 6 blocks, 1 sp, 1 block, 1 sp, 6 blocks, 5 sp. Turn. (25 squares: 13 blocks, 12 sp)
Row 7: Ch 3, sk first st, 5 sp, 6 blocks, 1 sp, 1 block, 1 sp, 6 blocks, 5 sp. Turn. (25 squares: 13 blocks, 12 sp)
Row 8: Ch 3, sk first st, 5 sp, 6 blocks, 1 sp, 1 block, 1 sp, 6 blocks, 5 sp. Turn. (25 squares: 13 blocks, 12 sp)
Row 9: Ch 3, sk first st, 6 sp, 5 blocks, 1 sp, 1 block, 1 sp, 5 blocks, 6 sp. Turn. (25 squares: 11 blocks, 14 sp)
Row 10: Ch 3, sk first st, 7 sp, 4 blocks, 1 sp, 1 block, 1 sp, 4 blocks, 7 sp. Turn. (25 squares: 9 blocks, 16 sp)
Row 11: Ch 3, sk first st, 8 sp, 3 blocks, 1 sp, 1 block, 1 sp, 3 blocks, 8 sp. Turn. (25 squares: 7 blocks, 18 sp)
Row 12: Ch 3, sk first st, 6 sp, 5 blocks, 1 sp, 1 block, 1 sp, 5 blocks, 6 sp. Turn. (25 squares: 11 blocks, 14 sp)
Row 13: Ch 3, sk first st, 4 sp, 7 blocks, 1 sp, 1 block, 1 sp, 7 blocks, 4 sp. Turn. (25 squares: 15 blocks, 10 sp)
Row 14: Ch 3, sk first st, 3 sp, 8 blocks, 1 sp, 1 block, 1 sp, 8 blocks, 3 sp. Turn. (25 squares: 17 blocks, 8 sp)
Row 15: Ch 3, sk first st, 2 sp, 9 blocks, 1 sp, 1 block, 1 sp, 9 blocks, 2 sp. Turn. (25 squares: 19 blocks, 6 sp)
Row 16: Ch 3, sk first st, 2 sp, 9 blocks, 1 sp, 1 block, 1 sp, 9 blocks, 2 sp. Turn. (25 squares: 19 blocks, 6 sp)
Row 17: Ch 3, sk first st, 2 sp, 9 blocks, 1 sp, 1 block, 1 sp, 9 blocks, 2 sp. Turn. (25 squares: 19 blocks, 6 sp)
Row 18: Ch 3, sk first st, 2 sp, 9 blocks, 1 sp, 1 block, 1 sp, 9 blocks, 2 sp. Turn. (25 squares: 19 blocks, 6 sp)
Row 19: Ch 3, sk first st, 3 sp, 8 blocks, 1 sp, 1 block, 1 sp, 8 blocks, 3 sp. Turn. (25 squares: 17 blocks, 8 sp)
Row 20: Ch 3, sk first st, 4 sp, 7 blocks, 1 sp, 1 block, 1 sp, 7 blocks, 4 sp. Turn. (25 squares: 15 blocks, 10 sp)
Row 21: Ch 3, sk first st, 6 sp, 5 blocks, 1 sp, 1 block, 1 sp, 5 blocks, 6 sp. Turn. (25 squares: 11 blocks, 14 sp)
Row 22: Ch 3, sk first st, 8 sp, 3 blocks, 1 sp, 1 block, 1 sp, 3 blocks, 8 sp. Turn. (25 squares: 7 blocks, 18 sp)
Row 23: Ch 3, sk first st, 11 sp, 1 block, 1 sp, 1 block, 11 sp. Turn. (25 squares: 2 blocks, 23 sp)
Row 24: Ch 3, sk first st, 10 sp, 1 block, 3 sp, 1 block, 10 sp. Turn. (25 squares: 2 blocks, 23 sp)
Row 25: Ch 3, sk first st, 25 sp. Do not turn. Fasten off, leaving a 24 inch tail for joining. (25 sp)
The two wings meet at the center body, which is the single block in column 13. The antennae are the 2 blocks in Rows 23 and 24.

— Layout and Joining (42 blocks, 6 across by 7 down) :

Block every square flat to about 14 inches before joining. Row 25 of every block is the top, so all the butterflies fly toward the headboard.
Layout: Lay the blocks out in 7 rows of 6 blocks, all facing the same direction. (42 blocks, about 86 by 100 inches before the edge)
Side seams: Place two blocks side by side and slip stitch through both loops of the outer edge of each, 1 sl st in each row end. (25 sl st per seam, 35 side seams)
Top and bottom seams: Join the rows to each other the same way, 1 sl st in each stitch of Row 25 and Row 1. (51 sl st per seam, 36 seams between rows)

— Border (bed cover) :

Round 1: Join yarn at any corner, ch 1, work 306 sc across the top edge, 2 sc in each of the 175 row ends down the right side, 306 sc across the bottom edge and 2 sc in each of the 175 row ends up the left side, working 3 sc in the st at each of the 4 corners (counted in the totals). Sl st to first sc. (1,320 sc: 306 + 350 + 306 + 350 + 8 corner sc)
Round 2: Ch 1, *sk 2 sc, 5 dc in next sc, sk 2 sc, sl st in next sc; repeat from * around, sl st to first sl st. Fasten off and weave in all ends. (220 scallops, 1,100 dc, 220 sl st)

— Sham Front (Make 2, dusty rose) :

Each sham front is 45 squares wide and 37 rows tall, about 25 by 21 inches, with the butterfly centered. Work it in the same way as the block.
Row 1: Ch 94, dc in 4th ch from hook, *ch 1, sk 1 ch, dc in next ch; repeat from * across. Turn. (45 sp)
Rows 2-9: Ch 3, sk first st, 45 sp. Turn. (45 sp in each row)
Rows 10-30: Ch 3, sk first st, 10 sp, then work the 25 squares of the matching butterfly block row (Row 10 uses Block Row 4, Row 11 uses Block Row 5, and so on up to Row 30 using Block Row 24), then 10 sp. Turn. (45 squares in each row)
Rows 31-37: Ch 3, sk first st, 45 sp. Turn. Fasten off after Row 37. (45 sp in each row)

— Sham Back Panel (Make 4, dusty rose) :

Row 1: Ch 94, dc in 4th ch from hook, *ch 1, sk 1 ch, dc in next ch; repeat from * across. Turn. (45 sp)
Rows 2-22: Ch 3, sk first st, 45 sp. Turn. Fasten off after Row 22. (45 sp in each row)
Each back panel is about 25 by 12 inches. Overlap two panels by 7 rows to match the 37 rows of the front.

— Sham Finishing :

Assembly: Place the front and the two overlapped back panels with wrong sides together. Work Round 1 through all layers around the outside.
Round 1: Ch 1, work 91 sc across the top, 2 sc in each of the 37 row ends and 2 extra sc evenly spaced down each side (76 sc per side), 91 sc across the bottom, with 3 sc in the st at each of the 4 corners. Sl st to first sc. (342 sc: 91 + 152 + 91 + 8 corner sc)
Round 2: Ch 1, *sk 2 sc, 5 dc in next sc, sk 2 sc, sl st in next sc; repeat from * around, sl st to first sl st. Fasten off and weave in the ends. (57 scallops, 285 dc, 57 sl st)

Assembly Instructions

  1. Make all 42 butterfly blocks and block each one flat to about 14 inches square, pinning the edges straight.
  2. Lay the blocks out in 7 rows of 6 with all the butterflies facing the same way, and take a photo to check the layout.
  3. Join the blocks into rows with slip stitches, 1 sl st in each row end along the side seams.
  4. Join the rows to each other with 51 slip stitches per seam, keeping the joins as loose as the mesh.
  5. Work the sc round and the shell round around the whole outer edge of the cover.
  6. For each sham, work the front and 2 back panels, then overlap the backs by 7 rows and join the three pieces with Round 1 through all layers.
  7. Work the shell round on each sham, weave in all ends and block lightly with a damp cloth.

Common Mistakes & How to Fix Them

Losing count on the chart makes the butterfly lopsided. Mark every 5th row with a stitch marker and check the block count against the row totals.

Missing the first skipped stitch after the turning ch 3 makes the edges slant. Always skip the first st at the base.

Pulling the slip stitch seams tight puckers the cover. Keep them loose so the mesh drapes softly.

Skipping the block before joining makes the squares different sizes. Block every square to the same measurement first.


Denise

Denise designs warm, easy-to-follow crochet patterns for the home and loves turning small pieces into big projects.


Important Notes

Gauge is 7 squares and 7 rows in 4 inches, so each block should measure about 14 inches. Make a test block first, because a different tension changes the finished size and yarn amount.

Filet mesh is open, so line the cover with a deeper rose fabric or use a bed skirt in a matching color if you want a solid look.

Yarn amounts are estimates, so buy extra from the same dye lot before you start.

Wash in cold water on a gentle cycle and dry flat. Do not hang the cover wet, because the weight will stretch the mesh.


I hope this cover makes your bedroom feel soft and special. Take it one butterfly at a time, and enjoy watching it grow. I would love to see yours when it is done.

Crochet Abbreviations

01 ch — chain
02 sl st — slip stitch
03 sc — single crochet
04 dc — double crochet
05 sk — skip
06 sp — space
07 st(s) — stitch(es)

You Ask, We Answer

What is the finished size of the bed cover?

The queen size cover is about 88 by 102 inches. It is made from 42 blocks in 7 rows of 6, plus the scalloped border.

Can I use a different yarn weight or make a different size?

Yes. A lighter yarn with a smaller hook gives smaller blocks, so you will need more of them. For a throw, make 4 blocks across and 5 rows long, which is 20 blocks and about 57 by 71 inches.

How do I wash and care for the finished cover?

Wash it in cold water on a gentle cycle, then dry it flat. Filet mesh is open and can stretch, so do not hang it wet.





