
Coral Pink and Gray Spiral Bed Cover Crochet Pattern
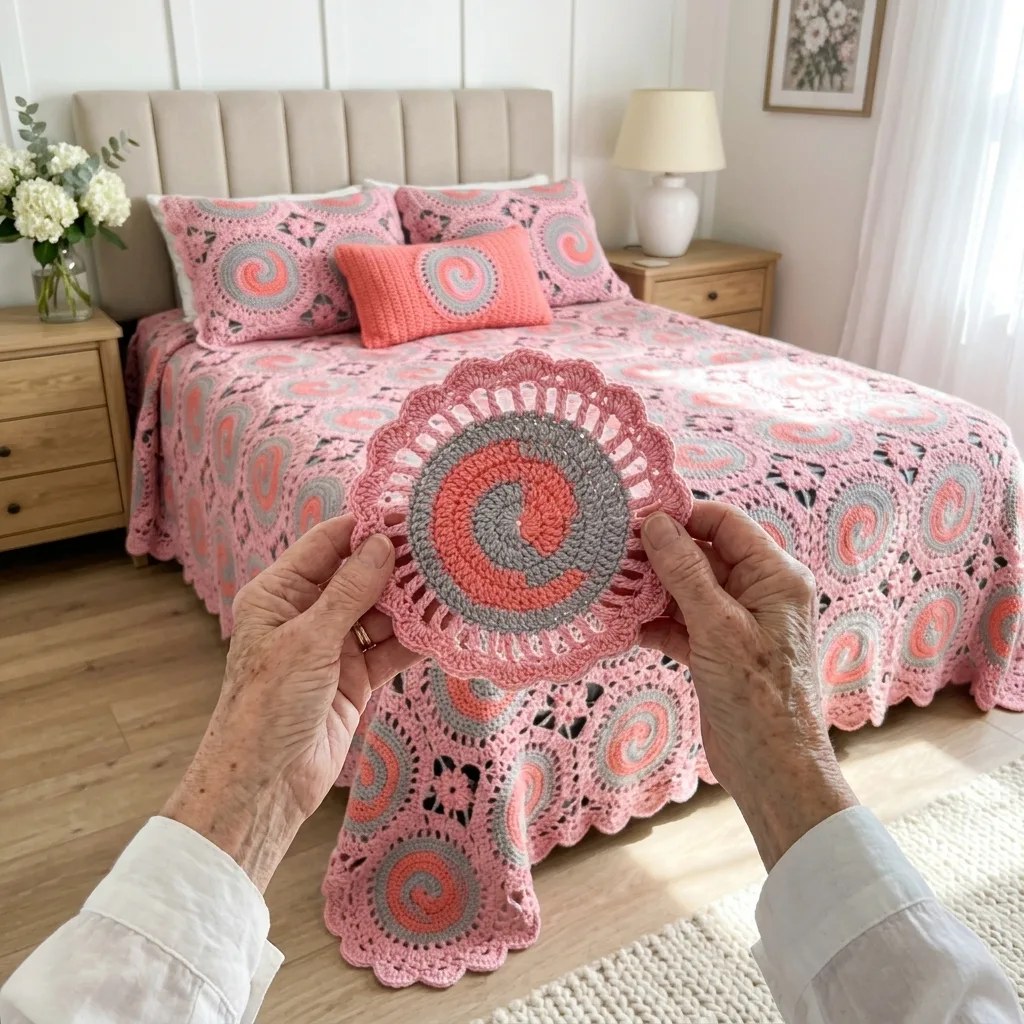
You juggle two colors in the spiral and join the circles as you go, all with basic stitches.
One motif takes under an hour, so the cover grows steadily one evening at a time.
Pink and gray spirals turn across the bed, held together by little pink flowers in every gap.
About This Coral Pink and Gray Spiral Bed Cover Crochet Pattern Pattern
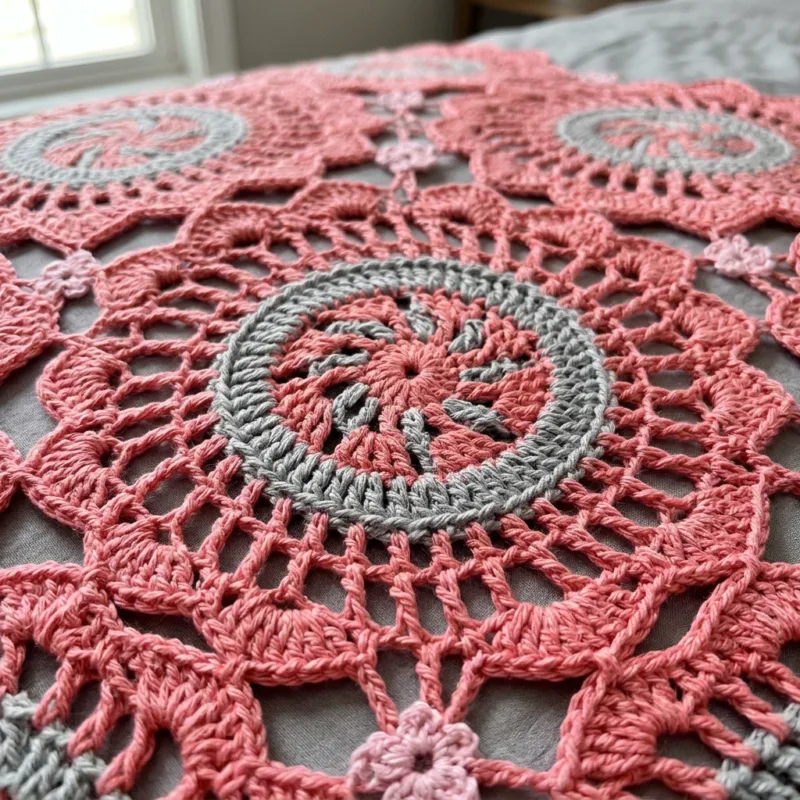
This bed cover is a field of swirling circles in coral pink and soft gray. Every motif starts as a two-color spiral, with a pink arm and a gray arm curling around each other into the center like a rose bud just opening or a curl of frosting on a cake. Around the spiral runs a quiet gray ring, then a wheel of pink treble spokes, and finally a crown of small pink scallops. The circles are joined in neat rows, and in every gap where four circles meet sits a tiny pink flower that holds them all together.
The center is made with the two-color spiral method. You start pink and gray in the same magic ring, and from then on the colors take turns: pink works half a round, waits on a stitch marker, and gray works the other half. Each color always stitches into the other color's last stitches, which pushes the color change a little further around on every round. After five rounds, you finish each color with a few shorter stitches, so the tips of the arms taper smoothly into the motif instead of ending in a sudden step.
Once the spiral is complete, the rest of the motif is worked in ordinary joined rounds. A round of gray single crochet circles the swirl like a picture frame. A round of pink treble crochet with chain spaces makes the open spokes, which let light and air through the cover. The last round is 24 small shells of single crochet, half double crochet and double crochet. From the second motif on, you join each new circle to its neighbors through the center of these shells, so the cover grows as one piece while you work.
Each motif measures about 8 inches across after blocking. The queen size uses 120 motifs, set in 10 columns and 12 rows, and 99 little pink flowers in the gaps. The finished cover measures about 80 by 96 inches, plus the edge. That covers a standard queen mattress with a drop of about 10 inches on each side and a long, soft drape at the foot, where the round motifs fall in a natural wave toward the floor.
The edge round is simple: single crochet all around the free shells, with a tiny picot at the tip of each one and a short chain bridge across each dip between two motifs. It firms up the scallops, keeps them from stretching with use and adds a delicate little frill to the outline. Because the outer motifs are round, the edge is scalloped all on its own, so there is no separate border to plan or measure.
The stitches are all basic ones: chain, slip stitch, single crochet, half double crochet, double crochet and treble crochet. What makes this pattern intermediate is handling two working loops in the spiral and keeping both colors even, plus the join-as-you-go round. I give a stitch count for each color at the end of every spiral round, and the joining is spelled out shell by shell, so you can always check your work before moving on.
Finished, the cover is light, lacy and full of motion. The spirals look almost three-dimensional, and pink with gray feels soft and modern, sweet without being childish. It suits a young girl's room, a teen's space, a guest room or a cottage bedroom with white furniture. If you like a project you can carry around and finish in small pieces, and you enjoy watching color do something clever, this one is for you.
Why You'll Love This Coral Pink and Gray Spiral Bed Cover Crochet Pattern Pattern
I chose this color pair because pink and gray are such good friends. The coral pink brings warmth and cheer, and the soft gray calms it down, so the result feels sweet but grown up. When the two colors twist together in the center of a motif, they look like a swirl of strawberry and vanilla ice cream. I can never resist turning each finished circle over in my hand and admiring it for a moment before it goes into the basket with the others.
The little rhythm of the spiral is what keeps me coming back. Pink, then gray, then pink again, each color climbing over the other. Once your hands know it, it is very soothing, almost like a slow dance. I can work the spiral rounds while chatting with family or listening to a story, and then give the outer rounds a bit more attention. One motif takes me about fifty minutes from magic ring to final shell, which fits beautifully into a quiet evening.
I love the tiny pink flowers between the circles. They are the last pieces you make, and they feel like the bow on top of a present. Each one pulls four motifs together and fills the gap so neatly that the cover suddenly looks finished and planned. People who see this bed cover always notice the spirals first, but then their eyes find the flowers, and they smile. Those small details are what make a handmade piece feel special.
Here are the habits that made this project easy for me:
- Keep the waiting color on a locking stitch marker every single time.
- Make five spiral centers in a row, then do their outer rounds together.
- Weave in the spiral tails before the gray ring, while the center is easy to reach.
- Lay the joined rows on the bed every week to watch the swirls grow.
I also love that the cover grows into one piece as I go. There is a happy little click in my mind each time I slip stitch a new shell into its neighbor and the circles become a row, then a panel, then something that already covers my lap. There is no long weekend of sewing squares together at the end. When the last motif is joined, only the flowers and the edge remain, and they go quickly.
This cover changes a room in such a lovely way. Against a white panelled wall, oak nightstands and cream lamps, the pink and gray spirals look fresh and full of life. It brightens the bedroom without shouting, and the soft gray stops the pink from feeling too sugary. It is the kind of bed cover that makes a plain room look cared for, and it makes you want to open the curtains just to let the light play across it.
Finally, I love making it as a gift. I made a throw-size version for a young girl in my family, and she wraps herself in it every time she reads. A full bed cover takes a lot of patient hours, and the person who receives it can feel that in every swirl. If you decide to keep this one for your own bed, you deserve it just as much.
Switch Things Up
Choose a new color pair. The spiral is all about contrast, so pick one warm or bright color and one quiet neutral. Lavender with gray feels dreamy and calm, mint with gray is fresh and spring-like, and navy with soft gold looks rich and elegant. For a sunny room, try butter yellow with white. Keep the gray ring and the flowers in the colors that match your room best, because they set the overall mood of the cover.
Make it for any bed. Each motif is about 8 inches across, so new sizes are easy to plan. Add or remove columns for the width and rows for the length. The number of flowers is always one less than the columns times one less than the rows. These sizes are before the edge:
- Twin: 8 by 12 motifs, 96 motifs and 77 flowers, about 64 by 96 inches
- Full: 9 by 12 motifs, 108 motifs and 88 flowers, about 72 by 96 inches
- Queen: 10 by 12 motifs, 120 motifs and 99 flowers, about 80 by 96 inches
- King: 12 by 12 motifs, 144 motifs and 121 flowers, about 96 by 96 inches
Make a sofa throw. Six columns by seven rows, 42 motifs and 30 flowers, makes a throw of about 48 by 56 inches. It uses about a third of the yarn, so it is a gentle way to learn the spiral before a full bed cover. It looks wonderful draped over a reading chair or folded at the foot of a bed, and it is a thoughtful birthday gift for a teen or a friend who loves pink.
Make a baby blanket. Four columns by five rows, 20 motifs and 12 flowers, gives a blanket of about 32 by 40 inches. For a baby, choose a soft cotton blend or a good baby acrylic that washes warm, and try pale pink with white or mint with cream. Close up the spokes a little by working the spoke round with ch 1 instead of ch 2, then add one extra round of single crochet around the outside, so tiny fingers cannot slip through the gaps.
Add matching pillows. Four motifs joined 2 by 2 with one flower in the middle make the front of a 16 inch cushion. Sew it onto a pink or gray fabric cover so the lace shows against a solid color. A single motif makes a pretty center for a lumbar pillow worked in pink single crochet rows, which ties it to the shams. Matching pillows make the bed look finished and use up the leftover yarn.
Change the flowers. The fillers do not have to be pink. Gray flowers make the circles stand out more and give the cover a calmer look, while white flowers add a crisp, bright touch. You can also work Rnd 1 of each flower in a little yellow or gold for a flower center, which adds a sweet spot of color. Lay out a few versions on the bed before you choose, because small details like these change the whole feel.
Change the edge. The single crochet and picot edge is light and dainty, but you can make it bolder. Work a second round of gray single crochet before the picots for a crisp outline, or replace the picots with a small shell at the tip of each scallop for a fuller frill. For a quieter look, skip the picots and work reverse single crochet all around the shells for a rounded rope edge.
Change the yarn weight. In DK cotton with a 4 mm hook, each motif comes out about 6.5 inches across, and a queen cover needs about 12 by 15 motifs, 180 in all. In bulky yarn with a 6.5 mm hook, the motifs grow to about 10 inches, and a queen needs only 8 by 10 motifs, 80 in all. Always make and block one motif first, measure it, and divide your bed size by that number before you buy any yarn.
Materials Needed
— Main Fabric
— Tools Required
The Free Pattern
0% complete
— Spiral Center (Make 120, coral pink and soft gray) :
— Outer Rounds (Make 120, soft gray and coral pink) :
— Layout :
— Tiny Pink Flower (Make 99, coral pink) :
— Edge :
Assembly Instructions
- Make one complete motif, block it and check that it measures about 8 inches across.
- Make the spiral centers and the gray and pink outer rounds for each motif, weaving in the ends as you go.
- Join each new motif during Rnd 8 to the motif on its left and the motif above it, keeping every motif in the same orientation, until you have 12 rows of 10 motifs.
- Work a tiny pink flower in each of the 99 gaps where four motifs meet, joining its 8 petals to the 8 corner shells around the gap.
- Work the pink edge round with picots into every free shell around the outside of the cover.
- Weave in all remaining ends, then pin the cover out, spray it lightly with water and let it dry flat so the spirals and shells open evenly.
Common Mistakes & How to Fix Them
Uneven colors in the spiral. If you pick up the wrong loop, or let a dropped loop slip and unravel a few stitches, one color ends up with more stitches than the other. The spiral then turns lopsided, one arm grows fatter than the other, and the center cups or ruffles on one side. Put the waiting loop on a locking stitch marker the moment you drop it, and check that pink and gray have the same count at the end of each round. If they differ, pull back to the last even round and work it again. It only takes a minute and keeps every swirl perfectly balanced.
Skipping the taper or tapering too early. Rnd 5 ends each color with an hdc, an sc and a slip stitch so the arm slides smoothly into the motif. If you end each color with a double crochet and fasten off, you get a sharp step that spoils the swirl and makes the gray ring wavy. If you start the shorter stitches too early, the center shrinks and the spokes pull. Work the increases exactly as written and only then the four tapering stitches. Each color should end with 30 stitches, so the center has 60 stitches before you join the gray ring.
Placing the spokes unevenly. In Rnd 7 you skip two single crochet between every treble, and it is easy to skip one or three by accident, especially when the gray stitches are hard to see. Then you end up with 23 or 25 spokes, the shells in the last round no longer divide into four sides of six, and the joins land in the wrong places. Count the sc of Rnd 6 before you start and place a stitch marker every 12 sts. You should have exactly 6 trebles between markers. Check before you work the shells, never after the motif is joined.
Joining in the wrong orientation. Every motif is joined through shells 3 and 4 of its top and left sides, and the flowers use shells 1 and 6. If a motif is turned when you join it, the joins pull the circles out of line, the corner shells no longer face the gaps, and the flowers cannot reach their shells. Mark the first shell of every motif with a small safety pin or a scrap of yarn, and always hold it at the top before you join. Check each finished row against the row above it, because a single turned motif is much easier to fix before the next row is joined.

You Might Also Like






Important Notes
Gauge matters because 120 motifs have to fit together. With a 5 mm hook, the spiral center after Rnd 5 should measure about 5 inches across, and the finished motif about 8 inches after blocking. A small difference is fine as long as every motif matches. Measure your first five motifs and then one in every ten after that. If the center cups, go up half a hook size; if it ruffles, go down half a size, and test again before continuing.
Block the first motif on its own to check the size, and block the whole cover once the flowers and the edge are done. Pin it out on a large clean surface or in sections on blocking mats, open each spiral into a round shape, and stretch each shell gently into a neat curve. Spray with water until damp, smooth the spokes so they sit straight, and let everything dry completely before unpinning. Blocking turns the lace from slightly crumpled to crisp.
The yarn amounts in the materials list are estimates for the queen size and include the flowers and the edge. Buy all of the pink and all of the gray at once, from the same dye lots, and keep the labels. Coral pink can shift noticeably between dye lots, toward peach or toward rose, and on a bed this size a change would show as a band across the spirals. Buy one extra skein of each color for safety and future repairs.
Wash the finished cover on a gentle cold cycle in a large mesh bag or a zipped duvet cover, with a mild detergent. Coral pink sits right next to soft gray in every spiral, so always add a color catcher sheet, especially for the first few washes, in case the pink tints the gray. Never wring or twist the lace. Press out the water, lay the cover flat on towels or a clean drying rack, reshape the spirals and shells while damp, and let it dry fully.
Thank you for making this coral pink and gray spiral bed cover with me. I hope you love the little dance of the two colors in the center, the moment each new circle joins its neighbors, and the tiny flowers that pull it all together at the end. It is a big project, but every motif is small and cheerful, and before long you will see the swirls turning across your whole bed.
So find your pink and your gray, make a magic ring, and start your first spiral today. Finish it, block it and lay it on your pillow to admire. Then make the next one, and the next, and soon you will have a bed cover that brings softness and a little bit of magic to your room for many years.
Crochet Abbreviations
You Ask, We Answer
How big is the finished bed cover, and how many motifs do I need?
Following the pattern exactly, each motif measures about 8 inches across after blocking. The queen size uses 120 motifs in 10 columns and 12 rows, plus 99 tiny pink flowers, and finishes at about 80 by 96 inches, with the scalloped edge adding a little more on every side. On a standard queen mattress of 60 by 80 inches, that gives a drop of about 10 inches on each side and a generous drape at the foot. For a taller bed, add one column for the width and one row for the length. To plan your own size, measure the mattress width plus twice the drop you want, and the mattress length plus one drop, then divide each number by 8 and round up. The number of flowers is always one less than the columns times one less than the rows, and the edge round works for any size.
Can I use a different yarn, fiber or hook size?
Yes. Worsted cotton is my favorite here because it gives clean, crisp spirals, keeps the treble spokes straight and washes well. A cotton and acrylic blend makes a softer, lighter cover, and a smooth acrylic works if you want easy care and a little extra warmth. Avoid very fuzzy yarns such as brushed acrylic or mohair, because they blur the spiral and fill in the lacy spokes. The shape of the motif comes from the stitch counts, so you can use any yarn weight and only the size changes. DK with a 4 mm hook gives motifs about 6.5 inches across, and bulky with a 6.5 mm hook gives motifs about 10 inches across. Make and block one motif in your yarn, measure it, then work out the number of motifs and the yarn you need before you buy everything.
How do I care for and store the bed cover so it lasts?
Wash it only when it really needs it, on a gentle cold cycle in a large mesh bag with mild detergent, and use a color catcher every time, because coral pink can tint soft gray. Dry it flat and reshape the spirals and shells while damp. Never use a hot dryer, since cotton can shrink and the lace may lose its shape. Between washes, shake the cover out gently and air it by an open window, away from strong sunlight, which can fade coral pink over time. To store it, fold it loosely with tissue paper between the layers and keep it in a cotton bag or a pillowcase, never in plastic, so the yarn can breathe. Refold it along different lines every few months, and if a joining shell ever loosens, simply slip stitch it back with a little pink yarn.
Success!
Thanks for subscribing — check your inbox for a welcome note.
Abbreviations
- ch — chain
- sl st — slip stitch
- sc — single crochet
- hdc — half double crochet
- dc — double crochet
- tr — treble crochet
- picot — ch 3, sl st in 3rd ch from hook
- st(s) — stitch(es)
- sp(s) — space(s)
- rep — repeat
- Rnd — round
- RS — right side