
Cranberry Bobble Spiral Bed Cover Crochet Pattern
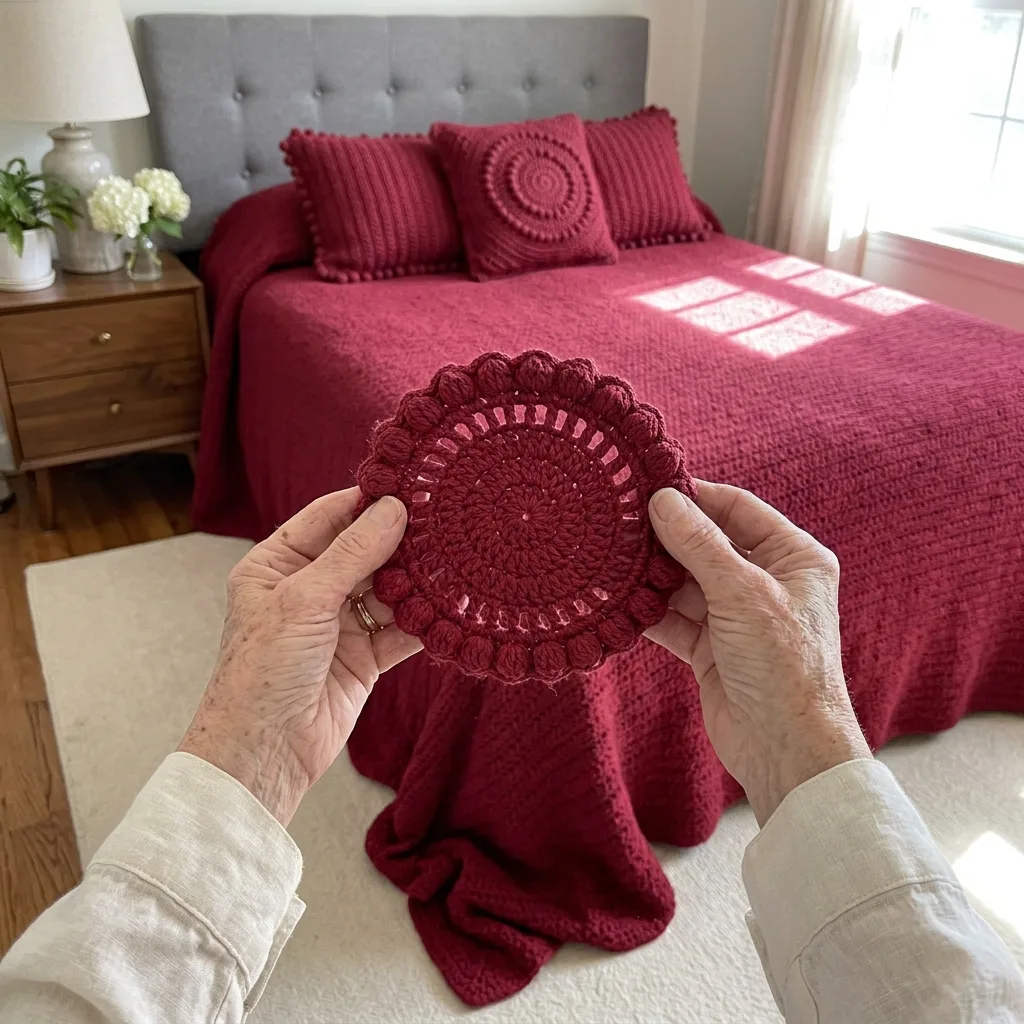
A two-ball spiral in one color, simple spoke rounds and a bobble round you join as you go.
Each motif takes a little over an hour, and the cover grows into one piece as you work.
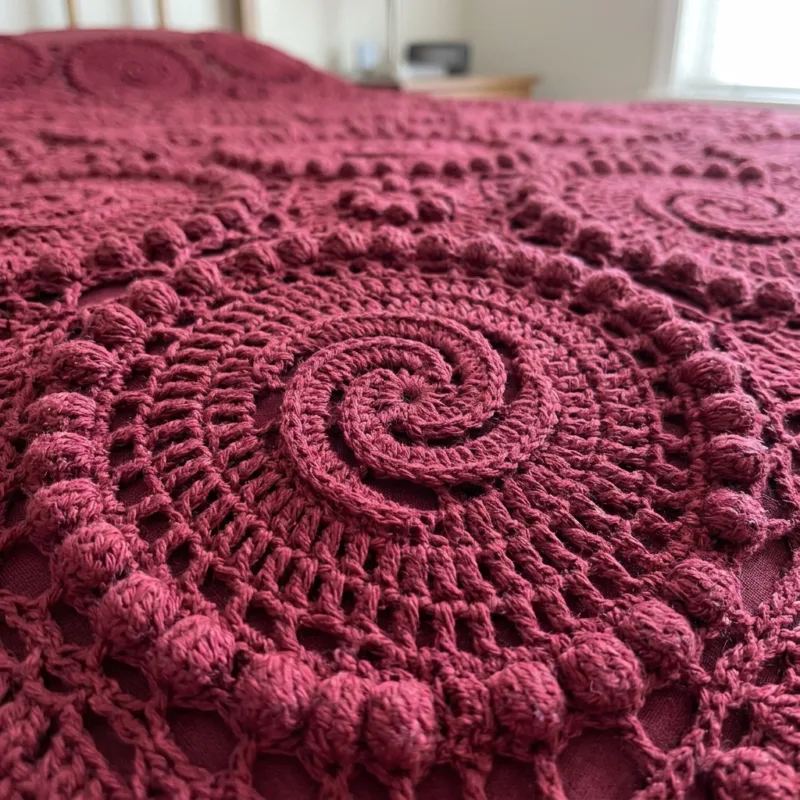
With one color, the spiral shows as pure texture, like a carved rose in deep cranberry.
About This Cranberry Bobble Spiral Bed Cover Crochet Pattern Pattern
This bed cover is all one color, a deep cranberry red, and yet it is full of movement. Every round motif has a sculpted spiral in the center that swirls into the middle like a rose bud or a seashell. Around the spiral sits a ring of open treble spokes, and around that a ring of 24 round bobbles that look like little berries. The motifs are joined in rows, and in every gap between four circles a small bobble flower holds them together. On the bed, the bobbles of the outer motifs form a soft, bumpy scalloped edge that falls toward the floor.
The spiral is the special part. You use two balls of the same cranberry yarn and work them in turns, just like a two-color spiral. Because both balls are the same color, there is no color change to see. Instead, the spiral shows through texture alone: each strand climbs over the other in steps, and the steps form two smooth arms that curl into the center. In the light, the arms catch highlights and cast tiny shadows, so the swirl looks almost carved, like a piece of sculpted velvet.
After five spiral rounds, each strand finishes with a few shorter stitches to taper the arms neatly into the circle. Then the motif is worked in ordinary joined rounds with just one ball. A round of single crochet frames the spiral, a round of treble crochet with chain spaces makes the spokes, and a round of single crochet closes the circle again. The last round alternates single crochet with round five double crochet bobbles, and this is where you join each new motif to its neighbors, through the tops of two bobbles on each shared side.
Each motif measures about 9.5 inches across, bobbles included. The queen size uses 80 motifs in 8 columns and 10 rows, and 63 bobble flowers in the gaps. The finished cover measures about 76 by 95 inches. A final edge round of single crochet and small chain spaces runs around the free bobbles on the outside, which firms up the edge and keeps the bobbles evenly spaced without hiding their round shape.
The stitches are chain, slip stitch, single crochet, half double crochet, double crochet, treble crochet and the bobble stitch. What makes this pattern intermediate is the two-ball spiral, where you have two working loops at once, and the join-as-you-go bobble round. I give the stitch count for each strand in every spiral round and explain the joining bobble by bobble, so you can always check your work.
The finished cover is rich, cozy and wonderfully tactile. The spirals are smooth and sculpted, the spokes are light and open and the bobbles are plump and round, so the cover has three kinds of texture in one color. It feels warm and luxurious on the bed and drapes softly at the sides. In cotton, it breathes well, and the deep color hides everyday wear far better than a pale cover.
Cranberry suits so many rooms. It looks elegant with gray upholstery and walnut furniture, cozy in a cottage bedroom and festive in December with a few white flowers on the nightstand. If you have never made a spiral motif, this one-color version is a lovely way to learn, because you can focus on the technique without worrying about colors. If you have made spirals before, you will enjoy seeing how beautiful they look as pure texture.
Why You'll Love This Cranberry Bobble Spiral Bed Cover Crochet Pattern Pattern
I love how surprising this cover is. People expect a one-color cover to look plain, but when they see this one, they lean in to look at the swirls. Without a second color, the spiral becomes a shape you feel more than see. I often catch guests running a finger along the arms of a spiral, tracing it into the center. That is the best compliment a cover can get, and this one gets it all the time.
The two-ball spiral is such a satisfying technique. You work a little with one ball, drop it, pick up the other, and keep leapfrogging around the circle. With two balls of the same color, there is no pressure to keep the colors neat, so it is the perfect way to learn. By the third motif my hands knew the rhythm completely, and by the tenth I could work the spiral while chatting at the kitchen table without looking down.
The bobbles are pure fun. After the smooth spiral and the airy spokes, the bobble round feels like a little celebration. Each bobble puffs up as you close it, round and plump like a ripe berry. I make sure to push each one out to the right side with my finger as I go, and watching the ring of 24 bobbles appear around the motif always makes me smile. They give the cover a playful, cozy charm.
Here are the habits that made this project easy for me:
- Wind the cranberry into two separate balls before starting each motif.
- Put the waiting loop on a locking stitch marker every single time.
- Push each bobble to the right side with a fingertip as soon as you close it.
- Weave in the spiral tails before the bobble round, while the center is easy to reach.
I love joining as I go, especially with bobbles. When you close a joining bobble, you slip stitch into the top of the matching bobble on the neighbor, and the two little berries kiss. The cover grows into one piece right across your lap, with no sewing at all. After the last motif, only the bobble flowers and the edge remain, and they are quick and cheerful to make.
The color is a big part of the joy. Cranberry is warm and deep without being dark, and it glows beautifully in lamplight. It feels like winter evenings, holiday dinners and warm mugs of tea, but it looks just as lovely in summer with white curtains and fresh flowers. A single bold color can make a room feel calm and rich at the same time, and this cover proves it.
Finally, I love that this cover is as practical as it is pretty. The deep color forgives everyday life, the cotton washes well and the joined-as-you-go construction is strong, with no seams to come apart. It is a cover to use, not just to admire, and I think that is what makes a handmade piece truly loved over the years.
Switch Things Up
Choose another single color. The sculpted spiral looks beautiful in any solid shade. Ivory or natural ecru gives it a vintage heirloom feel, sage green looks calm and fresh, navy feels classic and strong, and mustard brings warmth to a neutral room. Avoid very dark colors such as black or charcoal, because the shadows that show the spiral get lost. A medium to deep color with a little sheen shows the swirl best.
Make it for any bed. Each motif is about 9.5 inches across, so new sizes are easy to plan. Add or remove columns for the width and rows for the length. The number of bobble flowers is always one less than the columns times one less than the rows. These sizes are before the edge round:
- Twin: 6 by 10 motifs, 60 motifs and 45 flowers, about 57 by 95 inches
- Full: 7 by 10 motifs, 70 motifs and 54 flowers, about 67 by 95 inches
- Queen: 8 by 10 motifs, 80 motifs and 63 flowers, about 76 by 95 inches
- King: 10 by 10 motifs, 100 motifs and 81 flowers, about 95 by 95 inches
The edge round works for any size, because it follows the free bobbles of each outer motif.
Make a sofa throw. Five columns by six rows, 30 motifs and 20 bobble flowers, makes a throw of about 48 by 57 inches. It uses a little over a third of the yarn and is a perfect size for a reading chair or the end of a sofa. In cranberry, it makes a lovely holiday gift, and in ivory it looks wonderful in a white living room.
Make a baby blanket. Four by four motifs, 16 in all with 9 bobble flowers, gives a blanket of about 38 by 38 inches. Choose a soft, washable cotton blend in a gentle color such as blush, mint or pale yellow. Close the spokes by working Rnd 7 with ch 1 instead of ch 2, so little fingers cannot slip through, and make sure every bobble is closed firmly and every end is woven in well.
Add matching pillows. One motif sewn onto the center of a cranberry pillow cover makes a sweet accent, like the small square pillow on my bed. For a ribbed pillow, work rows of half double crochet in the back loops to the size of your pillow, then add a row of bobbles along each short end. Matching pillows bring the bobble texture up to the head of the bed and finish the look.
Try two colors after all. If you love the design but want the spiral to show more boldly, use two shades of the same color for the two balls, such as cranberry and rose or burgundy and wine. The swirl will show as a gentle two-tone stripe, while the outer rounds and bobbles stay in one color. It is a subtle twist that still keeps the calm, one-color look from a distance.
Change the bobbles. The bobbles can be bigger or smaller. For plumper bobbles, work 6 dc together instead of 5, and for a daintier look, work 4. You could also make the bobbles in a contrasting color, joining the new color only for the last round, so the motifs look ringed with berries. For a smoother look, replace the bobbles with 5-dc shells, which gives a soft scalloped edge.
Change the yarn weight. In DK cotton with a 4 mm hook, each motif comes out about 8 inches, and a queen cover needs about 10 by 12 motifs. In bulky yarn with a 6.5 mm hook, the motifs grow to about 12 inches, so a queen needs only 6 by 8 motifs, 48 in all. Always make one motif first, block it and measure it before you plan the layout and buy yarn.
Materials Needed
— Main Fabric
— Tools Required
The Free Pattern
0% complete
— Sculpted Spiral Center (Make 80, cranberry) :
— Outer Rounds and Bobble Ring (Make 80, cranberry) :
— Layout :
— Bobble Flower (Make 63, cranberry) :
— Edge :
Assembly Instructions
- Make one complete motif, block it and check that it measures about 9.5 inches across including the bobbles.
- For each motif, work the two-ball spiral center, then the outer rounds with one ball, weaving in the ends before the bobble round.
- Work the bobble round on each motif, joining it during Rnd 9 to the motif on its left and the motif above it, keeping every motif in the same orientation, until you have 10 rows of 8 motifs.
- Work a bobble flower in each of the 63 gaps where four motifs meet, joining its 8 arms to the 8 corner bobbles around the gap.
- Work the edge round around the free bobbles on the outside of the cover.
- Weave in all remaining ends, then pin the cover out, spray it lightly with water and let it dry flat, pushing every bobble out to the right side.
Common Mistakes & How to Fix Them
Mixing up the two balls. Because both balls are the same color, it is very easy to pick up the loop you just dropped instead of the waiting one, or to grab the wrong strand from the bag. Then one strand ends the round with too many stitches, the arms of the spiral are uneven and the center may cup. Always put the dropped loop on a locking stitch marker straight away, and keep Ball A on your left and Ball B on your right. Count each strand at the end of every round: 6, 12, 18, 24 and then 30 stitches.
Bobbles that sink to the back. A bobble naturally pops to the side facing away from you as you work, so if you are not careful, some bobbles end up on the wrong side of the motif. They look flat from the front and the bobble ring looks patchy. Work every bobble with the right side facing you, and push it out with your fingertip as soon as you close it. If a bobble still sinks, give it a gentle push from the back after the round is finished. When you block the cover, check every bobble again and push any shy ones out.
A spiral without shape. With one color, the spiral only shows if the stitches step down clearly where the strands meet. If you skip the tapering stitches in Rnd 5, the arm ends with a sharp corner and the swirl looks broken. If your tension is very tight, the steps flatten and the swirl almost disappears. Work the taper exactly as written, with 2 hdc, 1 hdc, 1 sc and a sl st, and keep a relaxed, even tension so each strand stands slightly proud of the other. Good light while working helps you see the steps.
Turning motifs when joining. Every motif must be held with bobble 1 at the top left of Side A, or the joining bobbles will not face their neighbors and the flower bobbles will not face the gaps. Because the motifs are round and all one color, it is very easy to lose your place. Tie a scrap of contrasting yarn to the first bobble of every motif as soon as you make it, and always hold that scrap at the top while joining. Remove the scraps only when the whole cover is finished.

You Might Also Like






Important Notes
Gauge matters because 80 motifs must fit together. With a 5 mm hook, the spiral center after Rnd 5 should measure about 5 inches across, and the finished motif about 9.5 inches including the bobbles. Measure your first five motifs and then one in every ten. If the center cups, go up half a hook size; if it ruffles, go down half a size. Bobbles add width, so measure across the bobbles, not just the spokes.
Block the first motif on its own and the whole cover once the flowers and edge are done. Pin the cover out on a large clean surface or in sections, opening each spiral into a round shape and spacing the bobbles evenly. Spray with water until damp and let it dry completely. Do not press the bobbles flat; instead, push each one out from the back so it dries round and plump.
The yarn amount in the materials list is an estimate for the queen size, including the flowers and the edge. Buy all of the cranberry at once, from the same dye lot, and keep the labels. With a one-color cover, even a small change in shade would show as a band of slightly different spirals. Buy one or two extra skeins for safety and future repairs. You need two balls in use for each spiral, so wind one skein into two balls if needed.
Wash the finished cover on a gentle cold cycle in a large mesh bag or a zipped duvet cover, with mild detergent. Cranberry is a deep color, so wash it alone or with other reds, and add a color catcher for the first few washes. Never wring or twist the cover. Press out the water, lay it flat, reshape the spirals and push out the bobbles while it is damp, and let it dry fully.
Thank you for making this cranberry bobble spiral bed cover with me. I hope you enjoy the gentle leapfrog of the two balls in the spiral, the airy spokes and the happy moment each ring of bobbles appears. It is a cover that shows how much beauty one color can hold when the stitches do the talking.
So wind your cranberry into two balls, make your magic ring and start your first spiral today. Finish it with its ring of berries and set it on your bed to admire. Then make the next one, and soon you will have a sculpted, cozy cover that warms your bedroom for many years.
Crochet Abbreviations
You Ask, We Answer
How big is the finished bed cover, and how many motifs do I need?
Following the pattern exactly, each motif measures about 9.5 inches across, including the bobbles. The queen size uses 80 motifs in 8 columns and 10 rows, plus 63 bobble flowers, and finishes at about 76 by 95 inches. On a standard queen mattress of 60 by 80 inches, that gives a drop of about 8 inches on each side and a generous drape at the foot, where the bobble edge hangs beautifully. For a deeper drop, add one column for the width, which also adds 9 more flowers. To plan your own size, measure the mattress width plus twice the drop you want, and the mattress length plus one drop, then divide each by 9.5 and round up. The flowers are always one less than the columns times one less than the rows, and the edge round works for any size.
Why do I need two balls of the same color for the spiral?
The spiral is made by two strands that take turns, each working half of every round into the stitches the other strand made before. That leapfrogging is what pushes the step around the circle and creates the swirl. With one ball, you would have to join every round, and the spiral would not form at all. Using two balls of the same color gives you all the shape of a two-color spiral with a calm, one-color look, where the swirl shows through light and shadow. If you only have one skein open, simply wind off about 15 yards into a second small ball for each motif. After Rnd 5, you fasten off one ball and finish the motif with the other, so you never handle more than two strands at once.
How do I care for and store the bed cover so the bobbles stay round?
Wash it only when it really needs it, on a gentle cold cycle in a large mesh bag with mild detergent, and use a color catcher for the first few washes, because cranberry is a deep color. Press out the water, lay the cover flat face up and push every bobble out from the back so it dries round. Never put it in a dryer, which can flatten the bobbles and shrink cotton. Between washes, shake it out and air it away from strong direct sunlight, which can fade cranberry over time. To store it, fold it loosely face out, with tissue paper between the layers, and keep it in a cotton bag rather than plastic. Avoid stacking heavy things on top, and refold it along different lines every few months so no crease sets into the spirals.
Success!
Thanks for subscribing — check your inbox for a welcome note.
Abbreviations
- ch — chain
- sl st — slip stitch
- sc — single crochet
- hdc — half double crochet
- dc — double crochet
- tr — treble crochet
- yo — yarn over
- bobble — 5 dc worked together in one stitch and closed into a round ball
- st(s) — stitch(es)
- sp(s) — space(s)
- rep — repeat
- Rnd — round
- RS — right side