
Cream Daisy Bed Cover Crochet Pattern
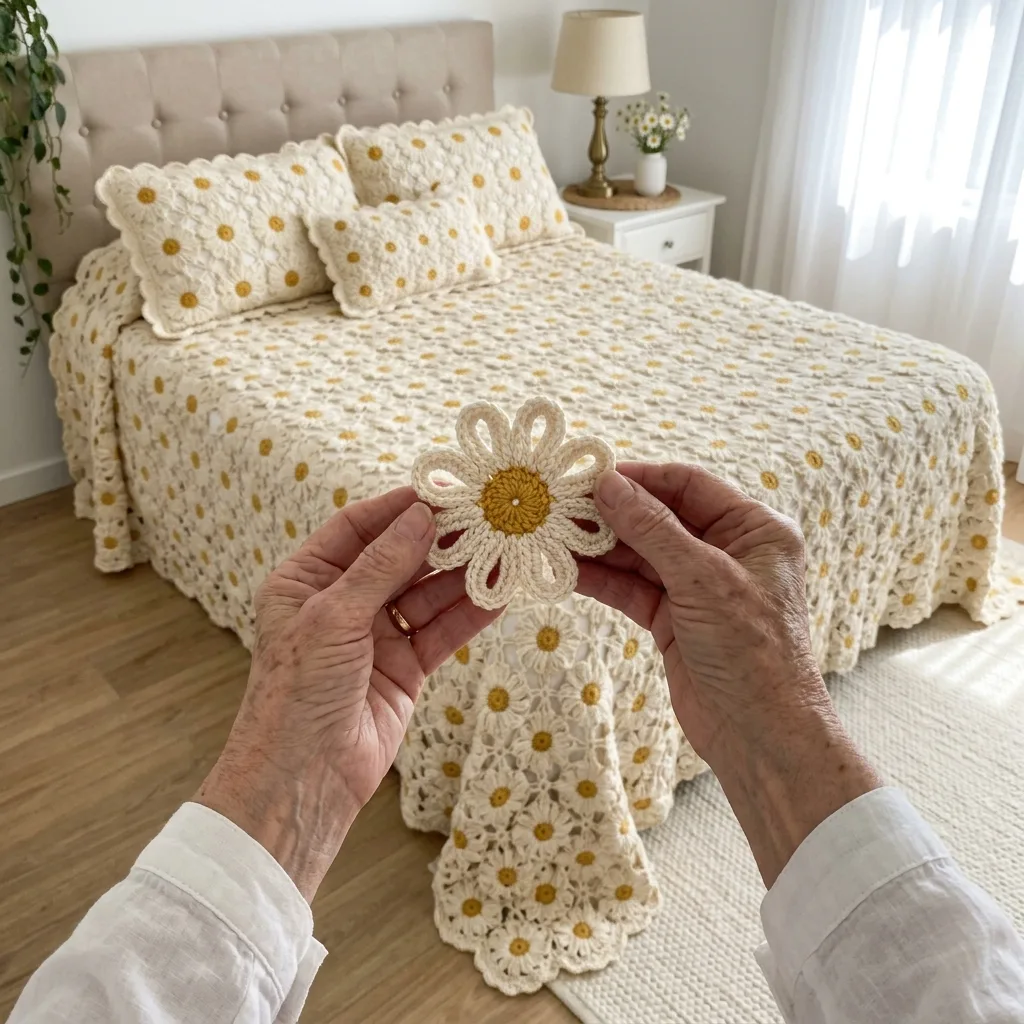
You only need chains, single crochet and a simple join-as-you-go method, but the project rewards steady patience.
Each daisy takes around forty minutes, so a few flowers a day add up to a full bed cover over a season.
Every flower links to its neighbors in the last round, so there is no long seaming session at the end.
About This Cream Daisy Bed Cover Crochet Pattern Pattern
This cream daisy bed cover is made from hundreds of small round flowers, and each one looks like a little piece of sunshine. The petals are a warm cream and every center is a bright golden yellow. When the whole thing is spread across a bed, it looks like a meadow of daisies seen from above. The cover drapes over both sides of the bed, and the outer flowers create a soft scalloped edge without any extra shaping. It is one of those projects that people stop to look at, and then they lean in closer to see how it was made.
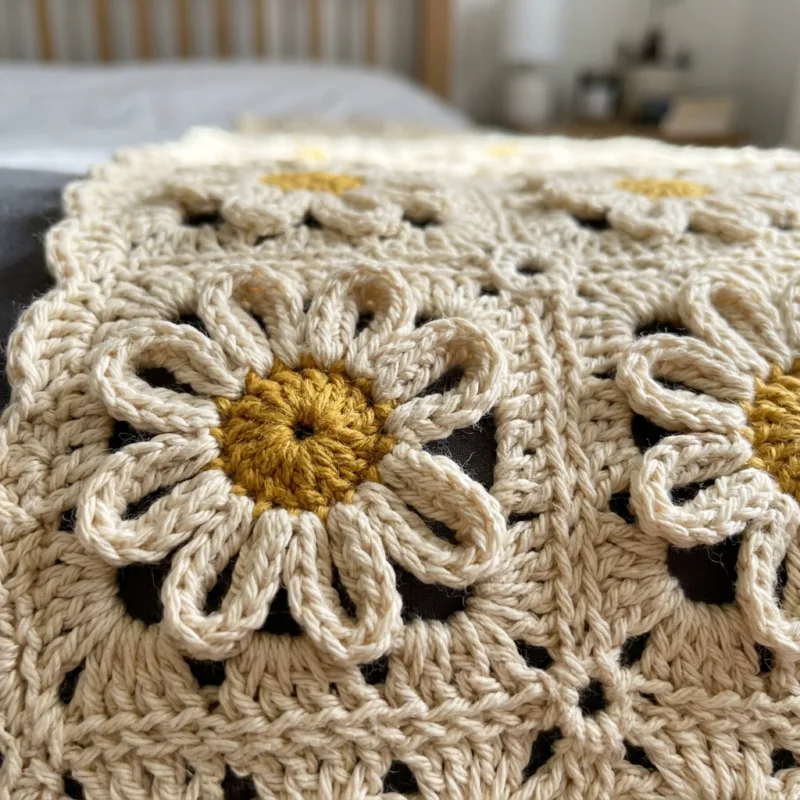
Each flower starts in yellow. You make a magic ring and work three rounds of single crochet to build a firm, round button center with a tiny hole in the middle. Then you switch to cream and work three rounds of chain loops, all anchored at the same eight points. The first loop is short, the second is longer, and the third is the longest, so the loops sit inside each other like ripples in a pond. In the last round you pack fifteen single crochet into every outer loop. That gives each petal a firm rolled edge, while the shorter loops inside stay open and lacy. This is what creates the pretty layered arcs you see in the photo.
The flowers are joined as you go in that last round. Each new daisy meets the flowers around it at one petal tip on each side: one above, one below, one to the left and one to the right. That leaves a small diamond-shaped gap between every four flowers. Those gaps are filled with a tiny cream filler ring that links to the four diagonal petals around it. The filler keeps the cover stable and stops the petals from flopping or folding over. Best of all, there is nothing to sew together at the end except your yarn tails.
The finished size is about 102 by 108 inches. That is 17 flowers across and 18 flowers down, which makes 306 daisies and 272 filler rings. On a queen bed, it covers the top and drops about 21 inches on each side, which is enough to reach close to the floor on most bed frames. Each flower measures about 6 inches across from petal tip to petal tip after blocking. I worked mine in worsted weight cotton with a 4.5 mm hook. If you want a smaller bed or a throw, the section on changing things up gives you the flower counts for every size.
The finished bed cover has a lovely weight to it, but it never feels heavy or stiff. Cotton breathes, so it is comfortable in spring and summer, and it looks fresh in a bright room. The open loops let a little light through, and the yellow centers add warmth to an all-cream bedroom. It feels lacy, but the firm edges of the petals and the filler rings give it real structure. After washing, the stitches soften and the flowers settle into a gentle, relaxed drape that only gets better with time.
This pattern suits an intermediate crocheter, or a confident beginner who knows the magic ring, chains and single crochet and is ready to learn join-as-you-go. The stitches are simple, but you will need to count your chains carefully and keep your tension even across hundreds of flowers. It is a long project, so it suits someone who enjoys slow, steady making and the comfort of repetition. Because every flower is small, you can carry the work anywhere in a little bag and make a few daisies while you wait or watch television. Over a few months the pile grows, and one day it turns into a whole bed of flowers.
Why You'll Love This Cream Daisy Bed Cover Crochet Pattern Pattern
I love this project because every single flower feels like a small win. You can finish a daisy in about forty minutes, and then you hold something complete and pretty in your hand. Big blankets can sometimes feel endless, but this one breaks down into tiny, happy steps. I kept a basket of finished flowers on my side table, and watching that basket fill up kept me going on the slow days. By the time I started joining, I already felt proud of what I had made.
Daisies have always made me smile. They are simple and cheerful, and they grow everywhere, in gardens and fields and cracks in the pavement. I wanted a bed cover that felt like waking up in a field of them on a bright morning. The cream petals keep the look soft and calm, so it fits almost any bedroom. The yellow centers give just enough color to make the room feel warm without being loud. When the sun comes through the window, the little centers almost glow.
I also love how portable this pattern is. You only need two colors of yarn, a hook and a pair of scissors. I carried a small pouch with one ball of yellow and one ball of cream everywhere I went for months. I made flowers in waiting rooms, on the porch, in the car while someone else drove and during long phone calls with my sister. It is easy to pick up and put down, because each round is short and the counts are simple. You never lose your place in a huge piece of fabric.
- Only two colors, so shopping for yarn is simple.
- Small pieces that travel with you anywhere.
- Joined as you go, so there is no sewing marathon.
- A heirloom piece that changes the whole look of a room.
This bed cover truly changes a room. Before I finished mine, my guest room looked plain and a little cold. Now it feels like a cozy cottage bedroom, and everyone who visits wants to sleep in it. A handmade bed cover says something that store-bought bedding never can. It tells people that someone sat down and gave months of care to make the space beautiful. That feeling is hard to describe, but you notice it the moment you walk in.
Making this cover taught me a lot about patience and consistency. I learned to check my first flower against my fiftieth flower so my tension did not drift. I learned to weave in my ends right away instead of saving them for later. And I learned that the slow joining rounds are actually the most satisfying part, because that is when the separate daisies finally become one big, soft bed cover. If you have been waiting for a project that you will keep for the rest of your life, I think this could be the one.

Switch Things Up
The first and easiest change is the color palette. Pure white petals with soft lemon centers give a very light, airy look that suits a beach house or a nursery. Blush pink petals with mustard centers feel sweet and vintage, perfect for a romantic bedroom. Sage green petals with cream centers look calm and earthy, and lavender petals with butter yellow centers are lovely for spring. Keep the center color strong enough to stand out against the petals, because the contrast is what makes each daisy pop.
You can also make this bed cover for any bed size by changing the number of flowers. Every flower is about 6 inches across, so you simply count how many fit across and down. Here are the counts I use, with the number of filler rings in brackets:
- Twin: 13 by 16 flowers, 208 daisies (180 fillers), about 78 by 96 inches.
- Full: 16 by 16 flowers, 256 daisies (225 fillers), about 96 by 96 inches.
- Queen: 17 by 18 flowers, 306 daisies (272 fillers), about 102 by 108 inches.
- King: 19 by 18 flowers, 342 daisies (306 fillers), about 114 by 108 inches.
For a sofa throw, make 8 flowers across and 10 flowers down. That is 80 daisies and 63 filler rings, and it finishes at about 48 by 60 inches. A throw is a wonderful way to try the pattern before you commit to a full bed cover. It takes about a month if you make a few flowers each evening, and it still looks just as special draped over the arm of a chair. It also makes a thoughtful housewarming gift.
A baby blanket works beautifully too. Make 5 flowers across and 6 flowers down for 30 daisies and 20 filler rings, about 30 by 36 inches. Use a soft cotton or a cotton blend that is gentle on baby skin, and pick a light palette like white and pale yellow. Because the loops are open, I think this works best as a decorative or stroller blanket that a grown-up keeps an eye on. It is a lovely shower gift that families keep for years.
To make matching pillow covers, join 4 flowers across and 5 flowers down, which gives 20 daisies and 12 filler rings, about 24 by 30 inches. Make two panels and join them on three sides with single crochet, then slip in a pillow and close the last side. Use a pillow insert in a color that matches your flowers so nothing contrasting shows through the loops. Matching shams make the whole bed look finished and pulled together.
You can change the edge if you prefer a simpler finish. For a clean look, skip the picots in Border Round 2 and work only single crochet. For a softer, more romantic look, replace each picot with a small shell of three double crochet. Or you can skip the border completely and let the outer flowers make the scallop on their own. The border does add strength to the outer petals, so I recommend at least Round 1 for a bed cover that will be used and washed often.
Finally, you can change the yarn weight. In DK cotton with a 4 mm hook, each flower is about 5 inches across, so you will need more flowers for the same size, roughly 20 by 22 for a queen. In bulky cotton with a 6 mm hook, the flowers grow to about 7.5 inches, so a queen needs only about 14 by 15 flowers. Always make one test flower first and measure it after blocking, then divide your bed size by that number. That small step saves you a lot of yarn and a lot of guessing.
Materials Needed
— Main Fabric
— Tools Required
The Free Pattern
0% complete
— Daisy Flower (Make 306: golden yellow center, cream petals) :
— Filler Ring (Make 272, cream) :
— Layout :
— Border (cream) :
Assembly Instructions
- Make your first Daisy Flower completely, then block it and check that it measures about 6 inches across.
- Work every following flower with the join-as-you-go Rnd 7, joining Petal 7 to Petal 3 of the flower on the left and Petal 1 to Petal 5 of the flower above, until the grid is 17 flowers across and 18 flowers down.
- After each row of flowers, work a Filler Ring in every diamond gap, joining it to the four diagonal petals around it.
- Weave in every yarn tail as you go, hiding yellow tails inside the yellow center and cream tails along the petal edges.
- Work Border Rnd 1 and Border Rnd 2 around all 206 unjoined outer petals.
- Lay the bed cover flat on blocking mats, pin each outer petal tip so the scallop is even, mist with water and let it dry completely before unpinning.
Common Mistakes & How to Fix Them
The most common mistake is miscounting the chain loops in Rounds 4, 5 and 6. When you are making hundreds of flowers, it is easy to chain 8 instead of 9 or 11 instead of 12, especially late in the evening. A short loop pulls the petal tight, and the 15 sc in Round 7 will bunch up and ruffle. A long loop makes a floppy petal that does not sit flat. To avoid this, count every chain out loud for your first ten flowers until it becomes automatic. If a petal looks wrong after Round 7, compare it to your test flower and redo that petal right away.
Another mistake is letting the loops twist or sit on the wrong side. In Rounds 5 and 6 the new, longer loop should lie outside the shorter loop of the same petal, all on the same side of the flower. If one loop crosses over or tucks behind, the layered arcs look messy and the petal will not hold its shape. This usually happens when you rush and pull the chain across without looking. Before you start each sc in Rounds 5 and 6, give the petal a quick glance and smooth the loops so they lie in neat ripples. It takes two seconds and keeps every flower looking even.
Joining the wrong petal is a mistake that can skew the whole grid. If Petal 2 is joined instead of Petal 1, the next flower sits at an angle and the row starts to wander. You may not notice until three or four flowers later, when the gaps for the filler rings look lopsided. To avoid it, place a stitch marker in the center of Petal 1 of every new flower before you start Round 7. Then count clockwise from the marker so you always know which petal you are on. If you find a wrong join, cut and redo only that one flower.
Many makers rush the yarn ends and then see yellow tails peeking through the cream petals after the first wash. Yellow yarn woven into cream petals shows clearly, and the loose ends can work free over time. This happens because weaving in tails feels slow when you have hundreds to do. The fix is to weave in as you go. Hide yellow tails inside the solid yellow center only, working back and forth through the stitches. Hide cream tails along the firm sc edge of the petals, never through the open loops. Your bed cover will look neat on both sides for years.

You Might Also Like






Important Notes
Gauge matters a lot in this project because small differences add up across 306 flowers. A blocked flower should measure about 6 inches from petal tip to petal tip. If your flowers are a quarter inch too big, the bed cover will grow by more than 4 inches in each direction. Make a test flower, block it and measure it before you buy all your yarn. Check one flower again every few weeks against your first one, because tension often loosens as we relax into a long project.
Blocking gives these daisies their crisp, open look. Pin the finished bed cover flat on blocking mats, placing a pin in the tip of each outer petal so the scalloped edge is even. Mist the whole piece with cool water until it is damp but not soaking, and let it dry completely before you take out the pins. Cotton holds its shape well after blocking. You can also block flowers in small batches before joining if you prefer, which makes the joining easier to line up.
The yarn amounts given are for the queen size in worsted weight cotton, so adjust them if you change the size or yarn. Buy all of your cream yarn from the same dye lot if you can, plus about 10 percent extra. Cream shades vary between lots, and a slightly different cream will show clearly in a large flat piece. If you cannot buy it all at once, mix balls from two lots across the grid, alternating rows, so any small color change is spread out evenly.
Wash the finished bed cover by hand or on a gentle cold cycle inside a large mesh laundry bag. Because the golden yellow centers sit next to cream petals, add a color catcher sheet to the first few washes in case the yellow dye bleeds. Use a mild detergent and no bleach. Never hang the bed cover to dry, because the weight of wet cotton will stretch it. Lay it flat on towels, shape the petals with your hands and let it dry fully. Store it folded loosely in a cotton bag.
I hope this cream daisy bed cover brings as much sunshine into your home as it has into mine. It is a long project, but it is made of small, happy steps, and every flower you finish is a little reason to smile. Take your time, enjoy the rhythm and let the basket of daisies slowly fill up beside you.
You do not have to think about all 306 flowers today. Just pick up your yellow yarn, make a magic ring and finish one daisy. Then make another one tomorrow. Before you know it, you will be joining them together and watching a whole field of flowers grow across your bed. Happy crocheting, my friend.
Crochet Abbreviations
You Ask, We Answer
What is the finished size of this daisy bed cover?
The queen version finishes at about 102 by 108 inches after blocking. That is 17 flowers across and 18 flowers down, with each flower measuring about 6 inches from petal tip to petal tip. On a standard queen mattress, the cover lies across the top and drops about 21 inches on each side, which reaches close to the floor on most bed frames. If your bed is taller or you want a longer drop, add one more flower on each side. If you want a shorter coverlet that only reaches the side of the mattress, use the full size layout of 16 by 16 flowers instead. Always measure your own bed, including the height of the mattress and frame, and divide by your blocked flower size. That gives you the exact number of flowers for the look you want, and it helps you buy the right amount of yarn before you start.
Can I use a different yarn weight or make a different size?
Yes, the pattern works in many yarn weights because the flower is the same in every size. In DK cotton with a 4 mm hook, each daisy is about 5 inches across. In bulky cotton with a 6 mm hook, it grows to about 7.5 inches. The stitch counts never change, only the flower size and the number of flowers you need. Make one test flower in your chosen yarn, block it and measure it. Then divide the width and length you want by that measurement to get your grid. The section on switching things up lists flower counts for twin, full, queen, king, a throw, a baby blanket and a pillow cover. Remember that the border repeat is worked once for each unjoined outer petal, so the border always fits any grid you choose. Just count 3 open petals for each side flower and 5 for each corner flower.
How do I wash and care for this crochet bed cover?
Wash it by hand in cool water or on a gentle cold cycle inside a large mesh laundry bag to protect the open loops. Use a mild detergent and never use bleach, because it can yellow the cream and weaken the cotton. Add a color catcher sheet to the first few washes, since the golden yellow centers sit right next to cream petals and some yellow dyes can bleed. Do not wring or twist the cover. Gently press out the water, then lay it flat on clean towels and shape the petals and the scalloped edge with your hands. Let it dry completely before you put it back on the bed. Never hang it while wet, because the weight of the cotton will stretch the loops. Between uses, store it folded loosely in a breathable cotton bag, away from direct sunlight, so the colors stay fresh for many years.
Success!
Thanks for subscribing — check your inbox for a welcome note.
Abbreviations
- ch — chain
- sc — single crochet
- sl st — slip stitch
- MR — magic ring
- st(s) — stitch(es)
- sk — skip
- lp(s) — loop(s)
- sp(s) — space(s)
- rep — repeat
- Rnd — round
- picot — ch 3, sl st in 3rd ch from hook