
Emerald Pineapple Lace Square Bed Cover Crochet Pattern
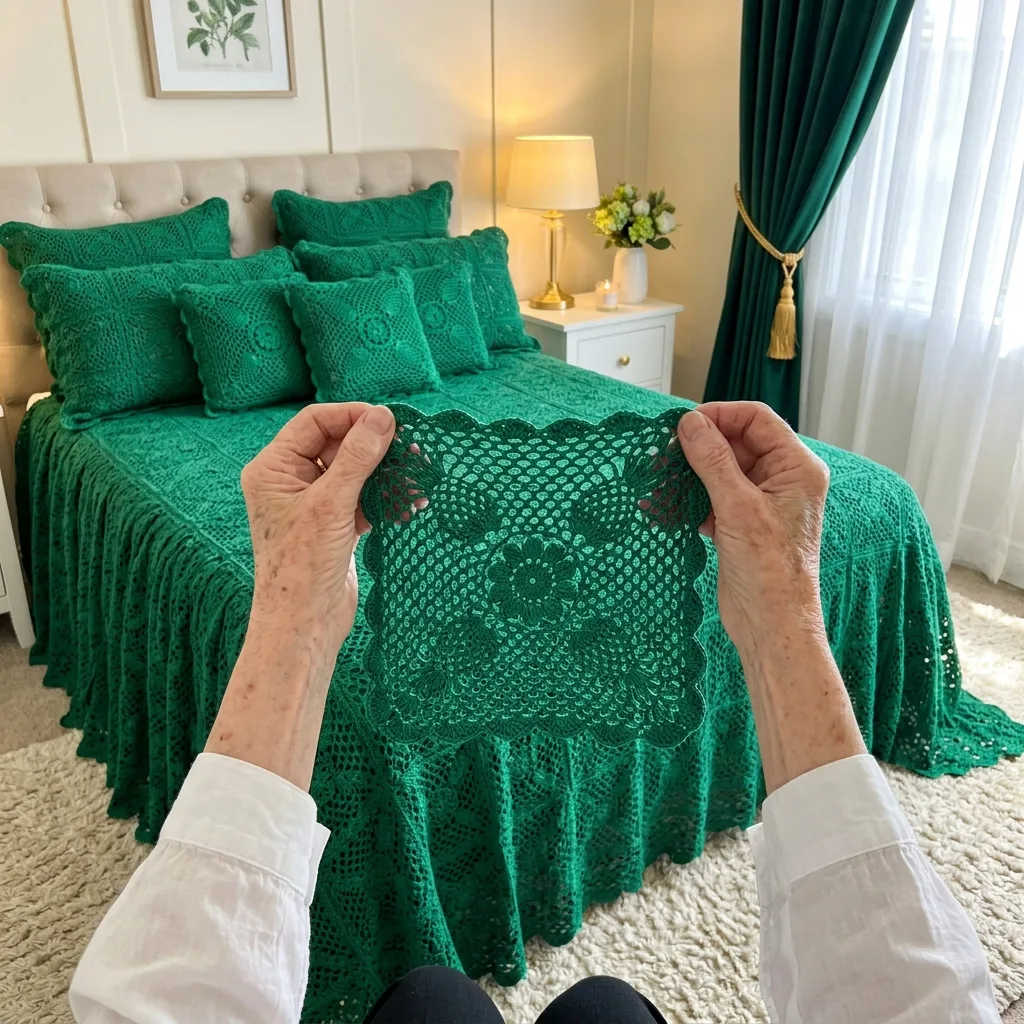
You need treble crochet fans, chain loops, shells and careful counting as each pineapple narrows.
Each square takes under two hours, so a few squares a week build into a full bed cover over a season.
Four pineapples grow toward the corners while shells fill the sides, a timeless lace design in one rich color.
About This Emerald Pineapple Lace Square Bed Cover Crochet Pattern Pattern
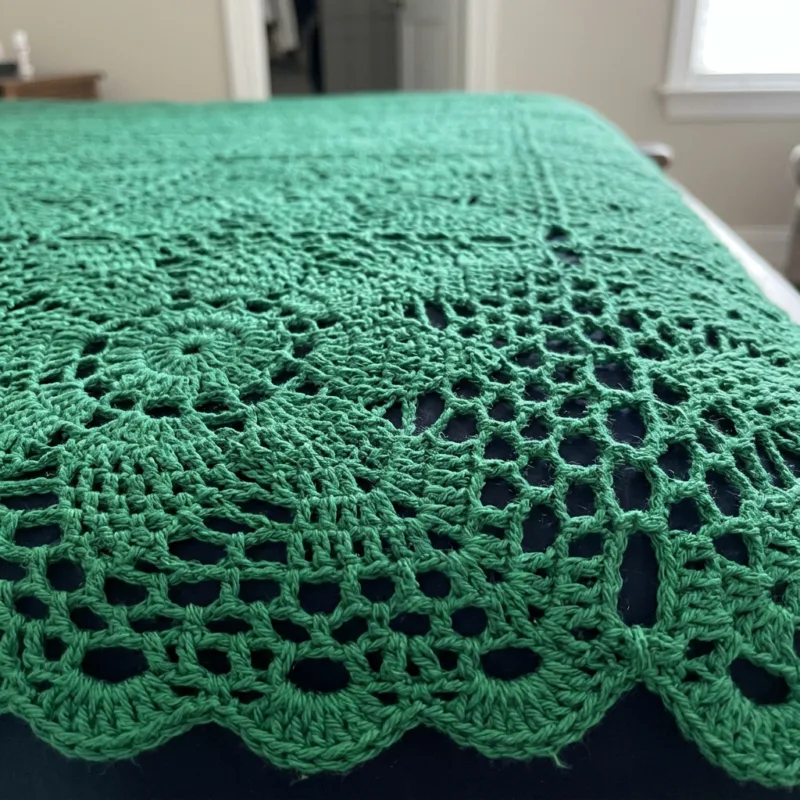
This emerald green bed cover is made from large lace squares that use one of the most loved designs in crochet: the pineapple. In the center of every square sits a small ring flower. From there, four pineapples grow outward toward the corners, each one narrowing round by round into a neat point. Between the pineapples, panels of shells and chain mesh fill the sides, and a scalloped shell edge finishes the square. Joined in a straight grid, the squares cover the bed in deep green lace that looks rich, elegant and timeless, like something from a grand old country house.
Each square is worked in rounds from the center out. You start with a magic ring of double crochet, then a round of spokes and a round of solid double crochet that form the ring flower. A round of chain loops sets up the design. In the next round, you work a fan of seven treble crochet into one loop of each quarter, which becomes the base of a pineapple, and a shell into another loop, which becomes the start of the side panel. Then, round by round, the pineapples get one loop narrower while the side panels grow wider with more shells and mesh.
When the pineapples reach their tips at the corners, you square everything up with a round of double crochet. This round fills the chain spaces with just the right number of stitches so every side has exactly 37 double crochet. The last round is a scalloped edge of shells, with a larger fan in each corner. This is also where the squares join to each other: each shell tip links to the matching shell on the neighboring square as you work. The small openings between the shells keep the lace airy and pretty.
The finished bed cover measures about 100 by 110 inches. That is 10 squares across and 11 squares down, which makes 110 squares, each about 10 inches across after blocking. On a queen bed, the cover lies across the top and drops about 20 inches on each side and about 30 inches at the foot, with the scalloped edge reaching toward the floor on most frames. I used DK weight matte cotton with a 3.5 mm hook, which gives crisp pineapples and clear shells, even in a deep color.
The finished cover has a graceful drape and a gentle weight. The treble crochet pineapples and solid rounds give it body, while the chain loops and mesh keep it light and breathable, so it works well in every season. Emerald green is a rich, calming color that brings nature indoors. It looks beautiful with cream walls, white furniture, gold lamps and fresh green flowers. Because the whole cover is one color, the lace design comes alive in light and shadow, and every pineapple stands out when sunlight crosses the bed.
This pattern suits an intermediate crocheter who is comfortable working in the round and counting chain loops. Pineapple lace looks complicated, but it follows a simple logic: every round, each pineapple has one fewer loop, and each side panel gains a little more mesh. Once you understand that, the rounds flow naturally. Since you use only one color, there are just two ends per square. Each square is a satisfying evening project, and your stack of green lace will grow steadily week after week.
Why You'll Love This Emerald Pineapple Lace Square Bed Cover Crochet Pattern Pattern
I love this bed cover because pineapple lace has always felt special to me. It is one of the first lace designs I ever saw, on an old tablecloth at my aunt's house, and I remember tracing the pineapples with my finger as a little girl. Making a whole bed cover of them feels like keeping that memory alive. Every square reminds me of family dinners, lace on the table and the feeling of something made with care.
Emerald green is such a beautiful color for a bedroom. It is calm and restful, like a walk in a forest or a garden after the rain. It also feels luxurious, especially with gold lamps and soft cream walls. When I put this cover on the bed for the first time, the room changed completely. It went from plain and pale to rich and cozy, and it made every green plant in the room look even brighter. Now it is my favorite place to read in the afternoon.
I love watching the pineapples grow. Every round, they get one loop smaller while the sides grow wider, and it feels like a little puzzle that always works out. By the last pineapple round, each one ends in a neat point right at the corner of the square. Then the squaring round and the shell edge turn the whole thing into a perfect lace tile. It is a very satisfying shape to finish, and I always hold the square up to the light to admire it.
- One color only, with just two ends per square.
- A classic pineapple design that never goes out of style.
- Joined as you go at the shell tips, with no sewing.
- A rich green that brings nature into the bedroom.
This cover also makes a meaningful gift. I made a smaller throw in ivory for my sister's anniversary, and she says it reminds her of our aunt's tablecloth every time she sees it. Pineapple lace carries a sense of tradition and love that people feel immediately. A whole bed cover in this design becomes a true heirloom, the kind of piece that gets passed down and treasured for generations.
Making this cover taught me a lot. I learned to count the loops in every pineapple round, because one missing loop shows right away. I learned to use bright stitch markers on dark green yarn so I never lose my place. And I learned that lace is not as hard as it looks when you understand how each round builds on the last. If you have always admired pineapple lace and want a project to master it, I think you will love this one.
Switch Things Up
The first and easiest change is the color. Emerald green is rich and natural, but pineapple lace looks beautiful in many solid shades. Classic ivory or white gives a timeless heirloom look, just like a vintage tablecloth. Soft sage green feels calm and fresh. Deep burgundy or navy makes a dramatic, elegant cover, and blush pink looks soft and romantic. Choose a smooth cotton with good stitch definition, so the pineapples, shells and mesh all show clearly.
You can make this bed cover for any bed size by changing the number of squares. Each square is about 10 inches across after blocking, so divide your bed width and length, including the drop, by 10. Here are the counts I use:
- Twin: 8 by 10 squares, 80 squares, about 80 by 100 inches.
- Full: 9 by 10 squares, 90 squares, about 90 by 100 inches.
- Queen: 10 by 11 squares, 110 squares, about 100 by 110 inches.
- King: 12 by 11 squares, 132 squares, about 120 by 110 inches.
For a sofa throw, join 5 squares across and 6 down. That is 30 squares and finishes at about 50 by 60 inches. A throw is a wonderful way to try pineapple lace before committing to a whole bed cover. It looks elegant draped over a cream sofa or a leather chair, and it makes a beautiful gift for a new home or an anniversary. If you make two or three squares a week, you can finish a throw in about three months.
This square also makes lovely table linens. Join 2 squares by 5 for a runner about 20 by 50 inches, or 4 by 4 squares for a tablecloth about 40 inches square. In ivory or white, it looks like a classic vintage tablecloth. In green, it makes a striking centerpiece for a holiday table. A single square works as a doily under a vase or lamp. These smaller pieces are quick to finish and make thoughtful gifts.
You can also change the edge of each square. For a straight-edged square that joins into a flatter grid, skip the shell round and finish with a round of single crochet with (sc, ch 2, sc) in each corner. Then join the squares with slip stitch through the back loops. For a more open look, replace the shells in the last round with chain loops of ch 5, which gives a lacy net between the squares. Make one test square of any change first.
To make matching pillow covers, join 2 by 2 squares for a cushion front about 20 inches square, or 2 by 3 squares for a standard pillow sham. Make a back panel the same size in simple rows of double crochet, or a second lace panel. Join front and back around three sides, slip in the pillow and close the last side. Use a pillow insert in emerald green fabric so the lace openings show a matching color. Matching pillows make the whole bed look planned and finished.
Finally, try a different yarn weight. In fine sport weight cotton with a 3 mm hook, each square is about 8.5 inches across, so a queen needs about 12 by 13 squares, and the lace looks more delicate. In worsted weight cotton with a 4.5 mm hook, a square grows to about 12.5 inches, and a queen needs only about 8 by 9 squares. Worsted gives bold pineapples and a cozier cover. Always make one test square in your chosen yarn and block it before you plan your layout.
Materials Needed
— Main Fabric
— Tools Required
The Free Pattern
0% complete
— Pineapple Lace Square (Make 110, emerald green) :
— Layout :
— Border (emerald green) :
Assembly Instructions
- Make your first Pineapple Lace Square completely, then block it and check that it measures about 10 inches across.
- Work every following square with the join-as-you-go Rnd 13, linking its side shells and corner fans to the square on its left and the square above it.
- Continue row by row until the grid is 10 squares across and 11 squares down.
- Weave in the two ends of each square as you finish it, hiding them in the solid Rnd 12.
- Work Border Rounds 1 to 3 around the whole bed cover.
- Pin the bed cover flat on blocking mats with a pin in every outer loop, mist with water and let it dry completely before unpinning.
Common Mistakes & How to Fix Them
The most common mistake is losing a loop in a pineapple round. Each pineapple must have exactly one loop fewer every round: 5, then 4, 3, 2 and 1. If you work one loop too many or too few, the pineapple tip ends up off the corner, and the squaring round will not fit. Dark green yarn makes this easy to miss in the evening. Place a bright stitch marker in the first loop of each pineapple and count the loops before you move on to the side panel. If a pineapple looks lopsided, pull back to the last correct round and redo it.
Another mistake is pulling the chain spaces between the pineapples and the side shells too tight. In Rounds 8 to 11, the ch-5 and ch-6 spaces need room to stretch as the square grows. If they are short or tight, the square cups like a bowl and the corners curl up. Chain at a relaxed tension and let the chains curve naturally. Lay your square on a table after Round 10. If it cups, go up half a hook size for the remaining rounds. If it ripples, go down half a size or chain a little more firmly.
Many makers put the wrong number of stitches into the spaces in Round 12, so the sides come out uneven and the shell edge does not fit. Every side must have exactly 37 double crochet: 3 from each corner half, 5 in each ch-6 space, 3 in each shell space and 3 in each of the 5 ch-3 spaces. If you add an extra stitch or two, the shell repeats in Round 13 will not come out even. Count each side before you join the round. Placing a stitch marker at every corner makes counting much easier.
The last common mistake is joining the shells in the wrong order, so the squares twist. When you join two squares, the first side shell of the new square must link to the last side shell of the finished square, and so on, in reverse order, so the shells face each other. If you join them in the same order, the seam twists and pulls. Before starting Round 13, lay the new square next to the finished one and place markers in the shells that will meet. Then match marker to marker as you go.

You Might Also Like






Important Notes
Gauge matters because small differences add up across 110 squares. A blocked square should measure about 10 inches across from shell tip to shell tip. If yours is a quarter inch larger, the bed cover will grow by 2.5 inches across and almost 3 inches in length. Make one test square and block it before you buy all of your yarn. Compare new squares to your first one every few weeks, because tension often changes during a long project.
Blocking opens up the pineapples and the mesh and gives the lace its crisp, even look. Pin each square or the finished cover flat, placing a pin in every shell tip and gently opening the pineapple loops with your fingers. Mist with cool water and let it dry completely. After joining and working the border, block the whole bed cover again so the grid lies straight and the outer picots sit evenly.
The yarn amount is for the queen size in DK weight cotton, so adjust it for other sizes or yarns. With a single deep color like emerald, dye lots matter a great deal, because green can lean blue or yellow from one lot to the next. Buy all of your yarn from the same dye lot at once, plus about 10 percent extra. If you must use two lots, alternate squares from both lots in a checkerboard so any change is spread evenly.
Wash the bed cover by hand or on a gentle cold cycle inside a large mesh laundry bag. Deep green dyes can release color, so wash the cover on its own and add a color catcher sheet to the first few washes. Use a mild detergent made for dark colors and no bleach. Do not hang the cover to dry, because wet cotton is heavy and will stretch the lace. Lay it flat on towels, shape the squares and pineapples and let it dry fully.
I hope this emerald pineapple lace bed cover brings a touch of classic elegance and calm green into your bedroom. It is a big project, but every square is a peaceful evening with one rich color and a hook. Enjoy watching the pineapples grow toward the corners and the shells fill in around them.
You do not have to think about all 110 squares today. Just make a magic ring and finish one square. Then make another tomorrow and join them at the shells. Before long, you will have a whole row of green lace, and one day it will cover your bed like a garden. Happy crocheting, my friend.
Crochet Abbreviations
You Ask, We Answer
What is the finished size of this bed cover?
The queen version finishes at about 100 by 110 inches after blocking. That is 10 squares across and 11 squares down, with each square measuring about 10 inches across from shell tip to shell tip. On a standard queen mattress, the cover lies across the top and drops about 20 inches on each side and about 30 inches at the foot, so the scalloped edge reaches toward the floor on most bed frames. If you prefer a shorter drop, use the full layout of 9 by 10 squares. If your bed is very tall, add one square to each row and column. Measure your own bed, including the mattress and frame height, and divide by your blocked square size. That gives you the exact grid for the look you want and helps you buy enough yarn from one dye lot.
Can I use a different yarn weight or make a different size?
Yes, this pattern works in many yarn weights because the square keeps the same stitch counts in every size. In fine sport weight cotton with a 3 mm hook, each square is about 8.5 inches across, and in worsted weight cotton with a 4.5 mm hook it grows to about 12.5 inches. Only the number of squares changes. Make one test square in your chosen yarn, block it and measure it, then divide your bed size by that number. The section on switching things up lists square counts for twin, full, queen, king, a throw and table linens. For the border, count one loop for each open side shell, each join point along the edge and each corner fan. Border Round 2 is always six times that number, so the picots in Round 3 always come out even.
How do I wash and care for this crochet bed cover?
Wash it by hand in cool water or on a gentle cold cycle inside a large mesh laundry bag to protect the pineapples and the shell joins. Use a mild detergent made for dark colors and never use bleach, because it can leave pale spots on green cotton. Wash the cover on its own and add a color catcher sheet to the first few washes, since deep green dyes can release a little color. Do not wring or twist the cover. Gently press out the water, then lay it flat on clean towels and shape the squares and pineapples with your hands. Let it dry completely, away from direct sunlight, which can fade dark colors over time. Never hang it while wet, because the weight of the wet cotton will stretch the lace. Between seasons, fold it loosely and store it in a breathable cotton bag.
Success!
Thanks for subscribing — check your inbox for a welcome note.
Abbreviations
- ch — chain
- sc — single crochet
- dc — double crochet
- tr — treble crochet
- shell — (3 dc, ch 2, 3 dc) in the same st or sp
- picot — ch 3, sl st in first ch
- sl st — slip stitch
- MR — magic ring
- beg — beginning
- sk — skip
- st(s) — stitch(es)
- lp(s) — loop(s)
- sp(s) — space(s)
- rep — repeat
- Rnd — round