
Amanda's Creative Corner Crochet · Kitchen
Free Crochet Patterns Handmade with Love

Green and White Granny Square Bedspread Crochet Pattern

Jump to Pattern
Green and White Granny Square Bedspread Crochet Pattern
90-120 Hours 0 made this
Intermediate Level

You need to be comfortable with clusters, color changes and joining squares.

90 to 120 Hours

Each square takes about an hour and a quarter, so you can work a little each evening.

Fresh Green Classic

A forest green diamond on every square gives a classic granny look a clean, modern feel.

About This Green and White Granny Square Bedspread Crochet Pattern Pattern

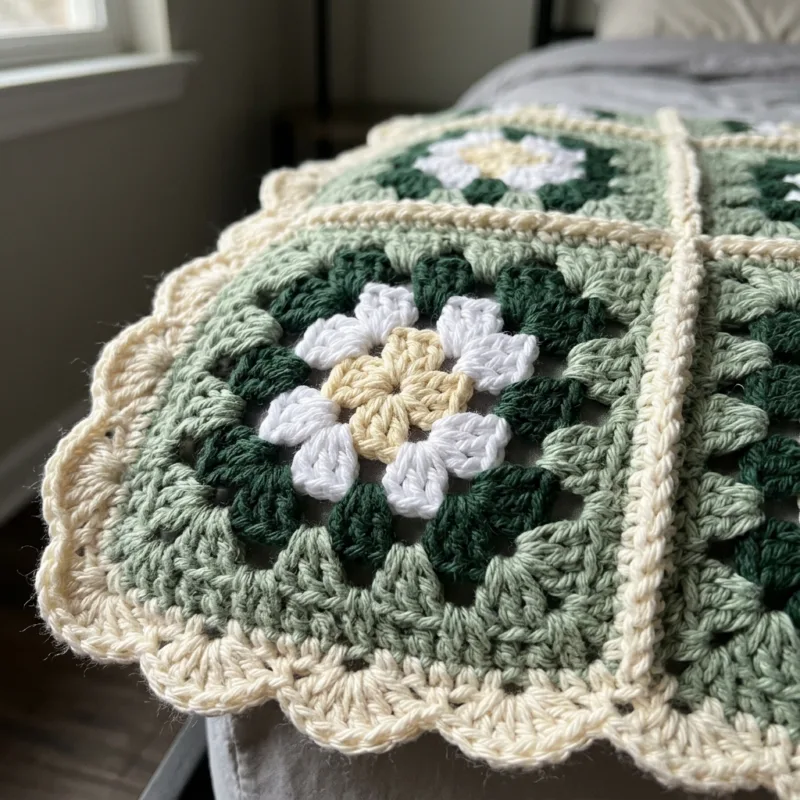
This bedspread is made from 56 granny squares, each worked in the round from the center out. Every square has a butter cream center, a white round, a deep forest green round that forms a diamond, white clusters on the sides and sage green corners. The squares are joined with a raised cream seam, and the foot and sides finish with a small cream scalloped edge.

The finished bedspread measures about 84 by 96 inches (213 by 244 cm), which covers a queen bed with a drop at the sides and foot. Each square is about 12 inches (30 cm) after blocking. It suits stitchers who already know the granny square and want a big project to grow slowly.
Green and White Granny Square Bedspread Crochet Pattern step detail

Why You'll Love This Green and White Granny Square Bedspread Crochet Pattern Pattern

I love this project because the granny square is easy to carry. I can make a square on the sofa, at the kitchen table or on a visit, and the pile of finished squares keeps growing.

The green and white colors make a bedroom feel fresh and calm. It also makes a lovely gift for a new home or a wedding.


Switch Things Up

Try navy, light blue, white and cream for a coastal bedroom, or rust, mustard, cream and brown for autumn. Make 4 columns of 5 squares for a lap throw, or 3 columns of 4 squares for a baby blanket. You can also join four squares into a pillow cover, or skip the scallops and finish with a simple single crochet edge.


Materials Needed

— Main Fabric

01 Chunky weight (5) cotton yarn in sage green: about 1,400 yards (1,280 m)
02 Chunky weight (5) cotton yarn in white: about 850 yards (780 m)
03 Chunky weight (5) cotton yarn in forest green: about 600 yards (550 m)
04 Chunky weight (5) cotton yarn in butter cream: about 450 yards (410 m), plus about 300 yards (275 m) in cream for the seams and edge
05 Yardage is estimated, so buy one extra ball of each color

— Tools Required

06 6.5 mm (US K-10.5) crochet hook
07 Yarn needle
08 Stitch markers
09 Scissors
10 Blocking mats and pins
11 Measuring tape

The Free Pattern

Intermediate 90-120 Hours

0% complete

— Granny Square (Make 56) :

Each square is worked in the round and not turned. A cluster is 3 dc. A corner is (3 dc, ch 2, 3 dc) in the corner space. The side count below means the number of clusters on each side between two corners. Change color at the start of each round, joining the new color in any corner space.
Round 1 (butter cream): Ch 4, sl st in first ch to form a ring. Ch 3 (counts as dc), 2 dc in ring, ch 2, *3 dc in ring, ch 2; rep from * 2 more times. Sl st in top of beginning ch-3 to join. (12 dc and 4 ch-2 spaces)
Round 2 (butter cream): Sl st in next 2 dc and in the first ch-2 space. Ch 3, (2 dc, ch 2, 3 dc) in same space, ch 1. *(3 dc, ch 2, 3 dc) in next ch-2 space, ch 1; rep from * 2 more times. Join. (24 dc, 4 corners, 4 ch-1 spaces)
Round 3 (white): Join white in any corner space. Ch 3, (2 dc, ch 2, 3 dc) in same space, ch 1. *3 dc in next ch-1 space, ch 1, (3 dc, ch 2, 3 dc) in next corner space, ch 1; rep from * 2 more times. 3 dc in next ch-1 space, ch 1. Join. (36 dc, 4 corners, 1 cluster per side)
Round 4 (forest green): Join forest green in any corner space. Ch 3, (2 dc, ch 2, 3 dc) in same space, ch 1. *(3 dc in next ch-1 space, ch 1) 2 times, (3 dc, ch 2, 3 dc) in next corner space, ch 1; rep from * 2 more times. (3 dc in next ch-1 space, ch 1) 2 times. Join. (48 dc, 4 corners, 2 clusters per side)
Round 5 (white): Join white in any corner space. Ch 3, (2 dc, ch 2, 3 dc) in same space, ch 1. *(3 dc in next ch-1 space, ch 1) 3 times, (3 dc, ch 2, 3 dc) in next corner space, ch 1; rep from * 2 more times. (3 dc in next ch-1 space, ch 1) 3 times. Join. (60 dc, 4 corners, 3 clusters per side)
To get the look in the photo, work the 4 corners of Round 5 in sage green and the side clusters in white, changing yarn at each corner. The stitch count does not change.
Round 6 (sage green): Join sage green in any corner space. Ch 3, (2 dc, ch 2, 3 dc) in same space, ch 1. *(3 dc in next ch-1 space, ch 1) 4 times, (3 dc, ch 2, 3 dc) in next corner space, ch 1; rep from * 2 more times. (3 dc in next ch-1 space, ch 1) 4 times. Join. (72 dc, 4 corners, 4 clusters per side)
Round 7 (sage green border): Ch 1, *sc in each of the next 18 dc along the side, working 1 sc in each of the 5 ch-1 spaces as you reach them, 3 sc in the corner space; rep from * 3 more times. Join and fasten off. (104 sc: 23 sc per side and 3 sc in each corner)
Block each square to about 12 inches (30 cm). Along each side, count 25 stitches from the middle sc of one corner to the middle sc of the next corner. This is what you will join in the seam.

— Layout :

Grid: 7 columns across by 8 squares down, 56 squares in total. (All squares are made the same, with the same color order)
The foot is the bottom row of squares and the head end is the top row. The head end has no edge. Lay out all squares before joining and rotate nothing, so every diamond sits upright.

— Joining Seams (cream yarn) :

Seam: Hold 2 squares with wrong sides together. With cream yarn, sl st through the back loops of both squares from the middle corner sc to the middle corner sc. (25 sl st per seam)
Order: Join the 8 squares of each column first, then join the 7 columns. (6 column seams of 8 squares and 7 row seams of 7 squares, 97 seams in total)
Working wrong sides together makes the raised cream ridge on the right side, as in the photo.

— Scalloped Edge (Make 1, foot and both sides) :

Work the edge down the left side, across the foot and up the right side. Do not work across the head end. At each seam, work 1 sc through the join where the corners meet.
Row 1 (sage green): Join sage green in the top left corner. Ch 1, 3 sc in the corner sc. Work 1 sc in each stitch along every square edge, sharing the corner sc at each seam, and work 3 sc in each outer corner. End with 3 sc in the top right corner. Ch 1, turn. (561 sc: foot 169, left side 193, right side 193, minus 2 shared foot corners = 553, plus 8 extra corner sc = 561)
Row 2 (forest green): Sc in each sc across. Ch 1, turn. (561 sc)
Row 3 (cream): Ch 1. *Sc in next sc, skip next sc, 3 dc in next sc; rep from * across. Fasten off. (187 shells made of 561 stitches, 3 stitches per repeat)

Assembly Instructions

  1. Make 56 Granny Squares in the color order given and block each one to about 12 inches (30 cm) square.
  2. Lay out the squares on the floor in 7 columns of 8 and check that every diamond sits upright.
  3. Join the squares of each column with cream slip stitch seams, holding the squares wrong sides together so the ridge shows on the right side.
  4. Join the 7 columns the same way, matching the corner stitches at each seam.
  5. Block the whole bedspread flat, pinning the edges straight, and let it dry fully.
  6. Work Rows 1 to 3 of the Scalloped Edge down the left side, across the foot and up the right side.
  7. Weave in all ends with a yarn needle.

Common Mistakes & How to Fix Them

Skipping the blocking step. Unblocked squares vary in size and the seams will pucker, so pin each square to 12 inches (30 cm).

Miscounting the clusters on each side. Count the clusters after every round, because you add 1 per side each round.

Pulling the cream seam too tight. Keep the slip stitches loose so the bedspread can drape over the edge of the bed.

Turning squares when you lay them out. Keep every diamond upright so the pattern lines up.


Denise

Denise designs cozy home decor crochet patterns with clear, step by step instructions for stitchers of every level.


Important Notes

Gauge is about 3 dc to 1 inch (2.5 cm) with a 6.5 mm hook. Make one square first to check that it measures 12 inches (30 cm) after blocking.

Yardage and finished size are estimates from the photo, so swatch one square before you buy all the yarn.

Wash in cool water on a gentle cycle and lay flat to dry. Use a color catcher when washing, because the forest green can bleed onto the white and cream yarns.


I hope you enjoy making this green and white bedspread as much as I did. Take it one square at a time, and soon you will have something special for your bedroom.

Crochet Abbreviations

01 ch — chain
02 sl st — slip stitch
03 sc — single crochet
04 dc — double crochet
05 st(s) — stitch(es)
06 rep — repeat

You Ask, We Answer

What size is the finished bedspread?

About 84 by 96 inches (213 by 244 cm) with 56 squares, enough to cover a queen bed with a drop at the sides and foot. Each square is about 12 inches (30 cm).

Can I use a different yarn weight or make a different size?

Yes. A thinner cotton with a smaller hook gives smaller squares, so you need more of them. For a throw, make 4 columns of 5 squares and skip the scalloped edge.

How do I wash and care for it?

Machine wash cool on a gentle cycle with a color catcher, then lay flat to dry. Avoid hot water so the green does not run into the white.





