
Amanda's Creative Corner Crochet · Kitchen
Free Crochet Patterns Handmade with Love

Pink Butterfly Filet Bedspread Crochet Pattern

Jump to Pattern
Pink Butterfly Filet Bedspread Crochet Pattern
120-150 Hours 0 made this
Intermediate Level

You need to be comfortable with double crochet and reading a simple filet chart.

120 to 150 Hours

Each block takes a few hours, so it grows slowly and steadily.

One Block at a Time

Every butterfly block is small enough to carry with you.

About This Pink Butterfly Filet Bedspread Crochet Pattern Pattern

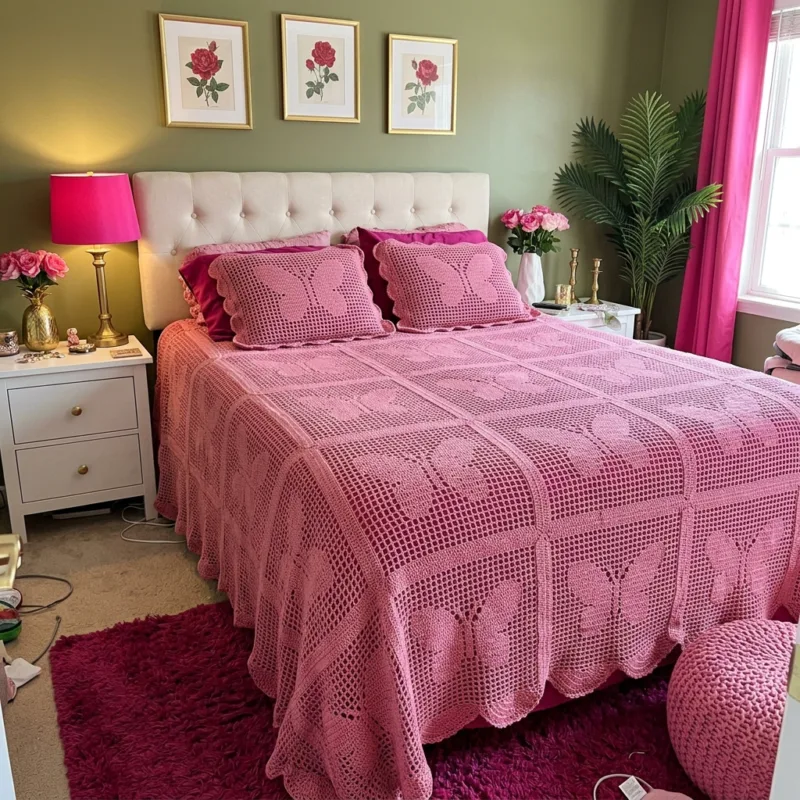
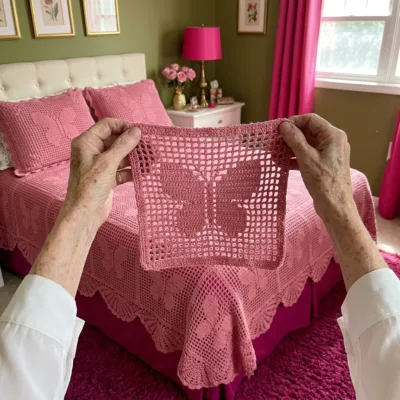
This bedspread is made from 24 square filet blocks, and every block has a big butterfly in the center. The wings are worked in solid blocks and the rest of the square is open mesh, so the cover looks light and lacy even though it is made of thick cotton cord. The blocks are joined with a slip stitch seam, and the solid frame of each block forms a neat band between the butterflies.

The finished cover measures about 77 by 109 inches with the edging, so it suits a queen bed with a generous drop at the foot. A scalloped fan edge goes all the way around. Every row is written out, so you do not need to read a chart.
Pink Butterfly Filet Bedspread Crochet Pattern step detail

Why You'll Love This Pink Butterfly Filet Bedspread Crochet Pattern Pattern

I love this project because it never feels too big. You only ever work on one 17 inch block, and when it is done you see a butterfly appear. It is easy to carry along, and I made most of mine on the sofa in the evening.

It also looks wonderful on a bed with a deep colored layer underneath. The mesh lets the color show through and the pink butterflies really stand out. It makes a lovely gift for a wedding or a new home.

Switch Things Up

Try a cream butterfly over a dark green or navy base, or use soft lavender for a calm bedroom. For a sofa throw, make a smaller grid of 2 by 3 blocks and add the same edging. You can also make a matching pillow cover from one block with the edging worked around it, or swap the fan edge for a simple single crochet border.


Materials Needed

— Main Fabric

01 Rose pink super bulky (6) cotton cord, about 2,800 yd (2,560 m) in total, which is roughly 2.8 kg (6 lb)
02 24 blocks use about 85 yd each (about 2,040 yd), joining about 150 yd, edging about 600 yd
03 These amounts are estimates, so buy about 10 percent extra and work one block before you start the others

— Tools Required

04 8 mm (L-11) crochet hook, or the size that gives you the gauge
05 Yarn needle for weaving in ends
06 Stitch markers
07 Scissors
08 Blocking mats and rust-proof pins
09 Measuring tape
10 A large flat surface or bed for laying out the blocks

The Free Pattern

Intermediate 120-150 Hours

0% complete

— Butterfly Filet Block (Make 24, rose pink) :

Each block is 21 units wide and 21 rows tall (43 sts per row). S (solid unit) = dc in each of the next 2 sts. O (open unit) = ch 1, skip 1 st, dc in the next st. Every row starts with ch 3, which counts as the first dc, and the last dc of every row goes into the top of the turning ch. The chart is symmetrical, so read each row from left to right and then check that your units add up to 21.
Row 1: Ch 45. Dc in the 4th ch from hook and in each ch across. (43 sts)
Row 2: Ch 3, turn. S1, O19, S1. (43 sts)
Row 3: Ch 3, turn. S1, O8, S1, O1, S1, O8, S1. (43 sts)
Row 4: Ch 3, turn. S1, O8, S1, O1, S1, O8, S1. (43 sts)
Row 5: Ch 3, turn. S1, O4, S4, O1, S1, O1, S4, O4, S1. (43 sts)
Row 6: Ch 3, turn. S1, O2, S6, O1, S1, O1, S6, O2, S1. (43 sts)
Row 7: Ch 3, turn. S1, O1, S7, O1, S1, O1, S7, O1, S1. (43 sts)
Row 8: Ch 3, turn. S1, O1, S4, O1, S2, O1, S1, O1, S2, O1, S4, O1, S1. (43 sts)
Row 9: Ch 3, turn. S1, O1, S3, O2, S2, O1, S1, O1, S2, O2, S3, O1, S1. (43 sts)
Row 10: Ch 3, turn. S1, O1, S7, O1, S1, O1, S7, O1, S1. (43 sts)
Row 11: Ch 3, turn. S1, O2, S6, O1, S1, O1, S6, O2, S1. (43 sts)
Row 12: Ch 3, turn. S1, O4, S3, O2, S1, O2, S3, O4, S1. (43 sts)
Row 13: Ch 3, turn. S1, O3, S5, O1, S1, O1, S5, O3, S1. (43 sts)
Row 14: Ch 3, turn. S1, O2, S4, O1, S1, O1, S1, O1, S1, O1, S4, O2, S1. (43 sts)
Row 15: Ch 3, turn. S1, O2, S6, O1, S1, O1, S6, O2, S1. (43 sts)
Row 16: Ch 3, turn. S1, O3, S5, O1, S1, O1, S5, O3, S1. (43 sts)
Row 17: Ch 3, turn. S1, O4, S3, O2, S1, O2, S3, O4, S1. (43 sts)
Row 18: Ch 3, turn. S1, O9, S1, O9, S1. (43 sts)
Row 19: Ch 3, turn. S1, O19, S1. (43 sts)
Row 20: Ch 3, turn. S1, O19, S1. (43 sts)
Row 21: Ch 3, turn. S21. Fasten off and leave a long tail for joining. (43 sts)
Block each finished square to about 17 by 17 inches before joining. Make all 24 blocks the same, with the butterflies pointing the same way.

— Layout and Joining :

Layout: 4 blocks across and 6 blocks down, 24 blocks in all, all in rose pink, with every butterfly upright. Lay them out on a bed or floor before you join.
Strip (Make 6): Place 2 blocks side by side with wrong sides together. Working through the back loops of both blocks, sl st in each of the 21 row-ends. Join 4 blocks this way. (3 seams, 21 sl st each, 63 sl st per strip)
Strip Seams (Make 5): Place 2 strips on top of each other with wrong sides together. Working through the back loops of both, sl st in each st across all 4 blocks, treating the join between blocks as a normal st. Join all 6 strips this way. (172 sl st per seam, 860 sl st in all)
Keep the seam tension loose. If it pulls tighter than the blocks, the cover will pucker.

— Scalloped Fan Edging :

The edge is worked around the whole cover with the right side facing. The top and bottom edges have 172 sts each. The side edges have 126 row-ends each. All counts below are worked out so that the final round divides evenly into 108 fans.
Round 1: Join yarn in any corner st. Ch 1, 3 sc in the corner st. Along the top and bottom edges, sc in each of the next 84 sts, 2 sc in the next st, sc in each of the next 85 sts. This uses the 170 sts between the corners and gives 171 sc. Along each side edge, work 2 sc in each of the 124 row-ends between the corners and work 3 sc in 3 evenly spaced row-ends, giving 251 sc. Work 3 sc in each corner st. Join with sl st to the first sc. (171 sc on each top and bottom edge, 251 sc on each side, 3 sc in each of 4 corners, 856 sc in all)
Round 2: Ch 1, sc in each sc around, working 3 sc in the center sc of each corner. Join with sl st to the first sc. (864 sc, 5 sc in each corner)
Round 3: Join yarn with a sl st in the 4th sc before the center sc of any corner. *Skip 3 sc, 7 dc in the next sc, skip 3 sc, sl st in the next sc. Repeat from * around, working the last sl st into the same st where you joined. Each corner center sc gets a fan. (108 fans, 756 dc, 108 sl st)
Round 4: Do not turn. Ch 1, sc in the first dc of any fan, *(ch 3, sc in the next dc) 6 times, sl st in the next sl st between fans, sc in the first dc of the next fan. Repeat from * around, join with sl st to the first sc. Fasten off and weave in ends. (108 fans, 756 sc, 648 ch-3 loops)

Assembly Instructions

  1. Make 24 butterfly filet blocks and weave in the ends of each one.
  2. Wet block every square to about 17 by 17 inches and let them dry completely.
  3. Lay out the blocks in 4 columns and 6 rows with every butterfly upright.
  4. Join 4 blocks into a strip with a slip stitch seam of 21 sl st per seam, and make 6 strips.
  5. Join the 6 strips together with 172 sl st per seam, working through the back loops of both pieces.
  6. Work Round 1 and Round 2 of the edging with single crochet, then the fan round and the picot loop round.
  7. Steam or lightly block the finished cover and lay it over a deep colored layer so the butterflies stand out.

Common Mistakes & How to Fix Them

Losing count in the middle of a filet row is the most common problem, so tick off each row and check that your units add up to 21 before you turn.

Forgetting to work the last dc into the top of the turning chain makes the sides curve in, so always find that stitch before you finish a row.

Joining too tightly gives a puckered seam, so use a larger hook for the slip stitches if your seams pull.

Skipping the blocking step leaves squares of different sizes, and the joins will not match up.


Denise

Denise designs cozy home decor crochet patterns with clear instructions for makers of every level.


Important Notes

Gauge: 10 sts and 5 rows measure 4 inches in filet pattern with an 8 mm hook. Each block should measure about 17 by 17 inches after blocking.

The finished cover is about 77 by 109 inches with the edging. Add or remove a row of blocks to fit your bed, and each row or column changes the size by about 17 inches.

Yarn amounts are estimates based on the stitch counts, so work one block and weigh it before you buy for the whole cover.

Wash gently in cool water and dry flat. Cotton cord is heavy when wet, so support the weight of the cover when you lift it.


I hope you enjoy every butterfly as much as I did. Send me a picture when your first block is done, I would love to see it.

Crochet Abbreviations

01 ch — chain
02 sc — single crochet
03 dc — double crochet
04 sl st — slip stitch
05 st(s) — stitch(es)
06 S — solid unit: dc in each of the next 2 sts
07 O — open unit: ch 1, skip 1 st, dc in the next st

You Ask, We Answer

What size is the finished bedspread?

It is about 77 by 109 inches with the edging. Each block measures about 17 inches, so you can add or remove a row to fit a twin, full or king bed.

Can I use a thinner yarn?

Yes, but the blocks will be smaller. With worsted weight cotton and a 5 mm hook each block would be about 10 inches, so you would need around 6 blocks across and 9 down for the same size.

How do I wash it?

Wash it gently in cool water on a delicate cycle or by hand, and dry it flat. Do not hang it wet, because the cotton cord is heavy and will stretch.





