
Pink Rose Cottage Curtain Crochet Pattern
The squares are simple solid rounds, and the roses are a short strip you roll up, so every step is easy to follow.
Each square with its rose and leaves takes a little over an hour, so plan a few cozy months of making.
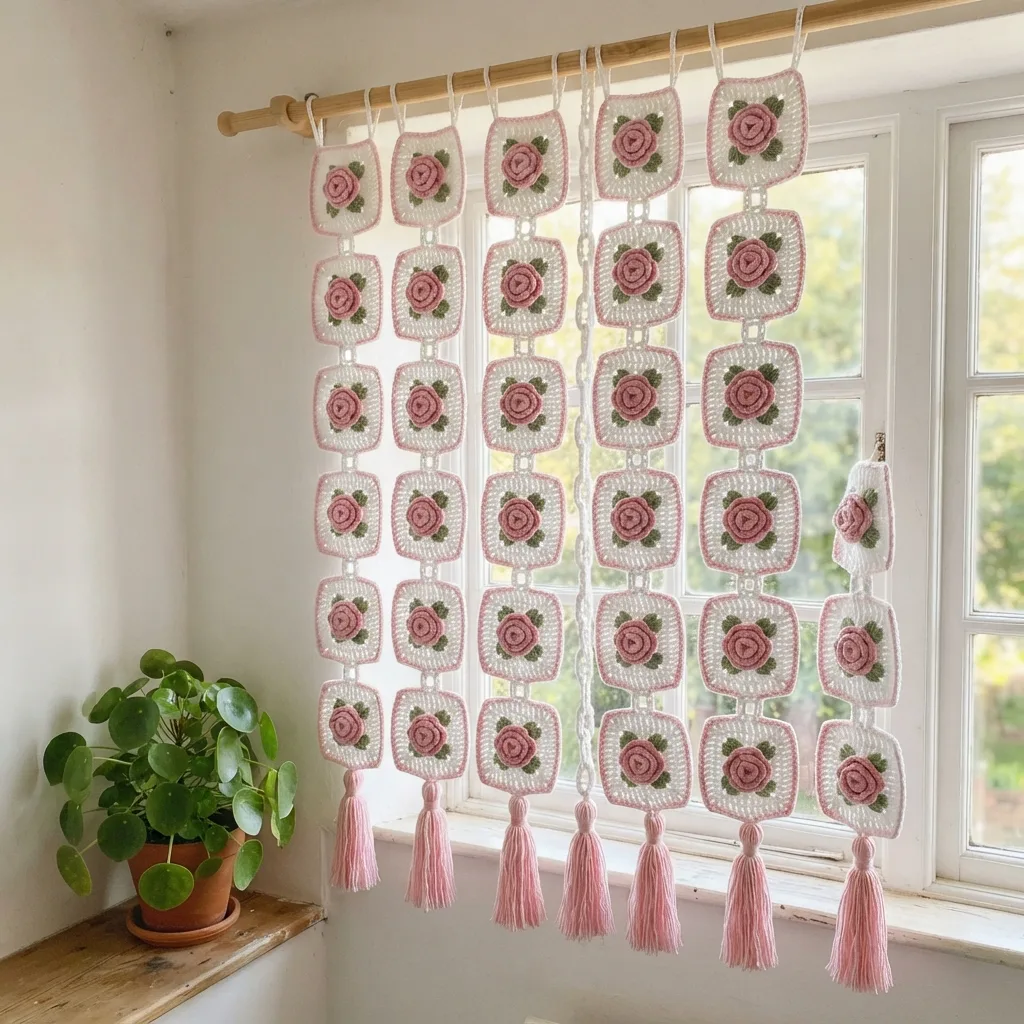
Raised pink roses on crisp white squares give your window the sweet, romantic look of an old cottage garden.
About This Pink Rose Cottage Curtain Crochet Pattern Pattern
This pink rose cottage curtain is the most romantic piece I have ever hung in a window. It is made of 48 white squares, and on each one sits a raised, three dimensional pink rose with two little sage green leaves. A thin soft pink edge frames every square, so the white looks crisp and the roses look like they are blooming on fresh linen. The squares hang in 8 separate columns of 6, joined by short white chains, and each column finishes with a long, full pink tassel that sways gently at the bottom.
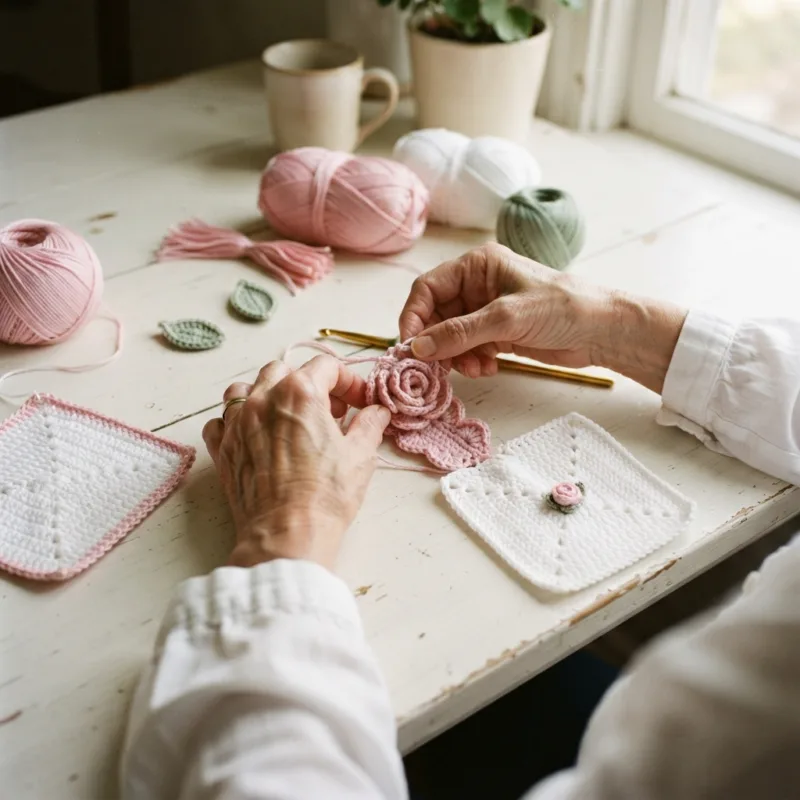
Here is how the pieces come together. The square is worked in five rounds of solid white double crochet, starting from a small ring and growing outward with neat corners. A sixth round of pink single crochet makes the edge. The rose is made separately as a short strip of single crochet with eight scallops of double crochet along one side. You roll the strip into a spiral, stitch the base together and suddenly you are holding a little rose. Two small leaves, each worked around a short chain, tuck under the rose before you sew everything to the center of the square.
The finished curtain measures about 55 inches wide on the rod and about 58 inches long from the top of the loops to the ends of the tassels, which is roughly 140 by 147 cm. Each square is about 6 inches after blocking, each chain link adds about 2 inches, and each tassel hangs about 9 inches. That size fits a standard window nicely. Because every column is separate, you can easily make it narrower, wider, shorter or longer, and I share a size guide for windows, doors and room dividers further down.
The stitches are all classic ones: chain, slip stitch, single crochet, half double crochet and double crochet. The only new skills are rolling the rose and sewing it in place, and both are much easier than they look. The trick is to roll loosely at the start and a little tighter toward the end, so the rose opens in the middle like a real bloom. I explain exactly how to sew it on, with the stitches hidden under the petals, so the back of each square stays neat.
The columns are joined with doubled chain links instead of seams. You chain from the center of the bottom edge of one square to the center of the top edge of the next, then slip stitch back up the chain so it is firm and does not stretch. The pink tassels tie on under the last square of each column, and two white loops worked into the top corners of the first square slide straight onto the rod.
When it hangs in the window, this curtain feels soft and sweet. The solid white squares give a little more privacy than open lace, while the gaps between the columns and around the chains still let plenty of daylight in. The raised roses catch the light and cast tiny shadows, so they really do look three dimensional from across the room. It is lovely in a bedroom, a nursery, a cottage kitchen or a sunny breakfast nook.
I would call this an intermediate project, mostly because of the time and the finishing work. You will make 48 squares, 48 roses and 96 leaves, and then sew them together, so patience is the main skill you need. If you enjoy small pieces and love the moment when something three dimensional appears in your hands, this curtain will make you very happy. Make your first square, rose and leaves slowly, check all the counts, and keep that motif as your guide.
Why You'll Love This Pink Rose Cottage Curtain Crochet Pattern Pattern
I love this curtain because it feels like a little cottage garden that never stops blooming. Pink roses on white have always reminded me of my grandmother's tablecloths and the rose bush by her front door. Every time I see the light on those raised roses, I think of summer afternoons in her kitchen. It is a curtain full of memories for me, and I hope it becomes one for you too.
I also love that the work comes in small, varied pieces, so it never feels boring. One evening I make white squares, another evening I make a pile of rose strips, and on a lazy Sunday I roll roses and sew them on while I listen to the radio. Each part uses a different rhythm, and switching between them keeps my hands interested. It is the perfect project for someone who gets restless with long repeats.
There is a special moment in this pattern that I never get tired of. You crochet a flat little strip with scallops, and then you roll it, and in a few seconds it turns into a rose. Even after dozens of them, it still makes me smile. Watching the curtain grow is just as rewarding. I hang each column as soon as it is finished, and the window slowly fills with roses week after week.
Here is why it is one of my favorite projects:
- The roses are quick and pure joy to roll.
- The pieces are small and easy to carry.
- White squares give soft privacy and light.
- It brings a romantic cottage feel to any room.
- It makes a heartfelt gift for someone special.
It is also a great way to use up leftover yarn. The leaves need only a few yards each, so any scraps of green cotton in the right weight will do, and small amounts of pink from other projects can become roses. You can even mix two or three close shades of pink for a more natural garden look. My scrap basket always gets a little lighter when I make this curtain, and I love that nothing goes to waste.
This curtain taught me patience with finishing. The first time I made it, I left all the sewing for the end and felt overwhelmed by a big pile of squares, roses and leaves. Now I finish each motif completely before I start the next one, square, edge, rose, leaves and sewing. It takes the same time in the end, but it feels much lighter, and I always have finished motifs to admire.
Finally, I love giving it as a gift. A rose curtain is a beautiful present for a new mother setting up a nursery, a daughter moving into her first home or a friend who loves vintage decor. It is used every day and seen by everyone who visits, so it carries your love for years. I have made three of them for family, and each one still hangs proudly in a sunny window today, years later.
Switch Things Up
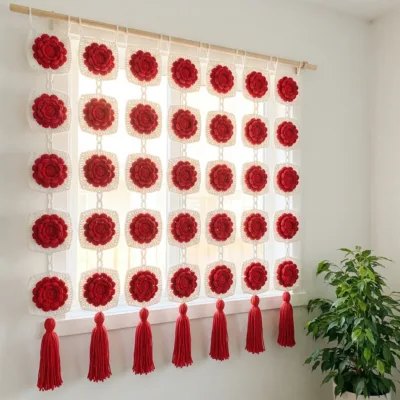
For a classic look, try red roses on cream. Make the roses and the edge in a deep red, the squares in warm cream and the leaves in a darker green, then add red tassels. It looks rich and traditional, and it is perfect for a country kitchen or a dining room at the holidays. Remember a color catcher when you wash it, because red and cream are washed together.
A lilac and white version feels soft and dreamy. Use lilac for the roses, the edge and the tassels, keep the squares white and the leaves sage. It suits a bedroom or a bathroom with white tiles beautifully. For something warm and gentle, choose peach and cream roses on cream squares, which glow especially nicely in the evening light.
If you like bright, happy colors, make yellow roses on white with golden tassels, which feel like sunshine in a kitchen window. For a mixed garden look, make the roses in three or four shades, such as pink, peach, lilac and pale yellow, and keep the squares, edges and leaves the same. Choose one of those shades for all the tassels so the curtain still looks planned.
Resizing is simple because every column is the same. Each column is about 6 inches wide plus a 1 inch gap, and each square with its chain link adds about 8 inches of length. The loops and tassels add about 11 inches to every column. Here is a quick guide:
- Narrow window, about 27 by 42 inches: 4 columns of 4 squares (16 squares).
- Standard window, about 55 by 58 inches: 8 columns of 6 squares (48 squares).
- Door, about 34 by 82 inches: 5 columns of 9 squares (45 squares).
- Room divider, about 69 by 90 inches: 10 columns of 10 squares (100 squares).
A short cafe curtain is a sweet project on its own. Make 8 columns of only 3 squares each, which is 24 motifs, and hang them on a rod across the middle of the window. It will be about 34 inches long with the tassels. It is perfect for a kitchen sink window or a bathroom, and it takes about half the time of the full curtain.
For a doorway curtain, follow the door layout and space the columns about 2 inches apart so it is easy to walk through. Make the chain links 18 chains long instead of 12, which lightens the curtain and lets it move gently as you pass. Shorter tassels of about 6 inches keep the bottom from tangling. A rose doorway curtain looks magical at the entrance of a little girl's bedroom.
The tassels change the mood of the whole curtain. Short, chunky tassels of about 6 inches, wound 40 times around a 7 inch card, look playful and modern. Long tassels of about 12 inches, wound 30 times around a 13 inch card, look graceful and vintage, especially on a tall window. For the long version, plan about 5 extra yards of pink for each tassel.
You can also change the yarn weight. In sport weight cotton with a 3 mm hook, each square is about 5 inches and the roses are a little smaller, so the standard layout becomes about 47 inches wide. In worsted cotton with a 4.5 mm hook, each square grows to about 7 inches, and the standard layout becomes about 63 inches wide, so 7 columns may be enough. Always make one full motif first, block it and measure it before you plan the curtain.
Materials Needed
— Main Fabric
— Tools Required
The Free Pattern
0% complete
— White Square (Make 48, white with pink edge) :
— Rolled Rose (Make 48, pink) :
— Leaves (Make 96, sage green, 2 per motif) :
— Motif Finishing (Make 48) :
— Layout :
— Chain Links and Joining (Make 40, white) :
— Tassels (Make 8, pink) :
— Top Loops and Hanging (Make 16, white) :
Assembly Instructions
- Block all 48 white squares to 6 in (15 cm) before adding any roses.
- Sew 2 sage leaves and 1 rolled pink rose to the center of every square, using 48 roses and 96 leaves in total.
- Lay the finished motifs out in 8 columns of 6, with all the leaves pointing the same way.
- Join the motifs in each column from the top down with 5 doubled white chain links, for 40 links in total.
- Make 8 pink tassels and tie one to the center sc of the bottom side of the last motif in each column.
- Work 2 white hanging loops into the top corners of the first motif in each column, for 16 loops in total.
- Slide the columns onto the wooden rod, spacing them about 1 in (2.5 cm) apart, then let the curtain rest for a day and trim the tassels.
Common Mistakes & How to Fix Them
The most common problem with this curtain is roses that look flat or messy instead of full and open. It happens when the strip is rolled too tightly from the very start, which squashes the center, or when the scallops twist and face different directions. A rose like that sinks into the square and loses its 3D look. Roll the first two scallops loosely around your finger, then tighten a little with each turn. Keep the flat sc edge at the bottom the whole time, and pin the rose with a sewing pin before you start stitching it together.
Another mistake is sewing the rose too loosely or only at one point. When the curtain hangs, the weight of the rose pulls it forward, and a loosely sewn rose flops down and shows the stitches underneath. It happens because it is tempting to tack it with just a few stitches. Sew all the way around the base of the rose, going through the square and catching the inner layers of the rose as well. Keep the stitches small and hidden under the outer petals, and tug gently on the rose afterward to make sure it sits firmly.
Squares that are not all the same size cause columns of different lengths, and the pink edges make any difference easy to see. This happens because you make 48 squares over many weeks, and tension changes with your mood and energy. A square that is even a quarter inch smaller will stand out once the curtain is hanging. Measure your first blocked square and write the size down, then check every fifth square against it. If one is off, set it aside and make another one. It is much easier than trying to hide it later.
A plain chain stretches over time under the weight of the motifs, and this curtain is heavier than most because of the solid squares and roses. If you skip the slip stitch row back up each link, the chains slowly lengthen and the columns droop and become uneven. Always slip stitch back up each link into the back bump of the chains, keep those slip stitches relaxed and use exactly 12 chains every time. Comparing all the columns side by side on a table before hanging makes any short or long link easy to spot and fix.

You Might Also Like
Important Notes
Gauge for this curtain is one white square of 6 inches (15 cm) after blocking, made in DK cotton with a 3.5 mm hook. The square after Round 2 should be about 2.5 inches across. If your square is larger, go down half a hook size, and if it is smaller, go up half a size. Each rolled rose should be about 2.75 inches across. Consistent size matters more than exact gauge, so keep your first finished motif as your sample.
Block the white squares before you sew on the leaves and roses. Pin each square to 6 inches on a blocking mat with straight sides and square corners, spray it until damp and let it dry completely. Do not block the roses flat, because they should stay raised and full. If a rose gets squashed later, hold it over a little steam for a few seconds and fluff the petals open with your fingers.
This curtain uses about 1,020 yards of white, 680 yards of pink and 160 yards of sage green DK cotton, including the tassels, chain links and hanging loops plus a little extra for your sample motif. Buy all the yarn for each color from the same dye lot at the same time. Soft pinks can look very different from one lot to the next, and the difference shows when two roses sit side by side in daylight.
The finished curtain weighs about 720 grams, so use a sturdy rod with brackets screwed into the wall instead of a tension rod. Wash it by hand in cool water with mild soap, or on a gentle machine cycle inside a mesh laundry bag. Always add a color catcher sheet, because the pink and green are washed together with the white. Press out the water in a towel, lay each column flat to dry and fluff the roses back into shape.
I hope this pink rose cottage curtain fills your home with the sweet, gentle feeling of an old fashioned garden. It is a big project, but every square, every leaf and every little rolled rose is a small joy of its own. When the last column goes up and the morning light falls across all those roses, I think you will feel just as happy and proud as I did.
So do not think about all 48 motifs today. Just pick up your pink yarn, crochet one little strip of scallops and roll it into your very first rose. Then make a white square to hold it. Before long your window will be blooming. Happy crocheting, and thank you so much for making this with me.
Crochet Abbreviations
You Ask, We Answer
What is the finished size of this curtain?
As written, the curtain measures about 55 inches wide on the rod and about 58 inches long from the top of the hanging loops to the ends of the tassels, which is roughly 140 by 147 cm. It is made of 8 columns with 6 motifs in each, so 48 white squares with 48 roses and 96 leaves. Each square is about 6 inches after blocking, each chain link adds about 2 inches, and each tassel hangs about 9 inches below the last square. The width allows for a gap of about 1 inch between columns, and you can close or widen that a little by sliding the loops along the rod. To change the size, add or remove columns for width and add or remove squares for length. Each extra column adds about 7 inches of width, and each extra square with its link adds about 8 inches of length. Measure your window before you begin.
Can I use a different yarn weight or make it in another size?
Yes, the pattern works in any yarn weight, and all the stitch counts stay the same. Only the size of the squares and roses and the amount of yarn change. In sport weight cotton with a 3 mm hook, each square is about 5 inches and each rose about 2.25 inches. In DK with a 3.5 mm hook, the square is about 6 inches, and in worsted cotton with a 4.5 mm hook it grows to about 7 inches. This curtain is already a little heavier than open lace curtains, so with worsted yarn make sure your rod and brackets are strong. I recommend cotton or a cotton blend, because it holds the rose shape well and does not stretch over time. Whatever you choose, make one full motif first, block the square and measure it. Then divide your window width by that size plus the gap to find the number of columns, and do the same for the length.
How do I wash and care for the curtain?
Take the columns off the rod before washing, so the loops and chain links do not stretch. Hand washing in cool water with a mild wool or baby soap is the gentlest choice and the best way to protect the roses. If you prefer the machine, put each column in a mesh laundry bag and use a cold, gentle cycle with a slow spin. Always add a color catcher sheet, because the pink and green can bleed onto the white, especially in the first few washes. Never wring the curtain. Roll each column in a large towel and press out the water. Then lay the columns flat on a dry towel, square up the motifs, fluff each rose back into shape with your fingers and comb the tassels straight. Avoid the dryer, because heat can shrink the cotton and crush the roses. Once dry, hang it back up and let it settle for a day.
Success!
Thanks for subscribing — check your inbox for a welcome note.
Abbreviations
- ch — chain
- sl st — slip stitch
- sc — single crochet
- hdc — half double crochet
- dc — double crochet
- sk — skip
- st(s) — stitch(es)
- sp(s) — space(s)
- rep — repeat