
Raspberry Fan Tassel Curtain Crochet Pattern
You need chains, single and double crochet, little picots and a good habit of counting your stitches.
Fourteen fans, twenty eight rosettes and seven tassels add up to a cozy project you can spread over a few weeks.
The open fans and chain links let the daylight pour through, so the whole window turns a warm rosy pink.
About This Raspberry Fan Tassel Curtain Crochet Pattern Pattern
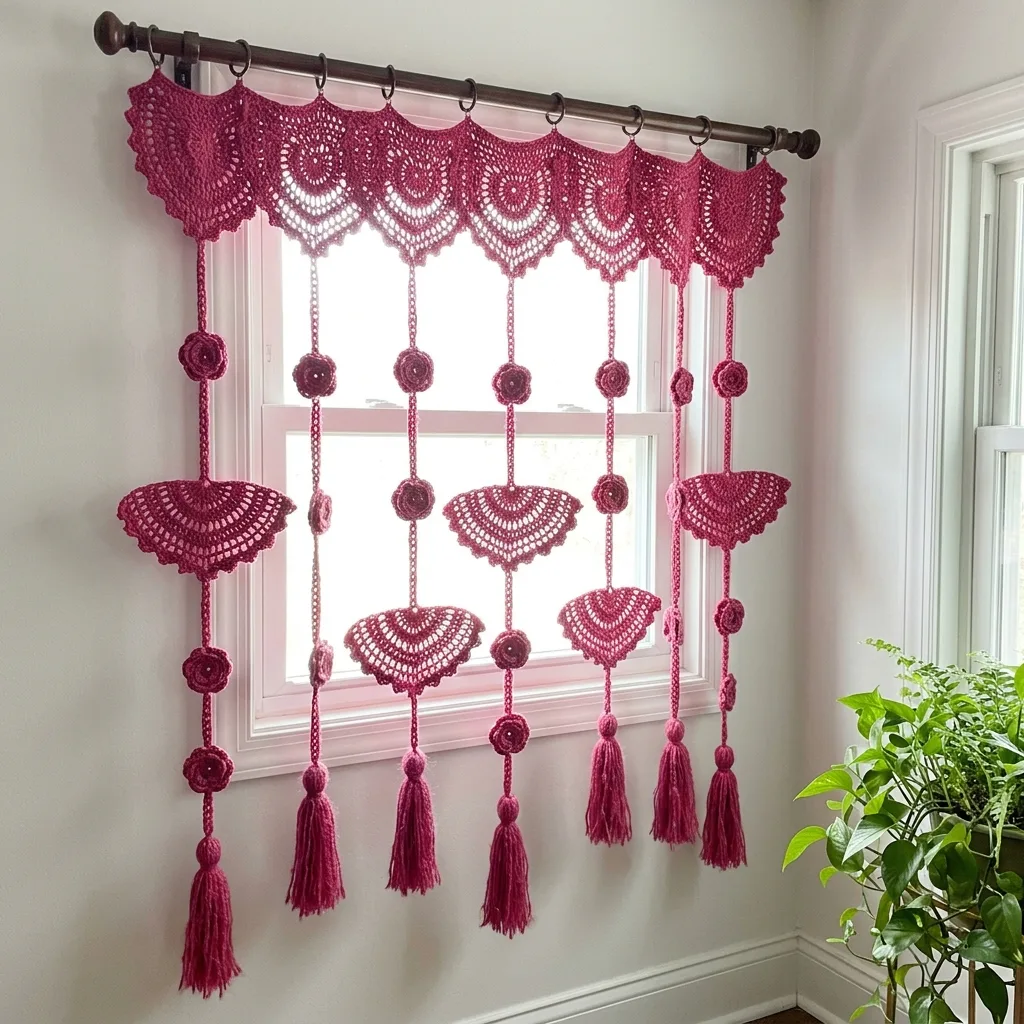
This curtain is one of those projects that makes a plain window feel loved. It is worked in a single raspberry pink cotton, and every part of it is small and simple on its own. Along the top sits a scalloped valance made of seven half circle fans joined into one band. From the bottom point of each fan, a strand of chain links drops down, carrying little round rosettes, one large open fan and a long full tassel at the end. When the sun comes in, the light falls through all the open spaces and the whole window turns soft and rosy.
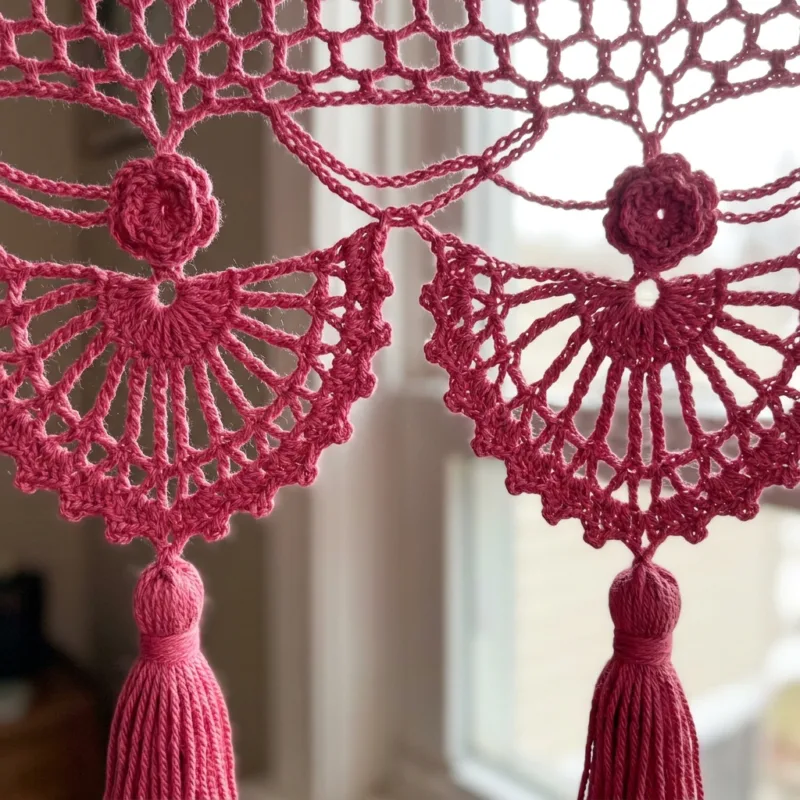
The fan is the heart of the design. You start it in a magic ring and work it flat in rows, so it grows into a half circle with spokes of double crochet and little chain spaces between them. A row of short loops comes next, and then a scalloped edge with a tiny picot on every scallop. The last row runs along the straight side to make it neat and firm. You make fourteen of these fans in total, seven for the valance and seven to hang lower down on the strands, and they are all exactly the same.
The rosettes are tiny eight petal flowers, about one and a half inches across. They take only a few minutes each, which makes them lovely to make in a spare moment. There are four on every strand, so you need twenty eight in all. The chain links are worked with the yarn held double, so they stay firm and do not stretch under the weight of the fans and tassels. I place a stitch marker where each rosette will sit, and later I sew the rosettes on right over those spots so they look like little flowers threaded on a string.
The finished curtain is about 42 inches (107 cm) wide across the valance. The four long strands reach about 33 inches (84 cm) from the top of the band to the tip of the tassel, and the three short ones about 29 inches (74 cm). The strands alternate long and short, so the big fans sit at two heights and the tassels form a gentle wave along the bottom. That little change in height is what keeps the eye moving and makes the curtain feel playful instead of stiff. It suits a kitchen window, a small bedroom window or the top half of a sunny door.
The top band is three rows deep and gives you a straight, sturdy edge for hanging. I used nine metal clip rings spaced evenly along it, and they slide easily on a wooden rod. You could also crochet small yarn loops instead if you like a softer look, and I have written that option into the pattern. Because the curtain is open and light, it does not need a heavy rod or special hardware. A normal cafe rod or a slim tension rod holds it well, even in a rented home where you cannot drill.
I call this pattern intermediate. You need to be comfortable with chains, single crochet, double crochet and working into chain spaces, and you should be happy to count. Nothing here is hard, but there are many small pieces, so it rewards patience more than skill. If you have made a shawl edge or a few simple motifs before, you will feel right at home. Plan on about 20 to 25 hours from the first fan to the last tassel, spread over evenings or weekends in whatever rhythm suits you.
Once it is blocked and hanging, the curtain feels light and a little bit romantic. The cotton holds the shape of the fans, and the tassels give it a nice swing when the window is open. It filters the light without blocking it, and it still gives you a touch of privacy near the top of the glass. I love how it looks in the morning, when the pink glows almost red against the bright sky and throws little fan shaped shadows across the table.
Why You'll Love This Raspberry Fan Tassel Curtain Crochet Pattern Pattern
I love projects I can carry with me, and this curtain is made of pieces that fit in a sandwich bag. A fan takes me about forty minutes, and a rosette about ten. I made most of mine at the kitchen table with my tea, a few in a waiting room, and a handful in the car while I waited for my grandson after school. By the time I sat down to join everything, I had a little basket full of pink fans and flowers, and it felt like a treasure chest I had filled one coin at a time.
There is a quiet joy in watching something grow one piece at a time. On the first day you have one fan, and it looks like a small seashell. After a week you have seven, and you can lay them in a row on the table and see the valance coming to life. Every rosette you add makes the pile a bit brighter. I find that kind of slow progress very calming, especially in the evening when the house is quiet and the only sound is the hook moving through the cotton.
This curtain changed my kitchen more than any new paint could. The window used to be bare, and the room felt a little cold in the morning. Now the light comes in pink and warm, and the tassels move gently when the window is open. Friends always stop and touch the fans when they come over, and almost all of them ask if I can teach them. It is a small thing, but it makes the room feel cared for and lived in, the way a kitchen should feel.
It also makes a wonderful gift, because it feels personal without needing to fit anyone. Here is who I would make one for:
- a daughter or friend moving into a first home
- a new mother who wants a sweet nursery window
- a neighbor with a sunny kitchen window
- anyone who loves pink, flowers or a cottage look
I like that the whole curtain uses one color. You do not have to plan color changes or weave in a hundred ends of different shades. You just pick a yarn you love and go. If you have a few leftover balls of the same cotton in your stash, the rosettes and tassels are a great way to use them up, as long as the shade matches. And if you decide later that you want two colors, the pattern adapts easily, as you will see in the ideas below.
Making it taught me a few things too. I learned how much a good blocking can do for a fan, turning a slightly curled shell into a crisp half circle. I learned to hold the yarn double for the chains after my first test strand stretched almost two inches overnight. And I learned that tassels look best when you are generous with the wraps, because a skinny tassel looks lost under a big fan. These are the little lessons I have written into the pattern for you, so you can skip the frustrating parts and go straight to the happy ones.
Most of all, I love it because it feels like something my mother would have made. It has that old fashioned charm of crochet hanging in a window, but the bright raspberry color makes it feel fresh and cheerful. Every time I see the sun come through it, I am glad I took the time to make every fan by hand.

Switch Things Up
This curtain is easy to change, because it is built from small pieces and a simple layout. Here are the variations I have tried or planned, with the numbers you need for each one. Read through them before you buy yarn, since a new size or color plan changes how much you need. The stitch counts of the fan and the rosette never change, so once you know them, every version feels familiar.
Red and white. Make the seven valance fans and the top band in white, and the strands, rosettes, hanging fans and tassels in a bright red. The white band frames the window like a lace edge, and the red strands pop against the glass. It looks wonderful in a farmhouse kitchen and makes a cheerful choice for the winter months. Green and cream works the same way, with cream fans and sage or leaf green rosettes and tassels, and it feels calm and fresh next to a row of houseplants.
Blue and white, or pink and white. For a seaside look, try cornflower or navy blue fans with white rosettes and white tassels. For a nursery or a little girl's room, a soft baby pink with white rosettes is very sweet. In both cases I keep the chain links in the darker color so the strands stay visible against the light. White with golden details is my choice for a dining room: make everything in white and add golden mustard tassels and a few golden rosettes for a warm, elegant finish.
A narrow window. For a window about 30 inches (76 cm) wide, make five valance fans and five strands instead of seven. The top band then has 149 stitches (5 x 29 sc plus 4 ch-1 spaces), and five clip rings fit evenly at every 37th stitch. Keep the long and short strands alternating, starting and ending with a long one, so the bottom wave still looks balanced. You will need about 360 yards of DK cotton for this smaller version.
A standard window or a door. The pattern as written, with seven fans, covers a standard window of about 38 to 42 inches (97 to 107 cm). For the glass panel of a door, keep the seven fans but add a second hanging fan to every strand, with 18 more chains and 2 more rosettes below it. That makes each strand about 8 to 9 inches longer, so the curtain covers most of the glass while the tassels still swing gently. Plan on about 670 yards of yarn for the door version.
A doorway curtain or a room divider. For an open doorway, make nine valance fans and nine strands, and give each strand three hanging fans with 27 chains and 2 rosettes between them. The top band has 269 stitches (9 x 29 sc plus 8 ch-1 spaces), and eleven rings spaced about every 27 stitches work well. Each strand then hangs about 50 inches (127 cm), so lengthen the first link until the tassels end where you want them. For a room divider, hang two of these doorway panels side by side from one long rod.
A shorter cafe curtain. If you only want a little frill at the top of the window, make the valance and top band, then skip the hanging fans. Work each strand as 18 chains, a rosette, 9 chains, a rosette and 9 chains, and finish with a 4 inch (10 cm) tassel. The whole curtain is then only about 16 inches (41 cm) deep, and it takes about half the time. Shorter or longer tassels change the mood too: wind 25 wraps on a 4.5 inch (11.5 cm) card for a neat 4 inch tassel, or 40 wraps on an 8.5 inch (21.5 cm) card for a dramatic 8 inch (20 cm) tassel.
A different yarn weight. The fans grow or shrink with your yarn, so you can change the size without changing a single stitch count. Here is roughly what to expect for the width of the seven fan version:
- Size 10 cotton thread with a 1.75 mm hook: about 24 in (61 cm) wide
- Sport weight cotton with a 3 mm hook: about 36 in (91 cm) wide
- DK cotton with a 3.5 mm hook, as written: about 42 in (107 cm) wide
- Worsted cotton with a 4.5 mm hook: about 52 in (132 cm) wide
Remember that a thicker yarn also makes a heavier curtain, so use a sturdy rod for the worsted version and buy about a third more yarn. Thread, on the other hand, makes a very delicate curtain that looks lovely in a small bathroom or above a kitchen sink.
Materials Needed
— Main Fabric
— Tools Required
The Free Pattern
0% complete
— Layout :
— Fan Motif (Make 14, raspberry pink: 7 for the valance, 7 to hang) :
— Rosette (Make 28, raspberry pink) :
— Top Band (Make 1, joins the 7 valance fans) :
— Chain Links and Joining (Make 7 columns: 4 long, 3 short) :
— Tassels (Make 7, raspberry pink) :
— Top Loops and Hanging :
Assembly Instructions
- Block all 14 fans and 28 rosettes flat and let them dry completely.
- Lay the 7 valance fans in a row with the straight edges at the top and work the Top Band across them to join them into one scalloped valance.
- Following the Layout, work the upper and lower chain links with doubled yarn for each column, joining each valance fan to one of the 7 hanging fans.
- Sew a rosette over each marked chain, 4 rosettes per column, 28 in all.
- Make the 7 tassels and tie one to the tail at the end of each lower chain link.
- Clip the 9 metal rings onto the Top Band at the marked stitches, slide them onto the rod and steam the chain links lightly while the curtain hangs.
- After the curtain has hung overnight, trim the tassels evenly.
Common Mistakes & How to Fix Them
Fans that cup or ruffle instead of lying flat. This usually happens in Rows 3 and 5, where the chains between the spokes are either pulled too tight or worked too loose. Tight chains make the fan curl up into a little bowl, and loose chains make the scalloped edge wave like lettuce. Count your chains every time, and try to make each chain about as wide as your double crochet. Lay your first fan on the table after Row 5. If it is not flat, rip back that row and adjust your tension before you work the scallops, because blocking can only fix a small amount.
Chain links that stretch after hanging. Cotton chains are very stretchy when they carry weight, and every strand here holds a fan, four rosettes and a tassel. If you work the links with a single strand, they can grow an inch or more in a few days, and the strands will no longer match. Always hold the yarn double for every chain link, as the pattern says. Before you make all seven columns, hang one finished strand from a door handle overnight and measure it in the morning. If it grew noticeably, go down half a hook size for the chains only.
Strands that end at different heights. This happens when you measure the chains with a tape instead of counting them, or when you sew a rosette a few chains away from its marker. Small differences add up, and at the bottom one tassel ends up a hand width higher than its neighbor. Count every chain and place a stitch marker exactly where each rosette goes. Before you sew anything, lay all seven strands side by side on the floor under the valance. The four long ones should match each other, and the three short ones should match each other, chain for chain.
Thin or messy tassels. A tassel with too few wraps looks skinny under the big fans, and a loose neck wrap lets the strands slide and spread apart. Wind the full 30 wraps on the card, tie the top tightly before you cut the bottom loops, and wrap the neck firmly six to eight times. Trim the tassel only after the curtain has hung and been steamed, because the strands relax and some become longer than others. Use sharp scissors and cut straight across while you hold the tassel taut, then give it a gentle shake to fluff it.

You Might Also Like






Important Notes
Gauge matters less than in a sweater, but it sets the width of the whole curtain. My gauge is 20 sc to 4 in (10 cm) with DK cotton and a 3.5 mm hook. After blocking, one fan measures about 6 in (15 cm) across the straight edge and 3 in (7.5 cm) deep, and one rosette is about 1.5 in (4 cm) across. Make one fan first and measure it. If it is too big, go down a hook size; if it is too small, go up one.
Block every fan before you join the valance. Pin it flat on a blocking mat with the straight edge in a perfectly straight line and a pin in every picot, then mist it with water and let it dry completely. Rosettes can be blocked in a group, with one pin in the center and a gentle pull on each petal. After the curtain is assembled, steam the chain links lightly while they hang so they settle at their true length. Never press hard with a hot iron.
The curtain uses about 500 yd (460 m) of DK cotton, and I recommend buying about 600 yd (550 m) so you have enough for a test fan and slightly fuller tassels. Buy all of your yarn at the same time and check that every ball has the same dye lot number on the label. Raspberry shades can vary a lot from one lot to the next, and a slightly different fan or tassel shows clearly against the light. Keep one label until the project is finished.
The finished curtain weighs only about 250 g, so a slim cafe rod or a tension rod holds it easily. Spread the rings evenly so the band does not sag. To wash it, take it down, remove the rings and hand wash it in cool water with mild soap. Roll it in a towel to press out the water, then lay it flat to dry and reshape the fans. If you make a two color version with dark and light yarns, add a color catcher sheet to the wash.
I hope this curtain brings as much warm light into your home as mine has brought into my kitchen. It looks like a big project when you see it hanging, but it is really just a pile of small, happy pieces that come together at the end. Take your time, enjoy each fan and do not worry if your first one is a little crooked. Blocking will help, and every fan you make will be a little better than the last.
So pick up your hook tonight and start with just one fan. Make a cup of tea, count your stitches, and watch that first little half circle open up in your hands. Before you know it, you will have a whole basket of them and a window that glows pink every morning. Happy crocheting, my friend.
Crochet Abbreviations
You Ask, We Answer
What is the finished size of the curtain?
As written, the curtain is about 42 inches (107 cm) wide across the top band. The four long strands measure about 33 inches (84 cm) from the top of the band to the tip of the tassel, and the three short strands about 29 inches (74 cm). These sizes are for DK cotton with a 3.5 mm hook and my gauge of 20 sc to 4 inches. The valance with its top band is about 4 inches (10 cm) deep. To check the fit, measure your window from frame edge to frame edge and add about 2 inches, so the fans overlap the frame a little and no gap shows at the sides. If your window is narrower, make five fans, and if it is wider, make nine. You can also lengthen the strands by adding 9 chains between rosettes, which adds about 2 inches each time. Always count the chains rather than measure them, so all the strands stay even.
Can I use a different yarn weight or make it bigger or smaller?
Yes, and you do not need to change any stitch counts. The fans, rosettes and band all grow or shrink with the yarn and hook. Size 10 cotton thread with a 1.75 mm hook makes a dainty curtain about 24 inches wide, sport weight with a 3 mm hook gives about 36 inches, and worsted cotton with a 4.5 mm hook gives about 52 inches. Keep in mind that the chain links grow too, so your strands will be longer with a thicker yarn and shorter with thread. I suggest you make one fan and one strand in your new yarn first, hang it overnight, and measure it before you go further. For sizing by window, change the number of fans instead: five for a narrow window, seven for a standard one and nine for a doorway. I prefer cotton or a cotton blend, because acrylic tends to stretch and the fans lose their crisp shape over time.
How do I wash and care for the curtain?
Cotton is easy to care for, but I treat this curtain gently because of the tassels and the long chain links. Take it down, slip off the rings and shake out the dust first. Hand wash it in a sink of cool water with a little mild soap, and squeeze it softly instead of rubbing. Rinse until the water runs clear. Roll it in a large towel to press out the water, then lay it flat on a dry towel or a blocking mat. Smooth each fan back into its half circle and comb the tassels straight with your fingers. Let it dry fully before you hang it again, so the chains do not stretch while they are wet. Avoid the dryer and avoid strong direct sun while it dries, as both can fade the raspberry color. Between washes, a light shake and a puff of steam keep it looking fresh and the tassels full.
Success!
Thanks for subscribing — check your inbox for a welcome note.
Abbreviations
- ch — chain
- sl st — slip stitch
- sc — single crochet
- hdc — half double crochet
- dc — double crochet
- sp — space
- st(s) — stitch(es)
- PM — place marker
- picot — ch 3, sl st in 3rd ch from hook
- in — inch or inches
- cm — centimeters
- mm — millimeters
- yd — yards
- m — meters
- g — grams