
Red and Cream Sunburst Flower Square Bed Cover Crochet Pattern
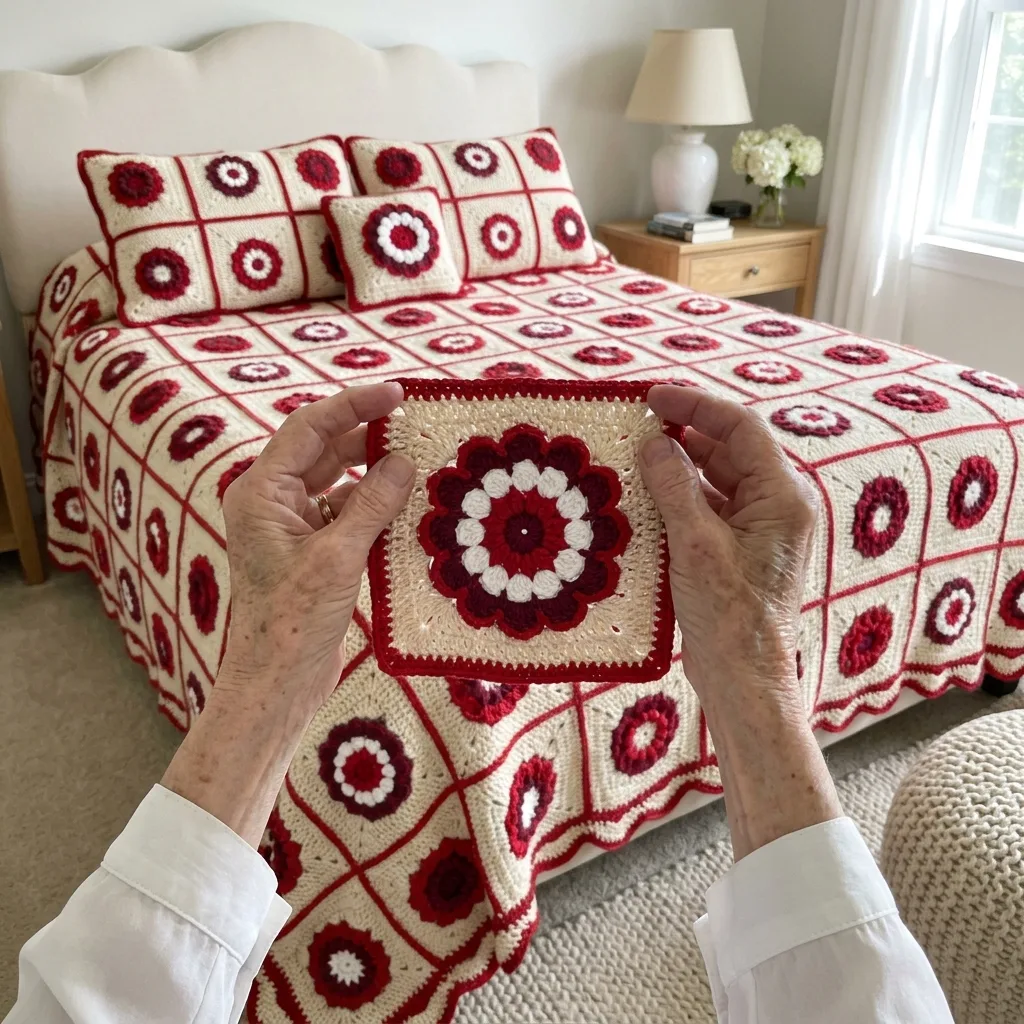
Doily-style spoke rounds, a squaring round, a layered flower and a counted scalloped edge.
Each square and flower take about two hours, made in small, satisfying pieces.
Each square looks like a little sunburst doily with a bright red flower at its heart.
About This Red and Cream Sunburst Flower Square Bed Cover Crochet Pattern Pattern
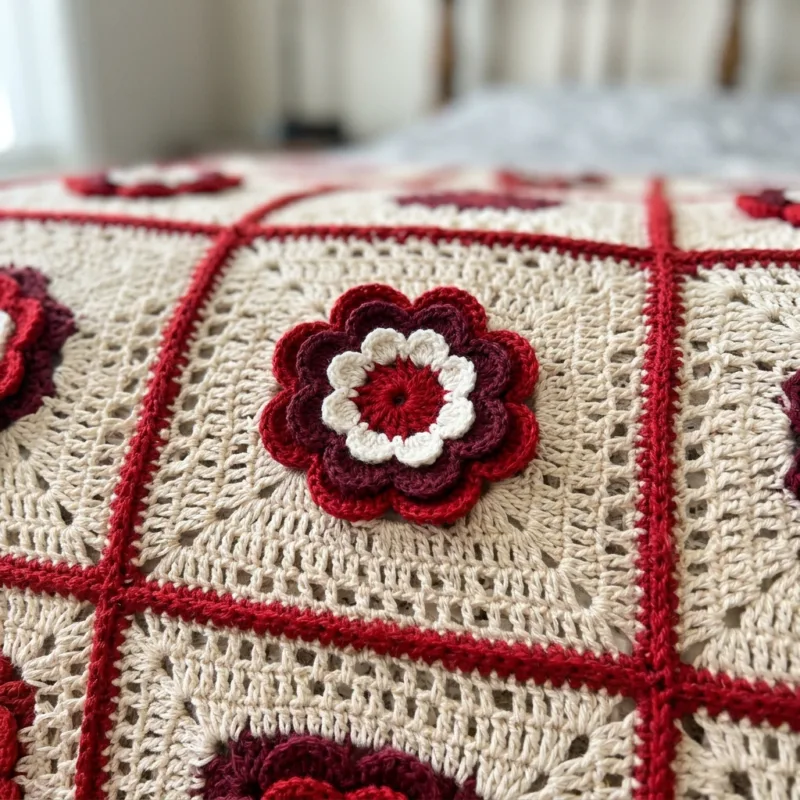
This bed cover looks like a collection of grandmother's doilies sewn together into a quilt. Every square is a cream sunburst of fine lace, with spokes of treble crochet radiating out from the center like rays of light and rounds of open mesh around them. In the middle of each sunburst sits a layered flower with a deep red center, a ring of round white petals, a ring of burgundy petals and a ring of bright red petals. Each square is framed in red, joined with red seams and finished with a scalloped edge in red and cream.
The square begins like a doily. A small ring of double crochet opens into a round of treble crochet spokes with chain spaces between them, then a second round of longer spaces and a third round where each spoke splits into two. That gives the fine, radiating sunburst you see behind every flower. A squaring round then turns the circle into a square, using taller stitches in the corners and shorter ones in the middle of each side, so the shape becomes perfectly square without pulling the spokes out of line.
Three more cream rounds frame the sunburst: an open mesh round, a solid round of double crochet and a second mesh round, which echoes the lace of the center. Then two red rounds, single crochet and half double crochet, make a crisp frame with 35 stitches on each side. The finished square measures about 9.5 inches. The red frames are what turn a pretty doily into a bold quilt block, and when the squares are joined, the frames line up into a red grid across the whole bed.
The flowers are made separately and sewn on, which keeps the sunburst flat and the flower lifted. Each flower has seven rounds and uses the front and back loop method to build its layers. The petal rounds go into the front loops and fold forward, and the base rounds go into the back loops behind them, ready for the next ring of petals. The result is a round, full flower about 4.5 inches across, with three rings of petals standing up from the lace.
The queen size uses 72 squares in 8 columns and 9 rows and 72 flowers. The squares are joined with a red whipstitch through the back loops. The border has four rounds: red single crochet, cream shells, a red round outlining every shell and a cream round with a picot at the top of each scallop. The finished cover measures about 79 by 88 inches. The counts work out evenly for any number of squares.
The stitches are chain, slip stitch, single crochet, half double crochet, double crochet, treble crochet and double treble crochet. What makes this pattern intermediate is the squaring round, with its mix of stitch heights, and the layered flower. I give the count at the end of every round, and each round is short, so it is easy to check your work and fix a mistake before it grows.
The finished cover is light, lacy and joyful. The fine cream spokes look delicate and old-fashioned, and the bright red flowers and frames make the whole cover sing. It looks wonderful at Christmas, of course, but just as lovely in summer with white curtains and fresh flowers. Red and cream suit a cottage bedroom, a farmhouse guest room or any space where you want a cheerful, welcoming heirloom on the bed.
Why You'll Love This Red and Cream Sunburst Flower Square Bed Cover Crochet Pattern Pattern
I have always loved doilies. My grandmother had them on every table, under every lamp and on the back of every armchair, and I spent hours as a child tracing their lacy spokes with my finger. This bed cover is my love letter to those doilies. Each square starts just like one, with a little ring and a burst of spokes, and when I hold a finished sunburst up to the window, I can almost see her living room again.
I love the first rounds of every square. The spokes grow so quickly, and each round opens the lace a little more. Then the squaring round comes, and the circle turns into a square right in your hands. I never get tired of that moment. It feels like a small piece of crochet magic, and it is surprisingly easy once you follow the order of the stitches: tall in the corners, short in the middle.
The flowers are pure joy to make. They are small, colorful and quick, about half an hour each, and they pile up in a bowl like a heap of red blossoms. I make them while watching a film in the evening, one layer at a time: the deep red center, the white petals, the burgundy ring and the bright red ring. When I lay a finished flower on a sunburst square for the first time, the square suddenly comes alive.
Here are the habits that made this project easy for me:
- Count the spokes after Rnd 2: there should be exactly 16.
- Place a stitch marker in each corner space during the squaring round.
- Make all the flowers in one color order so they all match.
- Weave in the flower ends as you change colors, not at the end.
I love the red frames and seams. Without them, the squares would blend into each other like one big lace tablecloth. With them, every sunburst sits in its own little window, like a framed picture, and the whole cover looks crisp and tailored. The red grid also connects the flowers, so the eye travels happily from one blossom to the next across the bed.
The colors feel cheerful in every season. At Christmas, the red and cream look festive and warm, with the flowers like poinsettias or holly berries. In spring and summer, they feel fresh and bright, like strawberries and cream. With white hydrangeas on the nightstand and a soft beige rug on the floor, the cover makes the bedroom feel cozy and welcoming all year long.
Finally, I love that this cover carries a story. Every square is a little doily, and together they hold the memory of all the doilies and all the hands that made them before us. If you make it, I hope it reminds you of someone you love, and I hope it becomes a treasured heirloom that tells your own story for many years to come.
Switch Things Up
Choose new flower and frame colors. The sunburst looks beautiful with many color pairs. Navy frames with blue and white flowers feel fresh and coastal, sage green frames with pink flowers look soft and romantic, and gold frames with yellow and orange flowers feel sunny. For a calm, all-neutral cover, make the frames in taupe and the flowers in cream and oatmeal. Keep the lace in a pale color so the spokes show clearly.
Make it for any bed. Each square is about 9.5 inches, and the border adds about 1.5 inches on every side. The border works for any number of squares, because each side of Border Rnd 1 always has 36 stitches per square plus 1, which divides evenly into the 6-stitch shell repeat. These sizes include the border:
- Twin: 6 by 9 squares, 54 squares and flowers, about 60 by 88 inches
- Full: 7 by 9 squares, 63 squares and flowers, about 69 by 88 inches
- Queen: 8 by 9 squares, 72 squares and flowers, about 79 by 88 inches
- King: 10 by 10 squares, 100 squares and flowers, about 98 by 98 inches
Make a sofa throw. Five columns by six rows, 30 squares, makes a throw of about 50 by 60 inches with the border. It uses less than half of the yarn and is a lovely way to try the sunburst and the layered flower before a full bed. It looks especially pretty folded over the arm of a cream sofa, and it makes a wonderful Christmas gift for someone who loves vintage lace.
Make a baby blanket. Four by four squares, 16 in all, gives a blanket of about 41 by 41 inches. For a baby, use soft pastels, such as pink and white flowers with pale pink frames, and a washable cotton blend. Close up the spokes a little by working Rnd 3 with ch 1 instead of ch 2. Sew each flower down around its outer base and tack each outer petal, so no small petal can be pulled by little fingers.
Make matching pillows and doilies. One square with the full four-round border makes a pretty pillow front of about 12.5 inches, or a small square doily for a nightstand. Six squares joined 3 by 2 make a standard sham front. A single sunburst square without the flower, edged with the border, makes a lovely lace mat under a lamp or vase, just like the doilies that inspired this cover.
Leave out the flowers. For a delicate, all-lace cover, make the squares without flowers, and work the red frames in cream too. The result looks like an antique lace bedspread, with rows of sunbursts across the bed. Or make the flowers on every other square only, for a lighter, more playful look. Lay out a few squares before you decide.
Change the edge. The red and cream scallops are bright and pretty. For a simpler finish, stop after the cream shell round and add a round of reverse single crochet. For a deeper edge, add a second round of cream shells before the red outline round, working each new shell into the center of the shell below. You could also work the whole border in red for a bold frame.
Change the yarn weight. In DK cotton with a 4 mm hook, each square comes out about 7.5 inches and the flowers about 3.5 inches, so a queen needs about 10 by 11 squares. In fine cotton thread with a small steel hook, the squares become true doilies, perfect for a table runner. In bulky yarn with a 6 mm hook, the squares grow to about 12 inches, so a queen needs only 6 by 7 squares.
Materials Needed
— Main Fabric
— Tools Required
The Free Pattern
0% complete
— Sunburst Square (Make 72, cream and red) :
— Layered Flower (Make 72, burgundy, white and red) :
— Sewing the Flowers (72 squares) :
— Layout and Joining :
— Border :
Assembly Instructions
- Make one sunburst square and one flower, check that the square is about 9.5 inches with 35 stitches per side and that the flower covers Rnds 1 to 3.
- Make all 72 squares and all 72 flowers.
- Sew a flower to the center of each square through the free back loops of Rnd 5 of the flower.
- Block each square gently from the back, opening the spokes and mesh without flattening the flower.
- Arrange the squares in 8 columns and 9 rows and whipstitch them together with red through the back loops.
- Work the four border rounds in red, cream, red and cream, weave in all ends and block the scallops into neat curves.
Common Mistakes & How to Fix Them
Losing a spoke in the sunburst. The sunburst depends on exactly 16 spokes in Rnds 2 and 3 and 32 in Rnd 4. If you skip a dc in Rnd 2, or forget to work the (tr, ch 1, tr) in one spoke of Rnd 4, the squaring round will not have 8 spaces in every quarter, and the corners will not fall in the right places. Count your spokes at the end of every early round. If you have 15 or 17, pull back right away, because the squaring round cannot fix a wrong count.
Mixing up the stitch heights in the squaring round. Rnd 5 turns the circle into a square by rising from sc in the middle of each side to dtr in the corners. If you work the stitches in the wrong order, or use the same height all the way around, the square comes out round, lopsided or with a bump in one side. Place a stitch marker in the corner space of each quarter before you start, and say the order quietly as you go: tr, dc, hdc, sc, hdc, dc, tr, corner. Lay the square flat afterward and check that all four corners are sharp.
Petals worked through both loops. The layered flower only works if the petal rounds go into the front loops and the base rounds go into the back loops. If you work a petal round through both loops, the next base round has nowhere to go, and the flower comes out flat, with its layers crowded together. Find the front loop carefully before each petal round, using good light and a hook with a pointed tip. After each petal round, fold the petals forward with your fingers, so the free back loops are easy to see for the next round.
Red frames that pull or ripple. The two red frame rounds can pull the lace in if you crochet them tightly, especially after the open mesh round, and then the square cups. If they are too loose, the edge ripples. Count 33 and then 35 stitches on each side, and check that the square lies flat after Rnd 10. If it cups, go up half a hook size for the red rounds only. Square frames that all match make the joining much easier and keep the red grid straight across the bed.

You Might Also Like






Important Notes
Gauge matters because 72 squares must fit together. With a 5 mm hook, the first four rounds should measure about 5.7 inches across, the finished square about 9.5 inches with 35 stitches per side and the flower about 4.5 inches across. Measure your first five squares and then one in every ten. If the spokes ruffle, tighten your chains a little; if the center cups, loosen them.
Block each square gently from the back after the flower is sewn on. Pin it face down on a towel by its edges, to 9.5 by 9.5 inches, open the spokes and mesh with your fingertips and mist it lightly. Let it dry completely. Do not press the flower flat. After the border, pin each scallop into a neat curve with the picot at the top, mist it and let it dry, so the edge hangs evenly.
The yarn amounts in the materials list are estimates for the queen size, including the joining and the border. Buy all four colors at once, from the same dye lots, and keep the labels. Reds in particular can vary between lots, and 72 red frames side by side would show any change clearly. Buy one extra skein of cream and red for safety and for future repairs.
Wash the finished cover on a gentle cold cycle in a large mesh bag or a zipped duvet cover, with mild detergent. Bright red and burgundy sit right next to cream and white, so always add a color catcher, and for the first wash you can soak the cover in cold water with a splash of vinegar. Never wring it. Lay it flat face up, open the spokes and fluff every flower while it dries.
Thank you for making this red and cream sunburst flower bed cover with me. I hope you enjoy watching each little doily grow from its ring of spokes, the clever squaring round, the bright layered flowers and the red frames that bring everything together. It is a cover full of memory and cheer, and every square adds a little more of both.
So find your cream, red, burgundy and white yarn, make your magic ring and start your first sunburst today. Add its flower, frame it in red and lay it on your bed to admire. Then make the next one, and soon you will have a joyful heirloom that brightens your bedroom for many years.
Crochet Abbreviations
You Ask, We Answer
How big is the finished bed cover, and how many squares do I need?
Following the pattern exactly, each square measures about 9.5 inches with 35 stitches on each side, and each flower about 4.5 inches across. The queen size uses 72 squares and 72 flowers in 8 columns and 9 rows, which makes a panel of about 76 by 85.5 inches. The border adds about 1.5 inches on every side, so the finished cover measures about 79 by 88 inches. On a standard queen mattress of 60 by 80 inches, that gives a drop of about 9 to 10 inches on each side and a little drape at the foot. For more length, add a row of squares. The border works for any number of squares, because each side always has 36 stitches per square plus 1. To plan your own size, measure your bed plus the drop you want and divide by 9.5.
Can I make the sunburst squares without the flowers, or use thread?
Yes to both. Without the flowers, the squares become pure sunburst lace, and the cover looks like an antique lace bedspread. In that case, you may want to work the red frame rounds in cream too, for a soft, all-cream look. The sunburst works beautifully in fine cotton thread with a small steel hook, where each square becomes a real doily of about 5 inches, perfect for a table runner or a dresser scarf. For a bed cover, worsted cotton is my favorite because it shows the spokes clearly and makes the cover warm enough to use. A cotton and acrylic blend is softer and lighter. DK cotton with a 4 mm hook gives squares of about 7.5 inches, and bulky yarn with a 6 mm hook gives squares of about 12 inches. Always make one square first and measure it.
How do I care for and store the bed cover so the flowers stay full?
Wash it only when it really needs it, on a gentle cold cycle in a large mesh bag with mild detergent, and always use a color catcher, because red and burgundy sit right next to cream and white. After washing, press out the water, lay the cover flat face up, open the spokes with your fingertips and fluff every flower so the petals stand up as they dry. Never use a dryer, which can flatten the flowers and shrink cotton. Between washes, shake it out gently and air it away from strong direct sunlight, which can fade red over time. To store it, fold it loosely face out, with tissue paper between the layers and a little crumpled tissue around the flowers, and keep it in a large cotton bag or box rather than plastic. Never stack heavy things on top.
Success!
Thanks for subscribing — check your inbox for a welcome note.
Abbreviations
- ch — chain
- sl st — slip stitch
- sc — single crochet
- sc2tog — single crochet 2 together (here worked over 2 corner spaces at a seam)
- hdc — half double crochet
- dc — double crochet
- tr — treble crochet
- dtr — double treble crochet
- picot — ch 3, sl st in 3rd ch from hook
- FLO — front loop only
- BLO — back loop only
- st(s) — stitch(es)
- sp(s) — space(s)
- rep — repeat
- Rnd — round
- RS — right side