
Yellow Plaid Flannel Square Bedspread Crochet Pattern
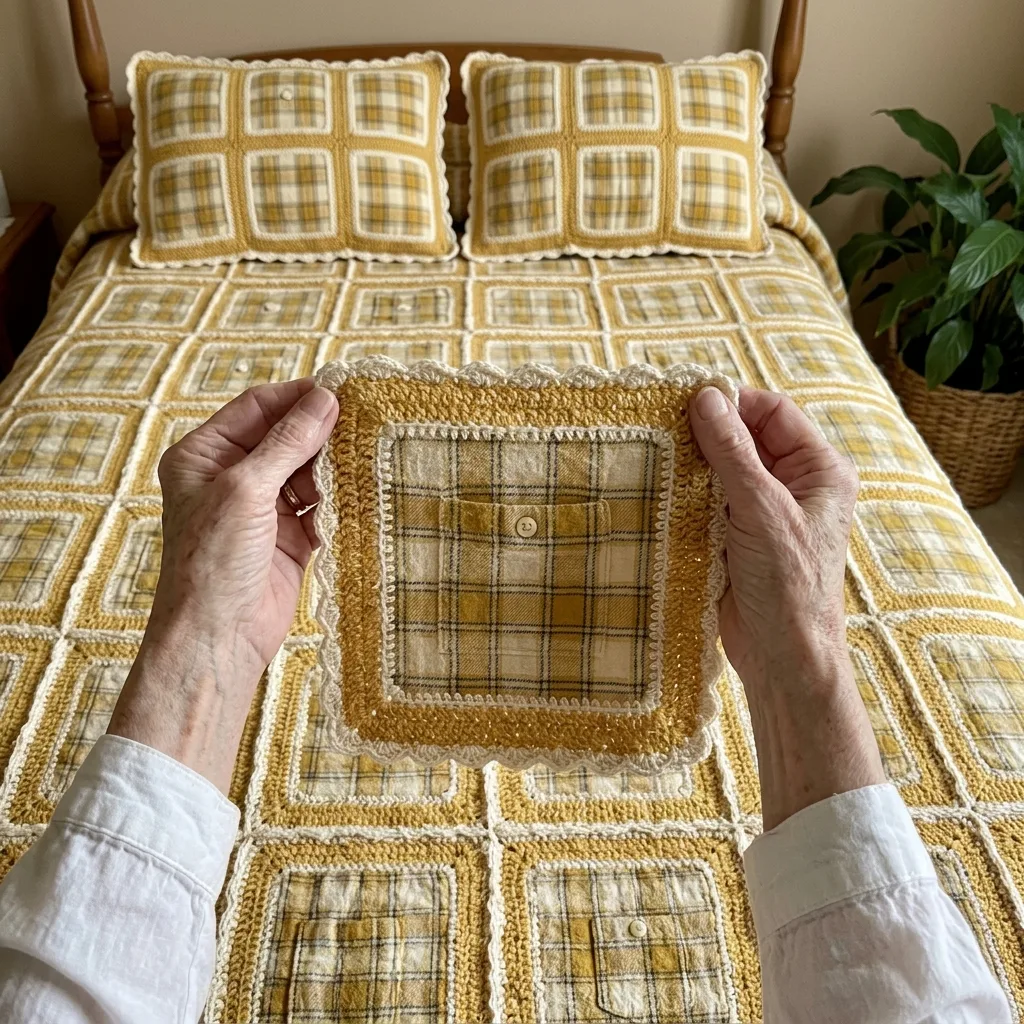
You need basic crochet stitches and a little care when you prepare the fabric.
Each square is small and portable, so the work fits into short sessions.
Worn flannel shirts become the plaid centers of every square.
About This Yellow Plaid Flannel Square Bedspread Crochet Pattern Pattern
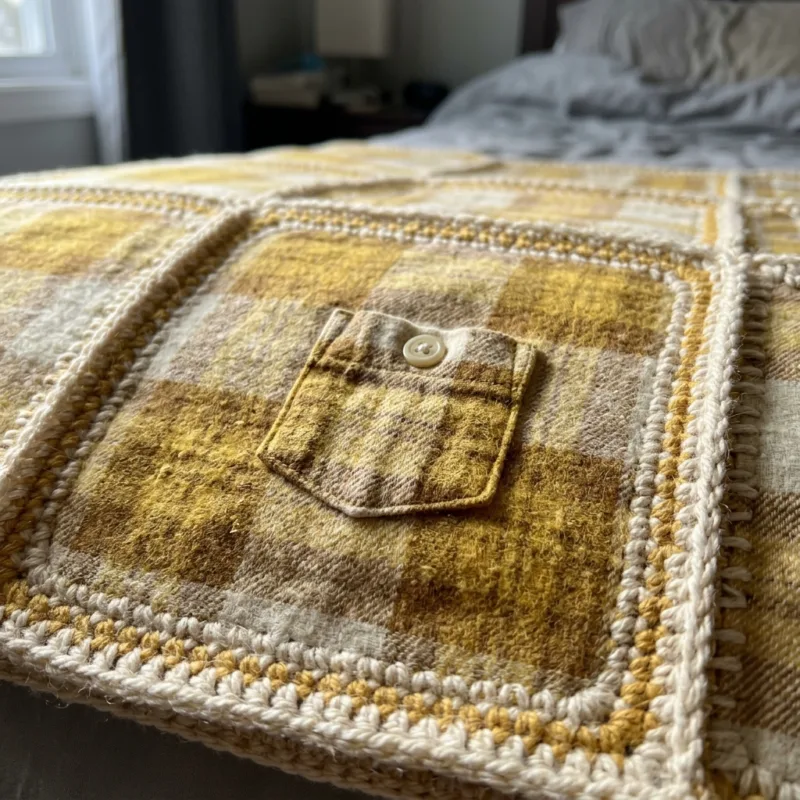
This bedspread gives a stack of old plaid flannel shirts a second life as a cozy, quilt-like cover, with crochet doing all of the framing. Each of the 72 squares has a center of soft yellow, mustard and cream plaid flannel, and a few of them keep a little shirt pocket with its button still in place. Around the fabric grows a crocheted frame: a thin cream round, three rounds of golden yellow, and a cream finish. Joined in a grid of 8 by 9, the squares make a bedspread of about 72 by 81 inches.
If you have never mixed fabric and yarn, this is a gentle way to start. You do not sew a quilt and you do not need a sewing machine. You cut a square of flannel, press the edges under, punch a neat row of small holes around the border, and then crochet straight through those holes with a hook. The first round of stitches locks the fabric in place, and every round after that is plain, easy crochet. Because the flannel gives each square a strong, flat center, the squares stay crisp and hold their shape on the bed.
The stitches are simple: chain, slip stitch, single crochet and half double crochet, and a double crochet for the shell edge. The rounds are short, the counts are easy to check, and every square is the same, so you learn the pattern in the first square or two and the rest feels relaxed. I call it Intermediate for two reasons. The first is the amount of work, because 72 squares is a big project. The second is the extra steps with fabric, such as preparing the squares and punching the holes, which take a little care to do evenly.
I picked yellow because it is such a friendly, welcoming color. Golden yellow with cream looks sunny in the morning and warm in lamplight, and it works well in a farmhouse bedroom, a cottage guest room or a child's room. The plaid brings in a bit of mustard and soft cream, so the squares look related to the yarn instead of fighting with it. If you are choosing the flannel yourself, look for a plaid with a yellow and cream ground and a few thin lines of a darker color, because those fine lines give the plaid its crisp, tailored look. You can use new yardage or shirts you already have.
The shirt pocket squares are my favorite detail. In this pattern, 12 of the 72 squares are cut so that a small chest pocket sits in the center, with the button left on. Scatter them across the bed and they work like little surprises. A visitor will notice the first one and then start looking for the rest. If you prefer a more uniform look, you can make all the squares plain plaid and keep the pocket squares for the pillow shams only.
This project suits anyone who loves the look of a quilt but would rather crochet than piece and quilt a top. It also suits people with a closet of worn flannel shirts that deserve more than the donation bin. It makes a wonderful gift for a new home, a cabin, or a family member who has always worn flannel. Plan for roughly 150 to 200 hours in all, split between preparing the squares, crocheting the frames, joining and the edge. Because every square is small and portable, the hours pass in short, comfortable sessions.
Why You'll Love This Yellow Plaid Flannel Square Bedspread Crochet Pattern Pattern
I love a project that begins with something I already own. Opening the closet, choosing a few worn plaid shirts and turning them into squares feels a bit like treasure hunting. The collars, cuffs and worn elbows go into the scrap bag, and the good flat parts of the fronts and backs become the center of the bedspread. Nothing is wasted, and the shirts get to stay in the family in a new form.
There is also something deeply comforting about flannel. It is soft, it is warm, and it carries a feeling of home with it. When that fabric sits inside a crocheted frame, it looks both rustic and neat, like a fine old quilt that someone made with care. I like how the yarn and the cloth are so different in texture, one brushed and soft, the other bumpy and raised, and how well they sit together in the same square.
If you are making this from shirts that belonged to someone you love, it can become a very meaningful piece. A father's work shirts, a grandfather's weekend flannels or a husband's favorite plaid can all be turned into squares. You do not need to cut anything precious until you are ready, and you can choose which parts of each shirt to keep, such as a pocket or a section with the best pattern. A cover like this gets used and touched every day, and that is a lovely way to remember someone.
I also love that this design is very forgiving. Each square is a small separate piece, so a crooked cut or a tight round never spreads through the whole bedspread. If one square comes out wrong, you can set it aside and make a new one in an evening. Blocking evens out small differences in tension, and the cream joining rounds hide the seams. I think this is a big reason why long projects get finished: the mistakes stay small.
The work itself is relaxing, too. Pressing and punching the fabric is a quiet, tidy task you can do at a table with a cup of tea. Crocheting the frame is a steady, rhythmic job where the rounds grow outward in the same order every time. Once the half double crochet rounds are in your hands, you can listen to a podcast, talk to a friend, or watch a film. I find that the repetition is where the calm comes from.
Because the squares are separate, a project like this can also be shared. A friend, a sister or a crochet group can each take a handful of shirts and make a few squares, and you can join them together as a group gift for a wedding or a new home. That turns a long project into a warm, shared one, and every person who helped can point to their own squares on the finished bed.
And finally, I love the finished look. Yellow and cream feel cheerful without being loud, and the plaid centers give the bed a cozy, lived-in charm. The cream joins frame each square like a small picture, and the scalloped edge softens the outline of the whole cover. When the sun comes through the window, the bed looks like a patchwork of little golden windows. I have rarely made something so simple that made a room feel so friendly.

Switch Things Up
One of the best things about a square-based pattern is how easily you can change the size. All the numbers below use the same 9 inch squares, so the edge counts still divide evenly by the shell repeat of 4. Choose the size that fits your bed, your sofa or your gift list.
- Baby blanket: make 4 columns by 5 rows, which is 20 squares and about 36 by 45 inches. The edge has 620 single crochet and 155 shells, and you need about 6 flannel shirts or three quarters of a yard of flannel.
- Throw for the sofa: make 5 columns by 6 rows, which is 30 squares and about 45 by 54 inches. The edge has 756 single crochet and 189 shells.
- Large bed: make 10 columns by 10 rows, which is 100 squares and about 90 by 90 inches, so the cover hangs well down the sides of a queen or king bed. The edge has 1,368 single crochet and 342 shells.
- Matching pillow front: make 2 columns by 2 rows, which is 4 squares and about 18 by 18 inches. The edge has 280 single crochet and 70 shells. Make two fronts for a pair of shams, and sew each one to a flannel or cotton back with an overlapping envelope opening.
Color is the next easy change. Yellow is cheerful, but this method works with any plaid. A classic red and cream plaid with terracotta yarn looks like an old cabin blanket, forest green and navy look calm and masculine, and soft gray with blue looks fresh and modern. The rule is simple: pick the main yarn color from the strongest color in the plaid, and pick the cream or lightest yarn from the lightest stripe. If you choose a plaid with a lot of colors, test your yarn against the fabric in daylight before you buy it all.
You can also change the fabric. Lightweight cotton shirting, linen, corduroy and even soft denim all work, as long as you fuse a lightweight interfacing to the back first so the holes stay clean and the fabric does not stretch. Thick wool plaid is very warm, but it needs a larger hole and a sturdier hook, so make one test square before you cut a whole shirt. If you want the squares to feel more like a quilt, you can also add a thin layer of cotton batting behind each square, though the cover will then be heavier to wash.
The edge is open to change as well. The shell edge is soft and traditional, but you can replace it with two rounds of single crochet for a plain, firm border, or add a small picot on top of each shell by working a chain 3 and a slip stitch into the center double crochet. If you would like a more contrasting frame, work the shells in the golden yellow instead of the cream. All of these versions use the same single crochet round as their base, so the counts above still apply.
Materials Needed
— Main Fabric
— Tools Required
The Free Pattern
0% complete
— Flannel Center (Make 72: 60 plain plaid and 12 with a shirt pocket) :
— Crochet Frame (Make 72) :
— Layout :
— Cream Shell Edge :
Assembly Instructions
- Prepare all 72 flannel squares first, so you can make the frames in batches, and keep them in a flat box so the folded edges do not get crushed.
- Crochet the frames in the same order every time, check the counts after Rounds 2, 3, 4 and 5, and weave in the ends of every square as you finish it.
- Block each framed square by pinning it to a mat at 9 inches, steaming it lightly from a little distance, and letting it dry flat, so the squares are all the same size.
- Lay out the 72 squares in 9 rows of 8 on a bed or floor, spread the 12 pocket squares evenly with every pocket at the top, and mark the rows with small pieces of paper.
- Join the squares with cream and a slip stitch seam into 9 strips of 8, working through both loops of 35 sc along each side and matching the corner middle sc.
- Join the 9 strips together in the same way, matching the seams so the four corners meet neatly in each cross, and weave in all the joining ends.
- Work Edge Round 1 around the whole bedspread with 3 sc in each outer corner and 1 sc in each seam, and check that you have 1,164 sc before you begin the shells.
- Work Edge Round 2 to make the 291 shells, fasten off, weave in the last ends, and give the bedspread a final light steam so the scallops lie flat.
Common Mistakes & How to Fix Them
Punching holes unevenly or too close to the folded edge is the most common problem with this pattern, because the fabric can tear or fray and the first round will look wavy. Mark every square with the same card template, keep the holes 1/8 inch from the edge, and always fuse interfacing to the back of the fabric before you punch.
Skipping the pre-wash is a mistake that shows up months later. Flannel can shrink 5 to 10 percent, and a fabric center that shrinks inside a crocheted frame makes the square pucker and pull. Wash and dry the flannel twice before cutting, and wash it in the same way you plan to wash the finished bedspread.
Losing track of the corners in the half double crochet rounds makes the square lean or cup. After every round, count the stitches on each side: 23 hdc after Round 2, 27 after Round 3 and 31 after Round 4, and check that each corner has its own ch-2 space.
Pulling the first round of single crochet too tight makes the fabric ripple and the frame curl inward. Use the 4 mm hook, let each sc sit loosely in its hole, and if the fabric still ripples, change to a 4.5 mm hook for Round 1 only.

You Might Also Like






Important Notes
The stitch counts, the square size and the yarn and fabric amounts are estimated from the finished bedspread, so please make one complete square first, block it, and check that it measures about 9 inches before you prepare the other 71.
Always press and fuse the interfacing and the folded edges before you punch the holes, and always use cotton or cotton blend flannel. Very stretchy or very thick fabrics need a test square first, because they can change the hole size and the count.
Buy all the cream and golden yellow yarn at the same time and from the same dye lot, because a small color difference shows clearly in the large bands of yellow.
Wash the finished bedspread in cool water on a gentle cycle, and dry it flat or on low heat. Cotton flannel and cotton yarn are easy to care for, but a large wet cover is heavy, so support its weight when you lift it. If you use a dark plaid with a light yarn, wash with a color catcher sheet.
Thank you for making this one with me. It is a big project, but it is built from small, friendly pieces, and every finished square makes the next one easier to start. I hope it gives your old flannel shirts a happy new life on your bed. Come back and tell me whose shirts you used.
Crochet Abbreviations
You Ask, We Answer
What is the finished size of this bedspread?
As written, with 8 columns and 9 rows of 9 inch squares, the bedspread measures about 72 by 81 inches (183 by 206 cm) before the shell edge, which adds a small amount. It lies over a twin or full-size bed with a drop at the sides. For a queen or king bed, make 10 columns by 10 rows, which is 100 squares and about 90 by 90 inches. For a sofa throw, make 5 columns by 6 rows. The stitch counts for the edge of each size are in the variations section.
Can I use other fabric or a different yarn weight?
Yes. Cotton shirting, lightweight linen and soft corduroy all work if you fuse interfacing to the back first. A thicker yarn and a larger hook make bigger frames, and a finer yarn makes smaller ones, so you need to change the number of hole stitches to match. If you change the square size, work out the edge again: each square contributes 33 sc, each seam 1 sc, each outer corner 3 sc, and the total must divide by 4 for the shell repeat. Cotton yarn is the best choice because it is firm and washes well.
How do I wash and care for the finished bedspread?
Wash it in cool water on a gentle cycle with a mild detergent, or by hand in a large tub. Cotton gets heavy when it is wet, so lift it with both arms under the whole cover. Dry it flat on a clean sheet or towels, or tumble dry on low if the yarn label allows it, and reshape the scallops with your fingers while it is still damp. Avoid bleach, and avoid hanging the wet cover, which can stretch the frames.
Success!
Thanks for subscribing — check your inbox for a welcome note.
Abbreviations
- ch — chain
- sl st — slip stitch
- sc — single crochet
- hdc — half double crochet
- dc — double crochet
- sk — skip
- sp — space