
Forest Green Rose Granny Square Bed Cover Crochet Pattern
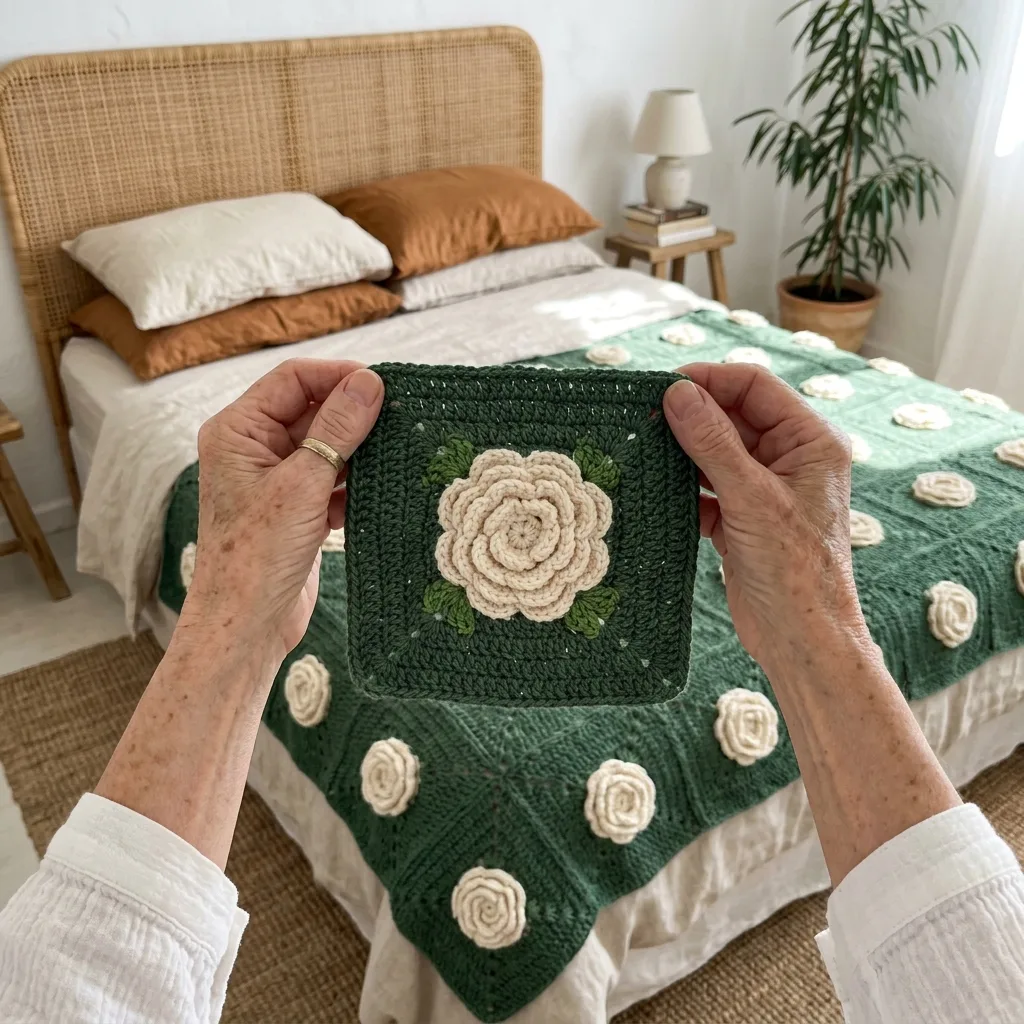
You need to be comfortable with double crochet, back loop work and sewing a small rose together.
Each square and rose is quick to make, and the hours add up one square at a time.
Every deep green square carries one large 3D rose with two little leaves.
About This Forest Green Rose Granny Square Bed Cover Crochet Pattern Pattern
This bed cover is made from 63 deep forest green squares, each worked in the round with dense, ridged double crochet. Every square carries one large raised cream rose with two green leaves sewn at its base. The squares are sewn together with flat seams and finished with a neat green edging.
The finished cover measures about 72 by 92 inches. It covers a twin bed with a soft drop on the sides and sits nicely as a topper on a larger bed. It suits crocheters who enjoy long projects made from small, repeating pieces.

Why You'll Love This Forest Green Rose Granny Square Bed Cover Crochet Pattern Pattern
I love that every square and every rose is small enough to tuck into my bag. I make a few squares, then a few roses, and the whole bed cover grows without me noticing.
The cream roses look so bright against the deep green. When the cover is on the bed with a few cushions, the bedroom feels warm and calm, and it makes a gift people keep for years.

Switch Things Up
Try a dusty rose flower on a charcoal square for a moodier look, or a soft butter yellow rose on sage green for a spring bedroom. For a baby blanket, join 3 by 4 squares to get about 30 by 40 inches. For a throw, join 5 by 6 squares to get about 50 by 60 inches. You can also leave out the roses on every other square for a lighter checkerboard look.
Materials Needed
— Main Fabric
— Tools Required
The Free Pattern
0% complete
— Textured Green Square (Make 63, forest green) :
— Rose Inner Strip (Make 63, cream) :
— Rose Outer Strip (Make 63, cream) :
— Leaf (Make 126, forest green) :
— Layout (Make 1 grid of 63 squares) :
— Edging (Make 1, forest green) :
Assembly Instructions
- Weave in all ends on the Textured Green Squares, then block each square to 10 inches by pinning it flat, misting it with water and letting it dry completely.
- Make 63 roses. Roll each Rose Inner Strip tightly, wrap the Rose Outer Strip around it, and stitch the base firmly with the cream tails.
- Sew one rose to the center of each square, then sew two Leaves at the base of each rose, following the Layout section.
- Lay all 63 squares on the floor in 9 rows of 7, and check that every square faces the same way and that the leaves sit in the same places.
- Join the squares into rows with a whipstitch seam in forest green, sewing through the back loops of the 30 dc on each side of both squares. Keep the seam loose so it stays as stretchy as the squares.
- Join the 9 rows to each other with the same whipstitch seam, and where four squares meet, sew through all four corner sps so the corners stay flat.
- Weave in the seam ends, then block the whole cover lightly on a clean bed or floor, pinning the outer edge straight and keeping the iron or steam away from the roses.
- Work the Edging in forest green around the outer edge, then weave in the last ends.
Common Mistakes & How to Fix Them
Working Rounds 2 to 8 into both loops instead of the back loop only. The squares then lose their ridged texture and come out smaller, so check your first square against the 10 inch measurement.
Skipping the ch 2 at a corner. The square then curls and ends up smaller than the others, so make each corner (2 dc, ch 2, 2 dc) every time.
Rolling the rose too loosely. A loose rose flops over on the square, so roll the inner strip tightly and sew through the base every few stitches.
Sewing the seams too tightly. A tight seam pulls the cover into puckers, so use a loose tension and check that each seam lies flat.

You Might Also Like
Important Notes
Each square should measure about 10 inches (25 cm) after blocking. If your square comes out smaller, go up a hook size before making the rest.
The edging counts are written for a grid of 7 by 9 squares. For another grid size, work 30 sc for every square along an edge, plus 2 sc at each seam.
Yarn amounts are approximate and depend on your tension, so keep a little extra of each color.
Wash the cover in cold water on a gentle cycle with mild detergent and dry it flat. Cotton is heavy when wet, so support the whole cover when you lift it.
Thank you for crocheting this bed cover with me. Take it one square and one rose at a time, and send me a photo when the last seam is sewn. Happy crocheting, Denise.
Crochet Abbreviations
You Ask, We Answer
How big is the finished bed cover?
With 7 squares across and 9 down, the squares measure 70 by 90 inches, and the edging adds about 1 inch on each side, so the finished size is about 72 by 92 inches. That covers a twin bed with a soft drop and works as a topper on a larger bed.
Can I use another yarn weight or make a different size?
Yes. A thinner yarn gives smaller squares, so you will need more of them to reach the same size. For a baby blanket, join 3 by 4 squares to get about 30 by 40 inches. For a throw, join 5 by 6 squares to get about 50 by 60 inches. For a queen size cover, join 9 by 9 squares to get about 90 by 90 inches, and work 30 sc for every square along each edge.
How do I wash and care for the cover?
Machine wash it in cold water on a gentle cycle with mild detergent, then dry it flat. Do not wring it, and support its weight when it is wet so the stitches and the roses do not stretch.
Success!
Thanks for subscribing — check your inbox for a welcome note.
Abbreviations
- ch — chain
- sl st — slip stitch
- sc — single crochet
- hdc — half double crochet
- dc — double crochet
- blo — back loop only
- sp — space (plural: sps)
- st — stitch (plural: sts)
- rep — repeat