Amanda's Creative Corner Crochet · Kitchen
Free Crochet Patterns Handmade with Love

Pink Star Granny Square Bed Cover Crochet Pattern

Jump to Pattern
Pink Star Granny Square Bed Cover Crochet Pattern
160-210 Hours 0 made this
Intermediate Level

You need to be comfortable with granny stitch, corner-to-corner blocks and whipstitch seams.

160 to 210 Hours

Each small square works up quickly, and the hours add up one star at a time.

Quilt Style Stars

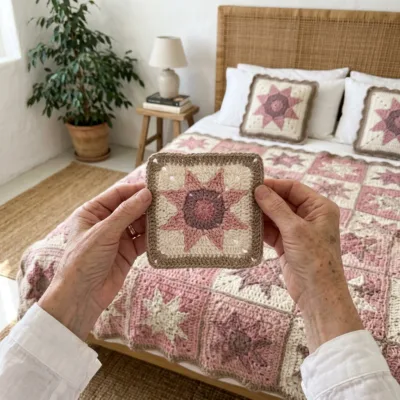
Pink star blocks framed in warm taupe give the cover the look of a patchwork quilt.

About This Pink Star Granny Square Bed Cover Crochet Pattern Pattern

This bed cover is made from 20 star blocks. Each block is built from nine small squares: four cream corner squares, four star edge squares that are half pink and half cream, and one pink and mauve center square. Every block gets a wide taupe frame, and the framed blocks are sewn together and finished with a scalloped taupe edging.

The finished cover measures about 79 by 98 inches, enough for a queen bed with a generous drop on the sides. It suits crocheters who enjoy long projects made from small, repeating pieces and who like the look of a patchwork quilt.

Pink Star Granny Square Bed Cover Crochet Pattern step detail

Why You'll Love This Pink Star Granny Square Bed Cover Crochet Pattern Pattern

I love that every little square is small enough to tuck into my bag, so the whole bed cover grows a little each day. Watching the star appear when the nine squares come together is the best part.

The soft pink and the warm taupe make the bedroom feel calm and cozy right away. It is also the kind of gift that people keep for years.

Switch Things Up

Try dusty blue and navy stars on cream with a charcoal frame for a cooler look, or sage and forest green with a warm gray frame for a quiet bedroom. For a baby blanket, make 2 by 2 blocks to get about 40 by 40 inches. For a throw, make 3 by 3 blocks to get about 60 by 60 inches. You can also make one block with a frame and sew it into a matching pillow cover.


Materials Needed

— Main Fabric

01 Worsted weight (4) 100% cotton yarn in cream: about 2,100 yards (about 1,250 g) for the corner squares and the cream half of the edge squares
02 Worsted weight (4) 100% cotton yarn in soft pink: about 840 yards (about 500 g) for the star points and the center squares
03 Worsted weight (4) 100% cotton yarn in dusty mauve: about 210 yards (about 125 g) for the outer rounds of the center squares
04 Worsted weight (4) 100% cotton yarn in warm taupe: about 2,400 yards (about 1,420 g) for the block frames, the seams and the scalloped edging
05 Buy a little extra of each color so you can make a test block and have spare yarn for repairs

— Tools Required

06 5.0 mm (H-8) crochet hook
07 Yarn needle
08 At least 4 stitch markers for the edging corners
09 Scissors
10 Blocking mats and rustproof pins
11 Measuring tape

The Free Pattern

Intermediate 160-210 Hours

0% complete

— Cream Corner Square (Make 80, cream) :

Each block uses 4 of these squares. Each square is worked in the round without turning and should measure about 5 inches (13 cm) after blocking. Make one test block first and check every size before making the rest.
Round 1: Ch 4 and join with sl st to form a ring. Ch 3 (counts as first dc), 2 dc in the ring, ch 2, *3 dc in the ring, ch 2; rep from * 2 more times, join with sl st to top of beginning ch 3. (12 dc, 4 ch-2 sps)
Round 2: Sl st in each of the next 2 dc and in the corner ch-2 sp. Ch 3 (counts as first dc), 2 dc, ch 2, 3 dc in same sp. *Ch 1, (3 dc, ch 2, 3 dc) in next corner sp; rep from * 2 more times. Ch 1, join with sl st to top of beginning ch 3. (24 dc, 4 ch-2 corner sps, 4 ch-1 sps)
Round 3: Sl st in each of the next 2 dc and in the corner ch-2 sp. Ch 3 (counts as first dc), 2 dc, ch 2, 3 dc in same sp. *Ch 1, 3 dc in next ch-1 sp, ch 1, (3 dc, ch 2, 3 dc) in next corner sp; rep from * 2 more times. Ch 1, 3 dc in next ch-1 sp, ch 1, join with sl st to top of beginning ch 3. (36 dc, 4 ch-2 corner sps, 8 ch-1 sps)
Round 4: Sl st in each of the next 2 dc and in the corner ch-2 sp. Ch 3 (counts as first dc), 2 dc, ch 2, 3 dc in same sp. *[Ch 1, 3 dc in next ch-1 sp] 2 times, ch 1, (3 dc, ch 2, 3 dc) in next corner sp; rep from * 2 more times. [Ch 1, 3 dc in next ch-1 sp] 2 times, ch 1, join with sl st to top of beginning ch 3. Fasten off. (48 dc, 4 ch-2 corner sps, 12 ch-1 sps)
Each finished side has 4 dc clusters. Count them once on your test square, because the edge squares and the center square must match this size.

— Pink and Mauve Center Square (Make 20, pink and mauve) :

Work Rounds 1 and 2 in pink and Rounds 3 and 4 in mauve. The stitch counts are the same as the Cream Corner Square.
Round 1: With pink, ch 4 and join with sl st to form a ring. Ch 3 (counts as first dc), 2 dc in the ring, ch 2, *3 dc in the ring, ch 2; rep from * 2 more times, join with sl st to top of beginning ch 3. (12 dc, 4 ch-2 sps)
Round 2: Sl st in each of the next 2 dc and in the corner ch-2 sp. Ch 3 (counts as first dc), 2 dc, ch 2, 3 dc in same sp. *Ch 1, (3 dc, ch 2, 3 dc) in next corner sp; rep from * 2 more times. Ch 1, join with sl st to top of beginning ch 3. Fasten off. (24 dc, 4 ch-2 corner sps, 4 ch-1 sps)
Round 3: Join mauve in any corner ch-2 sp. Ch 3 (counts as first dc), 2 dc, ch 2, 3 dc in same sp. *Ch 1, 3 dc in next ch-1 sp, ch 1, (3 dc, ch 2, 3 dc) in next corner sp; rep from * 2 more times. Ch 1, 3 dc in next ch-1 sp, ch 1, join with sl st to top of beginning ch 3. (36 dc, 4 ch-2 corner sps, 8 ch-1 sps)
Round 4: Sl st in each of the next 2 dc and in the corner ch-2 sp. Ch 3 (counts as first dc), 2 dc, ch 2, 3 dc in same sp. *[Ch 1, 3 dc in next ch-1 sp] 2 times, ch 1, (3 dc, ch 2, 3 dc) in next corner sp; rep from * 2 more times. [Ch 1, 3 dc in next ch-1 sp] 2 times, ch 1, join with sl st to top of beginning ch 3. Fasten off. (48 dc, 4 ch-2 corner sps, 12 ch-1 sps)

— Star Edge Square (Make 80, half pink and half cream) :

This square is worked flat from one corner to the opposite corner in blocks. One block is a ch-3 space plus 3 dc. Rows 1 to 4 add one block each row, and Rows 5 to 7 lose one block each row. Pink forms one half of the square and cream the other, with a stepped diagonal between them. The finished square has 16 blocks and should measure about 5 inches (13 cm) after blocking.
Row 1: With pink, ch 6. Dc in 4th ch from hook and in each of the next 2 ch. (1 block)
Row 2: Ch 6, turn. Dc in 4th ch from hook and in each of the next 2 ch, sl st in the ch-3 sp of the block below, ch 3, 3 dc in same sp. (2 blocks)
Row 3: Ch 6, turn. Dc in 4th ch from hook and in each of the next 2 ch, *sl st in next ch-3 sp, ch 3, 3 dc in same sp; rep from * 1 more time. (3 blocks)
Row 4: Ch 6, turn. Dc in 4th ch from hook and in each of the next 2 ch (block 1), *sl st in next ch-3 sp, ch 3, 3 dc in same sp; rep from * 2 more times (blocks 2 to 4). Work blocks 1 and 2 in pink, and change to cream on the sl st that starts block 3. (4 blocks, 2 pink and 2 cream)
Row 5: Turn. Sl st in each of the next 3 dc and in the ch-3 sp. Ch 3, 3 dc in same sp, *sl st in next ch-3 sp, ch 3, 3 dc in same sp; rep from * 1 more time. Sl st in the last ch-3 sp. Work this row and the next two in cream. (3 blocks)
Row 6: Turn. Sl st in each of the next 3 dc and in the ch-3 sp. Ch 3, 3 dc in same sp, sl st in next ch-3 sp, ch 3, 3 dc in same sp, sl st in the last ch-3 sp. (2 blocks)
Row 7: Turn. Sl st in each of the next 3 dc and in the ch-3 sp. Ch 3, 3 dc in same sp, sl st in the last ch-3 sp. Fasten off. (1 block, 16 blocks in the whole square)

— Star Block (Make 20: 4 corner squares, 4 edge squares, 1 center square, taupe frame) :

Lay out 9 squares in 3 rows of 3. Row 1: Cream Corner Square, Star Edge Square, Cream Corner Square. Row 2: Star Edge Square, Pink and Mauve Center Square, Star Edge Square. Row 3: Cream Corner Square, Star Edge Square, Cream Corner Square. Turn the four Star Edge Squares so the pink halves point the same way around the center, like a pinwheel, and check the star before you sew. Sew the squares into rows, then the rows together, with a whipstitch seam and cream yarn. The sewn block should measure about 15 inches (38 cm) square.
Frame Round 1: Join taupe in any outer corner ch-2 sp of the sewn block. Ch 1, 3 sc in same sp. *Work 36 sc evenly along the side (12 sc across each square edge), 3 sc in next outer corner sp; rep from * 2 more times. Work 36 sc along the last side, join with sl st to first sc. (156 sc, 4 corner groups of 3 sc)
Frame Round 2: Ch 1, hdc in each sc around, working 3 hdc in the center sc of each corner group. Join with sl st to first hdc. (164 hdc)
Frame Round 3: Ch 1, hdc in each hdc around, working 3 hdc in the center hdc of each corner group. Join with sl st to first hdc. (172 hdc)
Frame Round 4: Ch 1, hdc in each hdc around, working 3 hdc in the center hdc of each corner group. Join with sl st to first hdc and fasten off, leaving a 60 inch tail for sewing. (180 hdc, 42 hdc on each side between the corner centers)
Each framed block should measure about 19 inches (48 cm) square after blocking. Check your test block before you make the other 19.

— Layout (Make 1 grid of 20 blocks) :

Grid: Lay the framed blocks out in 5 rows of 4 blocks, all facing the same way. (4 x 5 = 20 blocks, about 76 by 95 inches before the edging)
Color placement: Every block uses the same colors: cream corners, pink star points, a pink and mauve center and a taupe frame. Check that the pink points turn the same way in every block before you join them. (20 blocks in one colorway)

— Scalloped Edging (Make 1, taupe) :

The joined grid has 174 hdc on each short edge (4 blocks) and 218 hdc on each long edge (5 blocks) between the 4 outer corner centers, counting the 2 hdc at each seam. Place a stitch marker in each of the 4 outer corner centers before you begin.
Round 1: Join taupe in any outer corner center hdc. Ch 1, 3 sc in same st. *Work 180 sc along the short edge (1 sc in each hdc, plus 6 extra sc spaced evenly), 3 sc in the next outer corner center; work 222 sc along the long edge (1 sc in each hdc, plus 4 extra sc spaced evenly), 3 sc in the next outer corner center; rep from * once more, omitting the last 3 sc. Join with sl st to first sc. (816 sc: 180 on each short edge, 222 on each long edge, 3 sc in each of the 4 corners)
Round 2: Sl st in the next sc (the center sc of a corner group). Ch 3 (counts as first dc), 2 dc, ch 2, 3 dc in same st, skip the next sc. *[Skip next 2 sc, 5 dc in next sc, skip next 2 sc, sc in next sc] 30 times along the short edge, skip the first sc of the next corner group, (3 dc, ch 2, 3 dc) in the center sc, skip the last sc of the corner group. [Skip next 2 sc, 5 dc in next sc, skip next 2 sc, sc in next sc] 37 times along the long edge, skip the first sc of the next corner group, (3 dc, ch 2, 3 dc) in the center sc, skip the last sc of the corner group; rep from * once more, ending after the last 37 repeats. Skip the last sc, join with sl st to top of beginning ch 3 and fasten off. (134 shells of 5 dc, 134 sc, 4 corner groups)
If your Round 1 counts differ from 180 and 222, check for a missed seam or a missed hdc along the edge. Fix it before starting Round 2, because the shell repeats depend on those counts.

Assembly Instructions

  1. Make 80 Cream Corner Squares, 80 Star Edge Squares and 20 Pink and Mauve Center Squares, weave in the ends, and block every square to 5 inches.
  2. Lay out 9 squares for each Star Block, with the pink halves of the four Star Edge Squares turning around the center like a pinwheel, and check the star before sewing.
  3. Sew the squares of each block into rows and then into a block, using a whipstitch seam and cream yarn, and keep the seam loose so it stays as stretchy as the squares.
  4. Work the taupe Frame Rounds 1 to 4 around each block, then block each framed block to about 19 inches.
  5. Lay all 20 framed blocks on the floor in 5 rows of 4, following the Layout section, and check that every star faces the same way.
  6. Join the blocks into rows with a whipstitch seam in taupe, matching the 42 hdc on each side and sewing the corner centers together, then join the 5 rows the same way.
  7. Weave in the seam ends, then block the whole cover lightly, laying it flat on a clean bed or floor and pinning the outer edge straight.
  8. Work the Scalloped Edging in taupe around the outer edge, Round 1 and then Round 2, and weave in the last ends.

Common Mistakes & How to Fix Them

Making the corner-to-corner Star Edge Squares tighter or looser than the granny squares. The block then ripples when you sew it, so measure all three kinds of squares against 5 inches and change the hook size for the one that is off.

Turning the pink halves in different directions. The star then breaks, so lay out all nine squares and check the pinwheel before you sew.

Skipping the 3 hdc at each frame corner. The frame then pulls in and the block becomes a bowl, so work 3 hdc in the center stitch of every corner.

Joining the framed blocks too tightly. A tight seam pulls the cover into puckers, so use a loose tension and check that each seam lies flat.


Denise

Denise is a crochet designer who writes clear, cozy patterns for the home and loves a blanket made one small square at a time.


Important Notes

Each small square should measure about 5 inches (13 cm), each sewn block about 15 inches and each framed block about 19 inches after blocking. If a size is off, change your hook size before making the rest.

The edging counts are written for a grid of 4 by 5 blocks. For another grid size, work 42 hdc for every block along an edge, counting the 2 hdc at each seam.

Yarn amounts are approximate and depend on your tension, so keep a little extra of each color.

Wash the cover in cold water on a gentle cycle with mild detergent and dry it flat. Cotton is heavy when wet, so support the whole cover when you lift it.


Thank you for crocheting this bed cover with me. Take it one little square at a time, and send me a photo when the first star shines. Happy crocheting, Denise.

Crochet Abbreviations

01 ch — chain
02 sl st — slip stitch
03 sc — single crochet
04 hdc — half double crochet
05 dc — double crochet
06 sp — space (plural: sps)
07 st — stitch (plural: sts)
08 rep — repeat

You Ask, We Answer

How big is the finished bed cover?

With 4 blocks across and 5 down, the framed blocks measure about 76 by 95 inches, and the scalloped edging adds about 1.5 inches on each side, so the finished size is about 79 by 98 inches. That covers a queen bed with a generous drop on the sides.

Can I use another yarn weight or make a smaller size?

Yes. A thinner yarn gives smaller squares, so you will need more of them to reach the same size. For a baby blanket, make 2 by 2 blocks to get about 40 by 40 inches. For a throw, make 3 by 3 blocks to get about 60 by 60 inches. Work 42 hdc for every block along each edge of the edging.

How do I wash and care for the cover?

Machine wash it in cold water on a gentle cycle with mild detergent, then dry it flat. Do not wring it, and support its weight when it is wet so the stitches do not stretch.