Amanda's Creative Corner Crochet · Kitchen
Free Crochet Patterns Handmade with Love

Heart Granny Square Bed Cover Crochet Pattern
Jump to Pattern
Heart Granny Square Bed Cover Crochet Pattern
120-150 Hours 0 made this
Intermediate Level

You need to be comfortable with double crochet, working in the round and sewing simple seams.

120-150 Hours

Each square and heart takes about two and a half hours, so this is a long and relaxing project.

Layered Hearts

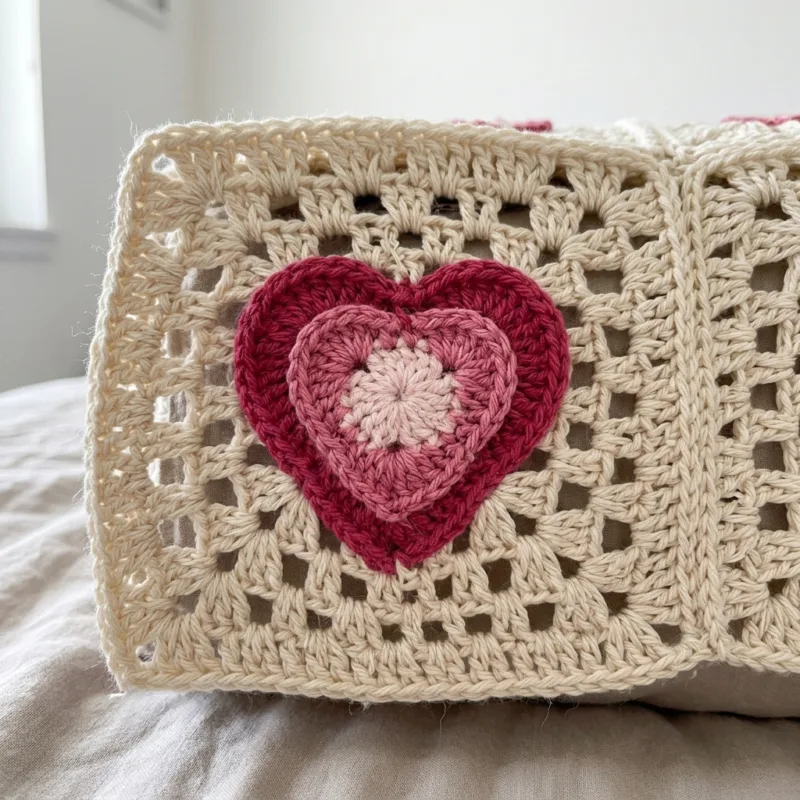
Every square gets a raised heart in three shades of pink that you sew on at the end.

About This Heart Granny Square Bed Cover Crochet Pattern Pattern

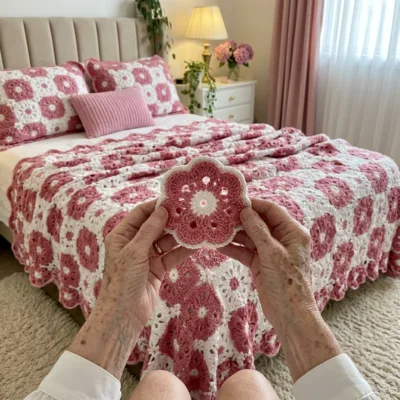
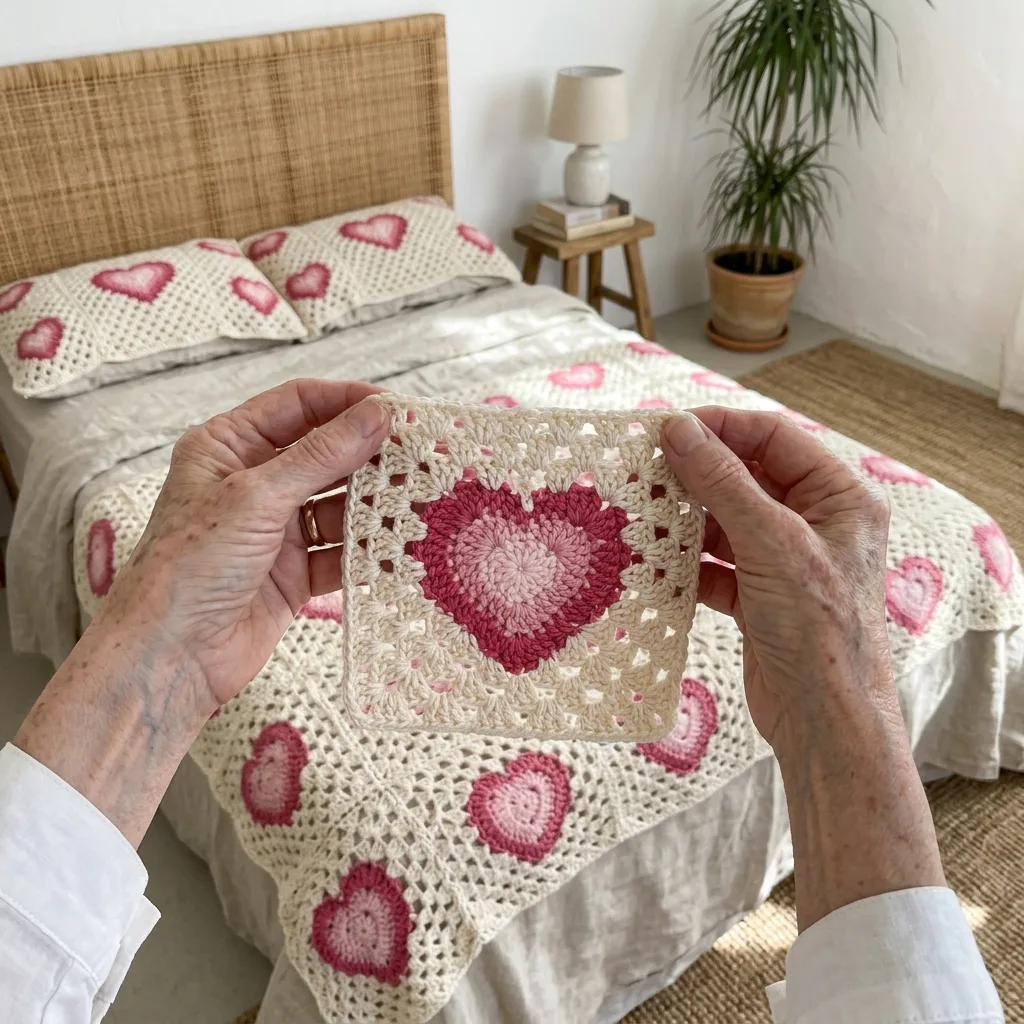
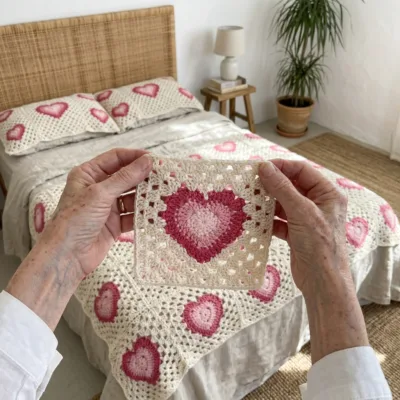
This bed cover is made from 48 open lace granny squares in cream. Each square carries a raised heart made of three rounds: pale pink in the center, medium pink in the middle and raspberry on the outside. The squares are sewn together in a grid of 6 across and 8 down. A cream scalloped border with an olive green round under it finishes the edge, and 22 small pink hearts are sewn along the border.

The finished size is about 66 by 86 inches, which fits a queen bed. You will use double crochet, simple lace rounds, small shaped hearts and whipstitch seams. It suits crocheters who have finished a few granny squares and want a big gift or heirloom project.
Heart Granny Square Bed Cover Crochet Pattern step detail

Why You'll Love This Heart Granny Square Bed Cover Crochet Pattern Pattern

I love this bed cover because every square is its own small project. I can finish a square and a heart in one evening and feel proud of it. A growing pile of 48 squares keeps me going.

It also makes a sweet gift for a wedding, an anniversary or a new baby girl's room. The soft pinks on cream look cozy in almost any bedroom, and the hearts make people smile.

Switch Things Up

Try three shades of blue, lilac or sage green instead of pink for a different mood. For a baby blanket, make 3 squares across and 4 down (12 squares) for about 36 by 46 inches. For a throw, make 5 across and 6 down (30 squares) for about 56 by 66 inches, and use fewer small hearts on the border. You can also skip the small hearts and keep the plain scalloped border for a quieter look.


Materials Needed

— Main Fabric

01 Worsted weight (4) 100% cotton yarn in five shades. Amounts are for the full 6 by 8 square size and include the border.
02 Cream: about 3,900 yards (2,050 grams) for the squares and the scalloped border
03 Raspberry pink: about 650 yards (340 grams) for the outer heart round
04 Medium pink: about 620 yards (330 grams) for the middle heart round and the small hearts
05 Pale pink: about 240 yards (130 grams) for the center heart round and the small hearts
06 Olive green: about 130 yards (70 grams) for the round under the scallops
07 Buy about 10 percent extra of each shade so you do not run short.

— Tools Required

08 4 mm (G-6) crochet hook, or the size that gives you a 10 inch square
09 Yarn needle
10 Stitch markers
11 Scissors
12 Blocking mats and pins
13 Measuring tape

The Free Pattern

Intermediate 120-150 Hours

0% complete

— Cream Granny Square (Make 48, cream) :

Each finished square should measure about 10 inches. If yours are smaller, go up a hook size. If they are larger, go down a hook size. All 48 squares must match.
Round 1: With cream, make a magic ring. Ch 3 (counts as dc), 2 dc in the ring, ch 2, *3 dc in the ring, ch 2; repeat from * 2 more times. Pull the ring tight and join with sl st to the top of the beginning ch 3. (12 dc, 4 ch-2 sps)
Round 2: Sl st in each of the next 2 dc and in the corner sp. Ch 3 (counts as dc), (2 dc, ch 2, 3 dc) in the same corner sp, ch 1, *(3 dc, ch 2, 3 dc) in next corner sp, ch 1; repeat from * 2 more times, join with sl st to the top of the beginning ch 3. (24 dc, 4 ch-2 sps, 4 ch-1 sps)
Round 3: Sl st in each of the next 2 dc and in the corner sp. Ch 3 (counts as dc), (2 dc, ch 2, 3 dc) in the same corner sp, ch 1, 3 dc in next ch-1 sp, ch 1, *(3 dc, ch 2, 3 dc) in next corner sp, ch 1, 3 dc in next ch-1 sp, ch 1; repeat from * 2 more times, join with sl st to the top of the beginning ch 3. (36 dc, 4 ch-2 sps, 8 ch-1 sps)
Round 4: Sl st in each of the next 2 dc and in the corner sp. Ch 3 (counts as dc), (2 dc, ch 2, 3 dc) in the same corner sp, ch 1, [3 dc in next ch-1 sp, ch 1] 2 times, *(3 dc, ch 2, 3 dc) in next corner sp, ch 1, [3 dc in next ch-1 sp, ch 1] 2 times; repeat from * 2 more times, join with sl st to the top of the beginning ch 3. (48 dc, 4 ch-2 sps, 12 ch-1 sps)
Round 5: Sl st in each of the next 2 dc and in the corner sp. Ch 3 (counts as dc), (2 dc, ch 2, 3 dc) in the same corner sp, ch 1, [3 dc in next ch-1 sp, ch 1] 3 times, *(3 dc, ch 2, 3 dc) in next corner sp, ch 1, [3 dc in next ch-1 sp, ch 1] 3 times; repeat from * 2 more times, join with sl st to the top of the beginning ch 3. (60 dc, 4 ch-2 sps, 16 ch-1 sps)
Round 6: Sl st in each of the next 2 dc and in the corner sp. Ch 3 (counts as dc), (2 dc, ch 2, 3 dc) in the same corner sp, ch 1, [3 dc in next ch-1 sp, ch 1] 4 times, *(3 dc, ch 2, 3 dc) in next corner sp, ch 1, [3 dc in next ch-1 sp, ch 1] 4 times; repeat from * 2 more times, join with sl st to the top of the beginning ch 3. Fasten off and weave in the ends. (72 dc, 4 ch-2 sps, 20 ch-1 sps)
Between the corner sps, each side of the square has 18 dc and 5 ch-1 sps, which makes 23 stitches to work into later. Block every square to about 10 inches before joining.

— Layered Heart (Make 48: pale pink, medium pink, raspberry) :

Each heart is worked in the round from the center out. In every round the stitches fall in this order: the dip at the top, the right lobe, the point at the bottom, the left lobe. Make one heart first and check that it looks like a heart before you make the rest. The finished heart should be about 5 to 6 inches wide.
Round 1: With pale pink, make a magic ring. Ch 1 (does not count as a stitch), sl st in the ring (the dip), hdc in the ring, 3 dc in the ring, hdc in the ring (right lobe), 3 sc in the ring (the point), hdc in the ring, 3 dc in the ring, hdc in the ring (left lobe). Pull the ring tight and join with sl st to the first sl st. Fasten off. (14 stitches: 1 dip, 5 right lobe, 3 point, 5 left lobe)
Round 2: Join medium pink in the dip sl st. Ch 1, sc in the same stitch, 2 hdc in each of the next 5 stitches, sc in the next stitch, 3 sc in the next stitch, sc in the next stitch, 2 hdc in each of the next 5 stitches, join with sl st to the first sc. Fasten off. (26 stitches: 1 dip, 10 right lobe, 5 point, 10 left lobe)
Round 3: Join raspberry in the dip stitch. Ch 1, sc in the same stitch, *dc in next stitch, 2 dc in next stitch; repeat from * 4 more times across the right lobe, sc in each of the next 2 stitches, 3 sc in the next stitch, sc in each of the next 2 stitches, *dc in next stitch, 2 dc in next stitch; repeat from * 4 more times across the left lobe, join with sl st to the first sc. Fasten off and leave a long tail for sewing. (38 stitches: 1 dip, 15 right lobe, 7 point, 15 left lobe)

— Mini Heart (Make 22, pale pink and medium pink) :

The small hearts for the border use the first two rounds of the Layered Heart. They should measure about 3 inches wide.
Round 1: With pale pink, make a magic ring. Ch 1, sl st in the ring, hdc in the ring, 3 dc in the ring, hdc in the ring, 3 sc in the ring, hdc in the ring, 3 dc in the ring, hdc in the ring. Pull the ring tight and join with sl st to the first sl st. Fasten off. (14 stitches)
Round 2: Join medium pink in the dip sl st. Ch 1, sc in the same stitch, 2 hdc in each of the next 5 stitches, sc in the next stitch, 3 sc in the next stitch, sc in the next stitch, 2 hdc in each of the next 5 stitches, join with sl st to the first sc. Fasten off and leave a long tail for sewing. (26 stitches)

— Layout :

Grid: 6 squares across and 8 squares down, 48 squares in all. All squares are identical cream squares. The joined panel measures about 60 by 80 inches before the border.
Sew one Layered Heart to the center of each square, with the point of the heart facing the same way on every square. Pin each heart before you sew it so it sits straight.
Lay the squares out in 8 rows of 6. Whipstitch each square to its neighbor through the back loops only, matching the corners and the stitches. Join the squares into rows first, then join the 8 rows together.

— Border :

Round 1: Join olive in any outer corner sp, ch 1, 3 sc in the same sp. *Sc in each of the 23 stitches (dc and ch-1 sps) along the side of a square. At each junction where two squares meet, work 1 sc in the corner sp of the first square and 1 sc in the corner sp of the next square. Work 3 sc in each outer corner sp. Repeat around and join with sl st to the first sc. Fasten off. (704 sc)
Round 2: Join cream with a sl st in any sc. *Skip 3 sc, 5 dc in next sc, skip 3 sc, sl st in next sc; repeat from * 87 more times, ending the last repeat with the sl st in the first sl st. If a shell does not land at an outer corner, skip 2 or 4 sc once on that side so the shells turn the corner smoothly. (88 shells, 440 dc)
Round 3: Join cream in any sl st between two shells. Ch 1, *sc in the sl st, sc in each of the 5 dc of the next shell; repeat from * around, join with sl st to the first sc. Fasten off and weave in the ends. (528 sc)
Sew the 22 Mini Hearts evenly along the olive round: 6 on the foot of the bed and 8 on each long side. Pin them first and check the spacing.

Assembly Instructions

  1. Weave in all ends on the 48 Cream Granny Squares and block each one to about 10 inches square.
  2. Sew one Layered Heart to the center of each square, with all the hearts pointing the same way.
  3. Lay the squares out in 8 rows of 6 and check that the layout looks even before you sew anything.
  4. Whipstitch the squares together into 8 rows of 6, using the back loops only and matching corners.
  5. Whipstitch the 8 rows together, keeping the seams flat and the corners aligned.
  6. Work Border Rounds 1 to 3 around the whole edge, then sew the 22 Mini Hearts evenly along the olive round.
  7. Weave in any last ends and block the finished bed cover flat, pinning each scallop into shape.

Common Mistakes & How to Fix Them

Squares that end up different sizes will make the panel ripple. Count the stitches on every round and measure each square before you join.

Hearts that are worked loosely will flop over. Keep your tension even and block each heart before you sew it on.

Pulling the whipstitch seams too tight puckers the squares. Sew loosely, with the same tension as your crochet.

Starting the shell round without checking your count can leave a shell off at a corner. Check for 704 sc after Round 1 so the shells turn the corners evenly.


Denise

Denise is a crochet designer who writes clear, friendly patterns for cozy home projects, with a special love for granny squares.


Important Notes

Gauge is not critical, but each square should measure about 10 inches. Change your hook size if yours are smaller or larger.

Cotton yarn grows slightly when washed, so block each square before joining and the whole cover again at the end.

Yarn amounts are estimates for worsted cotton. Buy extra of each shade from the same dye lot.

Machine wash cold on a gentle cycle and dry flat to keep the shape of the hearts and scallops.


I hope you enjoy making this bed cover one heart at a time. Take your time with the hearts, and please share a photo when you finish it. I would love to see which pinks you pick.

Crochet Abbreviations

01 ch — chain
02 sl st — slip stitch
03 sc — single crochet
04 hdc — half double crochet
05 dc — double crochet
06 sp — space

You Ask, We Answer

What is the finished size?

The bed cover is about 66 by 86 inches with the border, which fits a queen bed. The panel of 6 by 8 squares measures about 60 by 80 inches before the border.

Can I use a different yarn weight or make it a different size?

Yes. A thinner yarn makes smaller squares, so you would need more of them, and a thicker yarn makes larger ones. For a different size, change the number of squares: 3 by 4 makes a baby blanket and 5 by 6 makes a throw.

How do I wash and care for the finished bed cover?

Machine wash cold on a gentle cycle and dry it flat. Reshape the hearts and scallops while the cover is damp so they keep their form.