
Ivory Star Medallion Bed Cover Crochet Pattern

You need to be comfortable with front post stitches, popcorn stitches and working in the round.
Each square takes about 90 minutes, so the bed cover grows one textured block at a time.
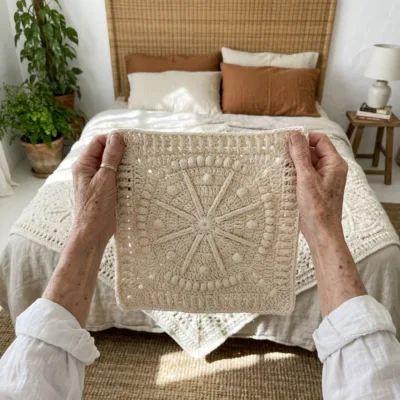
Raised stars and ribs do all the work, so a single ivory yarn looks rich and carved.
About This Ivory Star Medallion Bed Cover Crochet Pattern Pattern
This bed cover is made from 30 identical squares worked in one ivory cotton yarn. Each square has a raised star in the center, made of twelve spokes of front post stitches with a small popcorn bobble between them. A lacy round and a ribbed post stitch frame finish the square.
The finished size is about 73 by 87 inches, which covers a full or double bed. You will use single crochet, double crochet, front post double and treble crochet, popcorn stitches, whipstitch seams and a flat three round border. It suits crocheters who enjoy texture and want a long project with a very calm look.

Why You'll Love This Ivory Star Medallion Bed Cover Crochet Pattern Pattern
I love this project because the texture is so satisfying to make. Watching the star spokes rise round by round never gets old, and every finished square feels like a little piece of sculpture.
It is also a quiet, neutral piece that suits almost any bedroom. A bed cover in one color keeps the room calm, and the shadows from the raised stitches give it depth when the sun hits it.
Switch Things Up
Try the same pattern in soft gray, sage or oatmeal for a different mood. For a baby blanket, make 3 squares across and 3 down for a finished size of about 45 by 45 inches. For a throw, make 4 squares across and 5 down. You can also use two colors by working the star in a deeper shade and the frame rounds in ivory.
Materials Needed
— Main Fabric
— Tools Required
The Free Pattern
0% complete
— Star Medallion Square (Make 30, ivory) :
— Layout :
— Border (Make 1, ivory) :
Assembly Instructions
- Weave in all ends on each square, then wet block every square to about 14 inches, pinning the corners square and gently pulling the star spokes open.
- Lay the squares out in 6 rows of 5 squares on a bed or a clean floor, with all squares facing the same way, following the Layout section.
- Join the squares into rows by holding two squares side by side and whipstitching them together with ivory yarn, through the back loops only, matching the 29 sts on each side.
- Join the 6 rows to each other the same way, lining up the seams at every corner so the crossings look neat and flat.
- Weave in the seam ends and block the whole bed cover flat with pins, leaving it to dry completely.
- Work Border Round 1 around the outer edge, putting 3 sc in each outer corner and 1 sc at every seam.
- Work Border Rounds 2 and 3, then fasten off, weave in the end and lightly block the edge so it lies flat.
Common Mistakes & How to Fix Them
Front post stitches that are pulled too tight make the star cup, so keep the spokes relaxed and wrap the hook around the post loosely.
Popcorn stitches that are worked too tight will pucker the ring, so keep the 5 dc loose and tighten the closing loop gently.
Losing track of the 12 spokes makes the star lopsided, so keep a marker in each fptr and move it up every round.
Squares that come out in different sizes will make the seams ripple, so check each one against a 14 inch template and block them all the same way.

You Might Also Like
Important Notes
Gauge is not critical, but each square should measure about 14 inches. If yours are smaller or larger, change your hook size and expect the yarn amount to change too.
Always block the squares before joining. Blocking opens the lace round and evens the post stitches.
Yarn amounts are estimates for the full 30 squares plus seams and border. Buy extra from the same dye lot.
Machine wash cold on a gentle cycle and lay flat to dry. This is a heavy bed cover, so support it when you lift it while wet.
Thank you for crocheting this bed cover with me. Take your time, enjoy each little star, and I hope it becomes a calm and cozy part of your bedroom.
Crochet Abbreviations
You Ask, We Answer
How big is the finished bed cover?
It is about 73 by 87 inches with the border, made from 5 squares across and 6 squares down. That covers a full or double bed with a little drape on the sides.
Can I use a different yarn weight or make a different size?
Yes. Worsted weight yarn with a 4.5 mm hook gives smaller squares, so you will need more of them. To change the size, add or remove whole rows or columns of squares, and recalculate the border counts from the 29 sts on each square side.
How do I wash and care for it?
Wash it cold on a gentle cycle, or by hand, and lay it flat to dry. Avoid hanging it while wet because the weight of the cotton can stretch the squares.
Success!
Thanks for subscribing — check your inbox for a welcome note.
Abbreviations
- ch — chain
- sl st — slip stitch
- sc — single crochet
- dc — double crochet
- fpdc — front post double crochet
- fptr — front post treble crochet
- pop — popcorn stitch: 5 dc in the same st, drop the loop, insert the hook in the first dc, pick up the dropped loop and pull it through
- st — stitch
- sts — stitches
- sp — space (for example ch-1 sp is a space made by one chain)
- rep — repeat