Amanda's Creative Corner Crochet · Kitchen
Free Crochet Patterns Handmade with Love

Red Rose Lace Granny Square Bed Cover Crochet Pattern
Jump to Pattern
Red Rose Lace Granny Square Bed Cover Crochet Pattern
120-160 Hours 0 made this
Intermediate Level

You need to be comfortable with granny lace rounds, small shaped pieces and sewing on motifs.

120-160 Hours

Each rose square takes about 100 minutes with its leaves and buds, so you build the bed cover one square at a time.

A Garden Of Roses

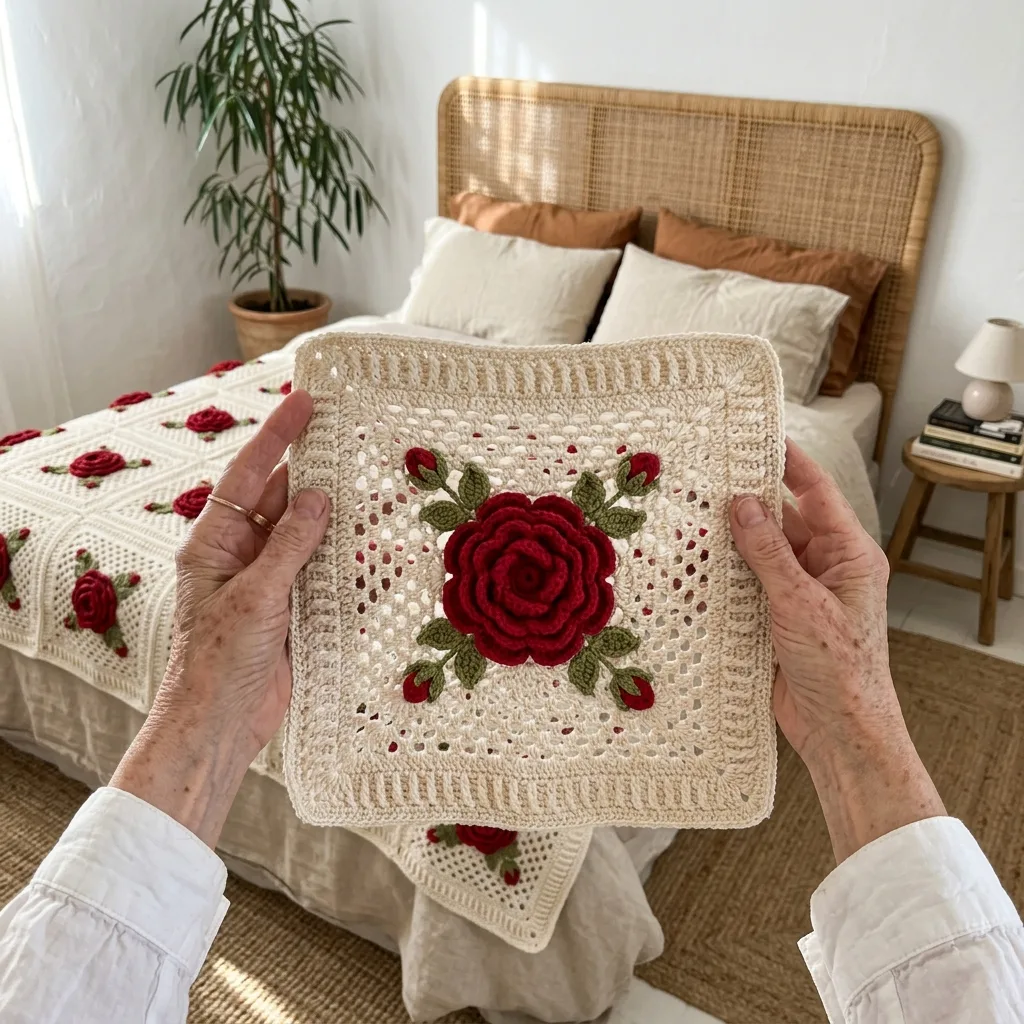
Deep red 3D roses sit on cream lace, with green leaves and little buds all the way to the edge.

About This Red Rose Lace Granny Square Bed Cover Crochet Pattern Pattern

This bed cover is made from 56 cream lace granny squares, and each one carries a raised red rose, six green leaves and three small rosebuds. The squares are joined with a slip stitch seam that makes a neat raised rib, and a small cream flower covers each place where four squares meet.

The edge is a scalloped shell border, trimmed with more leaves and rosebuds. The finished size is about 74 by 84 inches, which covers a full or double bed. You will use double crochet clusters, small petal strips, shaped leaves and buds, and simple sewing. It suits crocheters who like a long project and a romantic finish.
Red Rose Lace Granny Square Bed Cover Crochet Pattern step detail

Why You'll Love This Red Rose Lace Granny Square Bed Cover Crochet Pattern Pattern

I love this project because every little piece is quick to make. A rose takes about 20 minutes, a leaf takes a few minutes, and I can crochet them in front of the television in an evening.

It also looks like a garden when it is finished. Red roses on cream lace feel warm and timeless, and it makes a gift people keep for years.


Switch Things Up

Try dusty pink roses with sage leaves, or yellow roses with cream lace for a sunny bedroom. For a baby blanket, make 3 squares across and 3 down for a finished size of about 34 by 34 inches. For a throw, make 5 squares across and 6 down. You can also skip the border leaves and buds if you want a simpler edge.


Materials Needed

— Main Fabric

01 Worsted weight (4) 100 percent cotton yarn, matte finish
02 Cream: about 3,800 yards (about 2,250 g), for squares, joins, flowers and border
03 Deep red: about 1,900 yards (about 1,125 g), for roses and rosebuds
04 Olive green: about 1,400 yards (about 830 g), for leaves and sepals
05 Amounts include about 10 percent extra
06 A little scrap yarn or fiberfill to lightly stuff each bud

— Tools Required

07 4.5 mm (7) crochet hook for the squares, joining and border
08 4.0 mm (G-6) crochet hook for the roses, leaves, buds and flowers
09 Yarn needle
10 Stitch markers
11 Scissors
12 Blocking mats and rust-proof pins
13 Measuring tape

The Free Pattern

Intermediate 120-160 Hours

0% complete

— Lace Granny Square (Make 56, cream) :

Use the 4.5 mm hook. Work every round with the right side facing you and do not turn. Each finished square should measure about 10 inches (25 cm) after blocking.
Round 1: Ch 4 and join with a sl st to form a ring. Ch 3 (counts as first dc), 2 dc in the ring, ch 2, *3 dc in the ring, ch 2; rep from * 2 more times, join with a sl st to the top of the beginning ch-3. (12 dc, 4 ch-2 corner sps)
Round 2: Sl st in each of the next 2 dc and in the ch-2 corner sp. Ch 3 (counts as first dc), 2 dc, ch 2, 3 dc all in the same sp. *Ch 1, (3 dc, ch 2, 3 dc) in the next corner sp; rep from * 2 more times, ch 1, join with a sl st to the top of the beginning ch-3. (24 dc, 4 ch-1 sps, 4 ch-2 corner sps)
Round 3: Sl st in each of the next 2 dc and in the ch-2 corner sp. Ch 3 (counts as first dc), 2 dc, ch 2, 3 dc all in the same sp. *Ch 1, 3 dc in the next ch-1 sp, ch 1, (3 dc, ch 2, 3 dc) in the next corner sp; rep from * 2 more times, ch 1, 3 dc in the next ch-1 sp, ch 1, join with a sl st to the top of the beginning ch-3. (36 dc, 8 ch-1 sps, 4 ch-2 corner sps)
Round 4: Sl st in each of the next 2 dc and in the ch-2 corner sp. Ch 3 (counts as first dc), 2 dc, ch 2, 3 dc all in the same sp. *[Ch 1, 3 dc in the next ch-1 sp] 2 times, ch 1, (3 dc, ch 2, 3 dc) in the next corner sp; rep from * 2 more times, [ch 1, 3 dc in the next ch-1 sp] 2 times, ch 1, join with a sl st to the top of the beginning ch-3. (48 dc, 12 ch-1 sps, 4 ch-2 corner sps)
Round 5: Sl st in each of the next 2 dc and in the ch-2 corner sp. Ch 3 (counts as first dc), 2 dc, ch 2, 3 dc all in the same sp. *[Ch 1, 3 dc in the next ch-1 sp] 3 times, ch 1, (3 dc, ch 2, 3 dc) in the next corner sp; rep from * 2 more times, [ch 1, 3 dc in the next ch-1 sp] 3 times, ch 1, join with a sl st to the top of the beginning ch-3. (60 dc, 16 ch-1 sps, 4 ch-2 corner sps)
Round 6: Sl st in each of the next 2 dc and in the ch-2 corner sp. Ch 3 (counts as first dc), 2 dc, ch 2, 3 dc all in the same sp. *[Ch 1, 3 dc in the next ch-1 sp] 4 times, ch 1, (3 dc, ch 2, 3 dc) in the next corner sp; rep from * 2 more times, [ch 1, 3 dc in the next ch-1 sp] 4 times, ch 1, join with a sl st to the top of the beginning ch-3. (72 dc, 20 ch-1 sps, 4 ch-2 corner sps, 23 sts along each side between corner sps)
Round 7: Sl st in each of the next 2 dc and in the ch-2 corner sp. Ch 3 (counts as first dc), 2 dc, ch 2, 3 dc all in the same sp. *Dc in each of the next 23 sts (each dc and each ch-1 sp), (3 dc, ch 2, 3 dc) in the next corner sp; rep from * 2 more times. Dc in each of the last 23 sts, join with a sl st to the top of the beginning ch-3. Fasten off. (116 dc, 4 ch-2 corner sps, 29 sts along each side between corner sps)
Check your first square: each side should have exactly 29 sts between the ch-2 corner sps. All squares must match so the seams and the border line up.

— Rose (Make 56, deep red) :

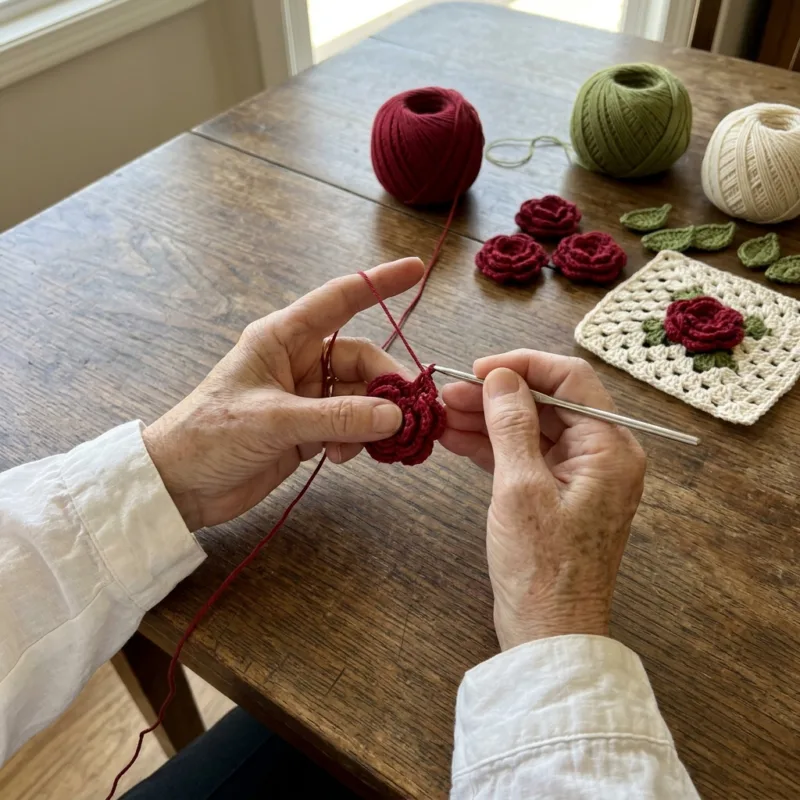
Use the 4.0 mm hook. The rose is a long petal strip that you roll up. It should measure about 4 inches (10 cm) across when it is finished.
Row 1: Ch 62. Sc in the 2nd ch from hook and in each ch across. (61 sc)
Row 2: Ch 1, turn. Sc in the first sc. *Skip next sc, 3 dc in next sc, skip next sc, sc in next sc; rep from * 3 more times (4 small petals). **Skip next sc, 5 dc in next sc, skip next sc, sc in next sc; rep from ** 5 more times (6 medium petals). ***Skip next sc, 7 dc in next sc, skip next sc, sc in next sc; rep from *** 4 more times (5 large petals). Fasten off, leaving a 24 inch tail. (15 petals, 77 dc, 16 sc)
To form the rose, start at the end with the small petals and roll the strip loosely with the petals facing up. After each turn, push the petals gently outward so they curl. Sew through the bottom edge with the tail to hold the rose together, and fasten off at the back.

— Leaf (Make 450, olive green: 6 for each square and 114 for the border) :

Use the 4.0 mm hook. Each leaf should measure about 3 inches (7.5 cm) long.
Round 1: Ch 12. Sl st in the 2nd ch from hook, sc in next ch, hdc in next ch, dc in each of the next 4 ch, hdc in next ch, sc in next ch, sl st in next ch, 3 sc in the last ch for the tip. Working along the other side of the foundation ch: sl st in next ch, sc in next ch, hdc in next ch, dc in each of the next 4 ch, hdc in next ch, sc in next ch, sl st in the last ch. Fasten off, leaving a 8 inch tail for sewing. (23 sts)

— Rosebud (Make 225, deep red with olive green sepals: 3 for each square and 57 for the border) :

Use the 4.0 mm hook. Work the red rounds in a spiral and do not join. Each bud should measure about 1 inch (2.5 cm) tall.
Round 1: With red, make a magic ring and work 6 sc in the ring. Place a marker in the first sc. (6 sc)
Round 2: *Sc in next sc, 2 sc in next sc; rep from * 2 more times. (9 sc)
Round 3: *Sc in each of the next 2 sc, 2 sc in next sc; rep from * 2 more times. (12 sc)
Rounds 4 and 5: Sc in each sc around. (12 sc in each round)
Round 6: *Sc in next sc, sc2tog; rep from * 3 more times. (8 sc)
Round 7: Sc2tog 4 times. Lightly stuff with a little scrap yarn, fasten off and close the top. (4 sc)
Sepals: Join olive green with a sl st in any st of Round 4. *Ch 5, sl st in the 2nd ch from hook, sc in next ch, hdc in next ch, sl st in last ch, sl st in each of the next 4 sts of the bud; rep from * 2 more times. Fasten off, leaving an 8 inch tail for sewing. (3 sepals, 4 sts in each sepal)

— Joining Flower (Make 42, cream) :

Use the 4.0 mm hook. One flower covers each point where four squares meet.
Round 1: Make a magic ring. Ch 1, *(sc, 3 dc, sc) in the ring; rep from * 4 more times. Join with a sl st to the first sc, pull the ring tight and fasten off, leaving a 10 inch tail. (5 petals, 25 sts)

— Layout :

Arrange the squares in 8 rows of 7 squares, for 56 squares in total. All squares are identical and all roses face the same way.
On each square, sew the rose in the center, then sew 6 leaves around it in three pairs, with one rosebud between each pair.
Finished size before the border is about 70 by 80 inches. The border adds about 2 inches on every side, so the bed cover ends up at about 74 by 84 inches.

— Border (Make 1, cream) :

Use the 4.5 mm hook.
Round 1: Join cream with a sl st in the ch-2 corner sp of any outer corner square. Ch 1, 4 sc in the same sp. *Sc in each of the 29 sts across the square, then work 1 sc through both ch-2 corner sps where two squares meet. Rep across the edge, ending with 29 sc across the last square, then work 4 sc in the outer corner sp. Rep from * around all four sides. Join with a sl st to the first sc. (912 sc: 209 sc along each short edge, 239 sc along each long edge, 16 sc in the outer corners)
Round 2: Ch 1, sl st in the first sc. *Skip next 3 sc, 7 dc in next sc, skip next 3 sc, sl st in next sc; rep from * 112 more times. Skip next 3 sc, 7 dc in next sc, skip last 3 sc, join with a sl st in the first sl st. Fasten off and weave in the end. (114 shells, 798 dc)
Sew a pair of leaves and one rosebud to the middle dc of every other shell, for 57 pairs of leaves and 57 buds in total. Keep the tips of the leaves pointing outward.
If your stitch count is a little off after Round 1, add or skip a sc near each outer corner so the total is exactly 912. The shells need a multiple of 8 stitches to fit evenly.

Assembly Instructions

  1. Make all the pieces: 56 Lace Granny Squares, 56 Roses, 450 Leaves, 225 Rosebuds and 42 Joining Flowers. Weave in the ends on the squares and block each one to about 10 inches.
  2. Roll each Rose as described in the Rose section and sew it through the base so it holds its shape.
  3. Before joining, sew one rose to the center of each square, then 6 leaves in three pairs around it and 3 rosebuds between the pairs.
  4. Lay the squares out in 8 rows of 7 squares, following the Layout section. Join them into rows, then join the rows, with a cream slip stitch seam worked through the back loops of both squares, with the wrong sides together, so the seam makes a raised rib on the right side.
  5. Sew one Joining Flower over each of the 42 points where four squares meet.
  6. Work Border Rounds 1 and 2 around the outer edge to make the scalloped shells.
  7. Sew 57 pairs of leaves and 57 rosebuds to every other shell, then weave in all ends and steam lightly from a distance, without pressing the roses flat.

Common Mistakes & How to Fix Them

Rolling the rose too tightly makes a hard knob, so roll it loosely and push the petals outward as you go.

Leaving out the stitch count at the end of a lace round makes the next round fit badly, so count the clusters and ch-1 sps against the numbers in brackets.

Sewing the roses on after joining makes the big cover hard to handle, so sew all the decorations onto the squares first.

Squares that come out in different sizes will make the seams ripple, so check each one against a 10 inch template and block them all the same way.


Denise

Denise designs cozy granny square blankets and home decor patterns with clear round by round instructions.


Important Notes

Gauge is not critical, but each square should measure about 10 inches. If yours are smaller or larger, change your hook size and expect the yarn amount to change too.

Buy extra red and green from the same dye lot, because you will make many small pieces and each one uses only a little yarn.

Do not press the roses flat when blocking. Block the lace squares first, then sew the roses on.

Wash by hand in cool water or use a mesh bag on a gentle cycle, then lay it flat to dry so the roses keep their shape.


Thank you for crocheting this rose bed cover with me. Take your time, enjoy each little rose, and I hope it makes your bedroom feel like a garden.

Crochet Abbreviations

01 ch — chain
02 sl st — slip stitch
03 sc — single crochet
04 sc2tog — single crochet 2 stitches together (a decrease)
05 hdc — half double crochet
06 dc — double crochet
07 st — stitch
08 sts — stitches
09 sp — space (for example ch-1 sp is a space made by one chain)
10 rep — repeat

You Ask, We Answer

How big is the finished bed cover?

It is about 74 by 84 inches with the border, made from 7 squares across and 8 squares down. That covers a full or double bed with a little drape on the sides.

Can I use a different yarn weight or make a different size?

Yes. Lighter yarn with a smaller hook gives a smaller square, so you will need more squares. To change the size, add or remove whole rows or columns of squares, and recalculate the border from 29 sts on each square side, keeping the total a multiple of 8.

How do I wash and care for it?

Hand wash in cool water or use a mesh bag on a gentle cycle, then lay it flat to dry. Avoid hanging it while wet because the weight of the cotton can stretch the squares and pull on the roses.