
Witch Hat Moon Halloween Table Runner Crochet Pattern
Only sc, increases and decreases, worked in easy rounds and rows.
About 10 to 14 hours, made one small circle at a time.
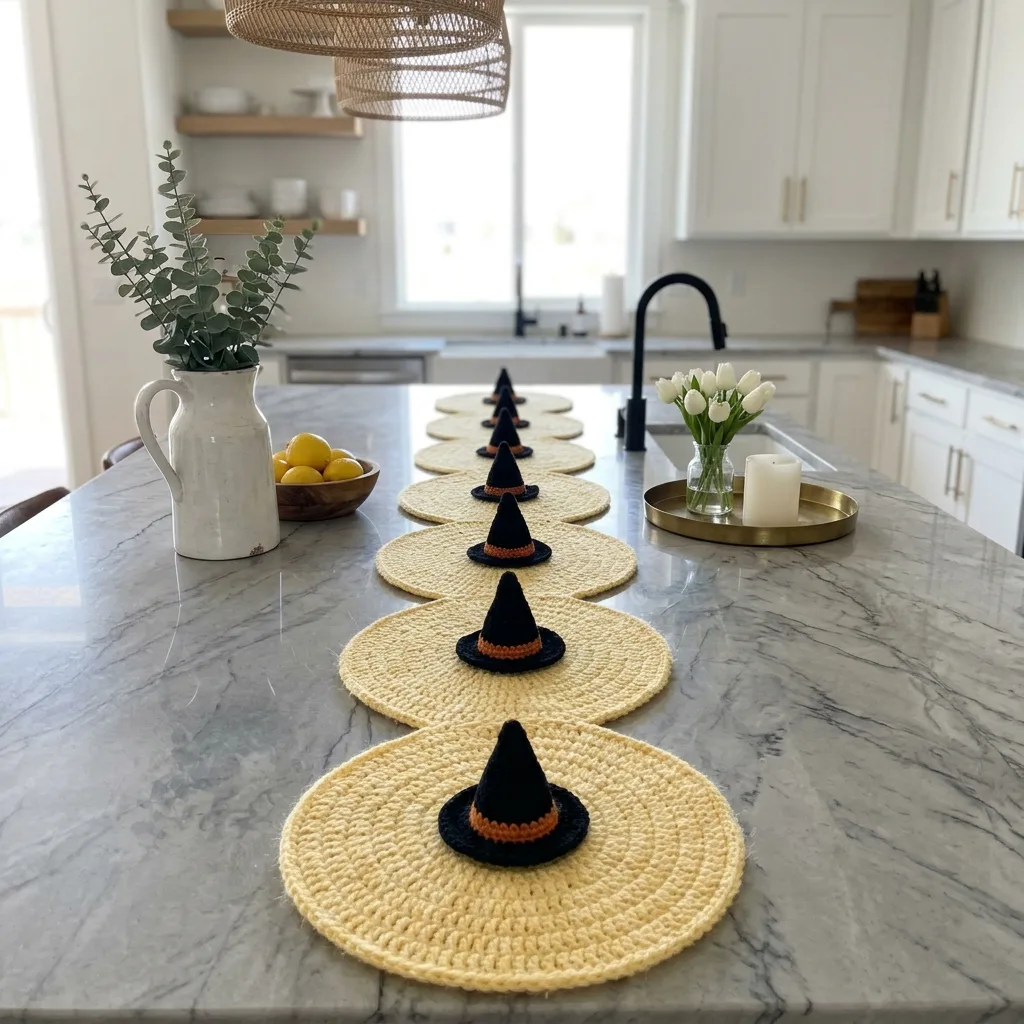
A bright butter yellow runner with cute witch hats instead of dark colors.
About This Witch Hat Moon Halloween Table Runner Crochet Pattern Pattern
This Halloween table runner is made from six butter yellow circles joined in one long row. It measures about 36 inches long and 6 inches wide. Each moon wears a tiny black witch hat with a pumpkin orange band.
Everything is worked in single crochet, with a few simple decreases for the hats, so it suits a confident beginner. You make one small piece at a time, which makes it easy to carry along.

Why You'll Love This Witch Hat Moon Halloween Table Runner Crochet Pattern Pattern
I love how cheerful this runner looks. Butter yellow is such a happy color, and the little black hats look like each moon is dressed up for the party.
I also love that the circles are quick. When you finish one moon, you can already picture the whole row on your table.

Switch Things Up
Try a soft white background for a glowing ghost moon look, make the hat bands purple or green, add a small star on a few circles, or use thicker cotton and a larger hook to make bigger moons with fewer circles.
Materials Needed
— Main Fabric
— Tools Required
The Free Pattern
0% complete
— Moon (Make 6) :
— Witch Hat (black) (Make 6) :
— Hat Brim (black) (Make 6) :
— Hat Band (orange) (Make 6) :
Assembly Instructions
- Weave in all loose ends on the six moons, hats, brims and bands.
- Place a hat on a brim so the bottom row of the hat sits in the middle of the brim, then sew the hat to the brim with black yarn.
- Sew an orange band across each hat, about 3 rows up from the bottom, so it covers the full width of the hat at that point.
- Pin each finished hat to a moon slightly off center and tilted a little, then sew it down with black yarn using small whip stitches around the brim and hat edge.
- Lay the six moons in one straight row, then sew each pair together with a whip stitch through the back loops where the edges touch, about 5 or 6 stitches wide.
- Block the whole runner flat to about 36 by 6 inches and let it dry completely.
Common Mistakes & How to Fix Them
Circles can ruffle if you skip an increase, so count your stitches at the end of every round and keep to the totals in brackets.
The hat can twist if you miss a decrease at the end of a row, so check that your row counts go down by 2 each time.
Hats can look crooked when sewn on without pinning, so pin all three pieces before you stitch.
The seams between the moons can pull and gap if you sew too tightly, so keep your stitches loose and even.

You Might Also Like






Important Notes
Keep your tension relaxed and even so all six moons end up the same size.
Gauge does not need to be exact, but the circles should match each other.
Blocking helps the circles lie flat and look neat.
Cotton yarn can be washed gently in cool water, then laid flat to dry.
I hope this little witch hat moon runner brings a smile to your Halloween table. Happy hooking!
Crochet Abbreviations
You Ask, We Answer
How big is the finished runner?
About 36 inches long and 6 inches wide, made from six 6 inch circles.
Can I use a different yarn weight?
Yes. DK weight yarn with a 3.5 mm hook makes smaller circles, so add one or two more moons to keep the length.
How do I wash it?
Wash gently in cool water, reshape it while damp and lay it flat to dry.
Success!
Thanks for subscribing — check your inbox for a welcome note.
Abbreviations
- ch — chain
- sc — single crochet
- inc — increase (2 sc in the same stitch)
- sc2tog — single crochet 2 stitches together (decrease)
- sl st — slip stitch
- mr — magic ring
- st — stitch (sts means stitches)