
Yellow and Gray Flower Lace Curtain Panels Crochet Pattern
You need double and treble crochet, join as you go and steady tension along very long borders.
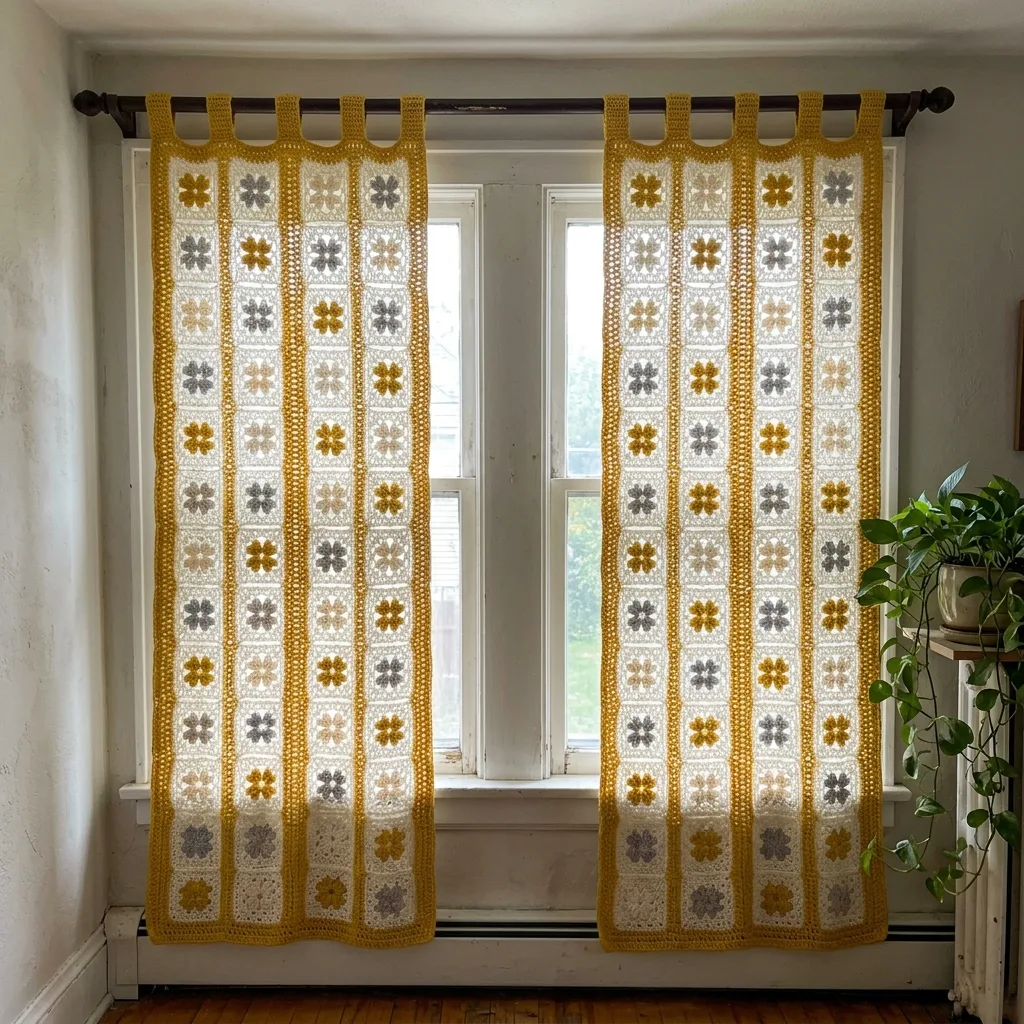
Sixty four flower squares and four long lace borders make a pair of panels you can build one square at a time.
The mustard stripes frame every column of flowers, so the panels look bright and cheerful even on a gray day.
About This Yellow and Gray Flower Lace Curtain Panels Crochet Pattern Pattern
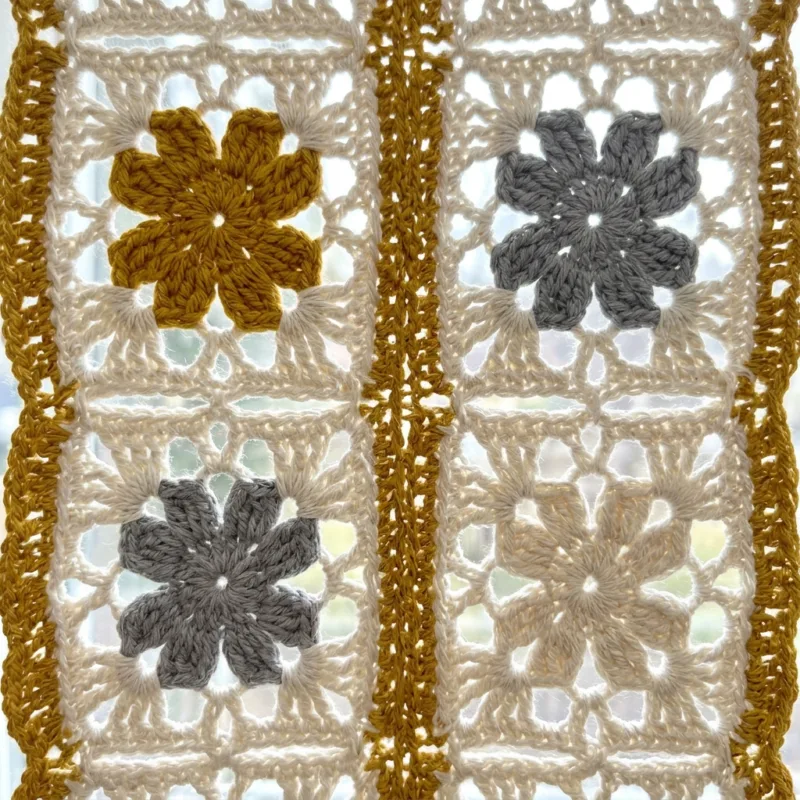
These curtain panels are my favorite way to dress a window without hiding it. There are two long panels, one for each side of the glass, and each one is built from two columns of small square lace motifs in a soft cream cotton. Every square holds a little four-petal flower in mustard yellow, soft gray or cream, and the colors repeat down the columns in a gentle rhythm. Around each column runs a mustard yellow lace border, so every panel shows three warm stripes: one on each outer edge and one down the middle where the two columns meet.
The flower square is the heart of the design. You start the flower in a magic ring with a round of double crochet, then shape four round petals in the second round, so it looks like a tiny clover or a little window flower. The square frame comes next in cream: a round of treble crochet corners and chain spaces, a round of double crochet groups, and a lacy round of chain loops. That open last round is what lets the light pour through. Each square measures about 5 inches (12.5 cm) after blocking.
You join the squares as you go, sixteen in each column, so you never have to sew long seams at the end. Once a column is finished, you work three rounds of mustard yellow lace all the way around it: a round of single crochet to tidy the edge, a round of open mesh, and a round of small chain loops. On the second column of each panel, the last round joins to the first column along the inner side, and that is how the middle stripe is made. The method is simple, but the long sides take patience and even tension.
Each finished panel is about 15 inches (38 cm) wide and about 83 inches (211 cm) long, not counting the tab tops. That is a standard full length for a living room or bedroom window, and the pair frames a window up to about 48 inches (122 cm) wide when the panels hang at the sides. The panels are made to stand open, like decorative side panels, but you can also hang them close together for more privacy and softer light.
The tab tops are five mustard yellow strips across the top of each panel, worked right onto the border and folded over the rod. They slide easily on a wooden pole, and they hide no hardware at all, which keeps the look simple and homey. A dark wooden rod makes the mustard stripes stand out beautifully, but a white or light wooden rod works just as well if your room is very bright.
When the sun comes through, the cream lace glows and the flowers look like they are floating in light. The gray flowers keep the yellow from feeling too sweet, and the cream flowers almost melt into the lace, which gives the whole panel depth. The cotton is matte and soft, so the panels hang straight and heavy enough to drape well, but they are still open enough to let a breeze move them a little.
I call this pattern intermediate. The stitches are basic, but you need to count well, keep your squares all the same size and work steady borders more than 80 inches long. More than anything, it rewards patience, because there are sixty four squares in the pair. Plan on about 60 to 70 hours from the first flower to the last tab, spread over evenings and weekends in a rhythm that suits you.
Why You'll Love This Yellow and Gray Flower Lace Curtain Panels Crochet Pattern Pattern
I love projects that grow one small piece at a time, and these panels are exactly that. A flower square takes me about forty five minutes, which fits perfectly into a quiet evening or a long phone call with my sister. I keep a little bag with cream, yellow and gray yarn by my chair, and every time I sit down I make one more square. After a few weeks, the stack on the side table had turned into something that already looked like a curtain.
The color mix makes me happy every single day. Mustard yellow is such a warm, honest color, and the soft gray calms it down so it never shouts. The cream flowers are the quiet surprise, because you only notice them when you look closely. I like that the panels feel cheerful in the morning and cozy in the evening, when the lamp light turns the mustard almost golden.
There is a special kind of satisfaction in joining the squares as you go. You finish the last round of a square, and instead of putting it on a pile, you hook it right onto the column. Every evening the column gets a little longer, and you can hold it up and see your progress. When I finished the first column of sixteen squares, I hung it on the window just to look at it, and I could not stop smiling.
These panels changed my living room more than any new furniture could. The window used to have plain white fabric that I barely noticed. Now the light comes in through lace and little flowers, and the mustard stripes frame the view like a picture. Friends always ask if they are vintage, and I love telling them I made them myself, one flower at a time.
They also make a wonderful gift, because handmade curtains feel like a real heirloom. I would make a pair for:
- a daughter or son moving into a first home
- a friend with a cottage or a farmhouse kitchen
- newlyweds who love vintage style
- anyone who loves yellow and sunny rooms
This pattern is also a lovely way to use stash yarn. The flowers take only a few yards each, so small leftover balls of yellow and gray can become flowers in no time. As long as the weight matches, a few slightly different yellows even look charming, like an old quilt. The cream frames and the borders need larger amounts, so that is where I spend money on good new yarn from one dye lot.
Making these panels taught me a lot. I learned that blocking every square to the same size is what makes the columns hang straight. I learned to count the stitches on the long yellow borders in sections, with a marker every ten squares, so I never lost my place. And I learned that cotton panels this long are heavier than they look, so a sturdy rod and good tabs really matter. I put all of those lessons into the pattern so yours go up smoothly.

Switch Things Up
Red and white. Make the frames in white, the flowers in red, white and a soft pink, and the borders and tabs in a bright red. It turns the panels into a cheerful farmhouse look that is perfect for a kitchen window. Green and cream is the calm option: keep the cream frames, make the flowers in sage, olive and cream, and work the borders in a deep leaf green. It looks wonderful in a room full of plants and wooden furniture.
Blue and white, or pink and white. For a seaside feeling, use white frames with flowers in navy, cornflower blue and white, and borders in navy. For a nursery or a little girl's room, pink and white is very sweet, with blush and white flowers and rose pink borders. White with golden details is my choice for an elegant dining room: white frames and white flowers, with golden mustard borders and tabs and a few golden flowers scattered in.
A narrow window. For a window about 24 inches (61 cm) wide, make each panel with one column of squares instead of two. A single column with its border is about 7.5 inches (19 cm) wide, so a pair of narrow panels frames the glass without covering it. Use three tabs per panel, at the two corners and the middle. You will need half the squares, 32 in total, and about half the yarn.
A standard window. The pattern as written, two panels of two columns each, frames a standard window of about 36 to 48 inches (91 to 122 cm). If you want the panels to cover more of the glass, add a third column to each panel, which makes them about 22.5 inches (57 cm) wide. A three column panel needs 48 squares, so the pair needs 96, and you add 2 more tabs per panel. Join the third column the same way as the second one.
A door. For a glass door, make one panel with three columns of 15 squares each, which gives about 22.5 inches (57 cm) of width and about 78 inches (198 cm) of length. That fits the glass on most doors, and the open lace still lets light into the hallway. Hang it from a slim rod at the top and, if you like, a second rod through the bottom border so it stays flat when the door moves.
A room divider. For a wide opening, make three or four panels and hang them side by side from one long ceiling rod. Four panels of two columns cover about 60 inches (152 cm), and you can leave small gaps between them so people can walk through. Use the full 16 squares per column, or add squares until the bottom edge sits just above the floor. A divider in cream and mustard makes a room feel warm without closing it off.
A shorter cafe curtain. For the lower half of a kitchen window, make each column only 6 squares long, which gives panels about 33 inches (84 cm) long including the borders. The pair then needs just 24 squares and makes a sweet weekend to week long project. Tassels are another easy change: the photo has none, but you can add a short 4 inch (10 cm) tassel at each bottom corner and at the bottom of the middle stripe, or a longer 7 inch (18 cm) one for a more dramatic look.
A different yarn weight. The squares and borders grow or shrink with your yarn, so you can change the size without changing a single stitch count. Here is roughly what to expect for one square and one panel of two columns:
- DK cotton with a 3.5 mm hook: squares about 4 in (10 cm), panels about 12 in (30 cm) wide and 67 in (170 cm) long
- Worsted cotton with a 4.5 mm hook, as written: squares about 5 in (12.5 cm), panels about 15 in (38 cm) wide and 83 in (211 cm) long
- Aran cotton with a 5 mm hook: squares about 5.5 in (14 cm), panels about 16.5 in (42 cm) wide and 91 in (231 cm) long
Materials Needed
— Main Fabric
— Tools Required
The Free Pattern
0% complete
— Layout :
— Flower Square (Make 64: 22 with yellow flowers, 22 with gray flowers, 20 with cream flowers, all with cream frames) :
— Chain Links and Joining (Make 4 columns of 16 squares, then join into 2 panels) :
— Tassels (optional, not shown in the photo) (Make 6, mustard yellow) :
— Top Loops and Hanging (Make 10 tabs, mustard yellow) :
Assembly Instructions
- Make the first flower square of a column, then make 15 more, joining each one to the square above it in Round 5 in the color order from the Layout.
- Make 4 columns this way, two with the Column A color order and two with the Column B color order, and block them flat.
- Work Border Rounds 1 and 2 around every column, then Border Round 3 around both Column A strips.
- Work Border Round 3 around each Column B, joining it to a Column A along the inner long side to make the middle stripe of each panel.
- Add the optional tassels at the bottom corners and middle stripe if you want them.
- Work 5 tab tops along the top of each panel, fold them over the rod, sew them down and hang both panels.
Common Mistakes & How to Fix Them
Squares that come out in different sizes. This happens most often when the three flower colors are from different yarn lines, or when your tension changes between a relaxed evening and a busy one. A difference of a quarter inch per square adds up to four inches over a column of sixteen, and the two columns of a panel will no longer meet evenly. Make one square in each flower color before you start and measure them side by side. Keep the same hook for every square, and if one color comes out bigger, use a hook half a size smaller for that flower only.
A long border that ripples or pulls in. The yellow borders are more than 80 inches long, and it is easy to work a few extra stitches in one section and too few in another. Too many stitches make the edge wave, and too few make the panel pull in and curl at the sides. Follow the counts per loop exactly, 4 sc in each ch-4 loop and 1 sc in each sc between, and place a marker every ten squares. Count the stitches between markers before you start the next round, because fixing a count now is much easier than ripping back 300 stitches later.
Colors that fall out of order. With three flower colors in two different orders, it is easy to join a yellow square where a gray one should go, and then the diagonal rhythm across the panel breaks. That happens when you make squares in batches and pick them from a mixed pile. Keep the finished squares in three separate bags, and write the column order on a card that you keep with your project. Before each join, check the card. If a square ends up in the wrong place, unpick that one join right away, because the next square will lock it in.
Panels that stretch and end up too long. Cotton is heavy, and a panel of thirty two squares can grow an inch or two in length after it hangs for a few weeks, especially after washing. If you only measure the panels flat on the floor, they can end up dragging on the windowsill or floor. Block the columns firmly before you add the borders, and hang the finished panels for a day or two before you decide on the final length. If they grew too much, you can remove one square from the bottom of each column before working the borders on a future pair.

You Might Also Like





Important Notes
My gauge is one blocked square of about 5 in (12.5 cm) on each side, in worsted cotton with a 4.5 mm hook. Rounds 1 and 2 alone, the flower, should measure about 2.75 in (7 cm) across. Make one complete square and block it before you buy all your yarn. If your square is bigger, go down a hook size, and if it is smaller, go up one. Keep that hook for all 64 squares, so the four columns match.
Block every column before you add the border, and block each finished panel once more at the end. Pin the column flat on mats, keep the long edges perfectly straight with a measuring tape, mist with water and let it dry completely. The cream frames open up beautifully when they are blocked, and the flowers sit flat in the middle. Never press the panels with a hot iron, because it flattens the texture of the petals and the lace.
The pair uses about 1,260 yd (1,152 m) of cream, 1,080 yd (988 m) of mustard yellow and 180 yd (165 m) of soft gray in worsted cotton. Buy all of each color at once and check that the dye lot number on every label is the same. Mustard and cream shades can change a lot between lots, and a different stripe or frame would show clearly when the light comes through. Keep one label of each color until both panels are finished.
The finished pair weighs about 1.5 kg, so each panel is about 750 g. Use a solid wooden rod at least 1 in (2.5 cm) thick with strong brackets, and spread the tabs evenly. To wash, hand wash each panel in cool water with mild soap, press the water out with towels and dry it flat, reshaping the squares. Because mustard, gray and cream are used together, always add a color catcher sheet to the wash.
I hope these panels bring as much sunshine into your home as mine have brought into my living room. They look like a huge project when you see them hanging, but they are really just sixty four little flowers, made one at a time and joined into something lovely. Take your time, enjoy the colors and do not worry if your first square is not perfect. Blocking helps, and every square you make will be a little better than the last.
So pick out your cream, your mustard and your gray tonight, and make just one flower square. Hold it up to the window and watch the light come through the lace. Before long you will have a column, then a panel, then a pair of curtains you will love for years. Happy crocheting, my friend.
Crochet Abbreviations
You Ask, We Answer
What is the finished size of the panels?
As written, each panel is about 15 inches (38 cm) wide and about 83 inches (211 cm) long, not counting the tab tops, which add about 2 inches above the rod. That length comes from 16 squares of about 5 inches in each column plus the yellow border at the top and bottom. These sizes are for worsted cotton with a 4.5 mm hook and my gauge of one 5 inch square. The pair is made to frame a standard window of about 36 to 48 inches (91 to 122 cm) when the panels hang at the sides. To fit your own window, measure from the rod to where you want the panels to end, subtract about 3 inches for the borders and divide by 5 to find how many squares you need in each column. For wider coverage, add a third column to each panel, which adds about 7.5 inches of width. Always block a test square first, so your math is based on your own gauge.
Can I use a different yarn weight or make the panels bigger or smaller?
Yes, and you do not need to change any stitch counts. The squares and borders simply grow or shrink with the yarn and hook. In DK cotton with a 3.5 mm hook, the squares are about 4 inches and a panel is about 12 inches wide and 67 inches long, which suits a shorter window. In aran cotton with a 5 mm hook, the squares grow to about 5.5 inches and a panel reaches about 16.5 inches wide and 91 inches long. To change the size without changing the yarn, add or remove squares in each column for length, or add or remove columns for width. Every extra square adds about 5 inches of length, and every extra column adds about 7.5 inches of width. I recommend cotton or a cotton blend, because acrylic can stretch under its own weight on long panels and loses the crisp lace look.
How do I wash and care for the panels?
Cotton panels are easy to care for, but I treat them gently because of their size and weight. Most of the time, a good shake outdoors every few weeks keeps them fresh. When they need a real wash, take them down, remove them from the rod and wash one panel at a time by hand in a tub of cool water with a little mild soap. Swish gently instead of rubbing, then rinse until the water runs clear. Add a color catcher sheet, since the mustard and gray sit right next to cream. Never wring the panels. Press the water out with large towels, then lay each panel flat on dry towels and smooth every square back into shape. Let them dry completely before you hang them, so the wet cotton does not stretch under its own weight. Avoid the dryer and avoid strong direct sun while they dry, as both can fade the colors.
Success!
Thanks for subscribing — check your inbox for a welcome note.
Abbreviations
- ch — chain
- sl st — slip stitch
- sc — single crochet
- dc — double crochet
- tr — treble crochet
- sp — space
- st(s) — stitch(es)
- RS — right side
- in — inch or inches
- cm — centimeters
- mm — millimeters
- yd — yards
- m — meters
- g — grams
- kg — kilograms