
Blue Carnation Granny Square Bed Cover Crochet Pattern
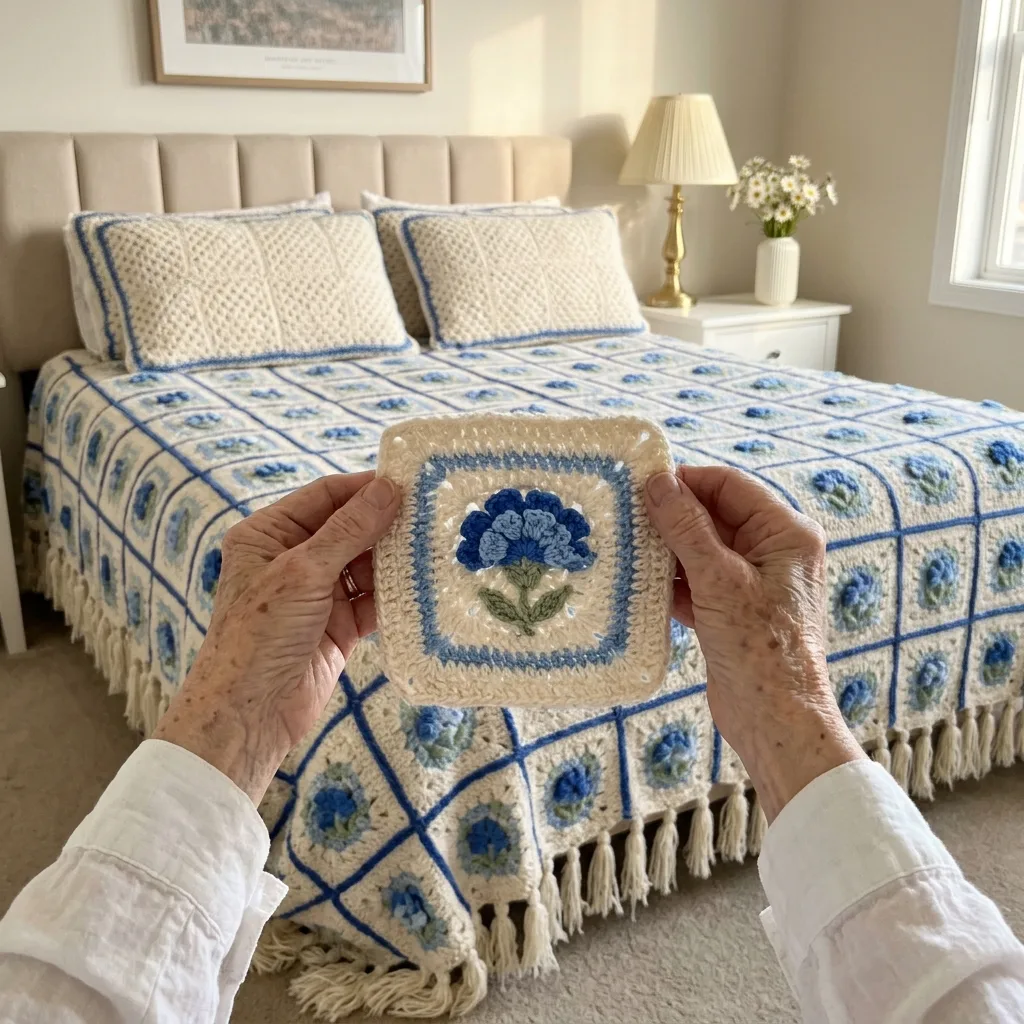
You need classic granny clusters, ruffled fan layers for the flowers and neat sewing to put them together.
This is a long heirloom project made of many small parts, perfect for a year of cozy evenings.
Every cream granny square holds a raised blue carnation with ruffled petals, so the bed blooms all year.
About This Blue Carnation Granny Square Bed Cover Crochet Pattern Pattern
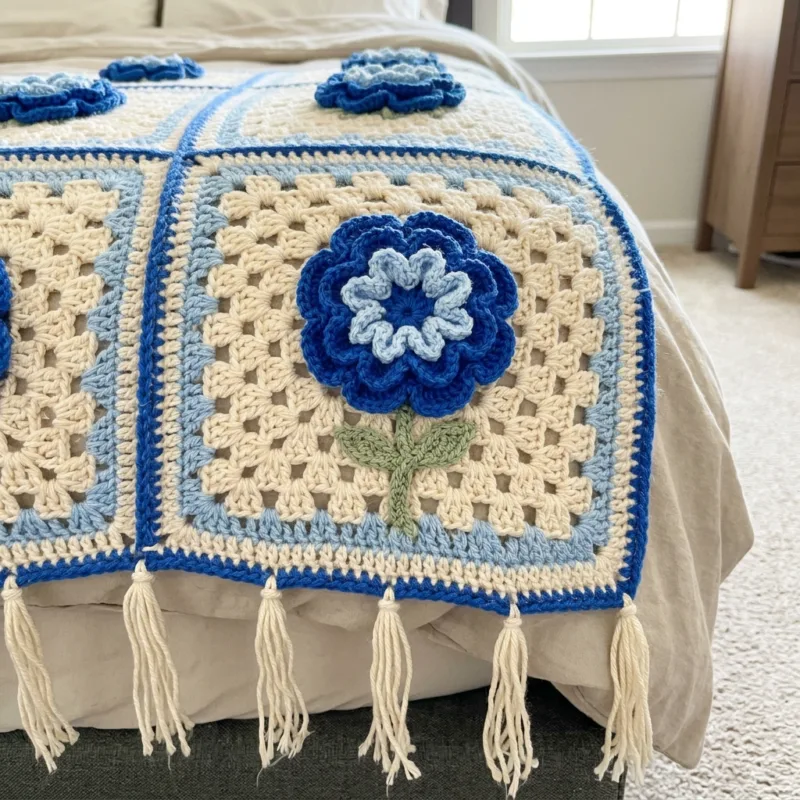
This blue carnation bed cover is a garden you can sleep under. It is made from cream granny squares, and on every square blooms a raised, layered carnation in royal blue and light blue. Each flower has ruffled petals that stand up from the square, a sage green stem and two leaves. A light blue band and a royal blue outline frame every square, and the squares are joined in a straight grid with royal blue seams, so each flower sits in its own little blue window. Along the sides and foot of the bed, a blue border with long cream tassels finishes the cover with a soft, old-fashioned touch.
The background squares are classic granny squares worked in cream. You make seven rounds of three double crochet clusters, with chain spaces between them and bigger chain spaces at the corners. The little holes between the clusters give the square that familiar, cozy granny look you see in the photo. Then you work one round of light blue double crochet and one round of royal blue single crochet to make the frame. These two rounds make the square sturdy and give a neat, even edge for joining.
The carnation is the star of each square, and it is made in layers. Each layer is a small fan worked in rows of double crochet, growing from a few stitches at the base to many stitches at the top. The last row of every fan is a frilly edge of single crochet and chain loops, which makes the ruffled petal look of a real carnation. You make a large royal blue back layer, a light blue middle layer, a small royal blue top layer and a tiny light blue center, then stack them and sew them together at the base. A green calyx, stem and two leaves finish the flower.
The finished bed cover measures about 94 by 103 inches before the tassels. That is 10 squares across and 11 squares down, which makes 110 squares and 110 carnations, each square about 9 inches across after blocking, plus a 2 inch border. The cream tassels add about 6 more inches on the sides and foot. On a queen bed, the cover lies across the top and drops about 17 inches on each side, with the tassels reaching toward the floor. I used worsted weight matte cotton with a 5 mm hook, which makes plump clusters and full, soft petals.
The finished cover has real weight and lots of texture. The granny squares are cozy and lightly open, while the carnations and leaves add raised, dimensional detail that you can feel with your hands. Blue and cream is a classic, fresh color pairing that feels calm and cheerful at the same time. It looks lovely with beige headboards, white furniture, gold lamps and fresh daisies, and it brings a cottage garden feeling into the bedroom. The tassels add movement and charm along the edges.
This pattern suits an intermediate crocheter who knows granny squares and is comfortable making small pieces and sewing them together. The granny squares are quick and relaxing, and the carnation layers are fun once you see the ruffles form. There are many parts, so this is a project for someone who enjoys a long, slow make and the joy of building something big from small, pretty pieces. Every part is portable, so you can make petals and leaves on the go and save the sewing for quiet evenings.
Why You'll Love This Blue Carnation Granny Square Bed Cover Crochet Pattern Pattern
I love this bed cover because it feels like a garden that never fades. Carnations have always been one of my favorite flowers. They are cheerful and full, with those lovely ruffled petals that look like little skirts. My mother always kept a vase of them on the kitchen table, and making these blue carnations brings back that happy memory every time. Seeing a whole bed covered with them makes my bedroom feel bright and loved.
The granny squares are pure comfort to make. I have been making granny squares since I was a girl, and the rhythm of three double crochet and a chain is like an old friend. I can make a square without even thinking, while I chat with my family or listen to music. Then the blue frame rounds feel like putting a pretty ribbon around a gift. My stack of cream squares grew so fast, and I loved seeing it get taller.
The carnations are where the real fun begins. Each layer starts as a tiny fan and grows wider row by row. When you work that last frilly row, the edge ruffles up like real petals, and it always makes me smile. Stacking the layers together and seeing the flower come to life is my favorite moment. I like to make all the back layers first, then all the middle layers, so my petals look the same on every flower.
- Classic, relaxing granny squares.
- Raised carnations with real ruffled petals.
- A fresh blue and cream cottage palette.
- Long cream tassels for an old-fashioned finish.
This cover truly changes a room. My guest bedroom used to feel a little plain, and now it feels like a sunny cottage in the countryside. Every guest reaches out to touch the flowers and asks how long it took. When I tell them it took most of a year, they look at it with new respect. A handmade bed cover like this is a true heirloom. It carries love in every stitch and will be treasured long after I am gone.
Making this cover taught me patience and planning. I learned to make all the parts of one kind in batches, so my tension stayed even. I learned to pin each flower in place before sewing so they all sit at the same height. And I learned that a simple granny square can become something truly special with a little decoration. If you love flowers and granny squares, I think this carnation garden will make you very happy.

Switch Things Up
The first and easiest change is the flower color. Blue carnations are fresh and striking, but you can make them in pink and rose, red and burgundy, purple and lilac or yellow and gold. Just keep two shades of the same color for the outer and inner petals, so the flower looks layered. Change the frame color to match your flowers, such as a pink frame for pink carnations. You can also make a mix of flower colors across the bed, like a real cottage garden in full bloom.
You can make this bed cover for any bed size by changing the number of squares. Each square is about 9 inches across after blocking, and the border adds about 2 inches on each side before the tassels. Here are the counts I use:
- Twin: 7 by 11 squares, 77 squares, about 67 by 103 inches.
- Full: 9 by 11 squares, 99 squares, about 85 by 103 inches.
- Queen: 10 by 11 squares, 110 squares, about 94 by 103 inches.
- King: 12 by 11 squares, 132 squares, about 112 by 103 inches.
For a sofa throw, join 5 squares across and 6 down. That is 30 squares and finishes at about 49 by 58 inches before the tassels. A throw is a wonderful way to try the pattern before committing to a whole bed cover. It looks lovely folded over the back of a sofa or the end of a bed, and the tassels make it feel cozy and classic. It makes a meaningful gift for Mother's Day, a birthday or a new home.
A baby blanket is sweet in this pattern too. Join 4 squares across and 4 down for 16 squares, about 40 inches square with the border. Use a soft cotton or cotton blend and gentle colors, such as pale pink carnations or soft yellow ones. Leave off the tassels for a baby blanket, and sew the flowers on very securely, because little hands love to pull. A handmade flower blanket is a keepsake that families treasure for years.
You can also make a simpler version. For a quicker cover, put a carnation on every other square and leave the rest as plain cream granny squares in a checkerboard. You could also make flat carnations by using only the back and middle layers, or replace the carnations with small flowers or hearts. For a lighter look, skip the tassels and finish with a simple picot edge along the border. Lay out a few squares to see which look you love.
To make matching pillow covers, join 2 squares side by side for a standard pillow sham front about 18 by 9 inches, or 2 by 2 squares for a square cushion. Make a back panel the same size in rows of cream double crochet. Join the front and back around three sides with royal blue single crochet, slip in the pillow and close the last side. Use a cream pillow insert so the granny holes show a matching color. Matching pillows make the whole bed look finished.
Finally, try a different yarn weight. In DK cotton with a 4 mm hook, each square is about 7.5 inches across, so a queen needs about 12 by 13 squares, and the flowers look more delicate. In bulky yarn with a 6.5 mm hook, a square grows to about 11 inches, and a queen needs only about 8 by 9 squares. Make the flowers in the same weight as the squares so they stay in proportion. Always make one test square and one flower before you plan your layout.
Materials Needed
— Main Fabric
— Tools Required
The Free Pattern
0% complete
— Granny Square (Make 110: cream with light blue and royal blue frame) :
— Carnation (Make 110: royal blue and light blue layers) :
— Calyx, Stem and Leaves (sage green: 110 calyxes, 110 stems, 220 leaves) :
— Layout and Joining :
— Border and Tassels :
Assembly Instructions
- Make one Granny Square, one Carnation, one calyx, one stem and two leaves, block the square and check that it measures about 9 inches across.
- Make all 110 granny squares, then make the carnation layers, calyxes, stems and leaves in batches.
- Stack and sew the four layers of each carnation together at the base.
- Pin the stem, calyx, carnation and leaves onto each square in the same position and sew them in place.
- Lay the squares out in a grid of 10 by 11 with every carnation facing the headboard, and join them wrong sides together with royal blue single crochet, first in rows and then in columns.
- Work Border Rounds 1 to 3 around the whole bed cover, then make the tassels and tie them along the two long edges and the foot.
- Block the finished bed cover flat, fluffing the carnation petals with your fingers and combing the tassels straight, and let it dry completely.
Common Mistakes & How to Fix Them
The most common mistake is granny squares that twist or grow lopsided. This happens when you start each round in a different place or miss a ch 1 between clusters, so one side ends up with more clusters than the others. Once the frame rounds are added, the square looks crooked and the carnation sits at an angle. Always start each round in a corner space, and check that every side has the same number of clusters before you join. By Round 7, each side should have 7 clusters counting the corner halves. If one side is off, pull back and fix it.
Another mistake is ruffles that lie flat instead of standing up. The frilly look of the carnation comes from the doubling in each fan row and the ch-3 loops in the last row. If you skip any increases or make the chains too short, the fan stays flat and looks more like a shell than a carnation. Work 2 dc in every stitch in Rows 2 and 3, and chain loosely in the ruffle row. After sewing the layers together, push the ruffles up gently with your fingers. A little steam or a light mist helps them hold their shape.
Many makers sew the flowers on at different heights, so the rows of carnations look uneven across the bed. When every flower is placed by eye, small differences add up, and some flowers sit high while others sit low. Make a simple paper template the size of the square and mark where the stem, flower and leaves go. Lay it on each square and pin the pieces in the same spots every time. Check two finished squares side by side before sewing all of them. Matching flowers make the whole cover look neat and planned.
The last common mistake is tassels of different lengths or thickness. If you wind some tassels 10 times and others 14, or cut them unevenly, the fringe looks messy and pulls the border out of line. Always wind exactly 12 times around the same 6 inch card, and wrap the neck at the same height on each tassel. Tie them to the border at the exact stitch spacing, every 6th sc. When all tassels are attached, lay the cover flat, comb the strands straight with your fingers and trim them all to the same length with sharp scissors.

You Might Also Like





Important Notes
Gauge matters because small differences add up across 110 squares. A blocked square with its frame should measure about 9 inches across. If yours is half an inch larger, the bed cover will grow by 5 inches across and more in length. Make one test square and one carnation before you buy all of your yarn, and check that the flower fits nicely in the upper half of the square with a little cream showing around it.
Blocking makes the granny squares straight and even and the frames crisp. Block each square flat at 9 inches before sewing on the flower, so the flower sits on a smooth surface. Do not press or pin the carnations, because the ruffles should stay raised. After joining and finishing the border, block the whole cover flat with the flowers facing up, and gently fluff each carnation while the cover is still slightly damp.
The yarn amounts are for the queen size in worsted weight cotton, so adjust them for other sizes or yarns. Buy all of each color from the same dye lot, plus about 10 percent extra. Cream can range from cool to warm, and royal blue can lean toward navy or purple between lots, so differences show. If you must use two lots, spread the squares and flowers from each lot evenly across the bed.
Wash the bed cover by hand or on a gentle cold cycle inside a large mesh laundry bag, with the tassels tucked inside. Because royal blue sits right next to cream, wash it on its own and add a color catcher sheet to every wash, especially the first few. Use a mild detergent and no bleach. This cover is heavy when wet, so never hang it. Lay it flat on towels, fluff the flowers, comb the tassels and let it dry fully.
I hope this blue carnation bed cover brings a whole garden of flowers into your bedroom. It is a big project with many parts, but every granny square, petal and leaf is a small, happy step. Take your time, make your pieces in batches and enjoy watching your baskets of flowers grow.
You do not have to think about the whole bed cover today. Just make one granny square this evening and one carnation tomorrow. Sew them together and hold up your first little flower in its blue frame. Before long, you will have a whole bed in full bloom. Happy crocheting, my friend.
Crochet Abbreviations
You Ask, We Answer
What is the finished size of this bed cover?
The queen version finishes at about 94 by 103 inches before the tassels, with the tassels adding about 6 inches along the sides and foot. That is 10 squares across and 11 squares down, with each square measuring about 9 inches across after blocking, plus about 2 inches of blue border on every side. On a standard queen mattress, the cover lies across the top and drops about 17 inches on each side, and the tassels bring it close to the floor on most bed frames. If you want a longer drop, add one more square on each side. Measure your own bed, including the mattress and frame height, and divide by your blocked square size before you buy yarn, so you know exactly how many squares and flowers you need.
Can I use a different yarn weight or make a different size?
Yes, this pattern works in many yarn weights because the square and the carnation keep the same stitch counts in every size. In DK cotton with a 4 mm hook, each square is about 7.5 inches across, and in bulky yarn with a 6.5 mm hook it grows to about 11 inches. Make the flowers, stems and leaves in the same weight as the squares so they stay in proportion. Make one test square and one flower in your chosen yarn, block the square and measure it, then divide your bed size by that number. The section on switching things up lists square counts for twin, full, queen, king, a throw and a baby blanket. For the tassels, keep the same spacing of one tassel every 6 stitches along the border, whatever the size.
How do I wash and care for this crochet bed cover?
Wash it by hand in cool water or on a gentle cold cycle inside a large mesh laundry bag to protect the raised carnations and the tassels. Tuck the tassels inside the bag so they do not tangle. Use a mild detergent and never use bleach, because it can fade the blues and yellow the cream. Because royal blue sits right next to cream, wash the cover on its own and add a color catcher sheet to every wash. Do not wring or twist the cover. Gently press out the water, then lay it flat on clean towels, fluff each carnation with your fingers and comb the tassels straight. Let it dry completely, away from direct sunlight. Never hang it while wet, because this cover is heavy and will stretch. Between seasons, fold it loosely and store it in a breathable cotton bag.
Success!
Thanks for subscribing — check your inbox for a welcome note.
Abbreviations
- ch — chain
- sc — single crochet
- hdc — half double crochet
- dc — double crochet
- cluster — 3 dc in the same sp
- sl st — slip stitch
- MR — magic ring
- beg — beginning
- st(s) — stitch(es)
- lp(s) — loop(s)
- sp(s) — space(s)
- rep — repeat
- Rnd — round