
Amanda's Creative Corner Crochet · Kitchen
Free Crochet Patterns Handmade with Love

Blue and Cream Medallion Bed Cover Crochet Pattern
Jump to Pattern
Blue and Cream Medallion Bed Cover Crochet Pattern
250-300 Hours 2 made this
Intermediate Level

You should be comfortable with double crochet, chain spaces and changing colors in a round.

250-300 Hours

Each medallion takes about three hours, so this is a long and cozy project.

Blue Arc Wedges

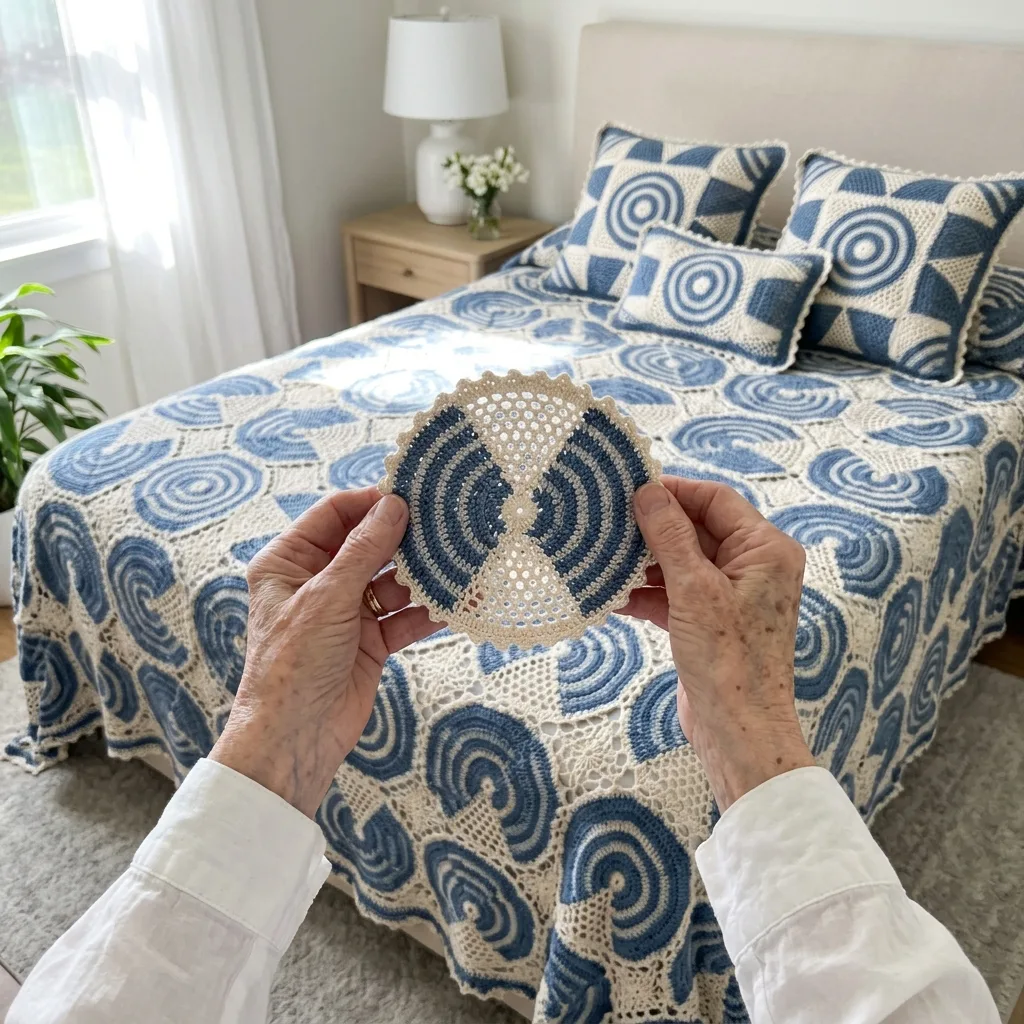
Every round medallion pairs denim blue arcs with open cream lace fans.

About This Blue and Cream Medallion Bed Cover Crochet Pattern Pattern

This bed cover is made from 63 round medallions, each with two denim blue wedges of concentric arcs and two cream wedges of open lace. The medallions sit side by side in a grid, and 48 small cream filler stars fill the gaps between them. A cream picot edge finishes the outside.

It measures about 77 by 99 inches, which covers a queen size bed with a soft drop at the sides. You will use double crochet, single crochet, chain loops and a little joining. It suits crocheters who have finished a few round motifs and want a big heirloom project.

Blue and Cream Medallion Bed Cover Crochet Pattern step detail

Why You'll Love This Blue and Cream Medallion Bed Cover Crochet Pattern Pattern

I love this project because every medallion is small and portable. I can crochet one at the kitchen table, in the car or on the sofa, and each finished circle feels like a little win.

The denim blue arcs against the cream lace make a bedroom feel calm and fresh. It is the kind of bed cover that becomes a family keepsake, and it makes a lovely wedding or housewarming gift.

Switch Things Up

Try dusty rose and cream, sage green and cream, or charcoal and cream for a different mood. For a throw, make 4 medallions across and 5 down for about 44 by 55 inches, or make 5 across and 6 down for a larger lap blanket. You can also join four medallions with one filler star for a matching pillow cover, or leave off the picots and finish with a plain round of single crochet. The border count changes with the grid, so use the formula in the Border section.


Materials Needed

— Main Fabric

01 Soft cream DK weight cotton yarn: about 8,100 yards (7,400 m) for 63 medallions, 48 filler stars, the joins and the border
02 Denim blue DK weight cotton yarn: about 3,900 yards (3,560 m) for the blue wedges of the medallions
03 Buy a little extra of each color from the same dye lot, because yarn amounts are estimated and depend on your tension

— Tools Required

04 3.5 mm (E-4) crochet hook
05 Yarn needle
06 Stitch markers
07 Scissors
08 Blocking mats and pins
09 Measuring tape

The Free Pattern

Intermediate 250-300 Hours

0% complete

— Round Medallion (Make 63, cream and denim blue) :

Use a 3.5 mm hook. Ch 3 at the start of a round counts as 1 dc. Ch 4 at the start of a round counts as 1 dc and ch 1. Join each round with a sl st in the top of beg ch 3, or in the 3rd ch of beg ch 4. Work with the right side facing you.
From Round 3 on, each medallion is worked in 4 wedges of equal size. Wedge 1 (top) is cream, wedge 2 (right) is blue, wedge 3 (bottom) is cream and wedge 4 (left) is blue. Place a marker in the first dc of each wedge. Change color on the last stitch of each wedge and carry the unused yarn loosely along the back.
Round 1 (cream): Make a magic ring. Ch 3 (counts as 1 dc), work 15 dc in the ring, pull the ring tight, sl st in the top of beg ch 3 to join. (16 dc)
Round 2 (cream): Ch 4, dc in next dc, *ch 1, dc in next dc; rep from * 13 more times, ch 1, sl st in the 3rd ch of beg ch 4 to join. (16 dc and 16 ch-1 sps)
Round 3 (cream): Ch 4, dc in same st as join, ch 1, dc in next dc, ch 1, *(dc, ch 1, dc) in next dc, ch 1, dc in next dc, ch 1; rep from * 6 more times, sl st in the 3rd ch of beg ch 4 to join. (24 dc and 24 ch-1 sps, 6 dc in each wedge)
Round 4 (wedge colors): Work each wedge in its color: dc in 1st dc of the wedge, ch 1, (dc, ch 1, dc) in next dc, ch 1, dc in each of the next 2 dc with ch 1 after each dc, (dc, ch 1, dc) in next dc, ch 1, dc in last dc of the wedge, ch 1. The ch 4 at the start counts as the first dc and ch 1 of wedge 1. Join. (32 dc and 32 ch-1 sps, 8 dc in each wedge)
Round 5 (wedge colors): Work each wedge in its color: dc in 1st dc of the wedge, ch 1, (dc, ch 1, dc) in next dc, ch 1, dc in each of the next 4 dc with ch 1 after each dc, (dc, ch 1, dc) in next dc, ch 1, dc in last dc of the wedge, ch 1. Join. (40 dc and 40 ch-1 sps, 10 dc in each wedge)
Round 6 (wedge colors): Work each wedge in its color: dc in 1st dc of the wedge, ch 1, (dc, ch 1, dc) in next dc, ch 1, dc in each of the next 6 dc with ch 1 after each dc, (dc, ch 1, dc) in next dc, ch 1, dc in last dc of the wedge, ch 1. Join. (48 dc and 48 ch-1 sps, 12 dc in each wedge)
Round 7 (wedge colors): Ch 1, *sc in next dc, ch 3, sk next ch-1 sp, next dc and next ch-1 sp; rep from * 23 more times, sl st in first sc to join. (24 sc and 24 ch-3 sps, 6 ch-3 sps in each wedge)
Round 8 (wedge colors): Sl st in first ch-3 sp, ch 3, 2 dc in same sp, 3 dc in each of the next 23 ch-3 sps, sl st in top of beg ch 3 to join. (72 dc, 24 groups of 3 dc)
Round 9 (wedge colors): Ch 1, *sc in the sp between the next two 3-dc groups, ch 3; rep from * 23 more times, sl st in first sc to join. (24 sc and 24 ch-3 sps)
Round 10 (wedge colors): Sl st in first ch-3 sp, ch 3, 2 dc in same sp, 3 dc in each of the next 23 ch-3 sps, sl st in top of beg ch 3 to join. Fasten off and weave in all ends. (72 dc, 24 groups of 3 dc, 18 dc in each wedge)
Block each medallion to about 11 inches across. Rounds 1 to 6 should measure about 6 inches across before blocking. If yours is smaller or larger, change your hook size and keep every medallion the same.
Sample medallion with picots: work 1 more round in cream. Ch 1, *sc in each of the next 2 dc, (sc, ch 3, sl st in first ch) in next dc; rep from * 23 more times, sl st in first sc to join. Fasten off. (72 sc and 24 picots)

— Filler Star (Make 48, cream) :

Round 1: Make a magic ring. Ch 3 (counts as 1 dc), work 11 dc in the ring, pull the ring tight, sl st in the top of beg ch 3 to join. (12 dc)
Round 2: Ch 1, sc in same st, *ch 7, sk next 2 dc, sc in next dc; rep from * 2 more times, ch 7, sk next 2 dc, sl st in first sc to join. (4 sc and 4 ch-7 sps)
Round 3: Ch 1, in each ch-7 sp work (sc, hdc, 7 dc, hdc, sc), sl st in first sc to join. (4 petals of 11 sts each, 44 sts)
Round 4: Ch 1, *sc in each of the next 5 sts, (sc, ch 2, sc) in next st, sc in each of the next 5 sts; rep from * 3 more times, sl st in first sc to join. Fasten off and weave in the end. (48 sc and 4 ch-2 tips)
Block each filler star so the 4 tips point to the 4 joins between the medallions. Each star should measure about 5 inches from tip to tip.

— Layout and Joining :

Layout: 7 medallions across and 9 down, 63 medallions in all, about 77 by 99 inches. Keep the blue wedges on the left and right and the cream wedges on top and bottom in every medallion, so the blue arcs of neighbors meet side to side and the cream wedges meet top to bottom.
Strips: make 9 strips of 7 medallions. With cream yarn and right sides together, join two medallions at the touching point with 3 sl st worked through the back loops of 3 dc of Round 10 on each medallion. (3 sl st per join, 6 joins per strip)
Joining the strips: join the 9 strips with 8 long seams in the same way, with 3 sl st at each touching point. (7 joins per seam, 56 joins in all)
Filler stars: each gap between four joined medallions gets one star, 6 x 8 = 48 stars. Sew each tip to a join, then whip stitch each of the 4 star sides to the 18 dc arc of the neighboring medallion. (about 18 whip stitches per side, 72 per star)

— Border (cream) :

Edge count: 7 x 9 grid, so 7 + 7 + 9 + 9 - 4 = 28 medallions touch the outside. 4 are corner medallions with 54 exposed dc each (216 in all). 24 are side medallions with 36 exposed dc each (864 in all). 216 + 864 = 1,080 sc, and 1,080 divided by 3 gives 360 repeats. For another grid size, use 36 x (number of side medallions) + 216.
Round 1: Join cream yarn in any exposed dc of a corner medallion. Ch 1, sc in each exposed dc along the outside edge, working sc in the sp between two medallions at each join, and sl st in first sc to join. (1,080 sc)
Round 2: Ch 1, *sc in each of the next 2 sc, (sc, ch 3, sl st in first ch) in next sc; rep from * 359 more times, sl st in first sc to join. Fasten off and weave in the end. (1,080 sc and 360 picots)

Assembly Instructions

  1. Weave in all ends and wet block every medallion to about 11 inches and every filler star to about 5 inches so all pieces match.
  2. Lay out the 7 by 9 grid before you join anything, and check that every blue wedge sits left and right and every cream wedge sits top and bottom.
  3. Join the medallions into 9 strips of 7 with cream sl st joins at the touching points.
  4. Join the 9 strips with 8 long seams, using the same 3 sl st at every touching point.
  5. Sew one filler star into each of the 48 gaps, matching the 4 tips to the 4 joins and whip stitching the sides to the medallion arcs.
  6. Work the two border rounds around the whole cover, single crochet first and then the picot round.
  7. Weave in the last ends and block the finished cover flat, pinning the picots so the edge lies neatly.

Common Mistakes & How to Fix Them

Skipping the blocking step makes the medallions come out different sizes and the gaps will not fit the stars, so block every piece before joining.

Losing track of the wedge markers changes where the colors fall, so check the dc count of each wedge at the end of Rounds 3 to 6.

Pulling the carried yarn tight at the wedge changes makes the medallion cup, so keep the strand loose along the back.

Pulling the joining sl st too tight makes the grid pucker, so keep the joins loose and match your tension.


Denise

Denise is a crochet designer who loves turning classic lace and medallion motifs into cozy home decor patterns.


Important Notes

Gauge: Rounds 1 to 6 of the medallion should measure about 6 inches across, and each blocked medallion should be about 11 inches. Make one medallion and one filler star first and test join them with a spare medallion before you commit to all 63.

Yarn amounts and piece sizes are estimated, so keep extra yarn from the same dye lot of both colors.

Use cotton yarn and wash the finished cover gently on a cool cycle. Because denim blue and cream are used together, wash with a color catcher and test the blue for bleeding before the first wash.

Dry flat and reshape the picots while the cover is still damp.


I hope you enjoy every medallion of this bed cover as much as I do. Take your time, make one circle at a time, and send me a photo when yours is finished on the bed.

Crochet Abbreviations

01 ch — chain
02 sl st — slip stitch
03 sc — single crochet
04 hdc — half double crochet
05 dc — double crochet
06 sp — space
07 sk — skip
08 st — stitch
09 beg — beginning
10 rep — repeat

You Ask, We Answer

What is the finished size of this bed cover?

It measures about 77 by 99 inches when blocked, made from 7 medallions across and 9 down. This covers a queen size bed with a soft drop at the sides.

Can I use a different yarn weight or make it a different size?

Yes. Worsted weight cotton with a 4 mm hook makes larger medallions, so you will need fewer of them. You can change the grid, and the border formula in the Border section tells you how many stitches to expect.

How do I wash and care for the finished cover?

Wash it gently on a cool cycle with a color catcher, then lay it flat to dry and shape the picots while it is damp. Cotton gets heavy when wet, so support its weight when you lift it.





