
Amanda's Creative Corner Crochet · Kitchen
Free Crochet Patterns Handmade with Love

Orange and Cream Swirl Motif Bedspread Crochet Pattern
Jump to Pattern
Orange and Cream Swirl Motif Bedspread Crochet Pattern
380-450 Hours 3 made this
Intermediate Level

You should be comfortable with two-color rounds, double crochet and popcorn stitches.

Long Project

Plan on about 380 to 450 hours, spread over several months.

Portable Motifs

Each swirl is small enough to crochet on the sofa or on the go.

About This Orange and Cream Swirl Motif Bedspread Crochet Pattern Pattern

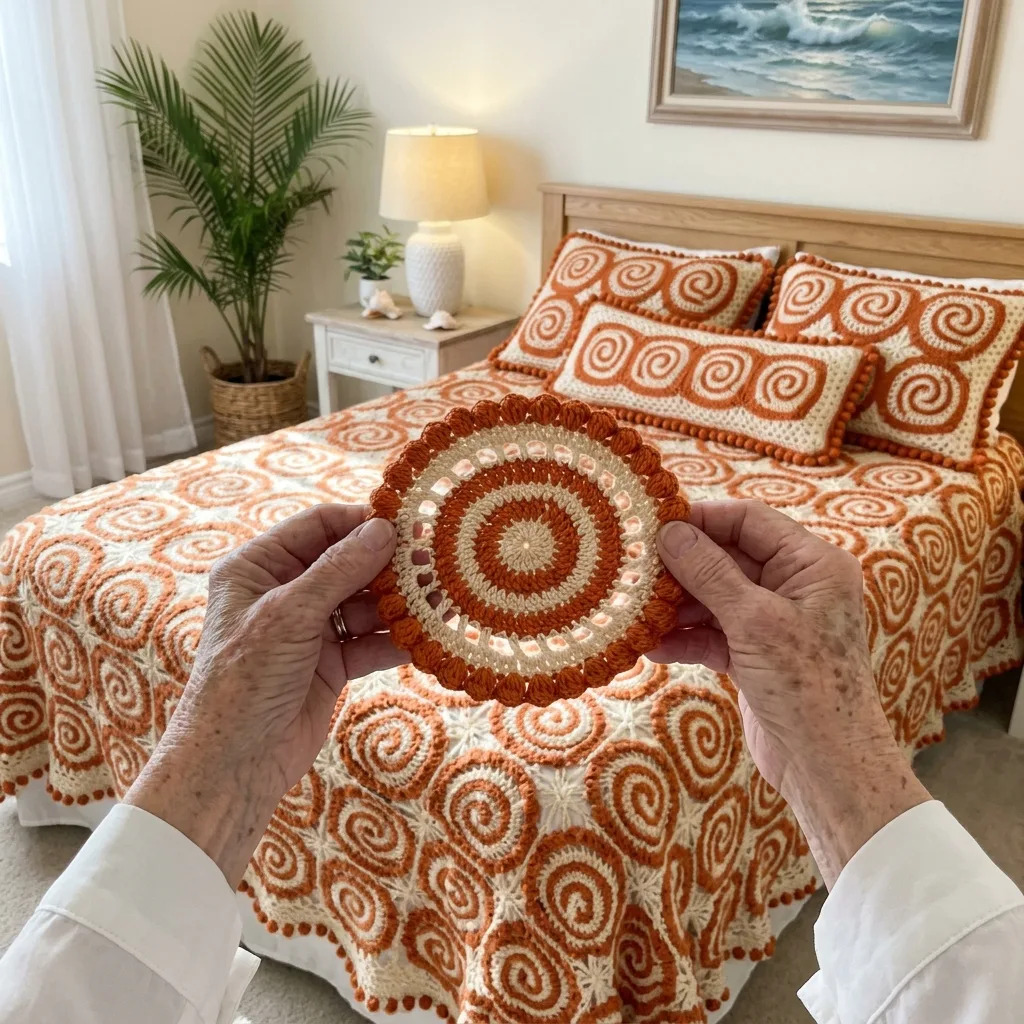
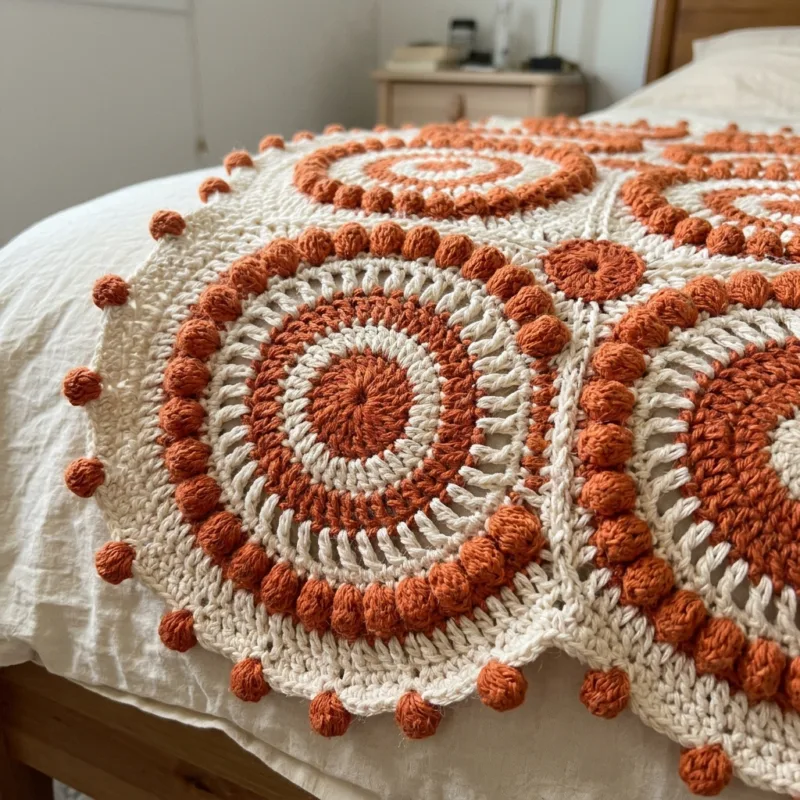
This bedspread is built from 110 round swirl motifs, each about 9 inches across, with an orange spiral arm curling through a cream center. A lacy ring of open arches and a rim of orange popcorn bobbles finish every motif. The motifs are joined as you go, 90 small orange fillers close the gaps, and a scalloped cream edge with orange bobbles goes around the outside.

The finished size is about 90 by 99 inches, enough to cover a queen bed and drape toward the floor. You will use a magic ring, two-color rounds, chain arches and popcorn stitches, so it suits crocheters who have already finished a few motif projects.
Orange and Cream Swirl Motif Bedspread Crochet Pattern step detail

Why You'll Love This Orange and Cream Swirl Motif Bedspread Crochet Pattern Pattern

I love that this big bedspread is really just one small swirl made again and again. I can finish a motif in an evening, tuck it in a bag and start the next one anywhere. Watching the orange and cream spirals pile up is the best motivation I know.

It also makes a cheerful bedroom heirloom. The warm orange and soft cream brighten a room in every season, and the open arches let the light through.

Switch Things Up

Try teal and cream, navy and ivory, or dusty rose and gray for a new look. Make only 6 motifs across and 7 down for a throw of about 54 by 63 inches, or use one motif alone as a large coaster or a doily. You can also crochet a few motifs into a pillow cover to match, or leave off the orange bobbles on the border for a quieter edge.


Materials Needed

— Main Fabric

01 Size 4 worsted weight cotton yarn in burnt orange: about 2,200 g (about 4,400 yd), including the fillers and the bobbles on the border
02 Size 4 worsted weight cotton yarn in cream: about 2,400 g (about 4,800 yd), including the first two border rounds
03 Yarn amounts are estimated, so crochet one motif first and weigh it before buying everything

— Tools Required

04 3.5 mm (US E-4) crochet hook
05 Yarn needle for weaving in ends
06 At least 20 stitch markers
07 Scissors
08 Blocking mats and rustproof pins
09 Measuring tape

The Free Pattern

Intermediate 380-450 Hours

0% complete

— Swirl Motif (Make 110, orange and cream) :

Each motif is worked in the round with the right side always facing you. Join every round with a sl st to the top of the beginning ch-3 unless told otherwise.
Making the swirl: in Rounds 2 to 5, one arc of stitches is worked in cream and the rest in orange. The cream arc starts 3 stitches later in each round, which turns the two colors into a spiral. Carry the unused color loosely behind the work or crochet over it.
Popcorn: 5 dc in the same space, drop the loop from the hook, insert the hook in the first dc of the group, pick up the dropped loop and pull it through. In Round 8 the beginning ch-3 counts as the first dc of the group, so work only 4 dc after it.
Rnd 1: In orange, make a magic ring. Ch 3 (counts as dc), 11 dc in the ring, join. (12 dc)
Rnd 2: Ch 3 (counts as dc), dc in the same st, 2 dc in each remaining st around, join. Work sts 1 to 12 in orange and sts 13 to 24 in cream. (24 dc)
Rnd 3: Ch 3 (counts as dc), 2 dc in next st, *dc in next st, 2 dc in next st*, repeat 11 times, join. Work sts 16 to 33 in cream, the rest in orange. (36 dc)
Rnd 4: Ch 3 (counts as dc), dc in next st, 2 dc in next st, *dc in next 2 sts, 2 dc in next st*, repeat 11 times, join. Work sts 19 to 42 in cream, the rest in orange. (48 dc)
Rnd 5: Ch 3 (counts as dc), dc in next 2 sts, 2 dc in next st, *dc in next 3 sts, 2 dc in next st*, repeat 11 times, join. Work sts 22 to 51 in cream, the rest in orange. (60 dc)
Rnd 6: In cream, ch 1, sc in the same st, ch 5, skip 2 sts, *sc in next st, ch 5, skip 2 sts*, repeat 19 times, join to the first sc. (20 sc, 20 ch-5 arches)
Rnd 7: Sl st into the first ch-5 arch, ch 1, sc in the same arch, ch 5, *sc in next arch, ch 5*, repeat 19 times, join to the first sc. (20 sc, 20 ch-5 arches)
Rnd 8: In orange, sl st into the first ch-5 arch, ch 3 (counts as dc), 4 dc in the same arch and close the popcorn, ch 5, *popcorn in next arch, ch 5*, repeat 19 times, join to the top of the first popcorn. Each popcorn and the ch-5 sp after it is one unit, and the first popcorn is unit 1. (20 popcorns, 20 ch-5 sps)
Joining as you go: on every motif after the first, work Round 8 as written, but in the ch-5 sp of units 1 and 16 replace the ch 5 with ch 2, sl st in the matching ch-5 sp of the neighbor, ch 2. Unit 16 joins the motif on the left (its unit 6), and unit 1 joins the motif above (its unit 11). Units 6 and 11 stay open until the next motifs are added. Every motif is held with unit 1 at the top, and units count clockwise.

— Gap Filler (Make 90, orange) :

Each small filler sits in the gap between four motifs. Make the fillers after the motifs are joined, and join each one to the units that face its gap: unit 8 of the top left motif, unit 13 of the top right motif, unit 3 of the bottom left motif and unit 18 of the bottom right motif.
Rnd 1: Make a magic ring. Ch 3 (counts as dc), 11 dc in the ring, join. (12 dc)
Rnd 2: Ch 1, *sc in next 3 sts, ch 2, sl st in the facing ch-5 sp of a neighboring motif, ch 2*, repeat 4 times, join to the first sc. (12 sc, 4 joins)

— Layout :

Arrange the motifs in 11 rows of 10 motifs, 110 motifs in total, all with the same spiral direction and the orange arm turning the same way. Work left to right in each row and top to bottom, joining each new motif to the one on its left and the one above it.
The gaps between four motifs number 9 across by 10 down, so 90 fillers are needed.
Outer edge count: each of the 4 corner motifs has 17 open units and each side motif has 15. The top and bottom rows have 8 side motifs each, so 2 x 8 x 15 = 240 units. The left and right columns have 9 side motifs each, so 2 x 9 x 15 = 270 units. The corners add 4 x 17 = 68 units, so the open units total 578. Add the 38 join points on the outer edge (9 along the top, 9 along the bottom, 10 on each side). 578 + 38 = 616 spaces.

— Border :

The border follows the scalloped outline of the outer motifs. Count every open ch-5 sp and every join point as one space, 616 in all. Place a stitch marker every 44 spaces so you can check your progress, 14 markers in all, because 616 divides evenly by 44.
Rnd 1: In cream, join in any ch-5 sp on the outer edge. Ch 1, *sc in next ch-5 sp or join point, ch 3 over the popcorn or join*, repeat around the whole outer edge, join to the first sc. (616 sc, 616 ch-3 sps)
Rnd 2: Sl st into the first ch-3 sp, ch 3 (counts as dc), 4 dc in the same sp, sc in next ch-3 sp, *5 dc in next ch-3 sp, sc in next ch-3 sp*, repeat 307 times, join to the top of the beginning ch-3. (308 five-dc shells, 308 sc)
Rnd 3: In orange, join in any sc between two shells. Popcorn in the same sc, ch 4, skip the next shell, *popcorn in next sc, ch 4, skip the next shell*, repeat 307 times, join to the top of the first popcorn. (308 popcorns, 308 ch-4 sps)

Assembly Instructions

  1. Crochet one Swirl Motif first, block it and check that it measures about 9 inches across before making the other 109.
  2. Lay the motifs out on a large floor or a bed in 11 rows of 10, keeping the spiral direction the same in every motif.
  3. Join the motifs as you go in Round 8, always to the motif on the left and the motif above, as described in the Swirl Motif section.
  4. When all 110 motifs are joined, crochet the 90 Gap Fillers and join each one to the four units that face its gap.
  5. Pin the whole piece out on blocking mats, mist it with water and let it dry flat so the arches and spirals open evenly.
  6. Work the three Border rounds around the whole scalloped outer edge, using the 14 markers to check your count on Round 1.
  7. Weave in all ends, taking special care at the color changes on the back of every motif.

Common Mistakes & How to Fix Them

Starting the cream arc at the same stitch in every round makes straight stripes instead of a swirl, so move the color change forward by 3 stitches each round.

Pulling the carried yarn too tight puckers the dc rounds, so leave a little slack behind the work.

Joining the motifs on the wrong units twists the grid, so mark units 1, 6, 11 and 16 with stitch markers on the first few motifs.

Skipping the stitch markers on the border makes a miscount likely, and with 616 spaces a mistake is hard to find later.


Denise

Denise designs cozy crochet patterns for the home and loves turning one small motif into a big heirloom.


Important Notes

Rounds 1 to 5 should measure about 5 inches across and the finished motif about 9 inches after blocking, so adjust your hook size if your motif is smaller or larger.

Yarn amounts and the counts for the joins and border are estimated from a photo, so crochet one motif and one filler as a swatch before you start the full bedspread.

Block the finished bedspread flat, and wash it by hand or on a gentle cycle in cool water.

Because dark and light yarns are used together, wash it with a color catcher to protect the cream.


I hope you enjoy every swirl as much as I do. Take your time, and send me a picture when your bedspread is on the bed.

Crochet Abbreviations

01 ch — chain
02 dc — double crochet
03 Rnd — round
04 sc — single crochet
05 sl st — slip stitch
06 sp — space
07 st — stitch
08 sts — stitches

You Ask, We Answer

What is the finished size of the bedspread?

With 110 motifs in 11 rows of 10 it measures about 90 by 99 inches, which covers a queen bed and drapes toward the floor.

Can I use a different yarn weight or make a smaller size?

Yes. Lighter cotton makes smaller motifs and a lighter bedspread, and using fewer motifs makes a throw or a baby blanket. Recalculate the border count with the formula in the Layout section.

How do I wash and care for it?

Wash it by hand or on a gentle cycle in cool water with a color catcher, then dry it flat and reshape it while it is damp.





