
Raspberry Wine Flower Square Bed Cover Crochet Pattern
You need confident double crochet, puff stitches and steady counting through the corner rounds.
Each square takes around two hours, so the cover grows one cozy evening at a time.
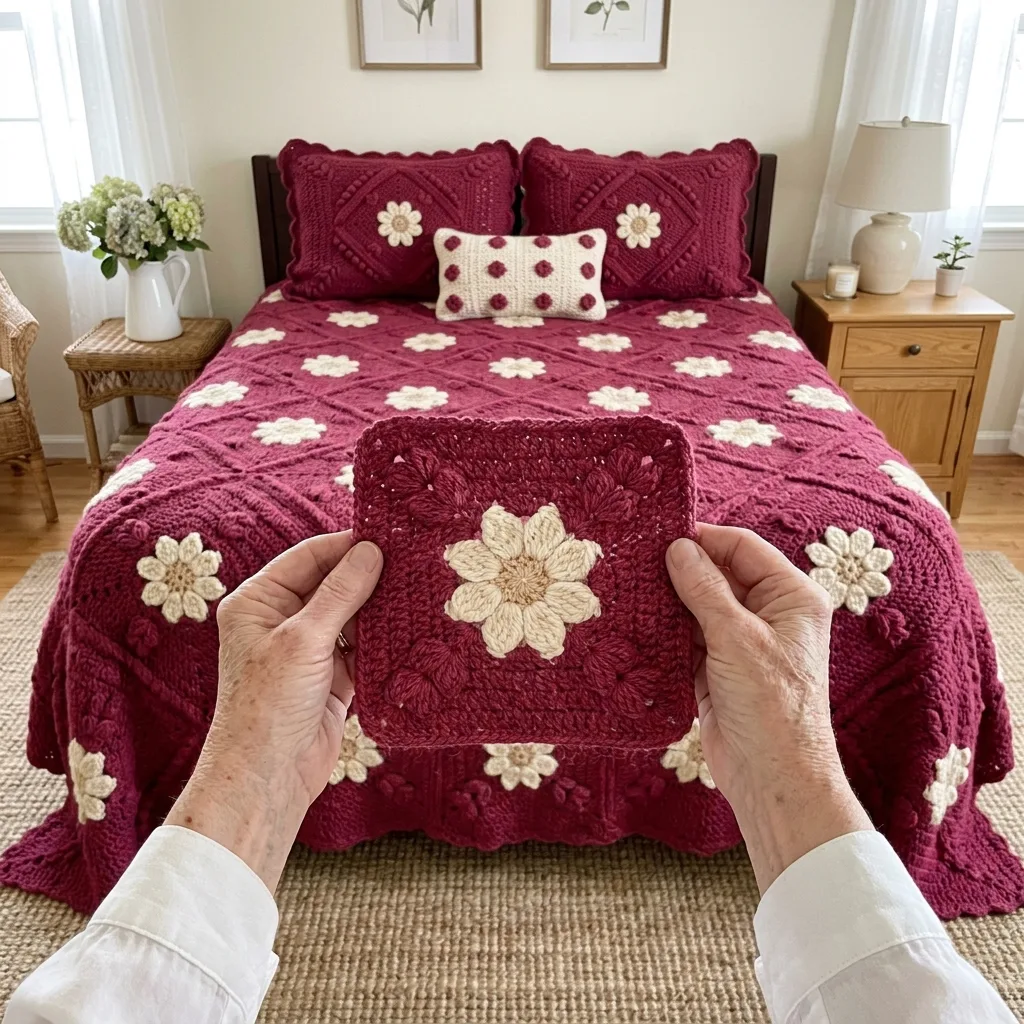
Puff stitch leaves run to every corner and join into a diagonal lattice across the whole bed.
About This Raspberry Wine Flower Square Bed Cover Crochet Pattern Pattern
This bed cover is made of eighty squares in a deep raspberry wine color, and every square carries a cream eight-petal flower in the middle. The flower has a small light tan center, so it looks like a daisy with a warm heart. From the flower, four lines of raised puff stitches run out to the four corners of the square, set in pairs like little leaves on a stem. When the squares are joined, the leaf lines of four squares meet at every corner, and they make a diagonal lattice that runs right across the bed, with a cream flower sitting in every diamond.
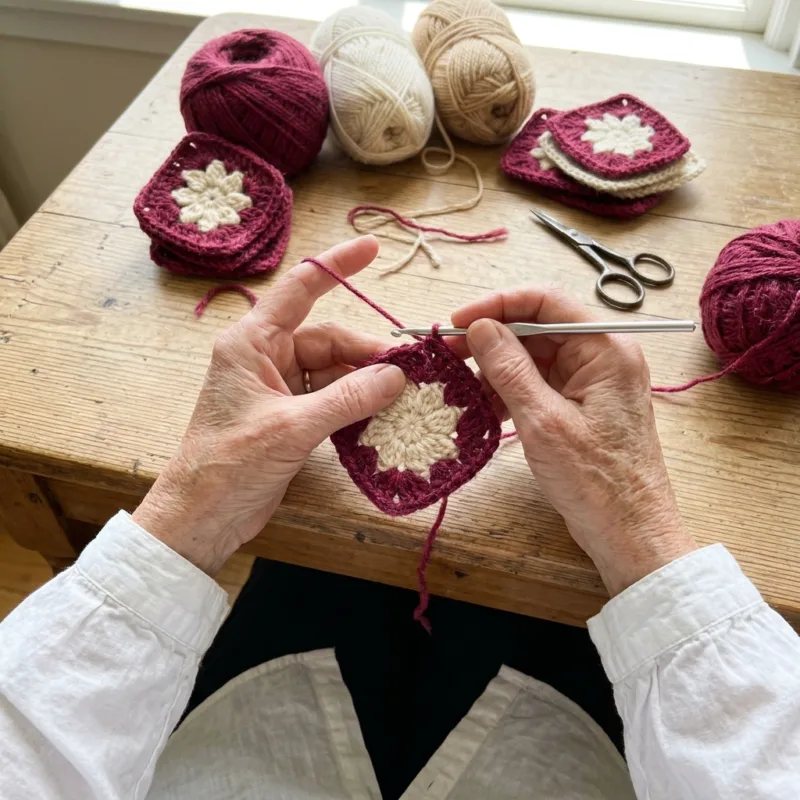
Each square is worked in the round from the center out. You start with a tiny tan ring, add the cream petals, then switch to raspberry wine for the rest of the square. A round of chain loops sits behind the petals, so the flower lies on top of the background like an appliqué, even though it is all one piece. Then the corners begin, and in each corner space you work a puff stitch on either side of the chain. Round after round, those puffs stack on top of each other and form the leaf pairs you can see in the photos. Four rounds of single crochet, half double crochet and single crochet finish the square with a firm, neat edge.
Each finished square measures about 10 inches after blocking. Eighty squares, set in 8 columns and 10 rows, make a cover of about 80 by 100 inches before the edge, and about 83 by 103 inches once the border is on. That is a generous queen size with a long, soft drop over both sides and the foot of the bed. The squares are joined with a slip stitch seam through the back loops, which leaves a small raised ridge on the right side. Those ridges outline every square and make the lattice of leaves stand out even more.
The edge is two rounds of single crochet and a round of scalloped shells. I worked out the stitch counts so the shells fall evenly along every side and a fuller shell sits in each corner, so the scallops turn the corners smoothly instead of bunching. The shell edge is heavy enough to make the bed cover hang straight and light enough to look pretty and feminine. In the photos you can see how the scallops ripple gently where the cover meets the floor.
The stitches are familiar ones: chain, slip stitch, single crochet, half double crochet, double crochet and the puff stitch. If you can make a granny square and a puff stitch, you can make this bed cover. What makes it intermediate is the corner work, because each corner round has a puff, a double crochet and a chain space to place, and the counts change on every round. I give the total and the count per side at the end of every round, so you can always check your work before you move on.
The finished bed cover is thick, warm and heavy in the nicest way. The raised puffs and flowers give it a textured, sculpted surface that catches the light, and the solid double crochet background makes it sturdy enough for daily use. In worsted cotton it breathes well, and the deep raspberry wine color hides everyday wear far better than a pale cover would. It looks right at home in a cottage bedroom, a farmhouse guest room, or anywhere you want warmth and color.
I would suggest this pattern to someone who has a few blankets behind them and enjoys a long, steady project. It is a real commitment, about 160 to 200 hours, but every square is a small, satisfying piece that you can finish in an evening. If you are newer to puff stitches, make a pillow cover from four squares first. By the time you finish it, the rounds will feel natural, and you will be ready for the whole bed.
Why You'll Love This Raspberry Wine Flower Square Bed Cover Crochet Pattern Pattern
I fell in love with this color first. Raspberry wine sits somewhere between a berry and a glass of red wine, deep and rich but never dark or gloomy. With the cream flowers on top it feels warm and romantic, like an old country quilt that has been in the family for years. Every time I walk past the bed I notice the color first, and then the flowers, and then the little leaf lines running between them. It is a cover that keeps giving you something new to look at.
I also love the moment the flower comes to life. The first two rounds are just a small tan ring and a circle of cream petals, and they look sweet but plain. Then you add the raspberry wine loops behind the petals, the first corners appear, and suddenly the flower is sitting on its own little stage. After the first puff round, the leaves begin, and by the fourth puff round the square looks finished and full of character. I always stop and turn it over in my hands at that point, because it is such a happy surprise.
Each square takes me about two hours, which is just right for an evening. I can start one after dinner and finish it before bed, and that steady rhythm made the whole project feel calm instead of overwhelming. I keep a small basket by my chair with the three colors, my hook and a few stitch markers. I make the flower centers in a batch of ten while I watch a program, then work the raspberry rounds one square at a time over the next week. It never feels like a chore.
Here are the habits that made this bed cover easier for me:
- Make the first square, block it and measure it before you buy all your yarn.
- Practice your puff stitch until all your puffs are the same size.
- Use a stitch marker in each corner space for the first few squares.
- Weave in the tan and cream ends as soon as each flower is done.
- Keep a tally of finished squares on a piece of paper in your basket.
The way it changes a bedroom amazes me. A plain bed with this cover on it suddenly looks styled and finished, as if a decorator had chosen everything around it. The deep color grounds the room, and the cream flowers echo white flowers in a jug, white curtains or a cream lamp. I added two shams made from the same squares and a small cream pillow, and the bed looked like a picture in a magazine without any other changes in the room.
I love that it is a cover for every season, too. In summer the cotton keeps it cool, and I fold it at the foot of the bed on very hot nights. In winter it goes over a duvet, and the weight of it feels comforting and snug. It is sturdy enough for everyday life, so I never worry about using it, and that is how I like my handmade things: used, loved and part of real life rather than kept in a cupboard for best.
Finally, I love what it means as a gift. A bed cover this size carries hundreds of hours of care, and the person who receives it feels that. I have made smaller versions as a wedding gift and as a throw for a friend who was recovering at home, and both were treasured from the first day. If you keep this one for yourself, you have earned every flower on it.
Switch Things Up
Choose a new background color. The cream flowers look lovely on almost any deep shade, so it is easy to change the mood of the room. Forest green with cream flowers feels fresh and woodland, navy with cream looks crisp and classic, and a soft dusty blue is gentle for a guest room. For a brighter look, try mustard with cream petals and a brown center. Keep the background dark or medium so the cream flowers still stand out clearly.
Make it for any bed. Each square is about 10 inches, so new sizes are simple to plan. Add or remove columns for the width and rows for the length. These counts give a cover with a generous drop, measured before the border:
- Twin: 6 by 10 squares, 60 squares, about 60 by 100 inches
- Full: 7 by 10 squares, 70 squares, about 70 by 100 inches
- Queen: 8 by 10 squares, 80 squares, about 80 by 100 inches
- King: 10 by 10 squares, 100 squares, about 100 by 100 inches
A nice detail is that the shell border works for any number of squares, because each square adds a whole number of shells, so you never have to adjust the edge.
Make a sofa throw. Five columns by six rows, 30 squares in all, gives a throw of about 53 by 63 inches with the border. It uses a little under 40 percent of the yarn, so it is a good way to try the pattern before committing to a whole bed. Fold it over the back of a sofa or an armchair and the flowers and leaves look just as pretty as they do on a bed. It also makes a wonderful housewarming gift.
Make a baby blanket. Three columns by four rows, 12 squares, makes a blanket of about 33 by 43 inches. Choose a soft cotton blend or a good baby acrylic that can go in a warm wash, and pick gentle colors such as dusty rose with cream flowers or sage with white. Keep the puffs a little smaller by using one fewer yarn over, and weave every end in very securely so little fingers cannot pull them loose.
Add matching pillow covers. One square is the perfect front for a small 10 inch pillow, four squares sewn 2 by 2 make a 20 inch cushion, and six squares sewn 2 by 3 make a sham front of about 20 by 30 inches. Use the same number of squares for the back, or a plain panel of double crochet in the background color. Work the shell edge around the joined front and back to close it, leaving one side open with buttons so you can wash the cover.
Make a scrappy flower version. Keep the background in one color but make every flower a different shade, using up small leftovers of soft pink, lilac, butter yellow, pale blue and cream. Keep the centers in one color, such as tan or gold, to tie them together. Lay all the squares out on the floor before joining and move them around until no two matching flowers sit side by side. The lattice of leaves keeps the whole cover calm while the flowers sparkle.
Change the edge. The scalloped shells give a soft, feminine finish, but you can choose something else. For a tailored look, stop after the two single crochet rounds and add one round of reverse single crochet. For a vintage feel, add a picot in the center of each shell. You could also add a cream round of single crochet before the shells, so the edge echoes the flowers and frames the raspberry wine background.
Change the yarn weight. In DK cotton with a 4 mm hook, the squares come out about 8 inches, and a queen cover needs about 10 by 12 squares, 120 in all. In bulky yarn with a 6.5 mm hook, the squares grow to about 12.5 inches, so a queen needs only 6 by 8 squares, 48 in all, and the cover becomes thick and very warm. Always make and block one square first, measure it, and divide your bed size by that number before you buy yarn.
Materials Needed
— Main Fabric
— Tools Required
The Free Pattern
0% complete
— Flower Square (Make 80, light tan, cream and raspberry wine) :
— Layout and Joining :
— Border :
Assembly Instructions
- Make one full square, block it to 10 by 10 inches and check your gauge before making the rest.
- Make all 80 flower squares, weaving in the tan and cream ends as soon as each flower is finished.
- Pin and block every square to 10 by 10 inches and let them dry completely.
- Lay the squares out in 8 columns and 10 rows on a bed or the floor.
- Join the squares into columns with a slip stitch seam through the back loops, holding them wrong sides together.
- Join the columns side by side the same way, matching every corner so the leaf lines meet neatly.
- Work the two single crochet border rounds and the scalloped shell round, weave in all remaining ends and give the finished bed cover a light final blocking.
Common Mistakes & How to Fix Them
Making puffs of different sizes. The puff stitch leaves are the main feature of this design, and if some puffs are tall and loose while others are short and tight, the leaf lines look wobbly across the bed. This happens when the loops are pulled up to different heights, or when you forget how many times you have wrapped. Always pull each loop up to the height of a double crochet and count your four loops out loud for the first few squares. Close every puff with a firm ch 1. If a puff looks flat or messy, pull it out at once and work it again.
Pulling the loops behind the petals too tight. In Rnd 3 you work chain loops behind the cream flower, and if those chains are tight the flower pops up into a cone and the whole square refuses to lie flat. If they are too loose, the petals droop and gaps show around the flower. Work the ch 3 loosely and check that each loop reaches comfortably behind its petal without stretching it. Before you start Rnd 4, lay the piece flat on the table. The petals should lie open and flat, with the raspberry loops hidden neatly behind them.
Losing count in the corner rounds. Each corner group is a dc, a puff, a ch 2, a puff and another dc, and it is very easy to skip the first dc or to work the next round into the chain space of a puff instead of the corner space. The square then grows unevenly, one side ends up shorter, and the leaf pairs drift away from the diagonal. Place a stitch marker in each corner space as you make it and move it up every round. Count each side at the end of the round and compare it with the number in brackets before you go on.
Joining the squares too tightly. A slip stitch seam is neat and strong, but if your slip stitches are tighter than your squares, the seams pull in and the bed cover puckers along every join, which also makes the leaf lattice look crooked. This is easy to miss until the whole cover is on the bed, and then it is a lot of work to undo. Work the slip stitches loosely, or go up one hook size just for the joining. After each column is joined, hold it up and check that the seam stretches as much as the squares on either side of it.

You Might Also Like






Important Notes
Gauge matters because eighty squares have to match. With a 5 mm hook, 14 double crochet and 8 rows should measure about 4 inches, and each finished square should block to about 10 by 10 inches. If your square is a little smaller or larger, that is fine, as long as every square matches. Measure the first five squares, then check every tenth square after that. If you change your hook partway through the project, block a test square with the new hook before carrying on.
Block the squares before you join them. Pin each one to a blocking mat at 10 by 10 inches, spray it with water until it is damp through, and let it dry completely. Gently shape the petals flat and press the puff leaves into a straight diagonal line while the square is damp. Blocking evens out the corner rounds and makes all the squares the same size, so the joins lie flat. Give the finished cover a light blocking after the shell border, especially at the corners.
The yarn amounts in the materials list are estimates for the queen size and include the joining and the border. Buy all of the raspberry wine yarn at once, from the same dye lot, because deep colors change a lot between lots, and a slightly different shade will show clearly on a large flat cover. Keep the labels together in a safe place. The cream and tan are used in small amounts, but it is still best to buy them from one lot so all the flowers match.
Wash the finished bed cover on a gentle cold cycle in a large mesh bag or a zipped duvet cover, with a mild detergent. Raspberry wine is a deep dyed color sitting right next to cream petals, so always add a color catcher sheet, and for the first wash you can soak it in cold water with a little vinegar. Never wring or twist it. Press out the water, lay it flat on towels or a clean drying rack, reshape it while damp and let it dry fully before using it.
Thank you for making this raspberry wine bed cover with me. I hope you enjoy every little flower, every pair of puff leaves and that lovely moment when four squares meet and the lattice appears. It is a big project, but it is made of small, cheerful steps, and each square brings you closer to a bed that feels warm, rich and full of your own handwork.
So find your three colors, wind a small ball of tan, and make your first flower today. Then add the raspberry rounds, block your first square and set it on your bed to admire. Before long you will have a basket full of flowers, and soon after that a bed cover to treasure for many years.
Crochet Abbreviations
You Ask, We Answer
How big is the finished bed cover, and how many squares do I need?
Following the pattern exactly, each square measures about 10 inches after blocking. The queen size uses 80 squares in 8 columns and 10 rows, which gives about 80 by 100 inches before the border and about 83 by 103 inches with the shell edge. On a standard queen mattress of 60 by 80 inches, that leaves a drop of about 11 inches on each side and a generous drape at the foot. If your bed is tall and you want the cover to reach the floor, add one column for width. To plan your own size, measure your mattress width plus twice the drop you want, and the mattress length plus one drop, then divide each number by 10 and round up. The twin, full and king counts in the variations section are a good start, and the shell border fits any number of squares without changes.
Can I use a different yarn, fiber or hook size?
Yes. I recommend worsted cotton because it shows the puffs and petals clearly, holds its shape and washes well. A cotton and acrylic blend gives a lighter, softer cover, and a good acrylic works if you want easy care and a warmer feel. Wool is lovely and cozy, but a cover this size is hard to hand wash, so choose a superwash wool if you go that way. The shape of the square comes from the stitch counts, so the pattern works in any weight of yarn, and only the size changes. DK with a 4 mm hook gives squares of about 8 inches, and bulky with a 6.5 mm hook gives squares of about 12.5 inches. Always make and block one square in your chosen yarn, measure it, and then work out how many squares and how much yarn you need before buying everything.
How do I care for and store the bed cover so it lasts?
Wash it only when it really needs it, on a gentle cold cycle in a large mesh bag with mild detergent, and use a color catcher every time because of the deep raspberry wine next to the cream petals. Dry it flat and reshape the flowers while it is damp. Avoid a hot dryer, which can shrink cotton and flatten the puff stitches. Between washes, shake it out and let it air near an open window, away from strong direct sun, because deep reds and wines can fade in bright light over time. To store it, fold it loosely and keep it in a cotton bag or an old pillowcase rather than plastic, so the yarn can breathe. Refold it along different lines every few months so no crease sets in, and if a seam ever loosens, simply slip stitch it closed again with a little raspberry yarn.
Success!
Thanks for subscribing — check your inbox for a welcome note.
Abbreviations
- ch — chain
- sl st — slip stitch
- sc — single crochet
- hdc — half double crochet
- dc — double crochet
- puff — puff stitch: (yo, insert hook, yo, pull up a loop) 4 times, yo and pull through all 9 loops, ch 1 to close
- yo — yarn over
- FLO — front loop only
- BLO — back loop only
- st(s) — stitch(es)
- sp(s) — space(s)
- rep — repeat
- Rnd — round
- RS — right side
- WS — wrong side