
Berry Rose Filet Heart Bed Cover Crochet Pattern
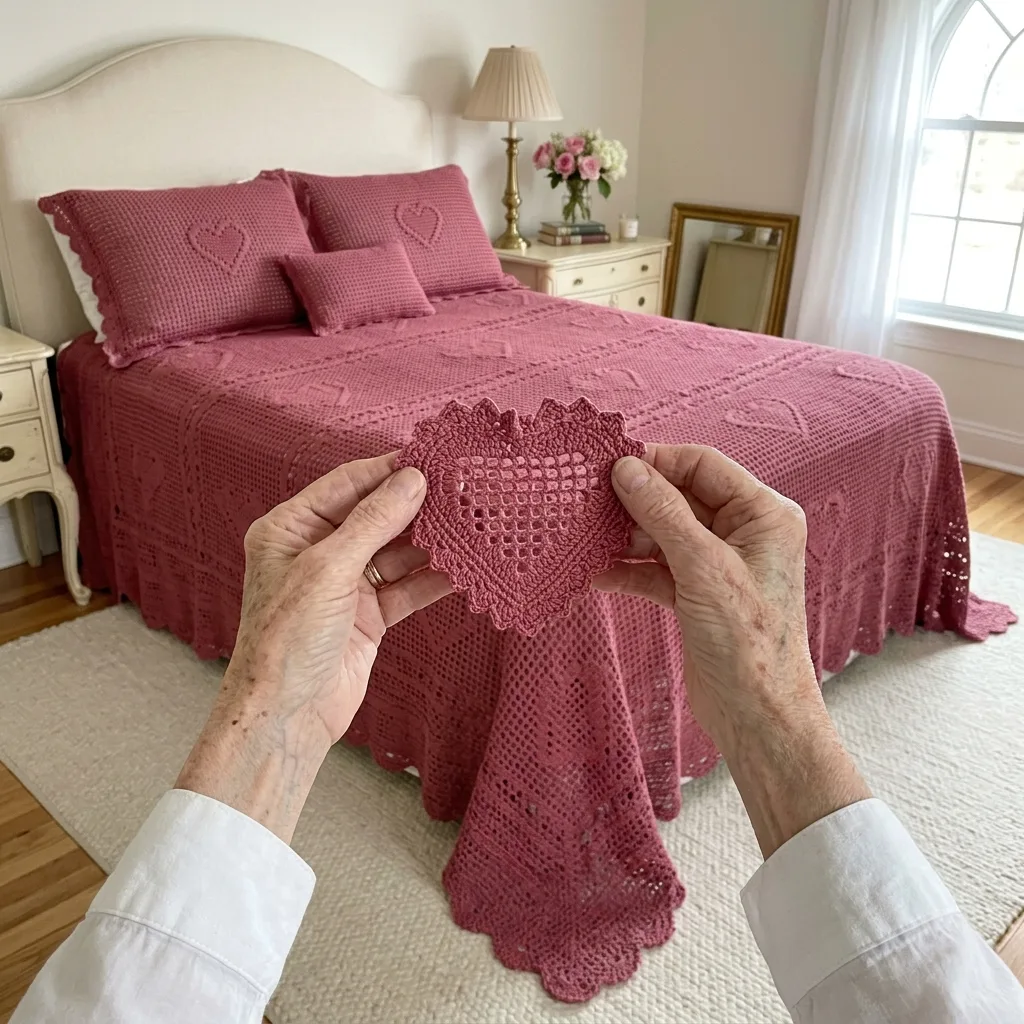
Mostly simple filet mesh, plus shaped rows for the heart and a counted lace border.
One color and one big panel, so there are very few ends and no squares to join.
A large raised heart edged in round fans sits right in the middle of the bed like a love letter.
About This Berry Rose Filet Heart Bed Cover Crochet Pattern Pattern
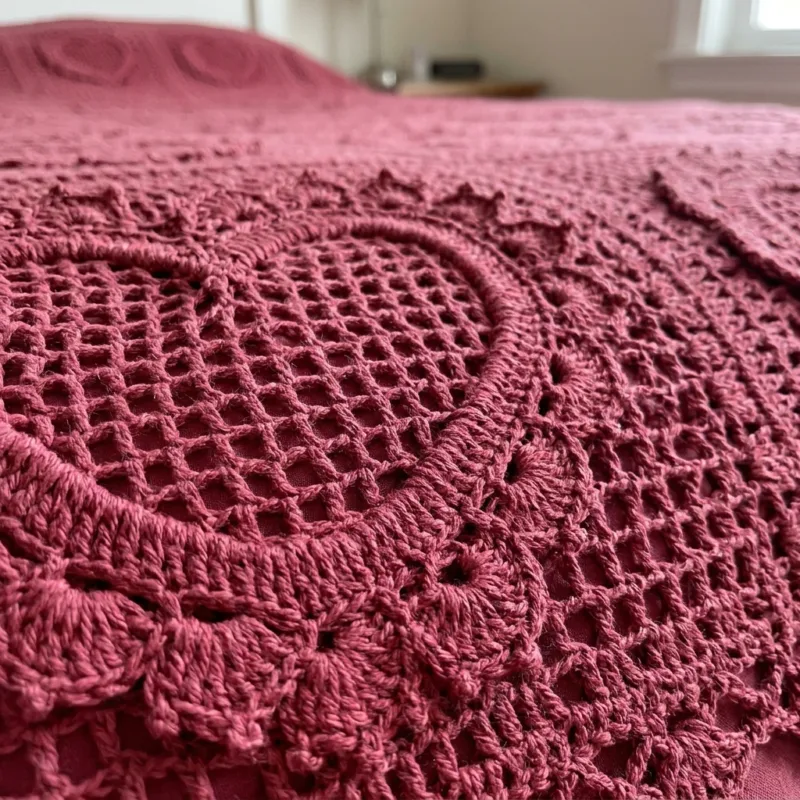
This bed cover is a romantic piece made in one rich berry rose color. The center is a large panel of open filet mesh, row after row of little square windows. Right in the middle sits a big heart, about 39 inches across, edged with a solid outline and a ring of round fans tipped with tiny picots. Around the mesh runs a lacy band of V-stitches, and the whole cover finishes with a deep scalloped edge. It is simple in color but full of texture, and the heart gives the whole bed a warm, loving focus.
The center panel is worked in rows of classic filet mesh: a double crochet, a chain, another double crochet, again and again. Each square of mesh is about half an inch, and the panel grows quickly because there is no counting of motifs, no color changes and no joining. I love it as a project to pick up whenever I have a quiet hour, because every row is the same and the work never needs much thought. The first and last rows are solid double crochet to give the panel firm, straight ends.
The heart is made separately, also in filet mesh. It starts with a single mesh at the bottom point and grows one mesh on each side of every row, until it is 69 mesh wide. After some straight rows, it splits into two lobes that shrink row by row into the rounded top. Then a round of single crochet outlines the heart, a round of fans makes the scallops, and a final round adds a picot to the top of each fan. You sew the heart onto the center of the panel along its single crochet outline, so the fans stay free and stand up a little from the mesh.
Because the heart is a second layer of mesh lying on top of the panel, it looks slightly raised, like a doily laid on the bed. That little bit of depth is what makes it catch the light so beautifully. It also means the heart can be placed exactly where you want it once the panel is finished. I put mine centered side to side, with the tops of the lobes about 14 inches from the head end, so the heart sits right on top of the mattress.
The finished panel measures about 76 by 86 inches. The border adds about 2.5 inches on every side, so the whole cover finishes at about 81 by 91 inches. The border has six rounds: single crochet, two rounds of V-stitches, single crochet again, a round of large scallops and a final round of picots. I worked out the stitch counts carefully so the scallops fall evenly along every side, with a fuller scallop turning each corner.
The stitches are chain, slip stitch, single crochet, double crochet and double treble crochet, used only for the increases at the end of the heart rows. What makes this pattern intermediate is shaping the heart with increases and decreases, and keeping the long border rounds counted correctly. If you have made filet crochet before, you will find it very relaxing. If you have not, the center panel is a wonderful way to learn.
The finished cover is light, lacy and drapes softly over the bed. In worsted cotton, the open mesh breathes in summer, and in winter it looks lovely over a warm blanket in a matching tone. Berry rose is deep and warm, a little vintage and very romantic, and it suits a cottage bedroom, a guest room with antique furniture or a newlywed's first home. It is also a beautiful anniversary or wedding gift.
Why You'll Love This Berry Rose Filet Heart Bed Cover Crochet Pattern Pattern
I love that this whole cover is made in one color. There are no balls of yarn tangling, no colors to plan and almost no ends to weave in. I simply pick up the berry rose, work my rows and watch the mesh grow. That quiet simplicity lets the texture speak: the little windows of the mesh, the round fans around the heart and the lacy band all show beautifully because nothing else distracts the eye. It is elegant in a calm, gentle way.
The filet mesh is my favorite kind of relaxing crochet. A double crochet, a chain, another double crochet. It has a steady, peaceful rhythm, almost like breathing, and I can work it while listening to an audiobook or chatting at the kitchen table. Each row takes me about twenty-five minutes. Some evenings I make three or four rows, some evenings only one, and the panel keeps growing either way, inch by inch, toward the size of a whole bed.
The heart is where the fun is. After all those straight rows, shaping the heart feels like a little adventure. You start with one tiny square at the point and add a mesh on each side of every row, and the heart blooms open in your hands. Then the two lobes appear, and you round them off. When I added the fans and picots and laid the heart on the panel for the first time, I actually had tears in my eyes. It looked like a love letter.
Here are the habits that made this project easy for me:
- Count the mesh on every tenth row of the panel and mark it with a stitch marker.
- Keep a small notebook and tick off each heart row as you finish it.
- Block the panel and the heart before sewing them together.
- Pin the heart in place and look at it from across the room before you sew.
I love the color too. Berry rose sits between a deep pink and a soft red wine. It is warm and grown up, never sugary, and it feels romantic without being loud. Against cream walls, antique white furniture and fresh roses on the nightstand, it makes the bedroom glow, especially in the late afternoon sun. It is the kind of color that makes a room feel loved.
I also love how meaningful this cover can be. A heart in the center of a bed is such a simple, honest symbol. I made my first one as an anniversary gift, and I have made smaller versions as wedding gifts, each with the couple's initials stitched into a corner. You could make it for a daughter's first home, for a parent, or simply for yourself, as a reminder that the work of your hands is a kind of love.
Finally, I love that it is so practical for such a pretty piece. There are no squares to join, so there are no seams to come loose. The cover is one strong piece of mesh with a firm border, and it washes and wears beautifully. It is the kind of cover you can use every day, not just for special occasions, and it will still look lovely years from now.
Switch Things Up
Choose another color. One-color filet looks beautiful in almost any shade. Ivory or ecru gives a classic heirloom look, soft blush pink feels sweet and light, and sage green or dusty blue looks calm and fresh. For a striking bedroom, try a deep forest green or a navy. Choose a smooth, solid color rather than a variegated yarn, because color changes would hide the square windows and the shape of the heart.
Make it for any bed. The panel is easy to resize, because it is only mesh and rows. For the border to divide evenly, keep an odd number of mesh across and an even number of rows. These panel sizes work, and each finishes about 5 inches larger with the border:
- Twin: 99 mesh by 172 rows, about 57 by 86 inches
- Full: 119 mesh by 172 rows, about 68 by 86 inches
- Queen: 133 mesh by 172 rows, about 76 by 86 inches
- King: 167 mesh by 172 rows, about 95 by 86 inches
For more length on any size, add rows in multiples of 2. The heart stays the same size and sits in the center of any of these panels.
Make a sofa throw. A panel of 85 mesh by 110 rows is about 49 by 55 inches before the border. Make the heart smaller by stopping the increases at Row 25, so it is 49 mesh wide, then work Rows 26 to 34 straight and split for the lobes, decreasing 1 mesh each side every row until each lobe has 6 mesh. It drapes beautifully over a sofa and makes a lovely Valentine or anniversary gift.
Make a baby blanket. A panel of 61 mesh by 76 rows is about 35 by 38 inches before the border. Use a soft, washable cotton blend, and make the heart small, stopping the increases at Row 15. For a baby, sew the heart down all around its outline and around the base of every fan, so nothing can catch little fingers. Soft pink, cream or pale blue all look sweet in a nursery.
Make small hearts for pillows. A heart stopped at Row 12, worked straight for 4 rows and split into lobes that decrease to 3 mesh, is about 8 inches across, the size of the heart in my hands in the video. Edge it with the same three rounds and sew it to the center of a square of filet mesh for a sham front, or use it on its own as a doily or a sachet for a drawer. Two or three of these hearts make a sweet set with the bed cover.
Add solid blocks to the mesh. Filet crochet lets you fill any square of mesh by working a double crochet in the chain space instead of a chain. You can fill a few blocks to spell initials and a wedding date below the heart, or fill a row of small blocks across each end of the panel as a simple stripe. Chart your design on squared paper first, one square for each mesh.
Change the edge. The scalloped picot edge is soft and romantic, but you can choose another finish. Stop after Border Rnd 4 for a tidy rectangular cover, or add a third V-stitch round for a wider lace band. You could also work Border Rnd 5 with smaller fans of 5 dc over a 4-stitch repeat for a daintier edge, as long as you recount the sides to fit the repeat.
Change the yarn weight. In DK or sport cotton with a 4 mm hook, the mesh is smaller and the cover looks finer and lacier, but you need more mesh and rows, about 165 by 214 for a queen. In bulky yarn with a 6.5 mm hook, the mesh is bigger and the cover grows very fast, about 105 by 136 for a queen. Always swatch 20 mesh by 20 rows first, measure it, and keep an odd mesh count and an even row count for the border.
Materials Needed
— Main Fabric
— Tools Required
The Free Pattern
0% complete
— Center Panel (Make 1, berry rose) :
— Large Heart (Make 1, berry rose) :
— Heart Edging (Make 1, berry rose) :
— Border :
Assembly Instructions
- Work a 20 by 20 mesh swatch, block it and check that 7 mesh and 8 rows measure 4 inches before starting the panel.
- Work the center panel of 133 mesh by 172 rows, counting the mesh every 10 rows.
- Work the six border rounds around the panel and weave in the ends.
- Make the large heart, then work the three edging rounds around it.
- Block the bed cover and the heart separately, pinning the mesh into straight squares and opening every fan and scallop.
- Lay the cover on the bed, center the heart side to side with the tops of the lobes about 14 inches from the head end, and pin it along Rnd 1 of the edging.
- Sew the heart to the panel with the long tail, using small whipstitches through the Rnd 1 sc and the mesh below, leaving the fans free, then weave in the end.
Common Mistakes & How to Fix Them
Losing or gaining a mesh in the panel. With 133 mesh in every row, it is easy to skip a chain space or work two double crochet into one space, especially near the turning chain. One extra or missing mesh makes the panel lean, the edges wavy and the border counts wrong. The most common slip is forgetting to work the last dc into the turning chain. Place a stitch marker every 10 rows and count the mesh on those rows. You can also count in groups of 10 using small removable markers along a row, which makes it much quicker to spot where a mesh went missing.
Increasing unevenly when shaping the heart. Each of Rows 2 to 35 must gain exactly 1 mesh at each end. If you forget one increase, or add it only on one side, the heart turns lopsided and the bottom point drifts to the side. Because the heart is so large, even one missed increase shows. Keep a small notebook and write the row number and the mesh count after each row: 3, 5, 7 and so on. If the count is wrong, pull back to the last correct row right away, because fixing it after the lobes are done means undoing a lot of work.
Mismatched lobes. The two lobes of the heart are worked separately, and they must be mirror images, with the same number of rows and the same decreases. If one lobe has one row more, or decreases 2 mesh where the other decreased 1, the top of the heart looks uneven and the dip is no longer centered. Work the first lobe, write down every row count, then follow your notes exactly for the second lobe. Before edging the heart, fold it in half along the center line and check that the two lobes match. A small difference can be eased out with blocking.
Sewing the heart too tightly or crooked. If you pull the whipstitches tight, the panel mesh gathers under the heart and the cover puckers in the middle of the bed. If you sew the heart without measuring, it can sit off-center or tilted, which is very noticeable on a bed. Block both pieces first, then lay the cover on the bed and pin the heart in place, measuring from both long edges. Step back and look before you sew. Use relaxed stitches that just catch the sc of Rnd 1 and the mesh below, and smooth the panel flat with your hand as you go.

You Might Also Like






Important Notes
Gauge matters because the panel is one big piece and the heart must fit it. With a 5 mm hook, 7 mesh and 8 rows should measure 4 inches. Work a 20 by 20 mesh swatch, block it, and measure it before you start. If your mesh is larger, use a smaller hook, and if it is smaller, use a larger one. Keep an odd number of mesh across and an even number of rows if you change the size, so the border counts still work.
Blocking makes filet crochet come alive. Pin the bed cover out on a large clean surface, such as a bed with a towel on top or a carpet covered with a sheet. Pin the mesh into straight lines and true squares, open every V-stitch and every scallop, and spray with water until damp. Block the heart on its own, opening each fan and pinning each picot. Let both pieces dry completely before you sew the heart on.
The yarn amount in the materials list is an estimate for the queen size, including the heart and the border. Buy all of the berry rose at once, from the same dye lot, and keep the labels. With a one-color cover, even a small change in shade between dye lots shows as a clear line across the mesh. Buy one or two extra skeins for safety and for any repairs in the future.
Wash the finished cover on a gentle cold cycle in a large mesh bag or a zipped duvet cover, with mild detergent. Berry rose is a deep color, so wash it alone or with other dark colors, and add a color catcher for the first few washes. Never wring or twist it, because filet mesh can stretch out of shape. Press out the water, lay it flat on towels or over a clean bed, reshape the mesh and the heart, and let it dry fully.
Thank you for making this berry rose filet heart bed cover with me. I hope you enjoy the calm rhythm of the mesh rows, the little adventure of shaping the heart, and that special moment when you lay the heart on the finished panel for the first time. It is a cover made with patience, and it will say something warm to everyone who sees it.
So find your berry rose yarn, make your swatch and start your first row of mesh today. Row by row, the panel will grow into a bed cover, and the heart will give it a center full of meaning. I hope it brings love and comfort to your bedroom for many years.
Crochet Abbreviations
You Ask, We Answer
How big is the finished bed cover, and where does the heart go?
Following the pattern exactly, the center panel measures about 76 by 86 inches, and the border adds about 2.5 inches on every side, so the finished cover is about 81 by 91 inches. On a standard queen mattress of 60 by 80 inches, that gives a drop of about 10 inches on each side. For a longer drop, add rows to the panel in multiples of 2. The heart is about 39 inches wide and 29 inches tall before its edging and about 43 by 33 inches with it. I place it centered side to side, with the tops of the lobes about 14 inches from the head end, so the heart sits right on top of the mattress and is not hidden by pillows. If your pillows sit lower, move it a little further down. Always lay the cover on your own bed before you sew.
Can I work the heart into the mesh instead of sewing it on?
Yes, if you know filet charting. Filet crochet lets you fill any mesh with solid blocks, so you can chart the heart outline as solid blocks in the panel itself, with open mesh inside and outside it. That gives a flat, traditional filet heart, but you lose the raised look and the round fans, which are what make this design so special. The method in this pattern, a separate heart sewn on top, keeps the panel simple, lets you place the heart exactly where you want it and gives it that lovely raised, doily-like edge. For the yarn, worsted cotton shows the square mesh most clearly and washes well, a cotton blend gives a softer drape, and a fine cotton gives a more delicate, lacy look with more mesh and rows. Always swatch first.
How do I care for and store the bed cover so it lasts?
Wash it only when it really needs it, on a gentle cold cycle in a large mesh bag or zipped duvet cover, with mild detergent. Wash it on its own or with other deep colors, and add a color catcher for the first few washes. Dry it flat, reshaping the mesh into straight squares and smoothing the heart fans while it is damp. Never hang it to dry, because the weight of wet cotton stretches filet mesh. Between washes, shake it out and air it by an open window, away from strong direct sun, which can fade berry rose. To store it, fold it loosely with tissue paper between the layers, keeping the folds away from the heart, and keep it in a cotton bag rather than plastic. Refold it along different lines every few months, and check the heart stitches once a year.
Success!
Thanks for subscribing — check your inbox for a welcome note.
Abbreviations
- ch — chain
- sl st — slip stitch
- sc — single crochet
- dc — double crochet
- dtr — double treble crochet
- V-st — V-stitch: (dc, ch 1, dc) in one stitch or space
- picot — ch 3, sl st in 3rd ch from hook
- mesh — one filet square: dc, ch 1, skip 1 st, dc in next st
- st(s) — stitch(es)
- sp(s) — space(s)
- rep — repeat
- Rnd — round
- RS — right side