
Crimson Leaf Square Bed Cover Crochet Pattern

Lacy squares with rays and a mesh frame, plus shaped leaves sewn on, all in one color.
A true heirloom project, built one square and four leaves at a time.
With only one deep red, the raised leaves, rays and mesh do all the talking.
About This Crimson Leaf Square Bed Cover Crochet Pattern Pattern
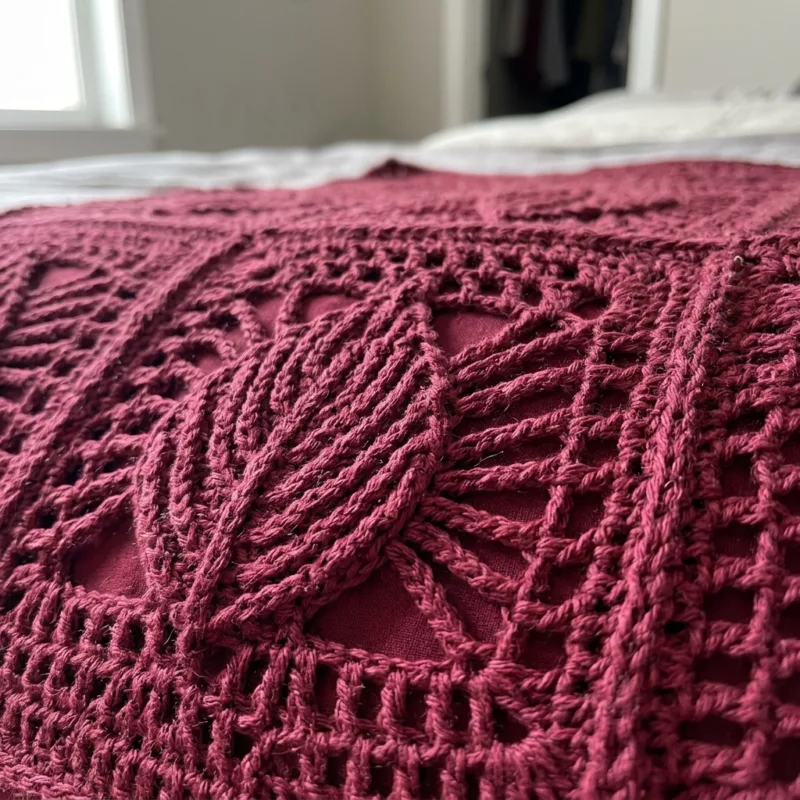
This bed cover is all about texture. It is made in a single deep crimson, the color of winter berries and holiday velvet, and every square carries four raised leaves that point from the center out to the corners. Around the leaves, a ring of open treble crochet rays fans out like sunlight, and a frame of filet mesh squares the block off neatly. When the squares are joined, the mesh frames line up into a soft grid, and the leaves of four squares meet at every corner. The whole cover is finished with a deep, round scalloped edge.
Because there is only one color, your eye goes straight to the shapes. The leaves sit up from the background and catch the light along their ribbed edges. The rays between them are open and airy, and the mesh frame adds a quiet line around every block. In daylight the cover looks rich and warm, and in the evening, under a lamp, the leaves cast tiny shadows that make the whole bed look sculpted. Many people tell me it reminds them of poinsettias, and it does look especially lovely in December.
Each square is worked in rounds from the center. The first four rounds are solid double crochet, which make a strong base for the leaves. Round 5 is the ray round, with treble crochet stitches separated by chain spaces, so it opens up like a sunburst. Round 6 is solid double crochet again, Round 7 is the filet mesh frame, and two rounds of single crochet finish the edge. The square measures about 8.5 inches when blocked.
The leaves are made separately, four for every square. Each one is worked around a foundation chain, with stitches that grow from single crochet at the ends to treble crochet in the middle, so it has a pointed, gracefully curved shape. A second round in the back loops leaves a ridge all around the edge, and the foundation chain becomes a natural center vein. You sew the leaves onto the square along the diagonals, with their bases close together in the middle and their tips pointing to the corners.
The queen size uses 99 squares in 9 columns and 11 rows and 396 leaves. The squares are joined with a whipstitch through the back loops, which keeps the seams flat and the mesh frames neat. The border is a round of single crochet, a round of big scallops of 9 double crochet with a fuller scallop at every corner, and a round of single crochet with a picot at the top of every scallop. The finished cover is about 81 by 98 inches.
The stitches are chain, slip stitch, single crochet, half double crochet, double crochet and treble crochet. What makes this pattern intermediate is the number of pieces, the careful counting in the ray and mesh rounds and the placing of hundreds of leaves. None of it is hard, but it rewards patience. I give stitch counts at the end of every round, and the border math works out evenly for any size.
The finished cover is heavy, warm and luxurious, the kind of bed cover that feels like a hug when you pull it up. In cotton, it is still breathable, and it looks just as good folded at the foot of the bed in summer as spread out in winter. Crimson suits a classic bedroom with dark wood and brass lamps, a cozy cabin or a guest room made ready for the holidays. It is a true heirloom piece to make once and keep forever.
Why You'll Love This Crimson Leaf Square Bed Cover Crochet Pattern Pattern
I love working in one color on a big project. It sounds simple, but it frees my mind completely. I never have to think about which color comes next, I never have to carry strands or weave in a dozen ends per square, and I never worry that two colors will clash in the end. I just pick up my crimson yarn and work. It lets me slow down and pay attention to the stitches themselves, which is where the beauty of this cover lives.
The leaves are my favorite part. I make them in batches of twelve, three squares' worth, while sitting by the window in the afternoon. Each one takes about twelve minutes, and they pile up in a basket like a heap of red petals. Before I sew them on, I always lay four on a square and move them around a little until the tips point perfectly to the corners. That moment of arranging them feels like arranging flowers in a vase.
The ray round is a quiet joy, too. After four solid rounds, the treble crochet stitches suddenly open the square into a sunburst, and the little gaps between the rays let the light through. Then the mesh round frames everything. Watching a square change character round by round keeps me interested, even though I have made it so many times. No two rounds feel the same.
Here are the habits that made this big project feel manageable:
- Set a gentle goal, such as two squares a week, and keep a tally on a card.
- Make all the leaves for a square before you sew any of them on.
- Use four pins to place the leaves, one at each tip, before stitching.
- Store finished squares flat in a box so the leaves do not get crushed.
I love how this cover looks during the holidays. With white hydrangeas on the nightstand, a little gold here and there and the lamps glowing, the deep red bed looks like the heart of a Christmas card. Yet it is not only a holiday piece. In spring and summer, it looks rich and elegant against white walls and light linens, and it gives the room a warm anchor all year round.
I also love the round scallops of the border. They are generous and full, and they swing gently when the cover hangs over the edge of the bed. The little picot at the top of each one adds a delicate finish to such a bold, dramatic color. Working the border is the last, happy stage of the project, and every scallop feels like a small celebration of all the hours that went before it.
Finally, I love what this cover represents. It is a long project, and I will not pretend otherwise. But every square is a small, finished thing, and over the months they become something truly grand. I made the first one for my own bed, and it is still the piece I am proudest of. If you make it, I hope it becomes a treasure in your home and a story in your family.

Switch Things Up
Choose another single color. One-color covers look elegant in any deep or soft shade. Forest green gives the leaves a natural look and feels perfect for a cabin. Navy looks classic and calm, ivory or ecru gives a vintage heirloom feel, and dusty rose is soft and romantic. Avoid busy variegated yarns, because the leaves and rays need a solid color to show their shape. A smooth cotton with a little sheen makes the texture pop.
Make it for any bed. Each square is about 8.5 inches, so new sizes are easy to plan. Add or remove columns for the width and rows for the length, and remember that every square needs four leaves. These sizes are before the border, which adds about 2 inches on every side:
- Twin: 7 by 11 squares, 77 squares and 308 leaves, about 60 by 94 inches
- Full: 8 by 11 squares, 88 squares and 352 leaves, about 68 by 94 inches
- Queen: 9 by 11 squares, 99 squares and 396 leaves, about 77 by 94 inches
- King: 11 by 11 squares, 121 squares and 484 leaves, about 94 by 94 inches
The border works for any size, because each side of Border Rnd 1 always has 32 stitches per square plus 1, which divides evenly into the 8-stitch scallop repeat.
Make a sofa throw. Five columns by six rows, 30 squares, makes a throw of about 46 by 55 inches with the border. It uses less than a third of the yarn and is a wonderful way to try the pattern before committing to a full bed. In crimson, it makes a beautiful Christmas throw for the back of a sofa, and it is a lovely holiday gift for someone special.
Make a table topper or runner. One square with the scalloped border worked all around it makes a pretty doily or a table topper, like the one in my hands in the video. Three squares joined in a row with the border make a table runner for a holiday table. Nine squares joined 3 by 3 make a square table topper that drapes over the edges of a small round table.
Add matching pillow shams. Six squares joined 3 by 2 make the front of a standard sham, and four squares joined 2 by 2 make an 18 inch cushion. Work the full scalloped border around the front, then back it with a panel of crimson fabric or a plain crochet panel in rows of double crochet. Matching shams make the bed look complete, as you can see in my photos.
Try two colors. If you love the design but want more contrast, make the background squares in cream and the leaves in crimson, or the squares in crimson and the leaves in green, like holly. You can also make the leaves in two shades, as I did in my rose and raspberry version, with matching colors on opposite diagonals. Keep the border in the background color so it frames the cover calmly.
Change the edge. The round scallops are full and dramatic. For a lighter finish, work Border Rnd 2 with smaller shells of 5 double crochet over a 4-stitch repeat, which also fits the counts exactly. For a very simple edge, stop after Border Rnd 1 and add a round of reverse single crochet. For a richer frill, add a second round of picots between the scallops.
Change the yarn weight. In DK cotton with a 4 mm hook, each square comes out about 7 inches, and a queen cover needs about 11 by 13 squares, which looks finer and lacier. In bulky yarn with a 6 mm hook, the squares grow to about 10.5 inches, and a queen needs only 7 by 9 squares, 63 in all, which cuts the time a lot. The leaves grow or shrink with the yarn, so they still fit.
Materials Needed
— Main Fabric
— Tools Required
The Free Pattern
0% complete
— Lacy Square (Make 99, crimson) :
— Ribbed Leaf (Make 396, crimson) :
— Sewing the Leaves (99 squares, 4 leaves each) :
— Layout and Joining :
— Border :
Assembly Instructions
- Make one complete square with its four leaves sewn on, block it and check that it measures about 8.5 inches before you go on.
- Make all 99 lacy squares and all 396 leaves.
- Pin four leaves onto each square along the diagonals, with the tips pointing to the corners, and sew them on all around their edges.
- Lightly block every square to 8.5 by 8.5 inches, opening the rays and mesh and smoothing the leaves flat.
- Lay the squares out in 9 columns and 11 rows and whipstitch them into columns through the back loops, then join the columns together.
- Work the three border rounds around the whole cover, weave in all remaining ends and give the finished bed cover a light final blocking.
Common Mistakes & How to Fix Them
Miscounting the ray round. In Rnd 5 you skip the first stitch after each corner and then work 7 trebles with a skipped stitch between each, so each side has 15 stitches covered exactly. If you skip one stitch too few or too many, the rays shift, Rnd 6 ends up with the wrong count and the square will not finish at 31 stitches per side. That makes it a different size from its neighbors, and the seams will not match. Count to 8 chain spaces per side before you close the round. It takes a few seconds and saves undoing a whole round later.
Losing the mesh pattern in Rnd 7. The mesh frame has 11 mesh on each side, each made of a double crochet and a chain over a skipped stitch. It is easy to work two double crochet side by side or to skip two stitches, which makes one side a mesh short or long and pulls the square crooked. Because the mesh frame is so visible on the finished cover, a wrong mesh stands out. Count the mesh on each side as you go, and use a stitch marker in the first mesh after each corner so you always know where the side begins.
Leaves that are too long or too short. The leaves should reach from near the center ring to the inner edge of the mesh frame. If your leaves are longer, their tips will cover the mesh and the four tips will not meet neatly at the seams. If they are shorter, a gap opens in the middle of every square. Leaf length depends a lot on how tightly you work the treble crochet section. Measure your first leaf against your first square before you make any more, and change the hook size for the leaves only if needed.
Sewing the leaves too tightly. With 396 leaves to sew, it is tempting to sew quickly with firm stitches, but tight stitches pull the rays and mesh together underneath, and the square puckers and shrinks. The joined cover then ripples and the scalloped edge will not lie straight. Use small, relaxed running stitches about 1/4 inch in from the leaf edge, and catch only the top of the stitches of the square. After each leaf, smooth the square flat with your hand. If you see a ripple, loosen the stitches with the tip of your needle.

You Might Also Like






Important Notes
Gauge matters because 99 squares and 396 leaves must fit together. With a 5 mm hook, the first four rounds of the square should measure about 4.25 inches, the finished square about 8.5 inches and each leaf about 5 inches long. Measure your first five squares and leaves, and then check one in every ten. If your squares are slightly bigger or smaller, that is fine, as long as every square matches its neighbors.
Block the squares after the leaves are sewn on, and block the cover once more after the border. Pin each square to 8.5 by 8.5 inches, open the rays and the mesh frame with your fingers, smooth the leaves flat, spray with water and let it dry completely. After the border, pin each scallop into a round shape and each picot to a point. Blocking is what turns a pile of red squares into a crisp, elegant cover.
This is a large, heavy cover, about 5 kilograms of cotton for the queen size. Buy all of the crimson at once, from the same dye lot, and keep the labels. Deep reds vary a lot between dye lots, and with a one-color cover, even a small change would show as a band across the bed. Buy one or two extra skeins for safety and future repairs. Because of the weight, always support the cover from below when you lift it wet.
Wash the finished cover on a gentle cold cycle in a large mesh bag or a zipped duvet cover, or in a bathtub by hand, with mild detergent. Wash it alone or with other reds for the first few washes, and add a color catcher, because crimson can release dye. Never wring or twist it, and never hang it wet, because the weight stretches the lace. Press out the water, roll it in towels, then lay it flat to dry.
Thank you for making this crimson leaf square bed cover with me. I hope you enjoy the calm of working in one rich color, the little sunbursts of the ray rounds, the baskets of red leaves and that wonderful moment when four leaf tips meet at the corners of your first joined squares. It is a long journey, but every square is a small, beautiful finish of its own.
So find your crimson yarn, make your first square and its four leaves today, and sew them together. Lay it on your bed and see how it glows. Then make the next one, and the next, and one day you will spread out a deep red heirloom that will warm your home for many years to come.
Crochet Abbreviations
You Ask, We Answer
How big is the finished bed cover, and how much work is it really?
Following the pattern exactly, each square measures about 8.5 inches after blocking. The queen size uses 99 squares in 9 columns and 11 rows, which makes a panel of about 77 by 94 inches, and the scalloped border adds about 2 inches on every side, for a finished size of about 81 by 98 inches. You need 99 squares and 396 leaves. It is a big project, about 230 to 270 hours in total, because each square with its four leaves takes a little over two hours. If you make two squares a week, you will have all of them in about a year, which is how many heirloom covers are made. For a quicker version, use bulky yarn and bigger squares, or make a throw of 30 squares, which takes about a third of the time.
Can I use a different yarn, or make the leaves part of the square?
Worsted cotton is my favorite here because it shows the ribbed leaves, rays and mesh crisply and washes well. A cotton and acrylic blend is lighter and softer, and a smooth acrylic is fine for easy care, though the leaves may not stand up as firmly. Avoid fuzzy yarns, which blur the lace. DK cotton with a 4 mm hook gives squares of about 7 inches, and bulky yarn with a 6 mm hook gives squares of about 10.5 inches, with the leaves scaling to match. As for the leaves, I strongly recommend sewing them on. Working leaves into the rounds of a square would mean complicated shaping in every round, and you would lose the raised, sculpted look that makes this cover special. Sewn leaves can also be placed exactly, so every square matches.
How do I care for and store such a heavy bed cover?
Wash it only when it really needs it, ideally in a bathtub with cold water and mild detergent, or on a gentle cold cycle in a large mesh bag if your machine is big enough. Add a color catcher for the first few washes. Never wring, twist or hang it wet, because the weight of wet cotton will stretch the lace. Press the water out, roll the cover in large towels, then dry it flat, reshaping the squares and scallops. Between washes, shake it out and air it in the shade, because strong sun can fade crimson over time. To store it, fold it loosely with tissue paper between the layers and keep it in a large cotton bag rather than plastic. Refold it along different lines every few months, and check the leaves and seams once a year.
Success!
Thanks for subscribing — check your inbox for a welcome note.
Abbreviations
- ch — chain
- sl st — slip stitch
- sc — single crochet
- sc2tog — single crochet 2 together (here worked over 2 corner spaces at a seam)
- hdc — half double crochet
- dc — double crochet
- tr — treble crochet
- picot — ch 3, sl st in 3rd ch from hook
- BLO — back loop only
- st(s) — stitch(es)
- sp(s) — space(s)
- rep — repeat
- Rnd — round
- RS — right side