
Blue Windowpane Lattice Bed Cover with Tassels Crochet Pattern

Simple rows of double crochet and open windows, with green bobbles carried along the band rows.
One piece worked in rows, with no motifs to join, so it grows quickly.
Open blue windows with a green bud at every crossing, finished with playful tassels.
About This Blue Windowpane Lattice Bed Cover with Tassels Crochet Pattern Pattern
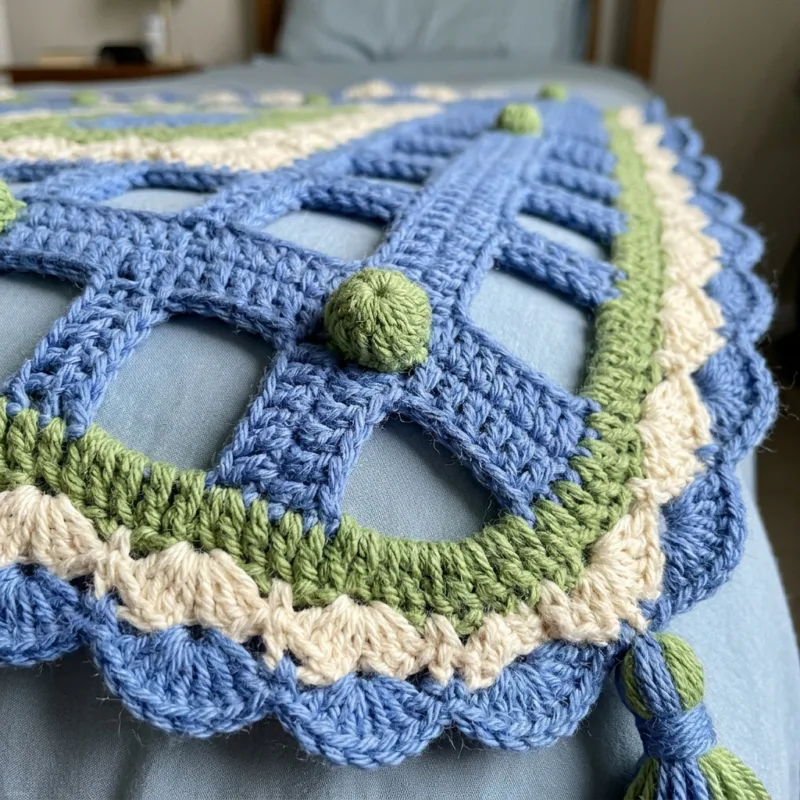
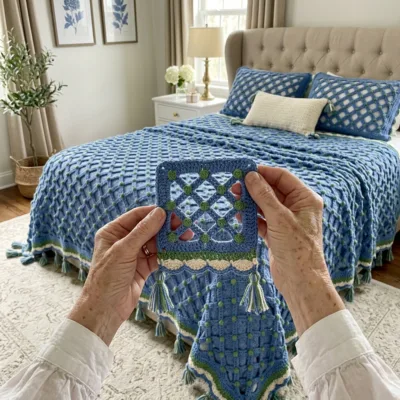
This bed cover looks like a garden trellis on a sunny morning. It is an open lattice of cornflower blue bands, crossing to make big square windows, and at every crossing sits a round green bobble like a little bud about to open. A border of three colors frames the lattice: a green round, a row of cream shells and a row of blue scallops. Big tassels in blue, green and cream hang from the scallops along both sides and the foot, so the cover sways gently with a cheerful, playful edge.
Unlike most of my bed covers, this one is not made from motifs. It is one big piece worked back and forth in rows, which makes it wonderfully simple and quick. The lattice is built from two kinds of rows. Band rows are solid double crochet, and window rows have three double crochet for each vertical bar with a chain of seven between the bars to make the open windows. Two band rows and four window rows make one repeat, and the pattern simply repeats up the length of the bed.
The green bobbles are worked in the second row of every band. As you work across the row in blue, you carry the green yarn along the top of the row, hidden inside the blue stitches. When you reach the center of a vertical bar, you switch to green for one bobble, then switch back to blue and keep going. Because the bobble rows are always wrong side rows, every bobble pops out to the right side by itself, plump and round. There are 25 bobbles in each band row and 29 band rows, for 725 little green buds in all.
The finished lattice has 24 windows across and 28 windows down, and each window is about 2 inches square, framed by bands about an inch wide. The panel measures about 69 by 85 inches before the border. The border adds about 1.5 inches on every side, so the cover is about 73 by 88 inches, and the tassels add another 6 inches of swing along the sides and foot. It is a lovely size for a queen bed, with the tassels hanging just above the floor.
The border has four rounds. A blue round of single crochet tidies the edges, a green round of double crochet adds a band of color, a cream round of shells creates soft scallops and a blue round outlines every shell. I worked out the counts so the shells fall evenly on every side. The tassels are wound around a piece of cardboard, mixing blue, green and cream strands, and tied to the center of every other blue scallop, with a blue wrapped neck that looks like a little bead.
The stitches are chain, slip stitch, single crochet, half double crochet, double crochet and the bobble. What makes this pattern intermediate is carrying the green yarn along the band rows and keeping the window bars lined up from row to row. Both are easy to learn, and the counts are the same in every row of the same kind, so after the first repeat you will barely need to look at the pattern.
The finished cover is light, airy and full of personality. The open windows make it breathable, perfect for warm nights or for layering over a blanket in winter. Cornflower blue and leaf green feel fresh and natural, and the cream shells soften the edge. It suits a cottage bedroom, a guest room with blue and white prints or a child's room that needs a little fun. And with no motifs to join, it is one of the fastest bed covers you can make.
Why You'll Love This Blue Windowpane Lattice Bed Cover with Tassels Crochet Pattern Pattern
I love that this bed cover is made in one piece. After many projects with dozens of motifs, it feels so freeing to simply work row after row and watch the lattice grow longer and longer. There is no joining, no stack of squares to block, no counting of how many motifs I still need. Just one row, then the next, and before I know it, the cover reaches across my lap and down to the floor.
The window rows are my favorite to work. Three double crochet, a long chain, three more double crochet, and the windows simply appear. They go so quickly that I can finish a window row during a short coffee break. Then the band rows close each row of windows like the top of a picture frame, and the green bobbles pop up one by one. The rhythm of quick windows and steady bands keeps the work lively from start to finish.
Carrying the green yarn felt a little strange at first, but I quickly came to love it. You simply lay the green along the top of the row and work your blue stitches over it, so it is hidden inside. When you reach a bobble, you pick up the green, make a plump little bud and go back to blue. Watching those green buds appear across the row always makes me smile. They give the cover its charm.
Here are the habits that kept this project easy for me:
- Count the vertical bars in every window row: there should always be 25.
- Keep the green carried loosely so the band rows do not pull in.
- Push each bobble out to the right side as you go.
- Wind all the tassels in one cozy evening near the end.
I love the tassels so much. They make the whole cover feel joyful, like a summer picnic blanket or a festive tablecloth. Mixing the three colors in each tassel ties the border together, and the wrapped blue necks look like little beads. When the cover is on the bed, the tassels swing softly whenever someone walks past. Children adore them, and so do I.
The colors feel like springtime to me. Cornflower blue is soft and happy, leaf green feels fresh and alive, and cream keeps everything light. Together they remind me of blue skies over a green garden. With blue botanical prints on the wall and white hydrangeas on the nightstand, this cover makes a bedroom feel fresh and welcoming, as if the windows had been thrown open on the first warm day of the year.
Finally, I love how fast it is. For a bed cover of this size, about 85 hours is wonderfully quick, and because it is one piece, you see your progress every single day. It is a perfect choice if you want a large, impressive project that you can actually finish this season, or a gift for a wedding or a new home that needs to be ready by a certain date.
Switch Things Up
Choose new colors. The lattice looks charming in many combinations. Red bands with white bobbles look like a classic gingham picnic, sage green bands with pink bobbles feel soft and romantic, and navy bands with yellow bobbles are crisp and nautical. For a calm room, try oatmeal bands with cream bobbles. Keep the bands in the strongest color, because they carry the pattern, and use a bright accent for the bobbles so the little buds stand out.
Make it for any bed. The width is set by the number of windows across. For the border to divide evenly, use a number of windows that is a multiple of 3, and work 10 sts for each window plus 3 in the foundation. The length of 29 bands, 170 rows, works for every size. These sizes include the border but not the tassels:
- Twin: 18 windows across, 183 sts, about 55 by 88 inches
- Full: 21 windows across, 213 sts, about 64 by 88 inches
- Queen: 24 windows across, 243 sts, about 73 by 88 inches
- King: 30 windows across, 303 sts, about 90 by 88 inches
For a longer cover, add bands in steps of one band plus four window rows; the border still works because the long sides always come out right with the one extra stitch in Border Rnd 1.
Make a sofa throw. Work 15 windows across, with a foundation of 153 sts, and 19 bands, which is 110 rows. The throw measures about 47 by 58 inches with the border, and with tassels on the two short ends only, it looks lovely folded over the back of a sofa. It uses about a third of the yarn and makes a cheerful gift for a new home.
Make a baby blanket. Work 12 windows across, with a foundation of 123 sts, and 13 bands, which is 74 rows. The blanket measures about 38 by 40 inches with the border. For a baby, leave off the tassels, which can be pulled or chewed, and finish with the border alone. You can also close the windows a little by working ch 5 and skipping 5 sts with 8 sts per window, recounting the foundation to match.
Add matching pillows. A small piece of lattice, 5 windows wide and 5 windows tall, makes a pillow front of about 16 inches. Work the border around it and sew it onto a blue fabric pillow cover so the bobbles stand out. A cream pillow worked in rows of half double crochet with a row of small tassels along each end makes a pretty lumbar pillow to finish the bed.
Change the bobbles. You can make the bobbles bigger or smaller by working 6 or 4 double crochet together instead of 5. You could also use two bobble colors, alternating green and cream in every band row, or use cream on every other band to create a checked effect. For a calmer cover, leave the bobbles out and work plain double crochet in their place, which turns it into a simple, elegant windowpane.
Change the edge. The tassels are playful, but you can choose a quieter finish. Stop after the blue scallop round for a soft scalloped edge, or add tassels only to the corners for a touch of fun. You can also make longer, fuller tassels for a dramatic look, or small pompoms instead of tassels. Place one on every scallop rather than every other if you love a lush edge.
Change the yarn weight. In DK cotton with a 4 mm hook, the windows are smaller and the cover looks finer, so a queen needs about 30 windows across and 36 bands. In bulky yarn with a 6.5 mm hook, the windows are larger and the cover grows very fast, so a queen needs about 18 windows across and 22 bands. Always swatch one repeat of 3 windows by 1 window first and measure it before you plan.
Materials Needed
— Main Fabric
— Tools Required
The Free Pattern
0% complete
— Windowpane Lattice Panel (Make 1, cornflower blue and leaf green) :
— Border :
— Tassels (Make 81: blue, green and cream) :
Assembly Instructions
- Work a swatch of 3 windows across and one full repeat high, block it and check that each window plus bar measures about 2.9 inches.
- Work the lattice panel in rows, from Row 1 to Row 170, counting 25 bars in every window row.
- Block the panel flat, pinning the windows into neat squares and pushing every bobble out to the right side.
- Work the four border rounds in blue, green, cream and blue.
- Wind 81 tassels in blue, green and cream, and sew one to every other blue scallop along both long sides and the foot, plus the two foot corners.
- Weave in all remaining ends and give the cover a final light blocking, combing the tassels straight.
Common Mistakes & How to Fix Them
Bars that drift out of line. In every window row, the 3 dc of each bar must sit right on top of the 3 dc of the bar below. If you work into a chain instead of a dc, or skip one stitch too few or too many in Row 3, the bars start to lean and the windows turn into slanting shapes. Count the bars in every window row: there should always be 25, with 24 windows between them. Place a stitch marker in the first bar every few rows so you can see quickly whether the edge is staying straight.
Pulling the carried green too tight. On bobble rows, the green yarn travels along inside the blue stitches. If you pull it tight, the band row gathers in and the cover gets narrower at every band, with a wavy edge. If you leave it too loose, loops of green peek out between the blue stitches. Lay the green along the top of the row with a little slack, and stretch the row gently after each bobble so the carried strand relaxes. Check the width of each band row against the window rows: they should match.
Bobbles that sink to the wrong side. A bobble pops out on the side facing away from you, so bobbles must always be worked on WS rows. If you lose track and work a bobble row with the RS facing, the bobbles sink to the back, and that band looks flat. In this pattern, every bobble row is an even-numbered row. Mark the RS of the foundation with a stitch marker so you always know which side you are on. Push each bobble out with a fingertip as you work, and check the RS after every bobble row.
Tassels that are uneven or loose. With 81 tassels, small differences add up, and a row of tassels in different lengths or thicknesses looks untidy. Tassels that are only knotted loosely can also slip off over time. Always wind on the same piece of cardboard with the same number of wraps in each color, and trim all the tassels to the same length at the end. Tie the top tightly, wrap the neck firmly, and sew each tassel to the scallop with several stitches and a secure knot on the WS.

You Might Also Like






Important Notes
Gauge matters because the panel is one large piece. With a 5 mm hook, 14 dc and 8 rows should measure 4 inches, and one window plus one bar should be about 2.9 inches wide. Work a small swatch of 3 windows and one full repeat, block it and measure it before you start. If your gauge is different, change your hook rather than your stitch counts, so the windows stay square and the border math still works.
Block the panel before adding the border, and give the finished cover a final light blocking. Lay it flat on a large clean surface, pin the windows into neat squares and the bands into straight lines, and push every bobble out from the back. Spray with water until damp and let it dry completely. After the border and tassels are on, lightly mist the tassels and comb them straight with your fingers.
The yarn amounts in the materials list are estimates for the queen size, including the border and the tassels. Buy all three colors at once, from the same dye lots, and keep the labels. Cornflower blue in particular can vary between lots, and in a cover worked as one piece, a different lot would show as a clear line across the lattice. Buy one extra skein of blue for safety.
Wash the finished cover on a gentle cold cycle in a large mesh bag or a zipped duvet cover, with mild detergent. Blue, green and cream sit side by side in the border and tassels, so always add a color catcher. Never wring the cover or the tassels. Press out the water, lay the cover flat, square up the windows, push out the bobbles, comb the tassels straight and let everything dry fully.
Thank you for making this cornflower blue windowpane lattice bed cover with me. I hope you enjoy the quick rhythm of the window rows, the little green buds popping up along the bands and the fun of winding a basket full of tassels at the end. It is a cheerful, breezy cover that brings a bit of garden sunshine into your bedroom.
So find your blue, green and cream yarn, make your foundation chain and start your first row today. Row by row, the windows will open up across your lap, and soon you will have a bright lattice cover with swinging tassels to enjoy for many years.
Crochet Abbreviations
You Ask, We Answer
How big is the finished bed cover, and how long does it take?
Following the pattern exactly, the lattice panel has 24 windows across and 28 windows down and measures about 69 by 85 inches. The four border rounds add about 1.5 inches on every side, so the cover measures about 73 by 88 inches, and the tassels hang about 6 inches below the edge along both sides and the foot. On a standard queen bed, that gives a good drop with the tassels hanging just above the floor. Because the cover is one piece worked in rows, with no motifs to join, it is one of the quicker bed covers to make, about 75 to 95 hours in total. Most of the time goes into the bobble rows, which take a little longer, and the window rows are very fast. Winding and attaching the 81 tassels takes about one or two relaxed evenings.
Do I have to carry the green yarn, or can I add the bobbles later?
Carrying the green is the neatest method, because it keeps the bobbles firmly attached and leaves only two ends per bobble row instead of two ends per bobble. With 725 bobbles, adding each one separately later would mean more than 1,400 ends to weave in. If you prefer not to carry, you can wind small bobbins of green and drop them at each bobble, which is called intarsia, but carrying is faster once you get the feel of it. For the yarn, worsted cotton gives crisp bands and round bobbles and washes well. A cotton and acrylic blend is lighter and softer, and a smooth acrylic is fine for easy care. If you change yarn weight, swatch first and keep the number of windows across a multiple of 3 so the border still divides evenly.
How do I care for the bed cover and keep the tassels neat?
Wash it only when it really needs it, on a gentle cold cycle in a large mesh bag or a zipped duvet cover, which also keeps the tassels from tangling. Use mild detergent and a color catcher, because the blue, green and cream sit side by side. Never wring the cover or put it in a hot dryer. Press out the water, lay it flat, square up the windows, push out the bobbles and comb each tassel straight with your fingers while it is damp. If the tassels get a little frizzy over time, steam them lightly with an iron held above them, without touching, and trim the ends evenly. To store the cover, fold it loosely with the tassels laid straight, and keep it in a cotton bag rather than plastic so the yarn can breathe.
Success!
Thanks for subscribing — check your inbox for a welcome note.
Abbreviations
- ch — chain
- sl st — slip stitch
- sc — single crochet
- hdc — half double crochet
- dc — double crochet
- yo — yarn over
- bobble — 5 dc worked together in one stitch and closed into a round ball
- st(s) — stitch(es)
- sp(s) — space(s)
- rep — repeat
- Rnd — round
- RS — right side
- WS — wrong side