
Navy Lace Lobed Square Bed Cover Crochet Pattern
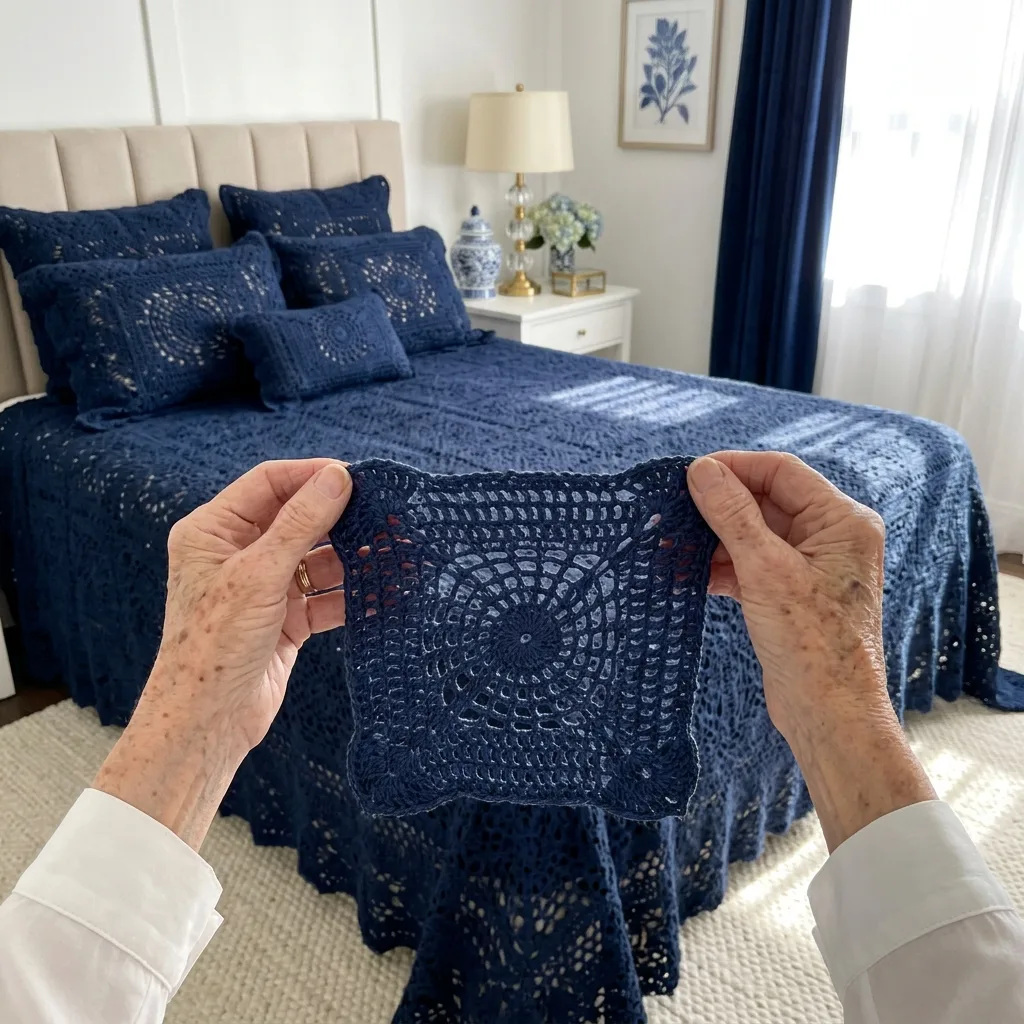
You need chain spokes, filet mesh, a graded stitch edge and steady counting in each round.
Each square takes under two hours, so a few squares a week build into a full bed cover over a season.
A last round that moves from tall to short stitches turns each corner into a soft lobe, like a four-leaf flower.
About This Navy Lace Lobed Square Bed Cover Crochet Pattern Pattern
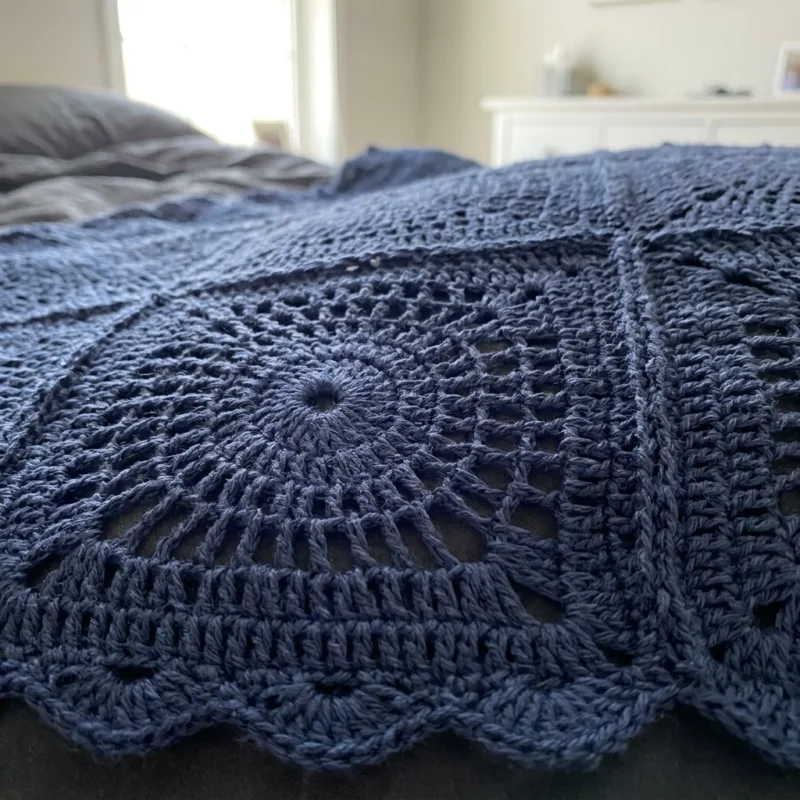
This navy bed cover is made from large lace squares that look rich, elegant and full of detail. Each square has a small bullseye ring at its center, surrounded by a fine web of spokes that radiate out like rays. Beyond the web, panels of filet bars run along each side, and the four corners swell into soft rounded lobes, so the square looks almost like a four-leaf flower. Joined in a straight grid, the squares cover the bed in a deep navy lace with a softly scalloped edge where the lobes hang over the sides. It feels classic, calm and a little bit grand.
Each square is worked in rounds from the center out. You start with a magic ring of double crochet, then build two solid rings in single crochet and double crochet, which form the bullseye. Next come three spoke rounds, each with longer chain spaces than the last, so the web opens up gently as it grows. Then you square up the circle with four corners and work a round of filet mesh, with bars of double crochet and little chain windows between them. A solid round of double crochet closes the mesh and gives the square a sturdy frame.
The magic of this pattern is in the last two rounds. In the shaping round, you work a fan of treble crochet into each corner, and along each side you move from double crochet to half double crochet to single crochet at the center, then back up again. That gentle change in stitch height makes the corners round and full while the middle of each side dips slightly. A final round of single crochet smooths the outline and adds extra stitches around each corner fan, giving the lobes their soft, rounded shape.
The finished bed cover measures about 100 by 110 inches. That is 10 squares across and 11 squares down, which makes 110 squares, each about 10 inches across after blocking. On a queen bed, the cover lies across the top and drops about 20 inches on each side and about 30 inches at the foot, with the lobed edge reaching toward the floor on most frames. I used DK weight matte cotton with a 3.5 mm hook, which gives crisp, fine lace and clear stitch details even in a dark color.
The finished cover has a graceful drape and a gentle weight. The solid bullseye and filet bars give it structure, while the web and mesh keep it airy and breathable, so it works in every season. Deep navy is a timeless color that feels calm, rich and a little formal. It looks beautiful with white furniture, gold accents, blue and white china and fresh hydrangeas. Because the cover is one color, the design comes alive through light and shadow, and every detail of the lace shows when sunlight crosses the bed.
This pattern suits an intermediate crocheter who is comfortable working in the round, counting chain spaces and reading simple stitch changes. The square has eleven rounds, so it takes a little longer than a granny square, but each round is straightforward. Dark yarn can be harder to see, so work in good daylight and use bright stitch markers. Since you use only one color, there are just two ends per square. Each square is a satisfying evening project, and your stack of navy lace will grow steadily week after week.
Why You'll Love This Navy Lace Lobed Square Bed Cover Crochet Pattern Pattern
I love this bed cover because it feels so elegant. Navy is one of those colors that never goes out of style. It reminds me of the sea at dusk, of old blue and white china and of crisp linen in a grand country house. When this cover is on the bed, the whole room looks pulled together and calm. It is the kind of piece that makes a bedroom feel like a beautiful hotel suite, but warmer and more personal because it is made by hand.
I also love watching each square grow. The bullseye center is quick and satisfying, and then the spokes start to spread out like rays of light. When I reach the filet bars, the square starts to look like real lace. My favorite moment is the shaping round, when the corners turn into soft lobes. A plain square suddenly becomes a flower, and I always hold it up to the window to admire it before starting the next one.
This pattern is also very relaxing. There is only one color, so there is no switching yarn and only two ends to weave in. The rounds have a calm rhythm, and after a few squares you will barely need to look at the instructions. I made most of my squares in the evenings with a cup of tea, and I loved how each one felt like a small, finished piece of art. Even if the bed cover takes months, each square gives you a little sense of pride.
- One color only, with just two ends per square.
- A beautiful mix of web, mesh and solid stitches.
- Rounded lobe corners that look like a flower.
- A rich, timeless color that suits any bedroom.
This cover also changes a room completely. My bedroom used to be all white and beige, and it felt soft but a little plain. The deep navy lace brought depth and warmth, and suddenly the gold lamp and the blue and white vase looked even prettier. Friends who visit always ask about it, and they are amazed when they see how many stitches are in each square. A handmade bed cover like this feels like an heirloom from the first day.
Making this cover taught me a lot. I learned to work in good light and use bright stitch markers on dark yarn. I learned to count my spokes and mesh windows carefully so every square matches. And I learned how much a simple change in stitch height can change the shape of a piece. If you want a big, elegant project that rewards patience with something truly beautiful, I think you will love this one as much as I do.
Switch Things Up
The first and easiest change is the color. Navy is rich and timeless, but this lace looks lovely in many solid shades. Ivory or cream gives a classic heirloom look. Sage green feels soft and natural. Burgundy is warm and dramatic, and dusty blue is calm and airy. A deep emerald green would look stunning in a room with gold accents. Because the pattern is so detailed, choose a smooth cotton with good stitch definition, so the web, bars and lobes all show clearly.
You can make this bed cover for any bed size by changing the number of squares. Each square is about 10 inches across after blocking, so divide your bed width and length, including the drop, by 10. Here are the counts I use:
- Twin: 8 by 10 squares, 80 squares, about 80 by 100 inches.
- Full: 9 by 10 squares, 90 squares, about 90 by 100 inches.
- Queen: 10 by 11 squares, 110 squares, about 100 by 110 inches.
- King: 12 by 11 squares, 132 squares, about 120 by 110 inches.
For a sofa throw, join 5 squares across and 6 squares down. That is 30 squares and finishes at about 50 by 60 inches. A throw is a wonderful way to try the pattern before committing to a whole bed cover. In navy, it looks elegant draped over a cream sofa or a leather chair. If you make two or three squares a week, you can finish a throw in about three months, and it makes a beautiful gift for a new home or a wedding.
A table topper or runner is a lovely smaller project. Join 2 squares across and 5 down for a runner about 20 by 50 inches, or 3 by 3 squares for a square table topper about 30 inches across. In navy, it looks striking on a white or wooden table with candles and flowers. In cream, it brings a vintage touch to a dining room. These smaller pieces are quick to finish and make thoughtful gifts.
You can also change the corners. For a straight-edged square, skip the shaping round and work the last round as plain single crochet with (sc, ch 2, sc) in each corner. That gives you a classic square that joins into a smooth grid. For deeper lobes, add one more fan round at the corners only. You could also alternate lobed squares with plain squares in a checkerboard for a different rhythm across the bed.
To make matching pillow covers, join 2 squares across and 3 down for a panel about 20 by 30 inches, which fits a standard pillow. Make two panels and join them around the edges with single crochet, then slip in the pillow before closing the last side. For a lumbar pillow, join 3 squares in a single row. Use a pillow insert in navy or a deep blue fabric so the lace openings show a matching color instead of white. Matching pillows make the whole bed look planned and finished.
Finally, try a different yarn weight. In fine sport weight cotton with a 3 mm hook, each square is about 8.5 inches, so a queen needs about 12 by 13 squares, and the lace looks even more delicate. In worsted weight cotton with a 4.5 mm hook, a square grows to about 12.5 inches, and a queen needs only about 8 by 9 squares. Worsted gives a bolder, cozier lace that works up faster. Always make one test square in your chosen yarn and block it before you plan your layout.
Materials Needed
— Main Fabric
— Tools Required
The Free Pattern
0% complete
— Lobed Lace Square (Make 110, navy) :
— Layout :
— Border (navy) :
Assembly Instructions
- Make one Lobed Lace Square, block it and check that it measures about 10 inches across from lobe to lobe.
- Make all 110 squares, weaving in the two ends of each square as you finish it.
- Block the squares in batches so they are all the same size, pinning each lobe into a smooth curve.
- Lay the squares out in a straight grid of 10 across and 11 down.
- Join the squares with slip stitch through the back loops along the 26 side stitches, leaving the lobes unjoined, first in rows and then in columns.
- Work Border Rounds 1 and 2 around the whole bed cover.
- Block the finished bed cover flat, pinning each lobe on the outer edge, and let it dry completely.
Common Mistakes & How to Fix Them
The most common mistake is losing count of the spokes on dark navy yarn. In Rounds 4, 5 and 6, each round must have exactly 16 spokes. If you miss one, the web pulls to one side and the square will not square up evenly in Round 7. Navy stitches are hard to see in the evening, so work in good daylight or under a bright lamp. Place a bright stitch marker in the first spoke of each round and count to 16 before you join. If you find a missing spoke, pull the round back and redo it.
Another mistake is placing the corners in the wrong spaces in Round 7. Every fourth ch-4 space becomes a corner, and the three spaces between each corner get 4 dc each. If you put a corner in the wrong space, one side ends up longer than the others, and the filet bars in Round 8 will not line up. Before starting Round 7, place a stitch marker in every fourth space around the web. Those four markers show exactly where the corners go. Count 18 dc on each side when you finish the round.
Many makers skip the stitch-height changes in Round 10 and work the whole round in double crochet. When that happens, the corners do not round out, the sides do not dip and the square looks flat and boxy instead of lobed. The graded stitches are what give the square its flower shape. Follow the sequence on every side: 5 dc, 4 hdc, 8 sc, 4 hdc, 5 dc, then the 9 tr fan. It can help to place a stitch marker at the start of the 8 sc so you can see where the dip falls on each side.
The last common mistake is joining the lobes when you join the squares. If you slip stitch through the lobe stitches too, the rounded corners are pulled flat and the little openings between four squares disappear. The lobes are meant to stay rounded and stand out from the seams. Join only along the 26 side stitches of each square, from the end of one lobe to the start of the next. Leave the 18 lobe stitches open. Place stitch markers at the ends of each side before you join so you know exactly where to start and stop.

You Might Also Like






Important Notes
Gauge matters because small differences add up across 110 squares. A blocked square should measure about 10 inches across from lobe to lobe. If yours is a quarter inch larger, the bed cover will grow by 2.5 inches across and almost 3 inches in length. Make one test square and block it before you buy all of your yarn. Compare new squares with your first one every few weeks, because tension often changes during a long project.
Blocking opens up the web and mesh and gives the lobes their rounded shape. Pin each square to a blocking mat, placing several pins around each lobe so it forms a smooth curve, and a pin at the center of each side dip. Mist with cool water and let it dry completely. After joining and working the border, block the whole bed cover again so the seams lie flat and the outer lobes hang evenly.
The yarn amount is for the queen size in DK weight cotton, so adjust it for other sizes or yarns. With a single dark color like navy, dye lots matter a great deal, because navy can lean toward black or royal blue between lots. Buy all of your yarn from the same dye lot at once, plus about 10 percent extra. If you must use two lots, alternate squares from both lots in a checkerboard so any difference is spread evenly.
Wash the bed cover by hand or on a gentle cold cycle inside a large mesh laundry bag. Navy dyes can release color, so wash the cover on its own and add a color catcher sheet to the first few washes. Use a mild detergent made for darks, and no bleach. Do not hang the cover to dry, because wet cotton is heavy and will stretch the lace. Lay it flat on towels, shape the lobes and squares and let it dry fully, away from direct sunlight.
I hope this navy lace bed cover brings a touch of calm elegance into your bedroom. It is a big project, but every square is a peaceful evening with one rich color and a hook. Enjoy watching each web spread out and each corner bloom into a soft lobe, and take your time with the counting.
You do not have to think about all 110 squares today. Just make a magic ring and finish one square. Then make another tomorrow. Before long, you will lay them out on the bed and see a whole field of navy lace flowers waiting to be joined. Happy crocheting, my friend.
Crochet Abbreviations
You Ask, We Answer
What is the finished size of this bed cover?
The queen version finishes at about 100 by 110 inches after blocking. That is 10 squares across and 11 squares down, with each square measuring about 10 inches across from lobe to lobe. On a standard queen mattress, the cover lies across the top and drops about 20 inches on each side and about 30 inches at the foot, so the lobed edge reaches toward the floor on most bed frames. If you prefer a shorter drop, use the full layout of 9 by 10 squares. If your bed is very tall, add one square to each row and column. Measure your own bed, including the mattress and frame height, and divide by your blocked square size. That gives you the exact grid for the look you want and helps you buy enough yarn from one dye lot.
Can I use a different yarn weight or make a different size?
Yes, this pattern works in many yarn weights because the square is the same in every size. In fine sport weight cotton with a 3 mm hook, each square is about 8.5 inches across, and in worsted weight cotton with a 4.5 mm hook it grows to about 12.5 inches. The stitch counts never change, only the square size and the number of squares you need. Make one test square in your chosen yarn, block it, measure it from lobe to lobe and divide your bed size by that number. The section on switching things up lists square counts for twin, full, queen, king, a throw and table pieces. For the border, count 26 sc for each open side, 19 stitches for each seam along the edge and 18 sc for each corner lobe, so the edge always fits your layout.
How do I wash and care for this crochet bed cover?
Wash it by hand in cool water or on a gentle cold cycle inside a large mesh laundry bag to protect the web, mesh and lobes. Use a mild detergent made for dark colors and never use bleach, because it can leave pale spots on navy cotton. Wash the cover on its own and add a color catcher sheet to the first few washes, since navy dyes can release a little color. Do not wring or twist the cover. Gently press out the water, then lay it flat on clean towels and shape the squares and lobes with your hands. Let it dry completely, away from direct sunlight, which can fade dark colors over time. Never hang it while wet, because the weight of the wet cotton will stretch the lace. Between seasons, fold it loosely and store it in a breathable cotton bag.
Success!
Thanks for subscribing — check your inbox for a welcome note.
Abbreviations
- ch — chain
- sc — single crochet
- hdc — half double crochet
- dc — double crochet
- tr — treble crochet
- rev sc — reverse single crochet (crab stitch), worked from left to right
- sc2tog — single crochet 2 together
- sl st — slip stitch
- MR — magic ring
- beg — beginning
- sk — skip
- st(s) — stitch(es)
- sp(s) — space(s)
- rep — repeat
- Rnd — round