
Lilac Filet Heart Bed Cover Crochet Pattern
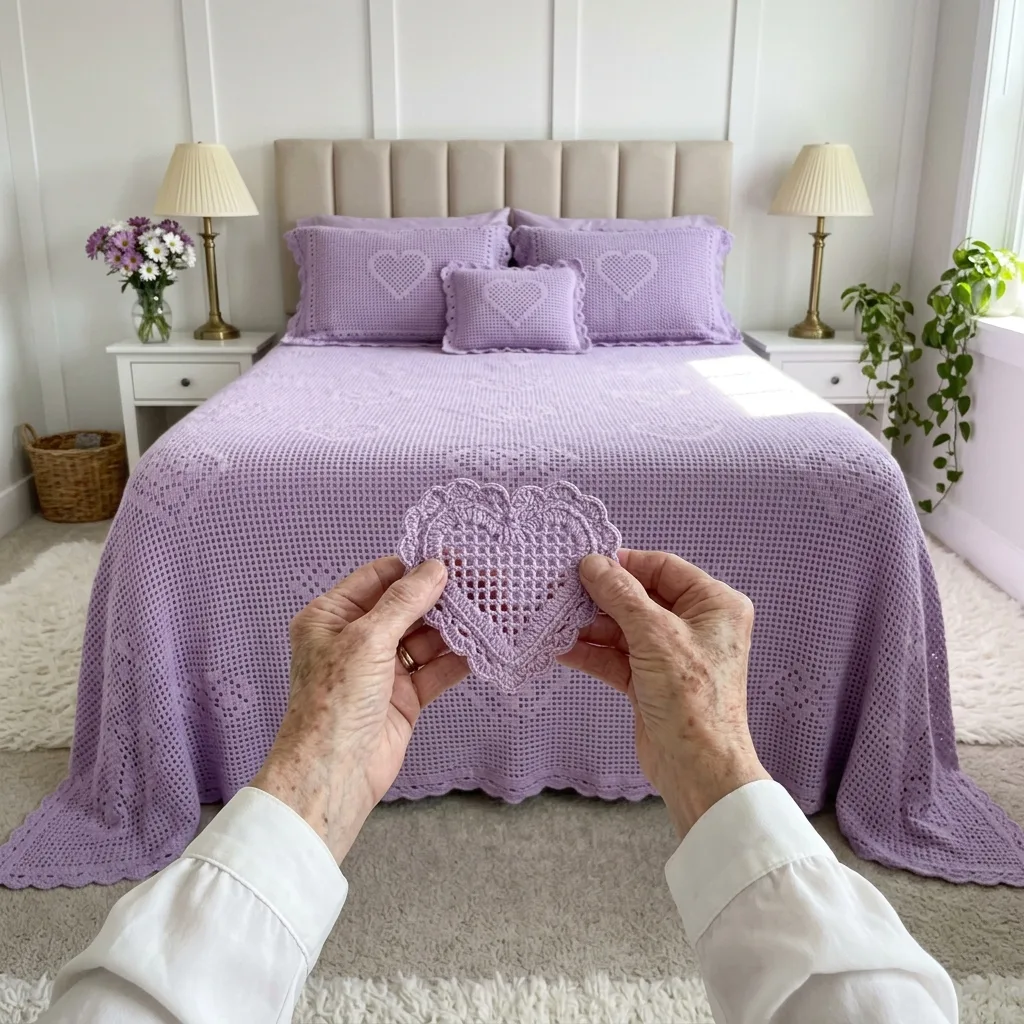
You need filet mesh with simple increases and decreases, shells and steady counting on long rows.
The big mesh panel grows row by row, so an hour a day turns into a finished bed cover in about seven months.
A large mesh heart with a ring of eyelet shells sits right in the middle of the bed like a love letter in lace.
About This Lilac Filet Heart Bed Cover Crochet Pattern Pattern
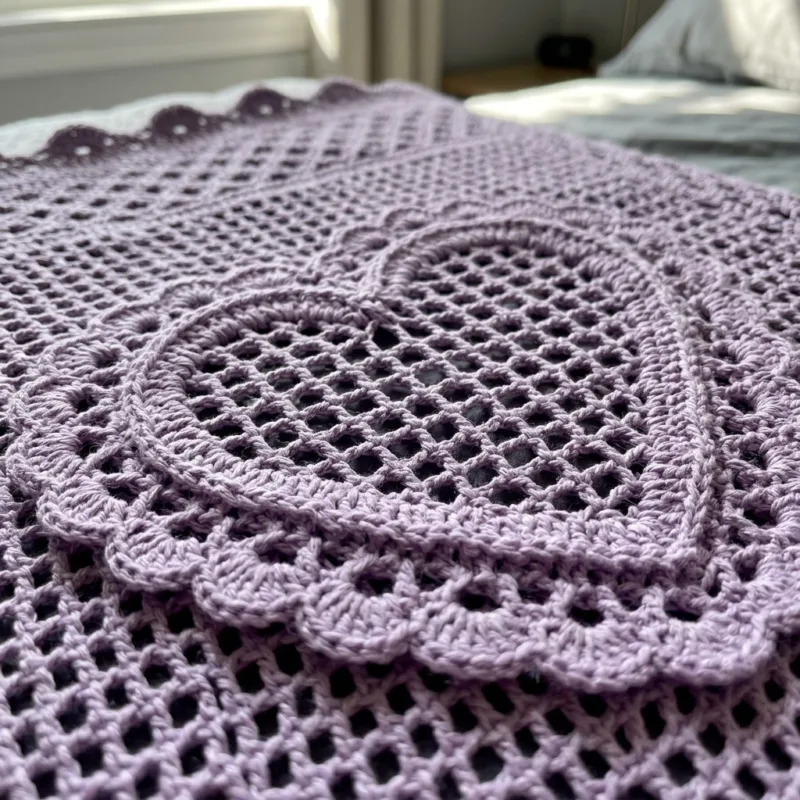
This lilac bed cover is all about one big, beautiful heart. In the center of the bed sits a large open-mesh heart with a raised outline, and around it blooms a ring of scalloped shells, each with a little round eyelet underneath. The rest of the cover is a soft filet mesh grid that lets the heart stand out. Around the edges, a diamond lace band and a band of V-stitches frame the mesh, and a scalloped eyelet border finishes the whole piece. In soft lilac cotton, it feels romantic, fresh and full of light, like a spring morning with the windows open.
Unlike a motif bed cover, this one is made from just two main pieces plus a frame. The first piece is the large background panel, worked in simple filet mesh rows of double crochet and chain spaces. It is very easy to memorize, because every row is the same. The second piece is the heart, worked separately in filet mesh from the bottom point upward. You add one mesh at each end of every row until the heart reaches its full width, then work a few straight rows and split the top into two rounded lobes.
Once the heart is shaped, you work edging rounds around it. A round of single crochet smooths the stepped edge into a neat outline, and a second round makes it slightly raised. Then you work a round of chain loops and fill them with shells of nine double crochet. Under each shell, a small round eyelet stays open, which creates the pretty ring of scallops and holes you see in the photo. The heart is then laid on the center of the panel with its mesh lined up exactly over the background mesh, and sewn in place along its outline.
The frame is worked in rounds all the way around the panel. A round of single crochet tidies the edges, two rounds of chain loops make a diamond lace band, and a round of V-stitches adds a light, airy row of little points. A round of single crochet closes the band, and the scalloped border repeats the eyelet shells from the heart, so the edge and the center match beautifully. The finished bed cover measures about 95 by 97 inches. On a queen bed, it lies across the top and drops about 17 inches on each side and at the foot, with the scallops reaching toward the floor.
I used worsted weight matte cotton with a 4.5 mm hook. Filet mesh in worsted cotton has a lovely drape, and the grid looks clear and even. The finished cover feels light and airy because most of it is open mesh, so it is perfect for spring and summer and pretty layered over a solid blanket in cooler months. Lilac is a gentle, cheerful color that pairs beautifully with white furniture, brass lamps and fresh flowers. The heart makes it a wonderful gift for a wedding, an anniversary or anyone you love.
This pattern suits an intermediate crocheter who knows basic filet mesh and is comfortable with long rows. The background panel is simple but large, so it rewards patience and steady counting. The heart introduces filet increases and decreases, which are easy once you have tried them on the small practice heart. Because the panel is one piece, it gets heavy toward the end, so I like to work with it resting on a table or on my lap. If you enjoy calm, repetitive stitching with a special centerpiece at the end, you will love this project.
Why You'll Love This Lilac Filet Heart Bed Cover Crochet Pattern Pattern
I love this bed cover because it says something. A heart in the middle of the bed is such a simple idea, but it makes the whole room feel warm and loving. I made my first one for my daughter when she got married, and I still remember the look on her face when she unfolded it. Every time I make another one, I think of her and of all the people I love. It is a bed cover with a story stitched right into it.
Filet crochet is one of my favorite ways to relax. Once the background rows begin, there is nothing to think about except dc, ch 2, skip 2, dc. The rhythm is so calming. I work a few rows every evening, usually with a cup of tea and a favorite show, and the panel slowly grows across my lap. It is lovely to have a project that feels peaceful rather than demanding, especially at the end of a busy day.
The heart is the exciting part. After all those calm background rows, it is fun to shape something special. Watching the heart grow from a tiny point into a big, wide shape feels like magic. Then the eyelet shells go around it, and suddenly it looks like a lace valentine. Laying the finished heart onto the middle of the panel for the first time is one of my favorite moments in any project I have ever made.
- Easy, relaxing filet rows for the background.
- A special heart centerpiece that is fun to shape.
- Matching eyelet shells on the heart and the edge.
- A romantic gift for weddings, anniversaries and loved ones.
This cover also changes a room beautifully. Lilac is soft and cheerful without being too bold, and the open mesh keeps it light and airy. In my guest room, it makes the white furniture look even fresher, and it brings out the purple in the flowers on the nightstand. Guests always smile when they see the heart. It feels personal and welcoming, like the room was made just for them. A handmade bed cover gives a space a warmth that nothing else can.
Making this cover taught me a lot about patience and precision. I learned to count my meshes at the end of every long row so the panel stays straight. I learned how simple filet increases and decreases can shape almost anything. And I learned to line up the heart's mesh with the background mesh so the grid looks like one continuous piece of lace. If you want a romantic, meaningful bed cover that you can make with calm, simple stitches, I think you will treasure this one.
Switch Things Up
The first and easiest change is the color. Lilac is soft and romantic, but this heart looks beautiful in any solid shade. Blush pink makes a sweet wedding or nursery cover. Classic white or ivory feels like a vintage heirloom. Soft sage green is calm and natural, and a deep red makes a bold, romantic statement for Valentine's Day. You can also work the heart in a slightly darker shade than the background, such as a deep purple heart on a lilac panel, so the center stands out even more.
You can make this bed cover for any bed size by changing the number of meshes and rows in the background panel. Each mesh is about 0.75 inches wide and each row about 0.67 inches tall, and the frame adds about 5 inches on every side. Here are the panel sizes I use:
- Twin: 77 meshes by 130 rows, about 68 by 97 inches with the frame.
- Full: 97 meshes by 130 rows, about 83 by 97 inches with the frame.
- Queen: 113 meshes by 130 rows, about 95 by 97 inches with the frame.
- King: 137 meshes by 130 rows, about 113 by 97 inches with the frame.
For a sofa throw, make a panel of 57 meshes by 72 rows and a smaller heart of 25 meshes at its widest. With the frame, it finishes at about 53 by 58 inches. A throw is a lovely way to try the pattern before making the full bed cover. It makes a meaningful gift for an anniversary or a new couple, and it looks pretty folded at the end of a bed or draped over a chair. You can finish a throw in about two months of evenings.
A baby blanket is sweet in this pattern too. Make a panel of 37 meshes by 45 rows and use the small heart from the pattern in the center. With a narrower frame of just the single crochet round and the scalloped border, it finishes at about 32 by 36 inches. Use a soft cotton in pale pink, lilac or white. Because filet mesh is open, I see this as a christening or photo blanket, or a crib rail blanket used with a grown-up nearby. It makes a beautiful keepsake.
You can also change the centerpiece. Instead of one big heart, sew four small hearts in a diamond around the center of the panel, or scatter small hearts across the whole bed. For a wedding, you can make two hearts that overlap slightly. You could even chart initials or a date in solid filet blocks inside the heart's mesh by filling chosen cells with 2 dc instead of ch 2. That turns the bed cover into a truly personal gift.
To make matching pillow covers, work a filet panel of 27 meshes by 30 rows for each pillow front, which is about 20 by 20 inches. Sew a small heart in the center and work the single crochet round and scalloped border around the edge. Make a plain filet back panel the same size and join it to the front on three sides, then slip in a lilac pillow insert and close the last side. A lilac insert keeps the mesh showing a matching color. Matching pillows make the whole bed look planned and finished.
Finally, try a different yarn weight. In DK cotton with a 3.5 mm hook, each mesh is about 0.6 inches wide, so a queen panel needs about 141 meshes by 162 rows, and the lace looks finer. In bulky yarn with a 6 mm hook, each mesh is about 1 inch, and a queen panel needs only about 85 meshes by 97 rows. Remember to change the heart size too, so it stays in proportion to the panel. Always make a small swatch of mesh and measure it before you plan your sizes.
Materials Needed
— Main Fabric
— Tools Required
The Free Pattern
0% complete
— Background Panel (Make 1) :
— Large Heart (Make 1) :
— Small Heart (practice heart and pillows) :
— Layout :
— Frame and Border :
Assembly Instructions
- Make a small swatch of filet mesh and the Small Heart to practice increases, decreases and the shell edging, and check your gauge.
- Work the Background Panel of 113 meshes by 130 rows, counting your meshes at the end of every row.
- Work the Large Heart from the bottom point up, then work its five edging rounds.
- Block the panel and the heart separately so the mesh is square and even.
- Pin the heart to the center of the panel, lining up its mesh cell over cell with the background, and sew it in place along Rnd 2.
- Work the Frame and Border Rounds 1 to 8 around the whole panel.
- Block the finished bed cover flat, pinning the scallops evenly, and let it dry completely.
Common Mistakes & How to Fix Them
The most common mistake is losing a mesh somewhere in the long rows of the background panel. With 113 meshes in every row, it is easy to skip one space or add an extra one, and the panel slowly turns into a trapezoid. This happens most often at the ends of rows, where the turning chain can hide the last stitch. Place stitch markers every 20 meshes on Row 1 and move them up every few rows, so you can count in small groups. Always work the last dc into the 3rd ch of the turning ch. Count every row before you turn.
Another mistake is working the heart increases loosely, which makes the edges of the heart wavy. The ch 7 and dtr at the ends of each increase row must match the height of the other stitches. If they are loose, the lower sides of the heart ripple and the heart will not lie flat on the panel. Keep your chains snug and your dtr even. Lay the heart flat after Row 21 and check that both sides make straight diagonal lines. If one side waves, pull back to the first loose row and redo it with tighter tension.
Many makers sew the heart on without lining up the mesh, so the two grids cross and look messy. If the heart's mesh is shifted half a cell from the background, you see a busy double grid instead of a clean lace heart. Before sewing, lay the panel flat and place the heart on top, then gently move it until every heart cell sits right over a background cell. Pin through both layers at many points, then check the whole outline from a distance. Sew with small stitches through Rnd 2 only, so the eyelet shells stay raised.
The last common mistake is pulling the frame too tight, so the panel edges pucker. The first round of single crochet must be spread evenly along very long edges, and it is easy to work too few stitches. If the edge feels tight or the corners curl, there are not enough stitches. Divide each edge into quarters with stitch markers and work the same number of sc in each quarter: 84 on each quarter of a short edge and 81 on a long edge. Check that the panel lies flat after Round 1 before continuing to the lace bands.

You Might Also Like






Important Notes
Gauge matters because the panel is large and every mesh adds up. Aim for 4 meshes to 3 inches and 6 rows to 4 inches. If your meshes are just a little larger, the bed cover can grow by several inches in each direction and use much more yarn. Make a small swatch of at least 10 meshes by 10 rows, block it and measure it before you start the panel. Check your gauge again after the first 20 rows, because tension often loosens as you relax into the rhythm.
Blocking makes the filet mesh square and even and helps the heart lie flat. Block the panel and the heart separately before sewing them together. Lay the panel on towels on a clean floor, smooth it into a rectangle, mist it with cool water and let it dry fully. After adding the frame and border, block the whole cover again, pinning each scallop evenly. Gently lift the eyelet shells around the heart with your fingers while damp so they stand up.
The yarn amount is for the queen size in worsted weight cotton, so adjust it for other sizes or yarns. With a single color like lilac, dye lots matter a great deal, because a slightly different shade will show clearly across a large mesh panel. Buy all of your yarn from the same dye lot at once, plus about 10 percent extra. If you must change lots, do it at the start of a row and alternate two balls for a few rows to blend them.
Wash the bed cover by hand or on a gentle cold cycle inside a large mesh laundry bag. Lilac can fade or bleed a little at first, so wash it on its own and add a color catcher sheet to the first few washes. Use a mild detergent and no bleach. Do not hang the cover to dry, because the large wet panel is heavy and will stretch the mesh out of shape. Lay it flat on towels, smooth the mesh and shells and let it dry fully.
I hope this lilac filet heart bed cover fills your bedroom with love and light. It is a big piece, but most of it is calm, simple mesh, and the heart in the middle is a joyful reward at the end. Take your time with the long rows, count your meshes and enjoy the peaceful rhythm of filet crochet.
You do not have to think about the whole bed cover today. Start with the small heart and let it teach you the increases and the eyelet shells. Then begin your first row of mesh. One evening at a time, you will build a beautiful lace heart for your bed or for someone you love. Happy crocheting, my friend.
Crochet Abbreviations
You Ask, We Answer
What is the finished size of this bed cover?
The queen version finishes at about 95 by 97 inches with the frame and scalloped border. The background panel is 113 meshes wide and 130 rows long, which is about 85 by 87 inches, and the frame and border add about 5 inches on every side. The large heart measures about 31 inches wide and 25 inches tall before its eyelet shells, and about 34 by 28 inches with them. On a standard queen mattress, the cover lies across the top and drops about 17 inches on each side and at the foot, so the scallops reach toward the floor on most frames. If your bed is taller, add more meshes and rows to the panel. Measure your own bed, including the mattress and frame height, and plan from your blocked mesh size before you buy yarn.
Can I use a different yarn weight or make a different size?
Yes, this pattern works in many yarn weights because the stitches stay the same in every size. In DK cotton with a 3.5 mm hook, each mesh is about 0.6 inches wide, and in bulky yarn with a 6 mm hook it grows to about 1 inch. Only the number of meshes and rows changes. Make a swatch of 10 meshes by 10 rows in your chosen yarn, block it and measure it, then divide your bed size by the size of one mesh and one row. Adjust the heart so it stays in proportion, adding or removing increase rows. The section on switching things up lists panel sizes for twin, full, queen and king, plus a throw, a baby blanket and pillows. For the frame, keep each edge to a multiple of 4 stitches so the lace and scallops come out even.
How do I wash and care for this crochet bed cover?
Wash it by hand in cool water or on a gentle cold cycle inside a large mesh laundry bag to protect the filet mesh and the heart. Use a mild detergent and never use bleach, because it can fade the lilac unevenly and weaken the cotton. Wash it on its own the first few times and add a color catcher sheet in case the dye releases a little color. Do not wring or twist the cover. Gently press out the water, then lay it flat on clean towels on the floor, smooth the mesh into straight lines and lift the eyelet shells with your fingers. Let it dry completely, away from direct sunlight, which can fade lilac over time. Never hang it while wet, because the weight of the large panel will stretch the mesh. Between seasons, fold it loosely and store it in a breathable cotton bag.
Success!
Thanks for subscribing — check your inbox for a welcome note.
Abbreviations
- ch — chain
- sc — single crochet
- dc — double crochet
- dtr — double treble crochet
- V-st — (dc, ch 3, dc) in the same st or sp
- sl st — slip stitch
- beg — beginning
- sk — skip
- st(s) — stitch(es)
- lp(s) — loop(s)
- sp(s) — space(s)
- rep — repeat
- Rnd — round