
Yellow Fan Scale Bed Cover Crochet Pattern
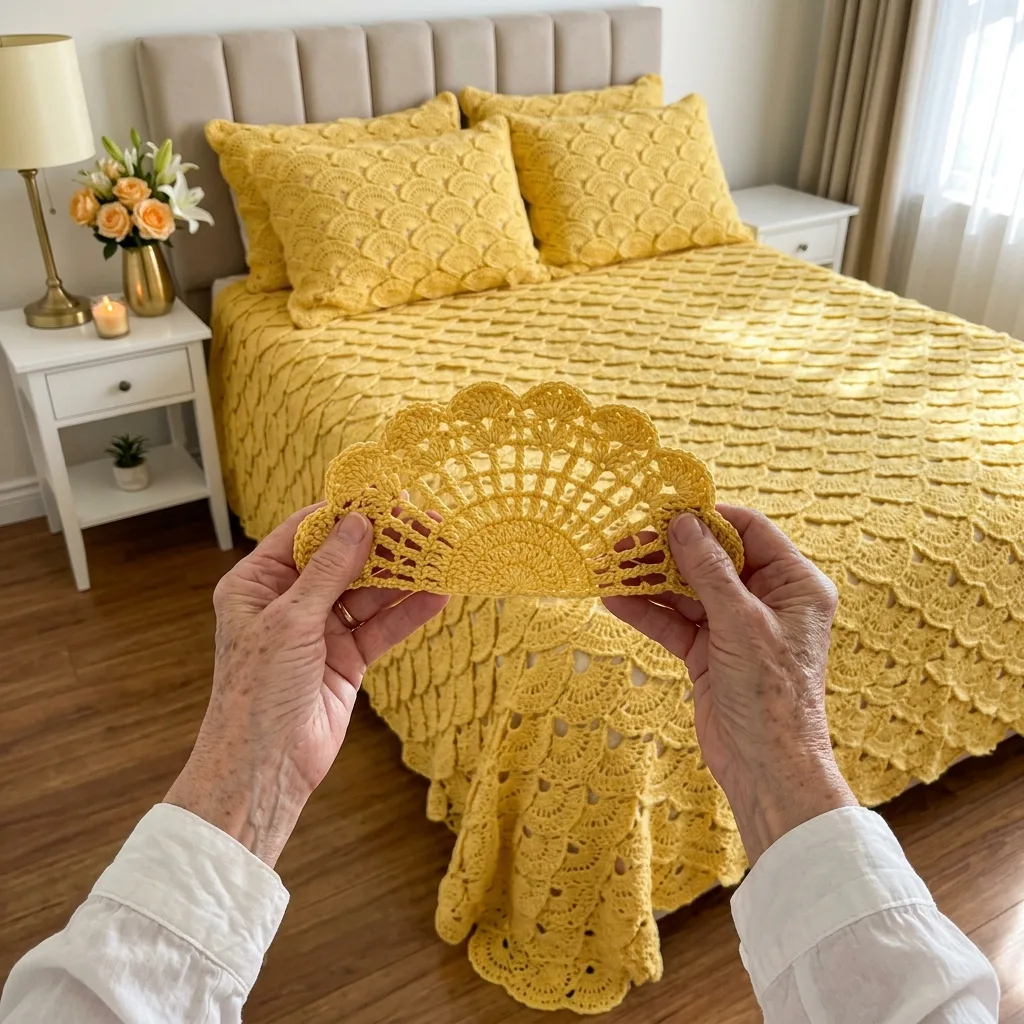
You need double crochet in turned rows, chain spokes, shells and neat sewing to overlap the fans.
Each fan takes about thirty-five minutes, so a few fans a day grow into a full bed cover over the seasons.
Every fan tucks under the two fans above it, so the cover looks like soft golden fish scales.
About This Yellow Fan Scale Bed Cover Crochet Pattern Pattern
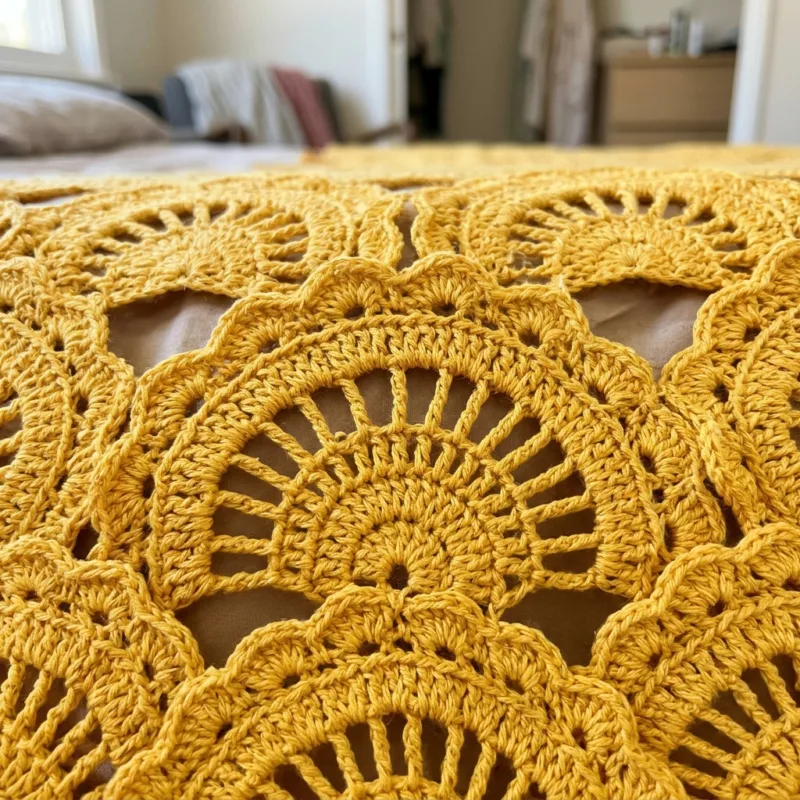
This yellow bed cover is made from hundreds of little lace fans, and together they look like warm golden fish scales spread across the bed. Each fan has a solid half-circle at its center, a ring of radiating spokes, a solid band and a scalloped edge of shells. The fans are arranged in offset rows, and each one tucks neatly under the scalloped edges of the two fans above it. All the scallops point toward the foot of the bed, so the cover seems to flow down the bed like water. At the sides and foot, the outer fans make a soft scalloped edge that hangs toward the floor.
Each fan is worked in turned rows from a small ring. You begin with a solid half-circle of double crochet, growing over three rows. Then you work two rows of spokes, double crochet with chain spaces between them, so the fan opens up like a little sunburst. A solid row of double crochet closes the spokes and gives the fan strength, and a row of chain loops prepares for the edge. In the last row, you work a shell of seven double crochet into each loop, which makes the pretty scalloped border and the round shapes you see in the photo.
The fans are joined in two ways. Side by side, each new fan links to the fan on its left at the tip of its first shell as you work the last row, so the row of fans holds together. Then each fan is tucked behind the two fans in the row above, with its straight top edge hidden under their scallops, and sewn in place. That overlap is what creates the beautiful scale look. It also hides the straight edges of every fan, so all you see is a sea of scallops, spokes and solid curves.
The finished bed cover measures about 95 by 105 inches. It uses 276 fans in 29 rows that alternate between 10 and 9 fans. Each fan is about 9.5 inches wide and 4.75 inches tall, and each new row adds about 3.5 inches in length because of the overlap. On a queen bed, the cover lies across the top and drops about 17 inches on each side and about 25 inches at the foot, with the fans reaching toward the floor. I used worsted weight matte cotton with a 4.5 mm hook, which gives crisp spokes and full, rounded shells.
The finished cover has a lovely weight and a soft, flowing drape. Because the fans overlap, the cover is denser than a single layer of lace, so it feels cozy and substantial, while the spokes and loops keep it light and pretty. Sunny yellow is a cheerful, warm color that fills a bedroom with light. It looks wonderful with white furniture, gold accents, peach flowers and warm wood floors. On a gray winter morning, this cover feels like a burst of sunshine, and in summer it looks fresh and bright.
This pattern suits an intermediate crocheter who is comfortable working in turned rows and counting chain spaces. Each fan is small and quick, and after a few you will be able to make them almost without looking. Sewing the overlaps takes a little patience, but it is calm work, and it is satisfying to watch the scales build row by row. Since you use only one color, there are very few ends to weave in. Every fan fits in a small bag, so you can make them anywhere and save the joining for quiet evenings at home.
Why You'll Love This Yellow Fan Scale Bed Cover Crochet Pattern Pattern
I love this bed cover because it is pure sunshine. Yellow is such a happy color, and when it covers a whole bed, the room glows. I made mine for my sunny guest room, and now every morning when the light comes through the window, the fans seem to shine. It reminds me of sunflowers, fresh lemons and warm summer afternoons. I cannot walk past that room without smiling, and every guest who sleeps there says it feels like waking up in the sun.
The fan motif is one of my favorite shapes to crochet. It starts as a tiny solid half circle, then opens up into spokes, then closes into a solid band and finishes with a frilly edge of shells. In just eight short rows, you have something that looks like a little lace sunrise. It is quick enough to finish in one sitting, and every fan feels like a small win. I kept my fans in a big basket, and watching the golden pile grow was half the fun.
I also love the scale effect. When I first started tucking the fans under each other and sewing them down, I was amazed at how the cover came alive. Single fans are pretty, but overlapping rows of them look like something from an old palace or a seaside shell collection. The scallops catch the light, and the shadows between the layers give the cover real depth. People always want to touch it to see how it was made.
- Quick, eight-row fans that you can finish in one sitting.
- One color only, with just two ends per fan.
- A beautiful overlapping scale effect.
- A sunny color that brightens any bedroom.
This project is also very portable. I carried a small pouch with a ball of yellow yarn and a hook, and I made fans in the car, at the doctor's office and while waiting for my grandchildren after school. Because each fan is so small, I could always finish one before I had to stop. Then at home in the evenings, I would sit with a cup of tea and sew a new row of fans onto the growing cover. It was a lovely rhythm for months.
Making this cover taught me a lot about consistency. I learned to keep every fan the same size so the rows line up neatly. I learned to pin each row before sewing so the overlap stays even across the bed. And I learned that a simple shape, repeated many times, can become something truly grand. If you want a cheerful, eye-catching bed cover that is made of small, easy pieces, I think this sunny fan cover will make you very happy.
Switch Things Up
The first and easiest change is the color. Sunny yellow is bright and cheerful, but these fans look beautiful in many shades. Soft peach or coral makes a warm, romantic cover. Sky blue or aqua turns the fans into ocean waves or fish scales, perfect for a beach house. Soft sage green looks calm and natural, and classic white or ivory gives an elegant heirloom look. You can also make an ombre cover, starting with a dark shade at the headboard and moving to lighter shades toward the foot, so the fans fade like a sunset.
You can make this bed cover for any bed size by changing the number of fans. Each fan is about 9.5 inches wide, and each new row adds about 3.5 inches in length. Here are the layouts I use:
- Twin: 27 rows alternating 8 and 7 fans, 202 fans, about 76 by 96 inches.
- Full: 27 rows alternating 9 and 8 fans, 229 fans, about 86 by 96 inches.
- Queen: 29 rows alternating 10 and 9 fans, 276 fans, about 95 by 105 inches.
- King: 29 rows alternating 12 and 11 fans, 334 fans, about 114 by 105 inches.
For a sofa throw, make 15 rows alternating 5 and 4 fans. That uses 68 fans and finishes at about 48 by 54 inches. A throw is a wonderful way to try the pattern before committing to a whole bed cover. It looks lovely draped over a sofa arm or folded at the end of a bed, and the scale effect is just as striking on a smaller piece. If you make a few fans most evenings, you can finish a throw in about a month and a half.
A baby blanket looks sweet in this pattern too. Make 11 rows alternating 4 and 3 fans for 40 fans and a blanket about 38 by 40 inches. Use a soft cotton or cotton blend in a gentle shade like pale yellow, mint or soft blue. The overlapping layers make it cozy for tummy time or a stroller ride, and the scalloped edges look beautiful in photos. A mermaid scale baby blanket in aqua is also a popular gift for little ones.
You can also change the direction of the fans. If you turn the fans so the scallops point toward the headboard, the cover looks like rising suns. You can also make the fans alternate direction row by row to create a wavy, ribbon-like pattern. For a lighter cover, skip the overlap and simply join the fans at their shell tips in rows, which uses fewer fans and gives a very open, airy lace. Lay a few rows on the floor to see which look you love most.
To make matching pillow covers, sew 5 rows alternating 3 and 2 fans onto a plain yellow crochet backing panel about 26 by 20 inches, which fits a standard pillow sham. You can make the backing in simple rows of double crochet. Join the front and back around three sides, slip in the pillow and close the last side. Use a yellow pillow insert so the lace shows a matching color. Matching pillows make the whole bed look planned and finished.
Finally, try a different yarn weight. In DK cotton with a 3.5 mm hook, each fan is about 7.5 inches wide, so a queen needs about 36 rows alternating 13 and 12 fans, and the lace looks finer and more delicate. In bulky yarn with a 6 mm hook, a fan grows to about 12 inches wide, and a queen needs only about 23 rows alternating 8 and 7 fans. Bulky fans make a thick, cozy cover that works up fast. Always make one test fan in your chosen yarn and measure it before planning your layout.
Materials Needed
— Main Fabric
— Tools Required
The Free Pattern
0% complete
— Lace Fan (Make 276, yellow) :
— Layout and Overlapping :
— Top Band (yellow) :
Assembly Instructions
- Make one Lace Fan, block it and check that it measures about 9.5 by 4.75 inches.
- Make the first row of 10 fans, joining each fan to the one on its left at shell 1 and shell 13 as you work Row 8.
- Make the second row of 9 fans the same way, then tuck it under the first row so each new fan sits centered under a join, with its straight edge at the level of the spokes above.
- Pin the row in place and sew along the straight edge of every new fan through the back of the fans above, keeping the stitches hidden.
- Continue making and overlapping rows, alternating 10 and 9 fans, until you have 29 rows.
- Work the Top Band along the straight edge of the first row at the headboard.
- Block the finished bed cover flat, smoothing every fan and pinning the outer scallops evenly, and let it dry completely.
Common Mistakes & How to Fix Them
The most common mistake is fans that cup or ruffle, so the scales do not lie flat. If your fan curls up like a little bowl, the spoke rows are too tight. If the scalloped edge ripples, there are too many stitches or the shells are too loose. This usually comes from tension changing in Rows 4 and 5, where the chain spaces are worked. Lay your first fan flat after Row 6 and check it. If it cups, chain a little more loosely in the spoke rows; if it ripples, work the shells more firmly. A flat fan makes a smooth, even scale pattern.
Another mistake is fans of different sizes, so the rows do not line up and the overlap becomes uneven. Even a quarter inch difference makes some fans hang lower than others and spoils the neat scale effect. This happens because 276 fans are made over many months, and tension naturally changes. Keep your first blocked fan as a guide and compare every few fans to it. Always use the same hook, and block fans in batches before joining. If a fan is clearly larger or smaller, set it aside for a pillow and make a new one.
Many makers overlap the fans by different amounts, so the rows drift and the scallops stop lining up. If one row tucks in an inch and the next tucks in two inches, the cover grows uneven, and the side scallops will not match. Measure and mark the overlap line before you sew. A simple trick is to place a stitch marker in the Row 5 spokes of the fans above at each join, then line up the straight edges of the new row exactly with those markers. Pin the whole row, check it from a distance and only then sew.
The last common mistake is sewing the overlap with stitches that show on the front. When you sew through all the layers, the yarn can peek out between the spokes and look messy, especially on a single bright color. Always sew from the back, working small running stitches through the solid back of the fans above and the straight edge of the fan below, without going through the spokes on the front. Use the same yellow yarn so any small stitch blends in. Turn the cover over now and then to check that the front looks clean.

You Might Also Like






Important Notes
Gauge matters because small differences add up across 276 fans. A blocked fan should measure about 9.5 inches across the straight edge and 4.75 inches tall. If yours is half an inch wider, the bed cover will grow by 5 inches across. Make one test fan and block it before you buy all of your yarn. Compare new fans to your first one every few weeks, because tension often changes during a long project made of many small pieces.
Blocking makes every fan flat and even, which keeps the scales neat. Block fans in batches before joining, pinning them on a mat at 9.5 by 4.75 inches and opening the spokes gently with your fingers. Mist with cool water and let them dry fully. After all the rows are joined and the top band is finished, lay the whole cover flat and smooth every fan and scallop once more while lightly damp.
The yarn amount is for the queen size in worsted weight cotton, so adjust it for other sizes or yarns. With one bright color like yellow, dye lots matter a great deal, because yellow can lean lemon or golden from one lot to the next. Buy all of your yarn from the same dye lot at once, plus about 10 percent extra. If you must use two lots, mix fans from both lots evenly across every row so any change blends in.
Wash the bed cover by hand or on a gentle cold cycle inside a large mesh laundry bag. Because of the overlapping layers, it holds a lot of water and becomes very heavy when wet, so support it well when lifting. Bright yellows can fade or release dye, so wash it on its own with a color catcher sheet and use a mild detergent with no bleach. Never hang it to dry. Lay it flat on towels, smooth the fans and let it dry completely.
I hope this yellow fan scale bed cover brings a little sunshine into your home every day. It is a big project, but each fan is a quick, cheerful piece that you can finish in one sitting. Take your time, keep your fans the same size and enjoy watching the golden scales build row by row across the bed.
You do not have to think about all 276 fans today. Just make a magic ring and finish one fan. Then make another and join them side by side. Before long, you will have a whole row of fans, then a whole bed covered in sunny lace. Happy crocheting, my friend.
Crochet Abbreviations
You Ask, We Answer
What is the finished size of this bed cover?
The queen version finishes at about 95 by 105 inches after blocking. It uses 276 fans in 29 rows that alternate between 10 and 9 fans. Each fan is about 9.5 inches wide and 4.75 inches tall, and because each row overlaps the row above, every new row adds about 3.5 inches in length. On a standard queen mattress, the cover lies across the top and drops about 17 inches on each side and about 25 inches at the foot, with the scalloped fans reaching toward the floor on most bed frames. If your bed is taller, add a fan to each row and two more rows. Measure your own bed, including the mattress and frame height, and plan from your blocked fan size before you buy yarn.
Can I use a different yarn weight or make a different size?
Yes, this pattern works in many yarn weights because the fan keeps the same stitch counts in every size. In DK cotton with a 3.5 mm hook, each fan is about 7.5 inches wide, and in bulky yarn with a 6 mm hook it grows to about 12 inches wide. Only the number of fans and rows changes. Make one test fan in your chosen yarn, block it and measure its width and height. Divide your bed width by the fan width to get the fans per long row. For the length, each row adds about three quarters of the fan height, so divide your length by that number. The section on switching things up lists layouts for twin, full, queen, king, a throw and a baby blanket. The top band always has 30 sc per fan, so it fits any width.
How do I wash and care for this crochet bed cover?
Wash it by hand in cool water or on a gentle cold cycle inside a large mesh laundry bag to protect the fans and the sewn overlaps. Use a mild detergent and never use bleach, because it can fade bright yellow unevenly and weaken the cotton. Wash it on its own and add a color catcher sheet to the first few washes, since bright dyes can release a little color. The overlapping layers hold a lot of water, so the wet cover is heavy; lift it carefully with both arms and support its whole weight. Gently press out the water, then lay it flat on clean towels on the floor and smooth every fan and scallop. Let it dry completely, away from direct sunlight, which can fade yellow. Never hang it while wet, because it will stretch.
Success!
Thanks for subscribing — check your inbox for a welcome note.
Abbreviations
- ch — chain
- sc — single crochet
- hdc — half double crochet
- dc — double crochet
- sl st — slip stitch
- MR — magic ring
- sk — skip
- st(s) — stitch(es)
- lp(s) — loop(s)
- sp(s) — space(s)
- rep — repeat