
Amanda's Creative Corner Crochet · Kitchen
Free Crochet Patterns Handmade with Love

Black and Red Christmas Granny Square Bed Cover Crochet Pattern
Jump to Pattern
Black and Red Christmas Granny Square Bed Cover Crochet Pattern
100-130 Hours 2 made this
Beginner Friendly

Only ch, dc and sc are used, plus one simple scalloped edge.

100-130 Hours

Each 8 inch square takes about one hour, so you can work in small sessions.

Cozy Holiday Look

Black squares with a tiny red or cream center give a moody, modern Christmas feel.

About This Black and Red Christmas Granny Square Bed Cover Crochet Pattern Pattern

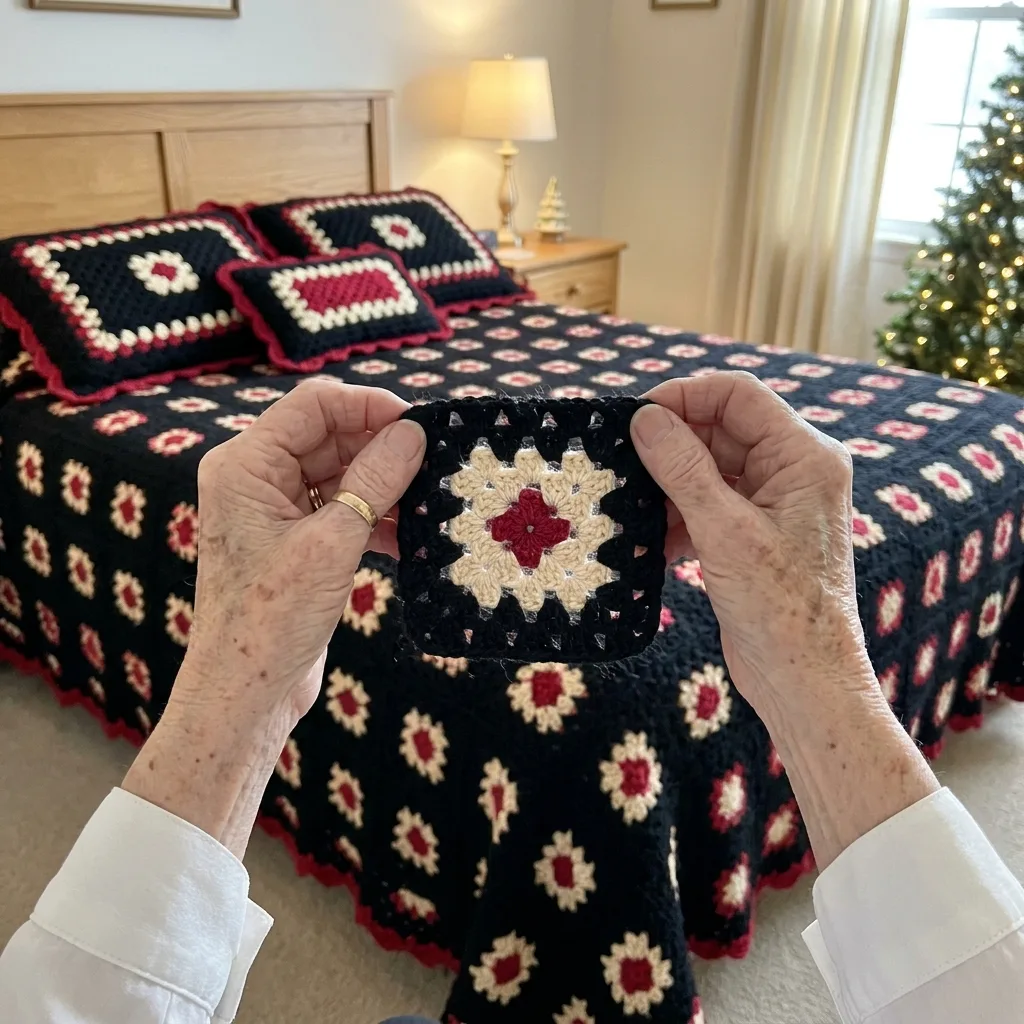
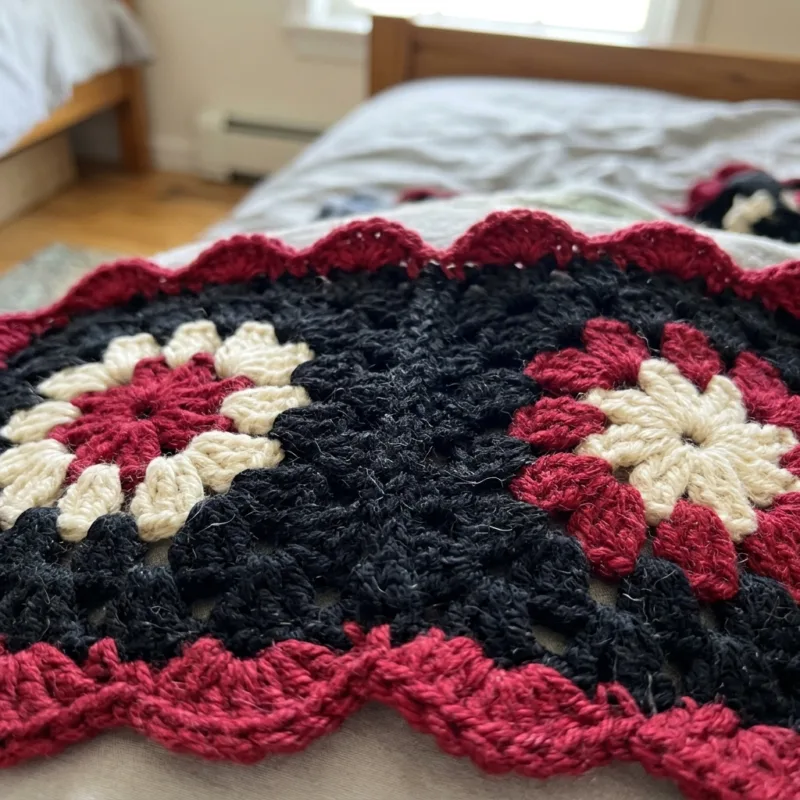
This bed cover is made from 99 granny squares worked in black, with a tiny cranberry red or ivory cream center in each one. The squares sit in a checkerboard, 9 across and 11 down, and are joined with black yarn so the seams almost disappear. A scalloped red edge finishes the cover.

The finished size is about 76 by 92 inches. That suits a full-size bed with a deep drop, or a queen bed with a shorter drop. You only need ch, dc and sc, so it is a good big project once you can crochet a basic granny square.
Black and Red Christmas Granny Square Bed Cover Crochet Pattern step detail

Why You'll Love This Black and Red Christmas Granny Square Bed Cover Crochet Pattern Pattern

I love this one because every square is small and portable. I crochet a few at the kitchen table, a few in the car, and slowly a bed cover appears.

The black makes the red and cream centers glow, and the red scallops make it feel like Christmas without shouting. It is a lovely gift for someone who likes a darker, cozy look.

Switch Things Up

Swap the cranberry red for forest green, or work all the centers in cream for a calmer look. For a throw, make 6 columns by 7 rows (42 squares) for about 52 by 60 inches with the border. Join four squares for a matching pillow cover about 16 inches wide. Try cream scallops instead of red for a soft frosted edge.


Materials Needed

— Main Fabric

01 Worsted weight cotton yarn (weight 4), black: about 5,500 yards for the squares, the joins and Border Rounds 1 and 2
02 Worsted weight cotton yarn, cranberry red: about 750 yards for the square centers and the scalloped edge
03 Worsted weight cotton yarn, ivory cream: about 500 yards for the square centers
04 Buy about 10 percent extra of each color, and buy all the black from the same dye lot

— Tools Required

05 5.0 mm (H-8) crochet hook
06 Yarn needle
07 Stitch markers (at least 8)
08 Scissors
09 Blocking mats and rustproof pins
10 Measuring tape

The Free Pattern

Beginner 100-130 Hours

0% complete

— Granny Square A (Make 50, red center and cream ring) :

Colors: Rounds 1 and 2 in cranberry red, Round 3 in ivory cream, Rounds 4 to 8 in black. Each finished square measures about 8 inches. Each ch 3 at the start of a round counts as the first dc.
Round 1 (red): Make a magic ring (or ch 4 and join with a sl st to form a ring). Ch 3, 2 dc in the ring, ch 2, *3 dc in the ring, ch 2; rep from * 2 more times. Join with a sl st to the top of the beginning ch 3. [12 dc, 4 ch-2 corner sp]
Round 2 (red): Sl st across the next 2 dc and into the first ch-2 sp. Ch 3, (2 dc, ch 2, 3 dc) in the same sp, ch 1. *(3 dc, ch 2, 3 dc) in next ch-2 sp, ch 1; rep from * 2 more times. Join with a sl st to the top of the beginning ch 3. Fasten off. [24 dc, 4 ch-1 sp, 4 ch-2 corner sp]
Round 3 (cream): Join cream in any ch-2 corner sp. Ch 3, (2 dc, ch 2, 3 dc) in the same sp. *Ch 1, 3 dc in next ch-1 sp, ch 1, (3 dc, ch 2, 3 dc) in next ch-2 sp; rep from * 2 more times. Ch 1, 3 dc in the last ch-1 sp, ch 1. Join with a sl st to the top of the beginning ch 3. Fasten off. [36 dc, 8 ch-1 sp, 4 ch-2 corner sp]
Round 4 (black): Join black in any ch-2 corner sp. Ch 3, (2 dc, ch 2, 3 dc) in the same sp. *[Ch 1, 3 dc in next ch-1 sp] 2 times, ch 1, (3 dc, ch 2, 3 dc) in next ch-2 sp; rep from * 2 more times. [Ch 1, 3 dc in next ch-1 sp] 2 times, ch 1. Join with a sl st to the top of the beginning ch 3. Do not fasten off. [48 dc, 12 ch-1 sp, 4 ch-2 corner sp]
Round 5 (black): Sl st across the next 2 dc and into the next ch-2 sp. Ch 3, (2 dc, ch 2, 3 dc) in the same sp. *[Ch 1, 3 dc in next ch-1 sp] 3 times, ch 1, (3 dc, ch 2, 3 dc) in next ch-2 sp; rep from * 2 more times. [Ch 1, 3 dc in next ch-1 sp] 3 times, ch 1. Join with a sl st to the top of the beginning ch 3. [60 dc, 16 ch-1 sp, 4 ch-2 corner sp]
Round 6 (black): Sl st across the next 2 dc and into the next ch-2 sp. Ch 3, (2 dc, ch 2, 3 dc) in the same sp. *[Ch 1, 3 dc in next ch-1 sp] 4 times, ch 1, (3 dc, ch 2, 3 dc) in next ch-2 sp; rep from * 2 more times. [Ch 1, 3 dc in next ch-1 sp] 4 times, ch 1. Join with a sl st to the top of the beginning ch 3. [72 dc, 20 ch-1 sp, 4 ch-2 corner sp]
Round 7 (black): Sl st across the next 2 dc and into the next ch-2 sp. Ch 3, (2 dc, ch 2, 3 dc) in the same sp. *[Ch 1, 3 dc in next ch-1 sp] 5 times, ch 1, (3 dc, ch 2, 3 dc) in next ch-2 sp; rep from * 2 more times. [Ch 1, 3 dc in next ch-1 sp] 5 times, ch 1. Join with a sl st to the top of the beginning ch 3. [84 dc, 24 ch-1 sp, 4 ch-2 corner sp]
Round 8 (black): Sl st across the next 2 dc and into the next ch-2 sp. Ch 3, (2 dc, ch 2, 3 dc) in the same sp. *[Ch 1, 3 dc in next ch-1 sp] 6 times, ch 1, (3 dc, ch 2, 3 dc) in next ch-2 sp; rep from * 2 more times. [Ch 1, 3 dc in next ch-1 sp] 6 times, ch 1. Join with a sl st to the top of the beginning ch 3. Fasten off and weave in ends. [96 dc, 28 ch-1 sp, 4 ch-2 corner sp, 24 dc on each side]

— Granny Square B (Make 49, cream center and red ring) :

Work exactly like Square A with the two center colors swapped. Rounds 1 and 2 in ivory cream, Round 3 in cranberry red, Rounds 4 to 8 in black.
Rounds 1 to 3: Work as Square A, Rounds 1 to 3, using cream for Rounds 1 and 2 and red for Round 3. [36 dc, 8 ch-1 sp, 4 ch-2 corner sp]
Rounds 4 to 8: Work as Square A, Rounds 4 to 8, in black. Fasten off and weave in ends. [96 dc, 28 ch-1 sp, 4 ch-2 corner sp, 24 dc on each side]

— Layout (9 columns by 11 rows, 99 squares) :

Lay the squares out in 11 rows of 9 squares in a checkerboard. Rows 1, 3, 5, 7, 9 and 11 start with Square A (5 A and 4 B in each row). Rows 2, 4, 6, 8 and 10 start with Square B (5 B and 4 A in each row).
Total: 6 rows x 5 A + 5 rows x 4 A = 50 Square A, and 6 rows x 4 B + 5 rows x 5 B = 49 Square B. The assembled cover measures about 72 by 88 inches before the border.

— Border (Black Rounds 1 and 2, Red Scallops Round 3) :

The border is worked around the assembled cover with the right side facing. Each square side has 24 dc and 7 ch-1 sp, which gives 31 sc per square side.
Round 1 (black): Join black in any outer corner ch-2 sp. Ch 1, 3 sc in the same sp. *Work 1 sc in each dc and each ch-1 sp across the square (31 sc). At each join between squares, work 1 sc in the corner sp of the first square and 1 sc in the corner sp of the next square (2 sc). Continue across the side. Work 3 sc in each outer corner sp.* Join with a sl st to the first sc. [295 sc along each short side (9 x 31 + 8 x 2), 361 sc along each long side (11 x 31 + 10 x 2), plus 12 corner sc = 1,324 sc]
Round 2 (black): Ch 1, sc in each sc around, working 3 sc in the center sc of each 3-sc corner group. Join with a sl st to the first sc. Place a marker in the center sc of each corner. [1,332 sc: 300 sts between corner centers on each short side, 366 on each long side]
Round 3 (red): Join red in the center sc of any corner. Ch 3, 4 dc in the same st (first shell made, 5 dc). *Sk 2 sts, sl st in next st, sk 2 sts, 5 dc in next st; rep from * around, so a shell lands in the center of every corner. Join with a sl st to the top of the beginning ch 3. Fasten off and weave in ends. [222 shells = 1,110 dc and 222 sl st: 49 shells between corner shells on each short side, 60 between corner shells on each long side, plus 4 corner shells]

Assembly Instructions

  1. Wet or steam block every Square A and Square B to 8 inches, pinning each one square on a blocking mat and letting it dry fully.
  2. Lay out all 99 squares on the floor in 11 rows of 9, following the checkerboard in the Layout section, with Square A in the top left corner.
  3. Using black yarn and a yarn needle, whip stitch the squares together row by row, working through the back loops of both squares from corner sp to corner sp. Sew loosely so the seam stays soft.
  4. Join the 11 rows to each other in the same way. Where four corners meet, stitch once around the center crossing so there is no gap.
  5. Weave in all the ends, then work Border Round 1 and Round 2 in black, marking the center sc of each corner after Round 2.
  6. Work the red scallops in Border Round 3, starting in a marked corner so a shell sits in the center of every corner.
  7. Give the whole cover a final light steam block, laying it flat and keeping the iron above the stitches, and let it dry completely before use.

Common Mistakes & How to Fix Them

Losing count of the side clusters in later rounds. Each round adds one more 3 dc cluster per side, so mark the corners and check the stitch count at the end of every round.

Making squares in different sizes. Black yarn hides the stitches, so work in daylight and measure each square after blocking. All 99 must measure about 8 inches or the rows will not line up.

Sewing the seams too tight. Use a loose whip stitch so the cover stays flexible and does not pucker.

Starting the scallops off center. Mark the center sc of each corner in Border Round 2 and begin Round 3 there so each corner has a shell.


Denise

Denise is a crochet designer who loves turning simple stitches into cozy pieces for the home.


Important Notes

Gauge: one finished square should measure about 8 inches across after blocking with a 5.0 mm hook and worsted cotton. If yours is smaller, go up a hook size.

Yarn amounts are estimates for the stated size. Buy extra, and buy all the black from the same dye lot so the color matches across 99 squares.

Block the squares before joining. It makes the seams much easier and the finished cover lies flatter.

Wash on a gentle cycle in cold water with a color catcher, because the black, red and cream yarns are used together. Wash one test square first.


Thank you for stitching along with me. I hope this cover keeps you warm all winter long. Please share your color choices with me, I love seeing them.

Crochet Abbreviations

01 ch — chain
02 sl st — slip stitch
03 sc — single crochet
04 dc — double crochet
05 sp — space
06 sk — skip
07 st(s) — stitch(es)
08 rep — repeat

You Ask, We Answer

What is the finished size?

About 76 by 92 inches including the border. Each square measures about 8 inches, and the cover is 9 squares wide and 11 squares long.

Can I use a different yarn weight or make it smaller?

Yes. Any yarn works if you make one square and measure it. If it is smaller than 8 inches, go up a hook size. For a throw, make 6 columns by 7 rows (42 squares).

How do I wash and care for it?

Wash on a gentle cycle in cold water with a color catcher, then dry flat or on low heat. Wash a test square first, because dark yarn can bleed onto cream.





