
Blue and Gold Compass Motif Bed Cover Crochet Pattern

A gold center, four wedges in rows, corded arches between them and a gold lace round you join as you go.
Only 63 motifs for a queen, each built from small, quick pieces.
Royal blue cords curve between the wedges like ripples on water around a golden compass.
About This Blue and Gold Compass Motif Bed Cover Crochet Pattern Pattern
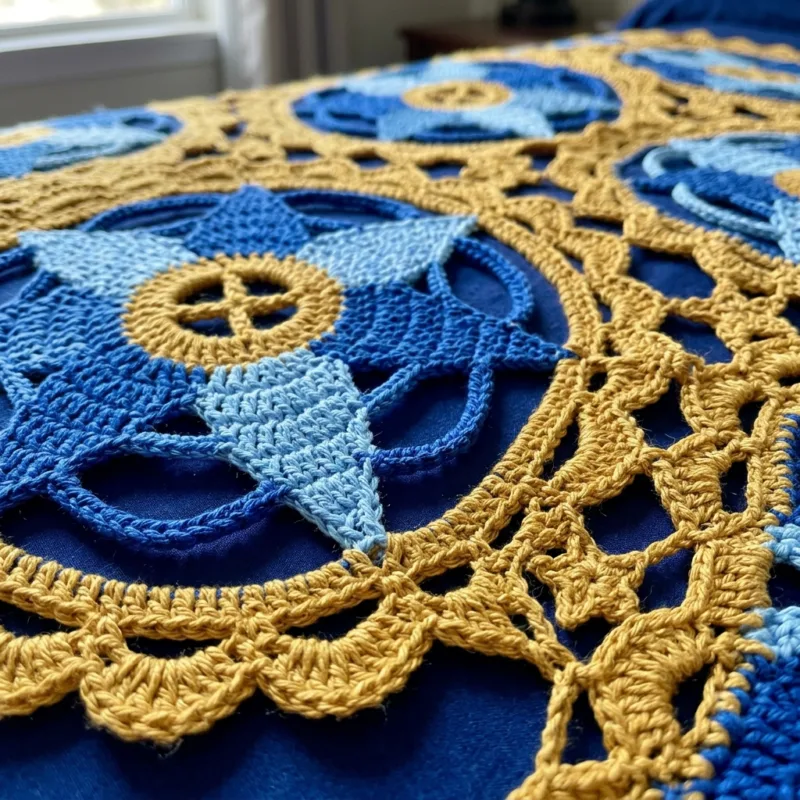
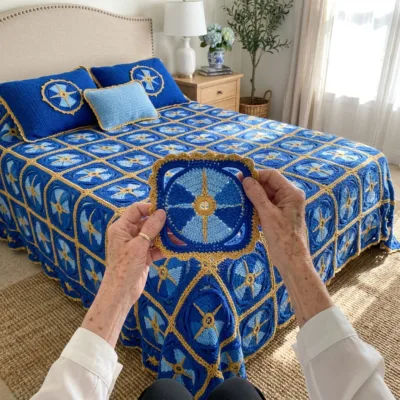
This bed cover looks like a map of the summer sea. Each motif has a small gold ring and cross in the center, like the heart of a compass, with four wedges pointing out to the four sides: sky blue at the top and bottom, royal blue at the left and right. Between the wedges, curved royal blue cords fill the corners in rings, like ripples spreading on water. A royal blue round frames it all, and a gold lace edge of little scallops finishes each motif. On the bed, the motifs join into rows with small gold stars in the gaps, and gold lace loops hang along the outer edge.
The motif is built in a few simple stages, which makes it a pleasure to work. First comes the gold center, three rounds that form a ring and four short arms. Then each arm grows into a wedge, worked in rows of double crochet that widen by two stitches every row. The top and bottom wedges are sky blue, worked in the back loops for a soft ridged texture, and the side wedges are royal blue, worked through both loops so they look smooth and rich. Each wedge is five rows and ends 15 stitches wide.
The corded arches are the clever part. In each corner, you join royal blue at the end of the first row of one wedge, chain across the gap to the matching row of the next wedge, then turn and work single crochet back over the chain. That makes a firm little cord, like a curved bar. You climb up one row and make a longer cord, and so on, five cords in each corner, each one longer than the last. The result is a fan of curved bars with open spaces between them that let the light shine through.
Once the arches are in, a round of royal blue single crochet goes all the way around, with exactly 30 stitches in each quarter of the motif. A gold round of chain loops follows, and then a gold round of small scallops with a picot at the top of each one. This last round is where you join each new motif to its neighbors, through the picots of two scallops on each shared side. Each finished motif is about 10.5 inches across.
The queen size uses 63 motifs in 7 columns and 9 rows and 48 little gold stars, one in every gap where four motifs meet. Two gold edge rounds of chain loops and picots run around the outside, giving the cover a soft, lacy finish. The finished cover measures about 75 by 96 inches. Because each motif is fairly large, there are fewer pieces to make than in many motif covers, and the project moves along nicely.
The stitches are chain, slip stitch, single crochet, half double crochet and double crochet. What makes this pattern intermediate is working the corded arches between the wedges and keeping track of the joining round. Every step is simple on its own, and I give the stitch counts for every wedge row, every arch and every round, so you can always check your work.
The finished cover is bright, fresh and full of rhythm. The solid wedges, the open arches and the gold lace give it three different textures, and the three colors make it cheerful without being loud. Blue and gold look wonderful with white walls, natural wood, blue and white pottery and green plants. This cover suits a coastal bedroom, a sunny guest room or any space that needs a breath of summer all year round.
Why You'll Love This Blue and Gold Compass Motif Bed Cover Crochet Pattern Pattern
I love how this motif comes together like a little puzzle. First the gold center, then four wedges, then the arches, then the edge. Each stage takes only a short time, and each one changes the motif completely. It never feels repetitive, even after dozens of motifs, because there is always a new stage just around the corner. I often make a batch of centers one evening and a batch of wedges the next, and then enjoy a quiet afternoon working all the arches.
The corded arches are my favorite part. The first time I chained across the gap and worked back over the chain, I was amazed at how firm and neat the cord looked. Then the next cord, a little longer, curved just above it, and suddenly I had a fan of ripples. It is such a simple technique, and yet it looks so special. Friends who crochet always ask me how the arches are made, and they are always surprised by how easy it is.
The colors make me happy every day. Royal blue is deep and confident, sky blue is light and airy, and gold adds a touch of sunshine. Together they remind me of a summer afternoon at the seaside, with the sky above, the sea below and the sun sparkling on the water. On our guest bed, with a blue and white vase of hydrangeas on the nightstand, the cover makes the room feel fresh and welcoming all year long.
Here are the habits that made this project smooth for me:
- Make all the gold centers first, then all the wedges, then all the arches.
- Keep sky blue and royal blue wedges in separate bags so you never mix them up.
- Count the stitches of every wedge row: 7, 9, 11, 13 and then 15.
- Lay every finished motif with the sky blue wedges at the top before joining.
I love the gold lace edge on each motif too. After the strong blues, the gold scallops feel light and delicate, like a frame of sunlight. Joining the motifs through the picots is so satisfying, because each little loop catches its neighbor and the cover grows into one piece without any sewing. When the gold stars go into the gaps, the whole cover suddenly sparkles.
I also love how practical this cover is for such a pretty piece. The wedges are solid and sturdy, the joins are strong, and cotton washes beautifully. It is the kind of cover you can use every day, on a guest bed, on a child's bed or folded on a sofa in winter. It holds its shape and its color, and it looks just as lovely after many washes as on the first day.
Finally, I love what the compass means. It is a symbol of finding your way and coming home, and I think that is a lovely thing to have on a bed. I made my first one for a niece who was moving to a new city, and she says it makes her new bedroom feel like home. If you make it, I hope it brings that same feeling of warmth and belonging to your home.
Switch Things Up
Choose a new color trio. The three-part motif looks wonderful in many palettes. Emerald, mint and cream feel fresh and green, burgundy, dusty rose and gold look warm and rich, and navy, gray and white are calm and modern. For a sunny look, try orange, yellow and white. Keep the center and lace edge in the lightest or brightest color, the arches and side wedges in the deepest one and the top and bottom wedges in the middle shade.
Make it for any bed. Each motif is about 10.5 inches across, so new sizes are easy to plan. Add or remove columns for the width and rows for the length. The number of stars is always one less than the columns times one less than the rows. These sizes are before the edge rounds:
- Twin: 5 by 9 motifs, 45 motifs and 32 stars, about 53 by 95 inches
- Full: 6 by 9 motifs, 54 motifs and 40 stars, about 63 by 95 inches
- Queen: 7 by 9 motifs, 63 motifs and 48 stars, about 74 by 95 inches
- King: 9 by 9 motifs, 81 motifs and 64 stars, about 95 by 95 inches
The edge rounds follow the free scallops of the outer motifs, so they work for any size.
Make a sofa throw. Four columns by five rows, 20 motifs and 12 stars, makes a throw of about 43 by 53 inches. It uses about a third of the yarn and is a lovely way to try the corded arches before a full bed. It brightens a sofa or a reading chair beautifully, and in blue and gold it makes a cheerful gift for someone who loves the sea.
Make a baby blanket. Three by four motifs, 12 in all with 6 stars, gives a blanket of about 32 by 43 inches. For a baby, choose soft pastels, such as mint, pale blue and butter yellow, and use a soft, washable cotton blend. The corded arches leave open spaces, so add a second gold round of single crochet around each arch area if you want a closed fabric, and weave in every end securely.
Add matching pillows. One motif sewn to the center of a royal blue pillow cover makes a lovely sham like the ones in my photos. Four motifs joined 2 by 2 with one gold star in the middle make a bigger cushion of about 21 inches. For a small accent pillow, work a sky blue square in rows of half double crochet and finish it with the gold lace edge of the motifs.
Rearrange the colors. You can play with where each color goes. Make all four wedges sky blue for a lighter, airier cover, or alternate motifs with sky blue top wedges and motifs with royal blue top wedges for a checkerboard effect. You can also turn every other motif a quarter turn, so the sky blue wedges point sideways, which creates a lovely woven pattern across the bed. Lay out a few motifs before you decide.
Change the edge. The gold lace loops are delicate and pretty. For a bolder finish, work a round of gold shells into each edge loop instead of single crochet and picots. For a cleaner look, work two rounds of royal blue single crochet around the outer scallops instead. You could also add small gold lace points to the outer motifs along the foot of the bed, as I sometimes do for a more dramatic drape.
Change the yarn weight. In DK cotton with a 4 mm hook, each motif comes out about 8.5 inches, and a queen needs about 9 by 11 motifs. In bulky yarn with a 6.5 mm hook, the motifs grow to about 13.5 inches, so a queen needs only 5 by 7 motifs. Always make one complete motif first, block it and measure it before you plan the layout and buy yarn.
Materials Needed
— Main Fabric
— Tools Required
The Free Pattern
0% complete
— Gold Center (Make 63, gold) :
— Wedges (Make 4 per motif: 126 sky blue and 126 royal blue) :
— Corded Arches (4 per motif, royal blue) :
— Edge Rounds (Make 63, royal blue and gold) :
— Layout :
— Gold Star (Make 48, gold) :
— Edge :
Assembly Instructions
- Make one complete motif, block it and check that it measures about 10.5 inches across with 120 sc in Rnd 1 of the edge.
- Make the gold centers, then work two sky blue wedges and two royal blue wedges on each center.
- Work five royal blue corded arches in each corner of every motif.
- Work the royal blue and gold edge rounds on each motif, joining each new motif during Rnd 3 to the motif on its left and the motif above it, until you have 9 rows of 7 motifs.
- Work a gold star in each of the 48 gaps where four motifs meet.
- Work the two gold edge rounds around the outside of the cover, weave in all ends and block the cover flat, opening the arches and the gold lace.
Common Mistakes & How to Fix Them
Wedges with uneven rows. Each wedge must gain exactly 2 stitches in every row, ending with 15 dc. If you forget to work 2 dc in the turning chain at the end of a row, the wedge leans to one side and its row ends no longer match the wedge beside it. Then the arches in that corner come out crooked. Count every row: 7, 9, 11, 13 and 15. Place a stitch marker in the top of each turning chain so you always know where the last stitch goes, which is where most missed increases happen.
Arches attached to the wrong row. Each arch must connect matching rows of the two wedges, Row 1 to Row 1, Row 2 to Row 2 and so on. If you skip a row end or attach to a different row on one side, the arch tilts and the curves in that corner no longer look like even ripples. Before you start each arch, find the row ends with your fingertip and count up from the gold center. If an arch looks tilted, pull it out and redo it. Arches are quick to rework, so it is always worth fixing them.
Tight chains in the arches. The arch chains are worked loosely so the cords curve gently outward. If the chains are tight, the cords pull the wedges together, the corners cup and the motif will not lie flat, which also changes the count of Rnd 1 of the edge. Work the chains at a relaxed tension, about the same height as a single crochet, and keep the single crochet worked back over them relaxed too. Lay the motif flat after the arches: the corners should be smooth and rounded, not puckered.
Joining motifs in the wrong orientation. Every motif must sit with the sky blue wedges at the top and bottom. If one motif is turned, its sky blue wedges point sideways, its joining scallops will not match its neighbors and the pattern of colors breaks across the bed. Because the scallop map depends on where you start Rnd 1, always start it at the arch to the right of a sky blue wedge. Then Side A will always sit over the sky blue top wedge, and every motif will join the same way.

You Might Also Like






Important Notes
Gauge matters because 63 motifs must fit together. With a 5 mm hook, the gold center should measure about 3 inches across, each wedge about 4.3 inches across its last row and the finished motif about 10.5 inches. Measure your first three motifs and then one in every ten. If your motif is a little smaller or larger, that is fine, as long as every motif matches and Rnd 1 of the edge has 120 sc.
Block each motif lightly before joining, and block the whole cover again at the end. Pin each motif into a round shape, open the corded arches so the spaces between them are even, and spray it with water until damp. Let it dry completely. Blocking makes the arches curve smoothly and the gold scallops lie flat, so the joins line up neatly. After the edge rounds, pin out every gold loop and picot so the edge hangs evenly.
The yarn amounts in the materials list are estimates for the queen size, including the stars and the edge rounds. Buy all three colors at once, from the same dye lots, and keep the labels. Royal blue and sky blue in particular can vary between lots, and on a cover with 126 wedges of each, a slight change would show clearly. Buy one extra skein of each color for safety and for future repairs.
Wash the finished cover on a gentle cold cycle in a large mesh bag or a zipped duvet cover, with mild detergent. Royal blue sits next to gold and sky blue in every motif, so always add a color catcher, and for the first wash you can soak the cover in cold water with a splash of vinegar. Never wring or twist it. Press out the water, lay it flat, reshape the motifs and arches, and let it dry fully.
Thank you for making this blue and gold compass bed cover with me. I hope you enjoy every stage: the little gold center, the wedges that grow row by row, the corded arches that ripple across the corners and the gold lace that brings it all together. It is a cover full of sunshine and sea air, and every motif brings a little more of it into your home.
So find your royal blue, sky blue and gold yarn, make your first center today and grow its four wedges. Add the arches and the lace, and lay your first compass on your bed to admire. Then make the next one, and soon you will have a bright, joyful cover to enjoy for many years.
Crochet Abbreviations
You Ask, We Answer
How big is the finished bed cover, and how many motifs do I need?
Following the pattern exactly, each motif measures about 10.5 inches across. The queen size uses 63 motifs in 7 columns and 9 rows, plus 48 gold stars, and finishes at about 74 by 95 inches before the edge and about 75 by 96 inches with it. On a standard queen mattress of 60 by 80 inches, that gives a drop of about 7 inches on each side and a long drape at the foot. For a deeper drop, add one column, which also adds 8 more stars. To plan your own size, measure the mattress width plus twice the drop you want, and the mattress length plus one drop, divide each by 10.5 and round up. The stars are always one less than the columns times one less than the rows, and the edge rounds work for any size because they follow the free scallops of the outer motifs.
Why are the wedges worked in rows instead of rounds?
Working each wedge in rows lets you give the top and bottom wedges one color and the side wedges another, without carrying yarn across the corners or changing colors in the middle of a round. It also creates the row ends that the corded arches attach to, which is what makes the curved ripples possible. Each wedge is only five short rows, so it works up in about ten minutes, and you can make them in batches by color. For the yarn, worsted cotton gives crisp wedges and firm arches and washes well. A cotton and acrylic blend is softer and lighter, and a smooth acrylic is fine for easy care. DK yarn with a 4 mm hook gives motifs of about 8.5 inches, and bulky yarn with a 6.5 mm hook gives motifs of about 13.5 inches. Make one motif first and measure it before planning.
How do I care for and store the bed cover so it lasts?
Wash it only when it really needs it, on a gentle cold cycle in a large mesh bag or zipped duvet cover, with mild detergent, and always use a color catcher, because royal blue sits next to gold and sky blue in every motif. Dry it flat, reshaping the motifs and smoothing the arches while it is damp. Avoid a hot dryer, which can shrink cotton and pull the arches out of shape. Between washes, shake the cover out and air it near an open window, away from strong direct sun, which can fade the blues and gold over time. To store it, fold it loosely with tissue paper between the layers and keep it in a cotton bag rather than plastic, so the yarn can breathe. Refold it along different lines every few months, and check the stars and joins once a year.
Success!
Thanks for subscribing — check your inbox for a welcome note.
Abbreviations
- ch — chain
- sl st — slip stitch
- sc — single crochet
- hdc — half double crochet
- dc — double crochet
- picot — ch 3, sl st in 3rd ch from hook
- BLO — back loop only
- st(s) — stitch(es)
- sp(s) — space(s)
- rep — repeat
- Rnd — round
- RS — right side