
Blush Rose Puff Flower Lattice Bedspread Crochet Pattern
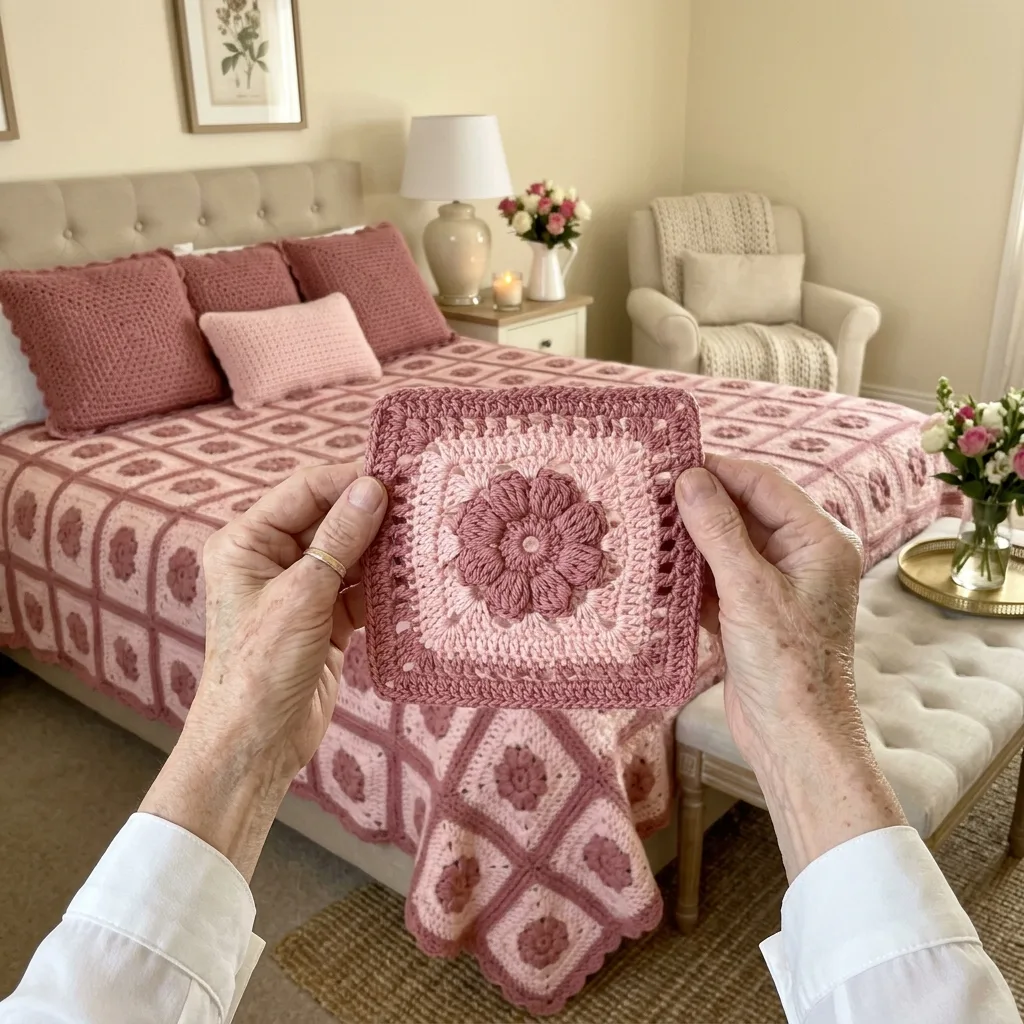
You only need basic stitches plus an easy puff stitch, worked in the round with careful counting.
Each square takes about an hour, plus the joining and the scalloped border at the end.
Open chain lattices meet at every join and make little crosses across the whole bed.
About This Blush Rose Puff Flower Lattice Bedspread Crochet Pattern Pattern
This is a queen size bedspread made from one hundred matching squares in two soft shades of pink: a pale blush and a deeper dusty rose. Every square starts with a small ring of dusty rose double crochet, then a round of chunky puff stitches that sit up like the petals of a little rose. Around that flower, blush pink double crochet fans open out like rays, and then the circle turns into a square. A band of dusty rose frames the middle, and the last rounds add an open chain lattice in the center of each side. When the squares are joined, those lattices meet and form little crosses all over the bed, which is my favorite part of the whole design.
The finished bedspread measures about 103 by 103 inches (262 by 262 cm) with the border. It is a 10 by 10 grid of 10 inch squares, finished with a scalloped shell edge. On a queen mattress that gives you a generous drop on both sides and at the foot, so the cover reaches close to the floor and hides the whole bed. Every square is the same, so once you have made one, you know the whole pattern. There is no color chart to follow and no tricky placement to track. You simply make one hundred squares, lay them out in rows, and join them.
The stitches are all ones most crocheters already know: chain, slip stitch, single crochet, double crochet and the puff stitch. The puff stitch is the only one that may be new to you, and it is just three loops pulled up in the same stitch and closed together. It takes two or three tries to get the puffs even, and after a few squares your hands will do it without thinking. The square is worked in the round from the center out, joining each round with a slip stitch, so there is no turning. Color changes happen only a few times per square, which keeps the ends to weave in down to a manageable number.
The squares are joined with a flat lattice join that I worked out to match the open sections on each side. On the solid parts you zigzag slip stitches between the two squares, and on the lattice parts you chain across from loop to loop. The join stays flat, it does not make a ridge, and it carries the open crosses right across the bedspread. After all the squares are joined, two rounds of single crochet give the edge a firm base. Then a round of shells makes the soft scalloped border you see hanging toward the floor.
In worsted weight cotton, the finished piece has real weight and a lovely drape. It feels cool in summer and cozy layered over a blanket in winter. The puff flowers give it a gentle texture under your hand, and the lattice keeps it from feeling stiff or heavy. The two pinks read as calm and warm, not sugary, and they go with beige, cream, gold and soft wood tones. It is the kind of bedspread that makes a bedroom feel finished.
I rate this pattern as intermediate. You need to be comfortable working in the round, counting stitches on every round, and keeping your tension even over a long project. It suits someone with patience who enjoys repetition and likes having a portable project in a bag. It is not a weekend make, but it is not hard either. If you can make one neat square, you can make this whole bedspread, and I will walk you through every round.
Why You'll Love This Blush Rose Puff Flower Lattice Bedspread Crochet Pattern Pattern
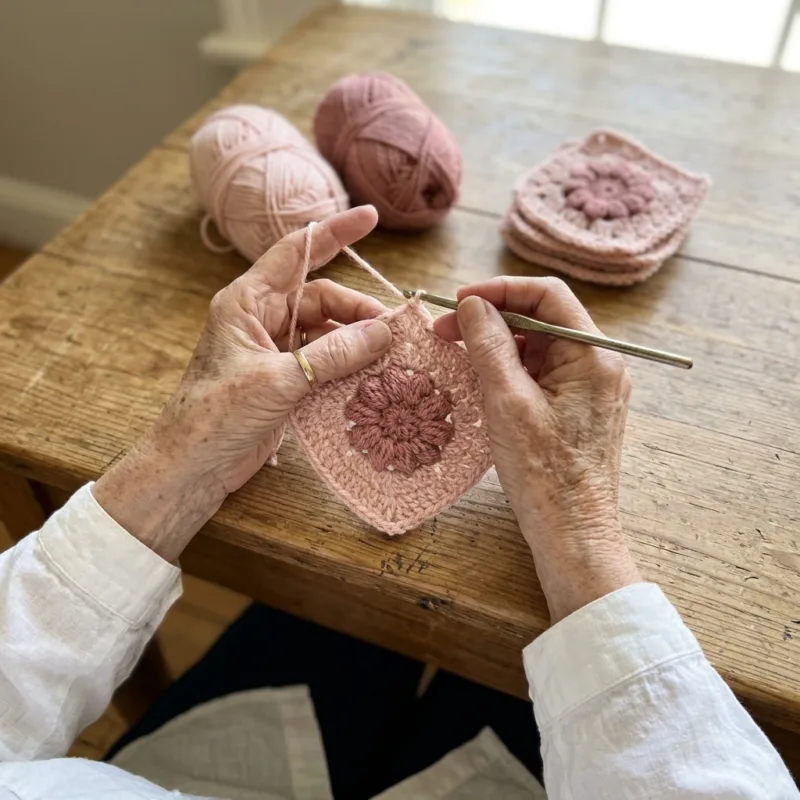
I love projects that grow one small piece at a time, and this bedspread is the best example I have. Each square takes about an hour, so I can finish one in the evening with a cup of tea and feel that I have done something. A square fits in my handbag with a ball of each color and my hook. I have made squares in the car, at the doctor's office and on the porch while the grandchildren played. By the time the pile reached one hundred, the squares had been with me through a whole season of my life.
The puff flower in the middle is my favorite little moment in every square. When you close the round of puffs and see the flower pop up from the ring, it never gets old. Then the blush pink fans open around it, and the square suddenly looks finished even before the frame goes on. I find that small reward keeps me going far better than a long panel ever could. It is the same feeling as finishing a chapter in a good book and wanting to read just one more.
I also love how this bedspread changes a room. Before I put it on our bed, the bedroom was beige and a bit flat. Now the pink pulls everything together, from the roses on the nightstand to the cushion on the chair. Morning light comes through the lattice crosses and makes soft shadows on the squares. My husband, who says very little about crochet, told me it looks like a fancy hotel room, and from him that is high praise.
Here is what I enjoy most about making it:
- Every square is identical, so there is nothing to plan or track.
- There are only two colors, so buying yarn is simple.
- The squares are small enough to carry anywhere.
- The lattice join is quick and stays flat.
- The scalloped edge finishes it in a couple of afternoons.
Making this bedspread taught me a few things too. I learned to check the size of my squares every ten or so, because my tension was looser on relaxed weekends and tighter on busy weekdays. I learned to weave in ends as I go, so I was not facing hundreds of tails at the end. And I learned that blocking really does turn a pile of slightly different squares into a set that fits together. Those lessons now help me in every project I make.
Finally, I love that this is a project that can last. A cotton bedspread made with care can be washed for years and handed down. I like to think that one day a granddaughter will pull it out of a cedar chest and remember the woman who made it. That is a big part of why I crochet at all. A bedspread like this is more than something to sleep under. It is a piece of family history you make with your own hands, and it makes a beautiful wedding or anniversary gift if you can bear to give it away.
Switch Things Up
The easiest change is the color. For a calm look, try sage green for the flower and band with soft cream for the rest. Navy and pale denim blue make a crisp, cottage style cover for a guest room. Lavender and lilac give a dreamy look that suits a girl's room, and caramel with oatmeal feels warm in a farmhouse bedroom. Keep one shade darker and one lighter, as in the original, so the flower and the frame still stand out.
You can also change the size by changing the number of squares. Each square is 10 inches after blocking, so you simply count how many squares you need across and down. The sizes below include a drop on the sides and the foot, so the cover reaches toward the floor. For a cover that sits only on top of the mattress, take away two or three squares in each direction.
- Twin: 7 by 9 squares (63), about 73 by 93 inches
- Full: 8 by 10 squares (80), about 83 by 103 inches
- Queen: 10 by 10 squares (100), about 103 by 103 inches
- King: 12 by 10 squares (120), about 123 by 103 inches
A throw for the sofa is a lovely smaller version. Make 5 by 6 squares, thirty in total, for a throw of about 53 by 63 inches with the border. It uses about a third of the yarn and takes around forty to fifty hours. It is a good way to try the pattern before you commit to a whole bedspread. It also makes a thoughtful housewarming gift that does not take a whole year.
For a baby blanket, use a soft baby cotton or cotton blend in DK weight with a 4 mm hook. The squares will come out at around 8 inches, so a 4 by 5 grid gives you about 34 by 42 inches with the border. Pale mint with white, or butter yellow with cream, are sweet for a nursery. Skip the shell edge and work three rounds of single crochet if you want a plainer, sturdier border that holds up to daily use and lots of washing.
A matching pillow cover pulls the whole bed together. Make four squares and join them in a 2 by 2 block for the front, then make a back from four more squares or a plain panel worked in rows of double crochet. Join front and back with single crochet on three sides, slip in a 20 inch pillow form, and close the last side. Work the shell edge right around it for a pretty finish. For a long lumbar pillow, join three squares in a row, like the small pillow on my bed.
If scallops are not your style, there are other edges to try. Three rounds of single crochet with a final round of reverse single crochet makes a neat corded edge. A simple tassel at each corner, or a short fringe along the two long sides, gives a more rustic look. For a lacy finish, work a round of ch-5 loops, then fill each loop with 5 sc and a picot in the center. Whatever you choose, keep it in the lighter shade so it frames the squares softly.
You can also play with yarn weight. In DK cotton with a 4 mm hook, each square measures about 8 inches, so you need more squares for the same bed, but the cover is lighter and drapes more. In aran or heavy worsted with a 5.5 mm hook, squares come out closer to 11 inches, and you can cover a queen bed with 9 by 9 squares. Acrylic works too and is lighter and warmer, though it does not have the cool, crisp feel of cotton. Always make one test square in your new yarn and measure it before you buy the rest.
Lastly, this is a great stash buster. Make the flower and the band of each square in a different leftover shade, and keep the blush pink, or any one steady color, for the rest of the square and all the joins. The steady background color holds the whole patchwork together. It is a fun way to use up the half balls that collect in every crafter's basket, and no two squares will ever look quite the same.
Materials Needed
— Main Fabric
— Tools Required
The Free Pattern
0% complete
— Puff Flower Lattice Square (Make 100, dusty rose and blush pink) :
— Layout (10 x 10 grid, 100 squares) :
— Lattice Join (Color A, 5.5 mm hook) :
— Scalloped Shell Border (Color A, 5 mm hook) :
Assembly Instructions
- Make 100 Puff Flower Lattice Squares and weave in all ends as you finish each one.
- Block every square to 10 by 10 inches, pinning the corners square and gently opening the lattice loops, and let them dry completely.
- Lay the squares out in a 10 by 10 grid following the Layout section, mixing squares from different weeks across the bedspread.
- Work all the horizontal seams with the Lattice Join, one full row at a time, using Color A and the 5.5 mm hook.
- Work all the vertical seams the same way, with a ch 1 across each place where four corners meet.
- Work Rounds 1 to 3 of the Scalloped Shell Border around the whole bedspread with the 5 mm hook.
- Weave in the last ends, then give the finished bedspread a final light blocking by spraying it flat on a clean floor and letting it dry.
Common Mistakes & How to Fix Them
Puff flowers that look uneven or flat. This happens when the loops of each puff are pulled up to different heights, or when the puff is closed too tightly. Some petals then look plump and others look skinny, and the flower loses its soft rose look. To fix it, pull each loop up to the same height as a double crochet, about half an inch, before you yarn over and close. Hold the loops loosely on the hook and close with one smooth pull. If one puff looks small, undo just that puff and work it again. A few practice puffs on a chain make a big difference.
Squares that grow to different sizes. Over one hundred squares, your tension will change with your mood, the time of day and even the weather. A square made on a tired evening can be half an inch smaller than one made on a relaxed Sunday. When you join them, the seams pucker and the lattice crosses do not line up. To avoid it, measure every tenth square against your first one. If it is off, change your hook by half a size for the next few squares. Blocking every square to 10 inches before joining also evens out small differences nicely.
Losing count in the lattice round. Round 9 has solid single crochet sections and a section of ch-3 loops in the middle of each side. It is easy to start the loops one stitch early or late, so one side has 7 solid stitches and the other has 9. That makes the lattice sit off center, and the joins will not match the next square. Place a stitch marker in the 8th single crochet of each side before you start the loops. Count the 8 solid stitches again after the last loop. Check that all four sides look the same before you fasten off.
Pulling the join too tight. The lattice join only looks right when the chains between the loops are relaxed. If you tug the chains or the zigzag slip stitches, the seam shrinks, the squares curl toward each other and the bedspread will not lie flat. Work the join with a hook half a size larger than the one you used for the squares, and stretch the seam gently every few inches as you go. Lay the joined strip on the floor after each seam to check it. If it ripples or pulls in, undo it and join it again more loosely.

You Might Also Like






Important Notes
Gauge and square size matter more than anything in this pattern. With worsted weight cotton and a 5 mm hook, Rounds 1 to 7 should measure about 8 inches (20 cm) from side to side, and the finished square should measure 10 inches (25 cm) after blocking. Make one square and block it before you buy all your yarn. If it is smaller, go up a hook size. If it is larger, go down a size. The grid sizes in this pattern all assume a 10 inch square.
Block every square before you join. Pin it to a blocking mat at 10 by 10 inches, with the corners square and the lattice loops gently opened. Spray it with water until damp, then let it dry completely, which usually takes a day. Blocking flattens the puff flowers just enough, opens the lattice and makes each square the same size. You can block several squares at once on interlocking foam mats. Block the finished bedspread once more after the border is done.
This bedspread uses a lot of yarn, about 4,400 grams of blush pink and 1,800 grams of dusty rose for the queen size. Buy all of it at once, and check that every ball has the same dye lot number on the label. Two lots of the same color can look different on a big flat piece, and the change will show in daylight. Buy one or two extra balls of each color so you do not run short at the border.
Wash the finished bedspread on a gentle cold cycle in a large machine, or by hand in a bathtub. Because the dusty rose is darker than the blush pink, add a color catcher sheet to the first few washes to catch any loose dye. Do not wring or twist it. Squeeze out the water, then lay it flat on towels or over a clean drying rack, shaping the squares and the scallops. Avoid the dryer, which can shrink cotton and make the edge curl.
I hope this bedspread brings as much calm to your bedroom as it has to mine. It is a big project, but it is made of small, happy moments, one puff flower at a time. Do not let the number one hundred scare you. You do not have to make one hundred squares today. You only have to make the first one.
So pick up your two pinks, find a quiet corner and a good cup of tea, and start with a single square. Block it, hold it up to the window and enjoy it. Then make another. Before you know it, you will have a tall stack of squares, and one day soon a bedspread you will be proud of for years. Happy crocheting, my friends.
Crochet Abbreviations
You Ask, We Answer
What is the finished size of this bedspread?
The bedspread in the photos measures about 103 by 103 inches (262 by 262 cm) including the border. It is made from 100 squares in a 10 by 10 grid, and each square measures 10 inches after blocking. The scalloped shell edge adds about one and a half inches on each side. On a standard queen mattress, which is 60 by 80 inches, this size gives a drop of about 21 inches on each side and at the foot, so the cover reaches close to the floor. If your bed is taller or lower, measure from the top of the mattress to the floor and add or remove squares to suit. Remember that a 10 inch square depends on your gauge, so measure your first blocked square and multiply by the number of squares you plan before you commit. The size list in the variations section gives grids for twin, full and king beds too.
Can I use a different yarn weight or make it smaller?
Yes. The pattern works with any yarn weight, but the size of each square will change, so you need to adjust the number of squares. In DK cotton with a 4 mm hook, squares come out at about 8 inches, and you would need about 13 by 13 squares for the same queen size. In aran weight with a 5.5 mm hook, squares are closer to 11 inches, and 9 by 9 squares cover a queen bed. To make a smaller piece, simply make fewer squares: thirty squares in a 5 by 6 grid make a sofa throw, and twelve to twenty squares make a baby blanket. The rounds and stitch counts of the square stay the same in every case, and so do the join and the border method. The border is planned so the shell round divides evenly on any grid, so just follow the note in the border section, and always make and block one test square first.
How do I wash and care for the bedspread?
Cotton is easy to care for, but a bedspread this size is heavy when wet, so treat it gently. Wash it on a cold, gentle cycle in a large capacity machine, or by hand in the bathtub with a mild wool or baby detergent. Add a color catcher sheet for the first few washes, because the dusty rose may release a little dye onto the blush pink. Never use bleach, even on light colors, as it weakens cotton and can leave pale spots. Do not hang it wet from a line, since the weight will stretch the squares and pull the lattice out of shape. Instead, press out the water with towels and lay it flat to dry, turning it once. Between seasons, fold it loosely and store it in a cotton bag, not plastic, with a sachet of lavender or cedar to keep moths away.
Success!
Thanks for subscribing — check your inbox for a welcome note.
Abbreviations
- A — Color A, blush pink
- B — Color B, dusty rose
- ch — chain
- sl st — slip stitch
- sc — single crochet
- dc — double crochet
- sc2tog — single crochet 2 together
- puff st — puff stitch
- beg puff — beginning puff stitch
- yo — yarn over
- sk — skip
- st(s) — stitch(es)
- sp(s) — space(s)
- ch-2 sp — the space made by 2 chains (same for ch-1, ch-3 and ch-4)
- rep — repeat