
Burgundy Rose Granny Square Bed Cover Crochet Pattern
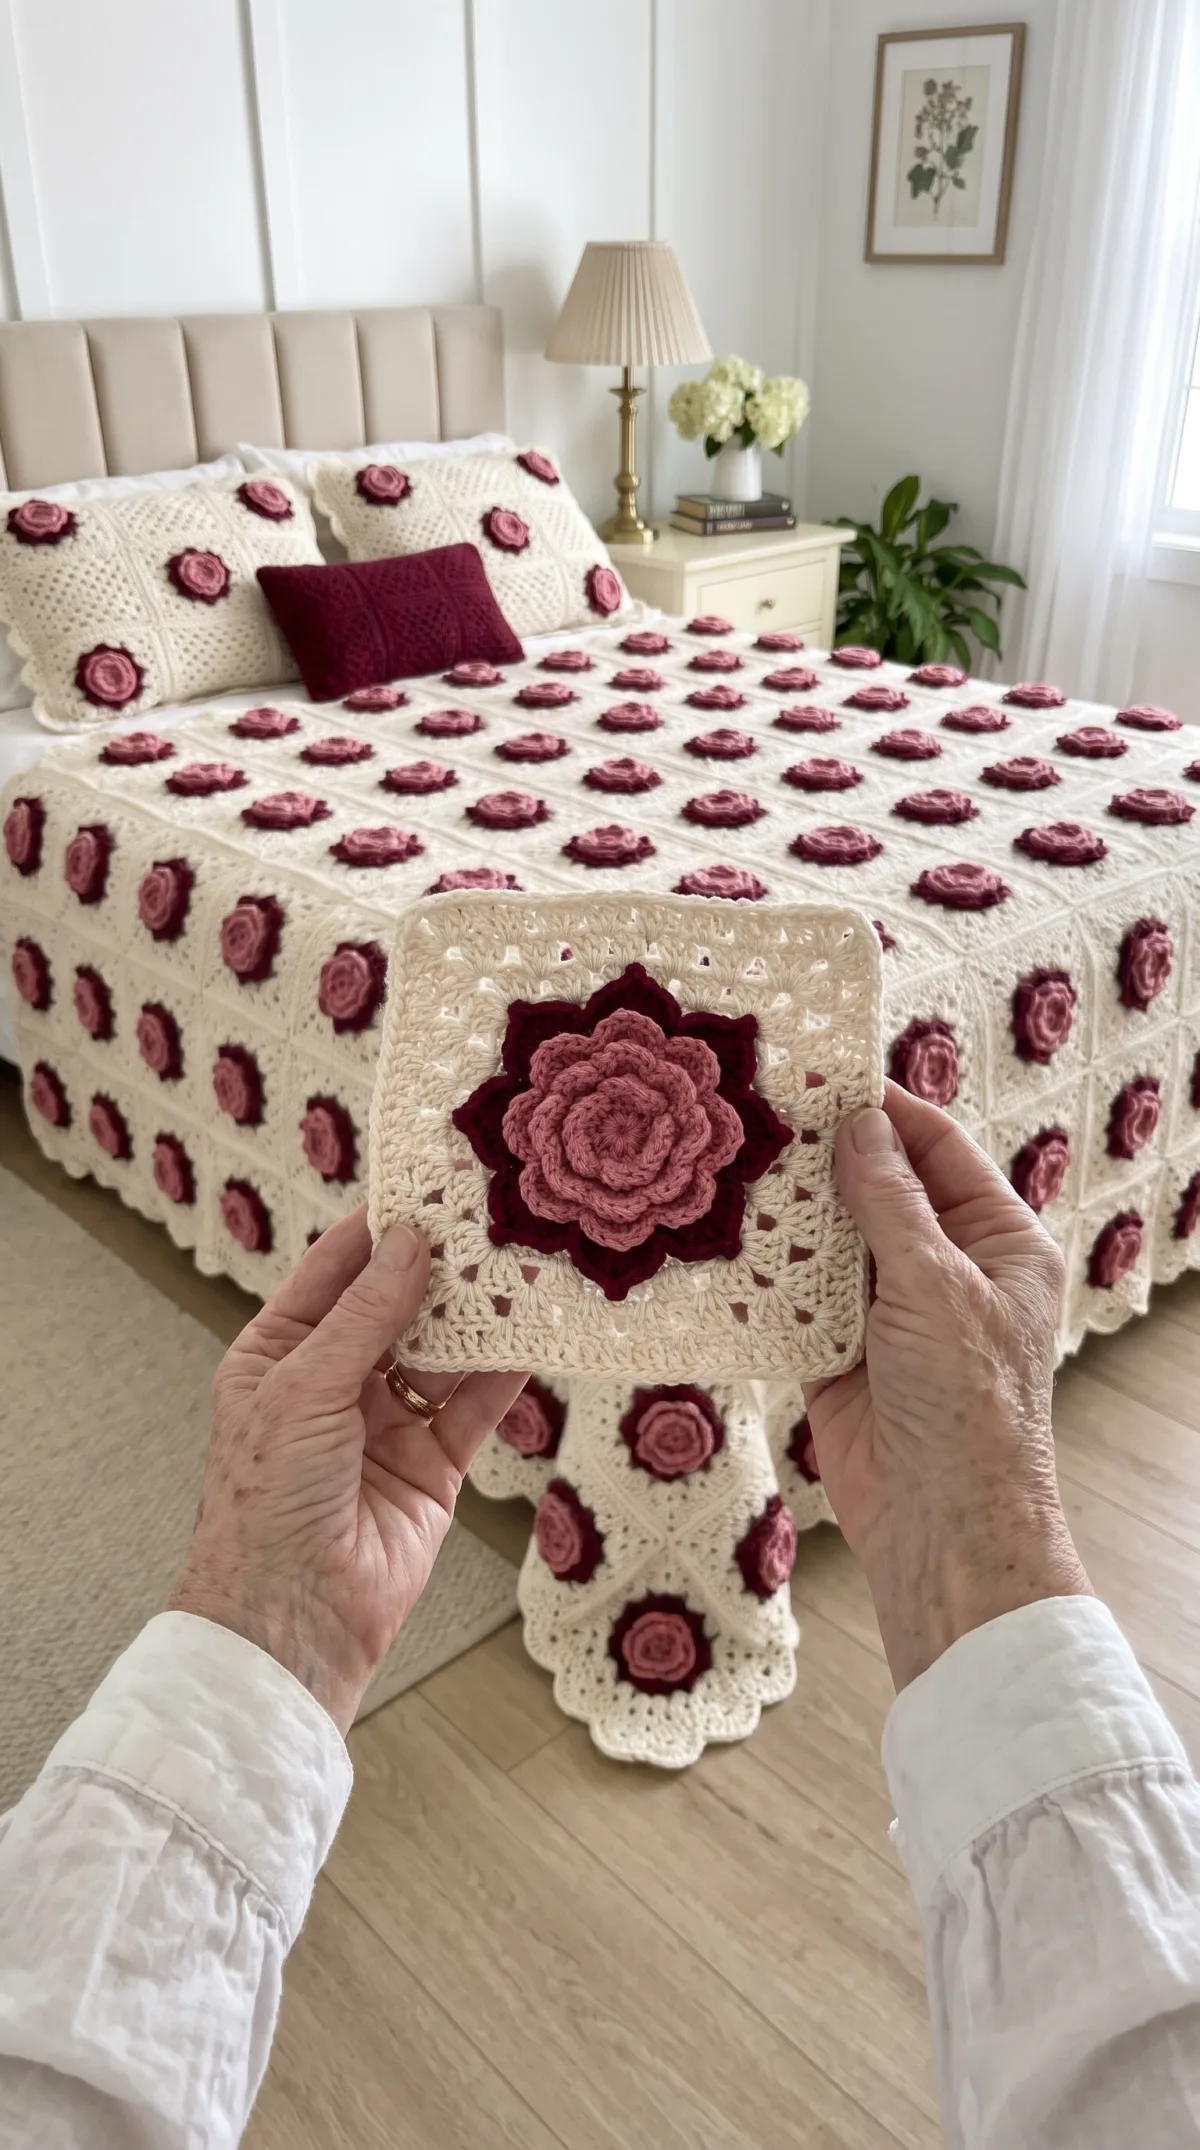
Layered roses worked in front and back loops, simple granny squares and a counted lace edge.
Each square and its rose take about two hours, so the garden grows one bloom at a time.
Eighty layered roses stand up from cream lace, so the cover looks like a rose garden in bloom.
About This Burgundy Rose Granny Square Bed Cover Crochet Pattern Pattern
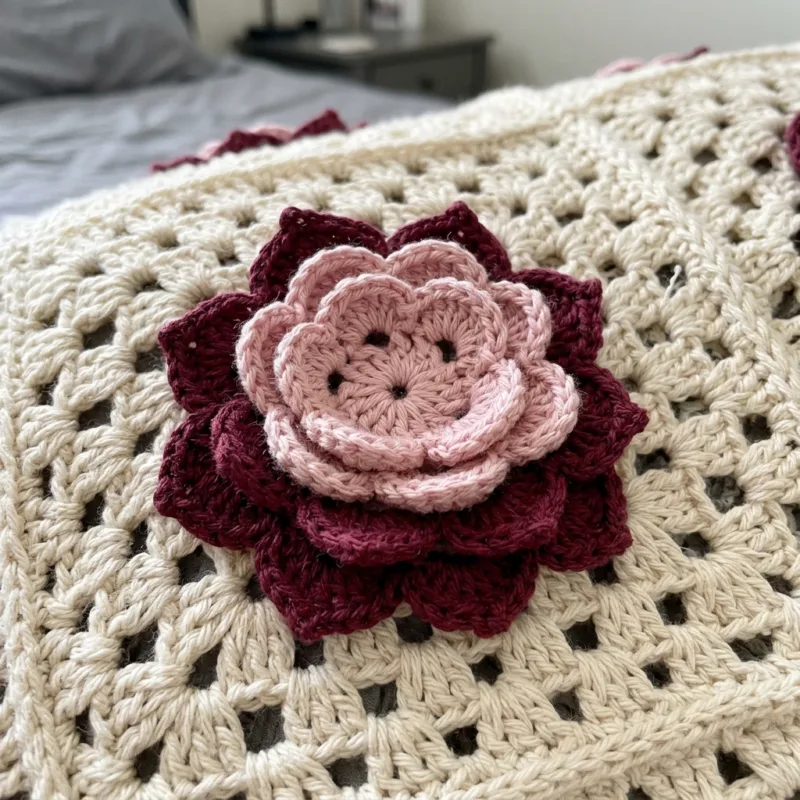
This bed cover is a rose garden you can sleep under. Every cream granny square carries one large layered rose in the center, with a rose pink heart, a ring of small pink petals and two layers of pointed burgundy petals that stand up from the square. The petals cast little shadows on the lace, so each rose looks full and alive. Around the roses, the cream granny clusters and open holes keep the cover light and airy, and a deep scalloped lace edge falls softly from every side of the bed.
The roses are the heart of this pattern, and they use a lovely trick. Each round is worked into only the front loops or only the back loops of the round below. The front loops hold a ring of petals that fold forward, and the back loops hold a flat base round behind them, ready for the next layer of petals. So the rose grows in layers, from the small pink petals at the center to the large burgundy petals at the outside, all in one piece with no sewing between the layers.
The rose has seven rounds. The first three are rose pink: a small ring, a flat round and six pink petals. The next four are burgundy: a base round, eight petals, a second base round and eight larger petals with longer stitches and a pointed tip. The finished rose is about 5.5 inches across. You start the outer petal round between two inner petals, so the outer petals sit in the gaps and the rose looks full from every angle.
The background is a cream square worked in rounds. Six granny rounds make a solid, even base that sits under the rose. A lacy round of chain spaces opens up the square, a round of double crochet closes it up again, and a final round of single crochet gives it a neat, straight edge for joining. Each finished square measures about 9 inches. You sew the rose to the center of the square through the free back loops of its last base round, so the petals stay free and lifted.
The queen size uses 80 squares and 80 roses, set in 8 columns and 10 rows and joined with a cream whipstitch through the back loops. The border has four rounds: a round of single crochet, a round of open fans, a round of shells that fill each fan and a round of single crochet with a picot at the top of every scallop. The result is a deep, rich lace edge that drapes beautifully. The finished cover measures about 77 by 95 inches.
The stitches are chain, slip stitch, single crochet, half double crochet, double crochet and treble crochet. What makes this pattern intermediate is working into front and back loops for the layered rose, and counting the long border rounds. Both are easy to learn, and I give a stitch count at the end of every round. If you have made a granny square and a flat flower before, you are ready for this.
The finished cover is romantic, textured and deeply cozy. The roses give it a lovely raised surface, and the cream background keeps it fresh and bright. Burgundy and pink on cream suit a traditional bedroom with soft linens and brass lamps, a cottage room filled with fresh flowers or a guest room prepared with love. It is a cover that feels like a celebration every time you make the bed.
Why You'll Love This Burgundy Rose Granny Square Bed Cover Crochet Pattern Pattern
I have always loved roses, and this cover lets me keep a whole garden of them on my bed all year long. Making the first rose felt like a little miracle. The pink center appears, then the small pink petals fold forward, and then the burgundy petals open around them, layer by layer. When I worked the last pointed petal and turned the rose over in my hand, it looked like something you could almost smell. I still feel that small thrill every time I finish one.
The front and back loop trick is so clever, and I love teaching it. You work a round of petals into the front loops, then go back behind them and work a flat round into the back loops of the same stitches. It feels odd the first time, but after one rose it makes perfect sense, and then you can see how every layered flower in the world is built. It is one of those small skills that opens up a whole new world of crochet.
I also love the calm of the cream squares. After the colorful roses, the granny rounds are pure comfort, and I can make them while chatting or watching a film without looking down. I usually make five squares in a row, then five roses, then sew them together on a quiet evening. That rhythm keeps the project fresh and gives me a little stack of finished blocks to admire every week.
Here are the habits that made this project easy and joyful for me:
- Make one rose and one square first, and check that the rose covers the granny center.
- Leave a long burgundy tail on every rose for sewing it down.
- Weave in the pink ends as soon as the center is finished.
- Keep finished roses in a box, not a bag, so the petals do not crush.
The colors are a big part of why I love this cover. Burgundy is deep and velvety, the color of old garden roses, and rose pink brings a soft glow to the heart of each bloom. On the cream background, both colors look rich but never heavy. In the morning sun the roses look fresh and bright, and in the evening lamplight they turn warm and dramatic. It is the kind of cover that changes with the day.
I love the deep lace edge too. It takes a while, with its four rounds, but it is the finishing touch that turns a pretty cover into a showpiece. The fans hang in soft scallops all around the bed, and the little picots at the top of each one look like the edge of an antique tablecloth. I worked the last round on a rainy Sunday, and when I spread the finished cover on the bed, I simply sat and looked at it for a long time.
Finally, I love that this cover carries so much feeling. Roses mean love, gratitude and celebration, and eighty of them make a very big message. It would be a beautiful gift for a wedding, a special anniversary or a mother who loves her garden. And if you make it for yourself, you will have a rose garden that never needs watering and blooms every single day.
Switch Things Up
Choose new rose colors. The layered rose looks lovely in many shades. Try coral and peach for a summery look, two shades of lavender for a soft, dreamy cover, or golden yellow with a cream center for a cheerful sunny bedroom. Classic red with pink is perfect for Valentine's Day. Keep the center in the lighter shade and the outer petals in the deeper one, so the rose looks like it is glowing from the inside.
Make it for any bed. Each square is about 9 inches, and the border adds about 2.5 inches on every side. For the fans to fall evenly, use an even number of squares on every side. These sizes include the border:
- Twin: 6 by 10 squares, 60 squares and roses, about 59 by 95 inches
- Queen: 8 by 10 squares, 80 squares and roses, about 77 by 95 inches
- King: 10 by 10 squares, 100 squares and roses, about 95 by 95 inches
With an even number of squares, each side of Border Rnd 1 has 33 stitches per square plus 1, which always divides into the 6-stitch fan repeat.
Make a sofa throw. Six columns by six rows, 36 squares, makes a throw of about 59 by 59 inches with the border. It uses less than half of the yarn and is a lovely way to try the layered rose before a full bed. Draped over a reading chair or folded at the end of a sofa, the roses look wonderful, and it makes a beautiful Mother's Day gift.
Make a baby blanket. Four by four squares, 16 in all, gives a blanket of about 41 by 41 inches with the border. For a nursery, choose soft pastels, such as pale pink roses on white or butter yellow roses on cream. Because the petals stand up, sew each rose down around its outer base and tack every outer petal at its base too, so no small petal can be pulled or caught by little fingers.
Add matching pillows. One square with the full four-round border makes a pretty pillow front of about 14 inches, like the one in my hands in the video. For a standard sham, join six squares 3 by 2 and work the border around them. A burgundy lumbar pillow in rows of half double crochet in the back loops gives a soft ribbed texture that ties the colors together, just as you can see on my bed.
Mix the rose colors. Instead of making every rose the same, use two or three different color pairs, such as burgundy and pink, rose and blush, and wine and coral, and scatter them across the bed. Keep the background squares all cream so the cover still looks calm. Lay out the squares before joining and move them until no two matching roses sit side by side, like planning a real flower bed.
Change the edge. The deep lace edge is generous and romantic. For a lighter finish, stop after Border Rnd 2 and add a picot to the top of each open fan. For a simple, tailored look, work two rounds of single crochet and a round of reverse single crochet instead. You could also work Border Rnd 3 in rose pink for a soft blush of color around the whole cover.
Change the yarn weight. In DK cotton with a 4 mm hook, the squares come out about 7.5 inches and the roses about 4.5 inches, so a queen needs about 10 by 12 squares. In bulky yarn with a 6 mm hook, the squares grow to about 11 inches and the roses become big and bold, so a queen needs only 6 by 8 squares. Always make one square and one rose first and check that the rose covers the granny center.
Materials Needed
— Main Fabric
— Tools Required
The Free Pattern
0% complete
— Layered Rose (Make 80, rose pink and burgundy) :
— Cream Granny Square (Make 80, cream) :
— Sewing the Roses (80 squares) :
— Layout and Joining :
— Border :
Assembly Instructions
- Make one rose and one square, check that the rose is about 5.5 inches and the square about 9 inches, and that the rose covers the granny center.
- Make all 80 roses and all 80 cream granny squares.
- Center a rose on each square and sew it down through the free back loops of its Rnd 6, leaving the outer petals free.
- Block each square lightly from the back, without flattening the roses, to 9 by 9 inches.
- Arrange the squares in 8 columns and 10 rows and whipstitch them into columns through the back loops, then join the columns together.
- Work the four border rounds around the whole cover, weave in all remaining ends and give the lace edge a final blocking.
Common Mistakes & How to Fix Them
Working the petal rounds in both loops. The whole layered effect depends on working the petal rounds in the front loops only and the base rounds in the back loops only. If you work a petal round through both loops, there is nothing left for the next base round, and the next layer has nowhere to sit. The rose then comes out flat and crowded. Before each round, look at the stitches closely and find the front loop, the one closest to you. If you find it hard to see, work in good light and use a hook with a pointed tip, which slips easily under a single loop.
Inner and outer petals lined up. If you start Rnd 7 right above a petal of Rnd 5, the outer petals sit directly behind the inner ones and the rose looks thin, like one layer instead of two. That is why Rnd 7 begins with 4 slip stitches. They move the start halfway between two petals, so each outer petal fills a gap. Check before you start Rnd 7: the first outer petal should open between two burgundy petals of Rnd 5. If it does not, pull out the slip stitches and move one or two stitches along.
Roses that are too big or too small for the square. The rose should cover the solid granny center and reach about Rnd 6, leaving the lacy Rnd 7 and the edges of the square open. If your rose is much bigger, it covers the lace and touches the seams, and the squares look crowded. If it is smaller, the plain granny center shows around it. Tension in the petal rounds makes a big difference here. Measure your first rose on your first square, and change the hook size for the roses only if needed.
Crushing the roses when blocking or joining. Roses that are pressed flat lose their beautiful depth, and cotton petals keep a crease for a long time. Never iron the squares from the front, and never pin a square face down on a blocking mat with weight on the roses. Block each square from the back, pinning only the edges, and spray it lightly. When joining, fold the roses out of the way rather than squashing them under your hand. If a rose does get flattened, mist it lightly and shape the petals with your fingers while it dries.

You Might Also Like






Important Notes
Gauge matters because 80 squares must match and every rose must fit its square. With a 5 mm hook, the first four granny rounds should measure about 4 inches, the finished square about 9 inches and the rose about 5.5 inches across. Measure your first five squares and roses and then one in every ten. If your squares are a little bigger or smaller, that is fine, as long as they all match and the roses still leave the lacy round free.
Block the squares gently from the back after the roses are sewn on. Pin each square face down by its edges to 9 by 9 inches, on a towel so the roses have soft support, and mist it lightly. Let it dry completely. Do not block the roses flat. After the border, pin each scallop of the lace edge into a neat curve with the picot at the top, spray it and let it dry, so the edge hangs evenly.
The yarn amounts in the materials list are estimates for the queen size, including the sewing tails, joining and border. Buy all of the cream, burgundy and rose pink at once, from the same dye lots, and keep the labels. Burgundy and pink in particular can vary between lots, and eighty roses side by side would show any change. Buy one extra skein of each color for safety and for future repairs.
Wash the finished cover on a gentle cold cycle in a large mesh bag or a zipped duvet cover, with mild detergent. Burgundy roses sit right on cream squares, so always add a color catcher, and for the first wash you can soak the cover in cold water with a splash of vinegar. Never wring or twist it. Press out the water, lay it flat face up, and fluff and shape every rose with your fingers while it dries.
Thank you for making this burgundy rose granny square bed cover with me. I hope you enjoy watching each rose open layer by layer, the calm rhythm of the cream granny squares and that wonderful moment when you lay out the first rows and see a whole garden of roses on your bed. It is a project full of beauty and patience, and every rose is a little gift to yourself.
So find your cream, burgundy and rose pink yarn, make your first rose today and sew it onto its square. Lay it on your pillow and admire it. Then make the next one, and soon your bed will bloom with roses that will bring warmth and joy to your home for many years.
Crochet Abbreviations
You Ask, We Answer
How big is the finished bed cover, and how many roses do I need?
Following the pattern exactly, each square measures about 9 inches and each rose about 5.5 inches across. The queen size uses 80 squares and 80 roses in 8 columns and 10 rows, which makes a panel of about 72 by 90 inches. The deep lace border adds about 2.5 inches on every side, so the finished cover is about 77 by 95 inches. On a standard queen mattress of 60 by 80 inches, that gives a drop of about 8 inches on each side and a long lace drape at the foot. For the border fans to fall evenly, keep an even number of squares on every side, such as 6, 8 or 10. To plan your own size, measure the bed plus the drop you want, divide by 9 and round to the nearest even number.
Can I make the roses part of the square instead of sewing them on?
The roses are made separately on purpose. A layered rose needs its own base rounds behind each layer of petals, and working those into a granny square would mean many color changes and a very thick, stiff center. A separate rose sewn through its free back loops sits on the square like a real flower, keeps its petals free and lets you place it exactly in the center. For the yarn, worsted cotton gives crisp petals that hold their shape and washes well. A cotton and acrylic blend makes softer petals that may droop a little, and a smooth acrylic is fine for easy care. DK cotton with a 4 mm hook gives squares of about 7.5 inches and roses of about 4.5 inches, and bulky yarn gives squares of about 11 inches. Make one rose and one square first and check that they fit.
How do I care for and store the bed cover so the roses stay full?
Wash it only when it really needs it, on a gentle cold cycle in a large mesh bag with mild detergent, and always use a color catcher, because burgundy sits right on cream. After washing, press out the water, lay the cover flat face up and fluff every rose with your fingers so the petals stand up as they dry. Never put it in a dryer, which can flatten the roses and shrink cotton. Between washes, shake it out gently and air it away from strong direct sunlight, which can fade burgundy and pink over time. To store it, fold it loosely face out, with tissue paper between the layers and a little crumpled tissue around the roses, and keep it in a large cotton bag or box rather than plastic. Never stack heavy things on top of it.
Success!
Thanks for subscribing — check your inbox for a welcome note.
Abbreviations
- ch — chain
- sl st — slip stitch
- sc — single crochet
- sc2tog — single crochet 2 together (here worked over 2 corner spaces at a seam)
- hdc — half double crochet
- dc — double crochet
- tr — treble crochet
- picot — ch 3, sl st in 3rd ch from hook
- FLO — front loop only
- BLO — back loop only
- st(s) — stitch(es)
- sp(s) — space(s)
- rep — repeat
- Rnd — round
- RS — right side