
Amanda's Creative Corner Crochet · Kitchen
Free Crochet Patterns Handmade with Love

Caramel and Cream Granny Square Bed Cover Crochet Pattern

Jump to Pattern
Caramel and Cream Granny Square Bed Cover Crochet Pattern
100-130 Hours 12 made this
Intermediate Level

You need basic stitches, a puff stitch and a neat slip stitch join.

100-130 Hours

Each square takes about 25 minutes, so the cover grows a little every evening.

Portable Squares

Every square is small, so you can crochet it on the sofa, on the bus or at a friend's house.

About This Caramel and Cream Granny Square Bed Cover Crochet Pattern Pattern

This bed cover is made from 224 granny squares in warm caramel and soft cream. Each square has a caramel center, a ring of eight cream puff petals, caramel corners and a double cream border. The squares are joined with a raised cream seam and finished with a deep scalloped shell edge.

It measures about 82 by 93 inches, which covers a queen bed with a generous drop on both sides. You will use basic stitches, a puff stitch and a slip stitch join. Two matching pillow covers are included.
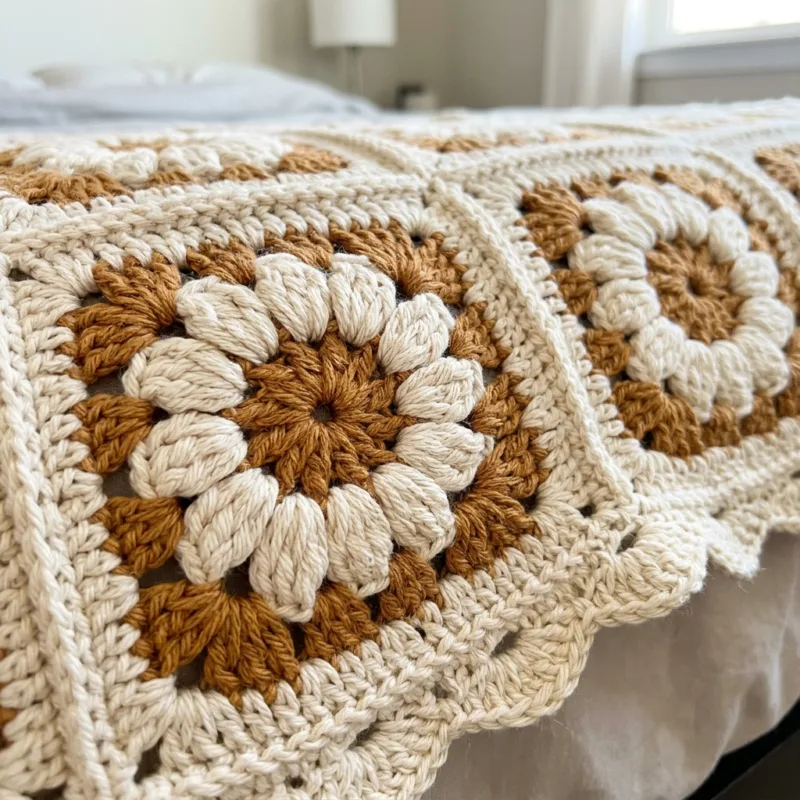
Caramel and Cream Granny Square Bed Cover Crochet Pattern step detail

Why You'll Love This Caramel and Cream Granny Square Bed Cover Crochet Pattern Pattern

I love that this big project is really just one small square repeated. I carry a few balls of yarn in a bag and finish a square wherever I sit. After a few weeks the pile becomes something I can actually see growing.

The caramel and cream palette also makes a bedroom feel calm and warm. It sits well with wooden furniture, and the matching pillows tie the whole bed together.
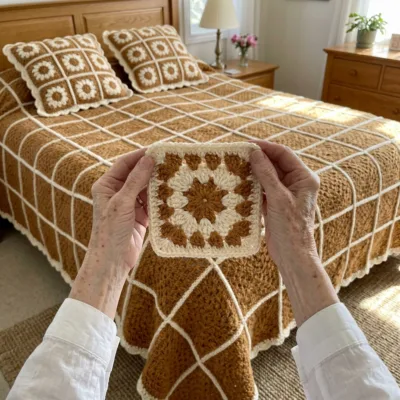

Switch Things Up

Try swapping the caramel for dusty rose, sage green or navy and keep the cream for the petals and borders. Make 6 by 8 squares for a baby blanket, or 9 by 11 squares for a sofa throw. You can also stitch a single 3 by 3 panel into a cushion cover, or finish the cover with a plain single crochet border instead of the shell scallops.


Materials Needed

— Main Fabric

01 Worsted weight cotton yarn (weight 4) in cream: about 3,700 g (approx. 7,400 yd) for 242 squares, the seams and both edges
02 Worsted weight cotton yarn (weight 4) in caramel brown: about 1,250 g (approx. 2,500 yd) for the square centers and corners
03 Buy a little extra of each color, since these amounts are estimated and dye lots can vary

— Tools Required

04 4.5 mm (US 7) crochet hook
05 Yarn needle
06 Stitch markers
07 Scissors
08 Blocking mats and rust-proof pins
09 Measuring tape
10 Two 16 inch pillow forms for the matching pillows

The Free Pattern

Intermediate 100-130 Hours

0% complete

— Granny Square (Make 242: 224 for the bed cover and 18 for the pillows, caramel and cream) :

Every square uses the same colors: caramel for Rounds 1 and 3, cream for Rounds 2, 4 and 5. Each square measures about 5.5 inches (14 cm) after Round 5. Weave in the ends as you go.
Puff stitch (puff): [yo, insert hook in the stitch, yo, pull up a loop] 4 times in the same stitch (9 loops on hook), yo and pull through all 9 loops.
Round 1: With caramel, make a magic ring. Ch 1, work 16 sc in the ring, pull the ring closed and join with a sl st to the first sc. Cut caramel. (16 sc)
Round 2: Join cream in any sc. Ch 2, [yo, insert hook in the same sc, pull up a loop] 3 times (7 loops on hook), yo and pull through all 7 loops, ch 2 (first puff made). *Skip next sc, puff in next sc, ch 2; repeat from * 6 more times. Skip the last sc and sl st to the top of the first puff. Cut cream. (8 puffs, 8 ch-2 sps)
Round 3: Join caramel with a sl st in any ch-2 sp. Ch 3 (counts as dc), 2 dc, ch 2, 3 dc in the same sp (first corner). *Ch 1, 3 dc in next ch-2 sp, ch 1, (3 dc, ch 2, 3 dc) in next ch-2 sp for a corner; repeat from * 2 more times. Ch 1, 3 dc in the last ch-2 sp, ch 1, sl st to the top of the beginning ch-3. Cut caramel. (36 dc, 4 corner ch-2 sps, 8 ch-1 sps)
Round 4: Join cream in any corner ch-2 sp. Ch 3 (counts as dc), 2 dc, ch 2, 3 dc in the same sp. *[Ch 1, 3 dc in next ch-1 sp] twice, ch 1, (3 dc, ch 2, 3 dc) in next corner sp; repeat from * 2 more times. [Ch 1, 3 dc in next ch-1 sp] twice, ch 1, sl st to the top of the beginning ch-3. (48 dc, 4 corner ch-2 sps, 12 ch-1 sps)
Round 5: Sl st in each of the next 2 dc and into the corner ch-2 sp. Ch 3 (counts as dc), 2 dc, ch 2, 3 dc in the same sp. *[Ch 1, 3 dc in next ch-1 sp] 3 times, ch 1, (3 dc, ch 2, 3 dc) in next corner sp; repeat from * 2 more times. [Ch 1, 3 dc in next ch-1 sp] 3 times, ch 1, sl st to the top of the beginning ch-3. Fasten off. (60 dc, 4 corner ch-2 sps, 16 ch-1 sps)
Each side of the finished square, not counting the corner ch-2 sps, has 19 stitches (12 dc plus 3 dc corner ends and 4 ch-1 sps). You will need this number for the edge.

— Layout and Joining :

Bed cover grid: 14 squares across and 16 squares down, 224 squares in total. All squares are identical, so there is no color placement to plan. Finished size before the edge is about 77 by 88 inches.
Lay out the squares on the floor and check that the caramel centers all face the same way. Join the squares into 16 strips of 14 squares each.
Joining: hold two squares with the wrong sides together. With cream and your hook, sl st through the back loops only of both squares, working from corner ch-2 sp to corner ch-2 sp (19 sl st plus 1 in each corner sp). This makes the raised cream seam you see in the photo.
Join the 16 strips to each other in the same way, matching the corners so that four squares always meet in one point.
Pillow panels: make 4 panels of 3 by 3 squares (9 squares each), joined the same way. Each panel measures about 16.5 inches square.

— Scalloped Shell Edge (cream) :

Block the joined cover to size before you start the edge, so the stitches lie flat.
Round 1: Join cream with a sl st in any outer corner ch-2 sp. Ch 1, 3 sc in the same sp. Work 1 sc in each dc and each ch-1 sp along the side (19 sts per square), and 1 sc in each seam where two squares meet (work through the two corner sps together). Work 3 sc in each outer corner sp. Join with a sl st to the first sc. (Top and bottom: 14 x 19 + 13 = 279 sc each. Sides: 16 x 19 + 15 = 319 sc each. Plus 4 corners x 3 sc = 12. Total 1,208 sc)
Round 2: Count the first sc of Round 1 as stitch 1. *Skip next 3 sc, 7 dc in next sc, skip next 3 sc, sl st in next sc; repeat from * around, 151 times in total, ending with the last sl st just before the first sc. Fasten off. (151 shells, 1,057 dc; 1,208 sc divided by 8 = 151)
The shells do not need to line up with the corners. For the best look, start Round 2 in the middle of a long side so the pattern flows evenly around the bed.

— Pillow Cover (Make 2, caramel and cream) :

For each pillow, take two 3 by 3 panels (a front and a back). Place them together with the right sides facing out.
Round 1: Join cream through both layers in any outer corner ch-2 sp. Ch 1, 3 sc in the same sp. Work 1 sc in each dc and ch-1 sp through both layers (19 sts per square), 1 sc in each seam and 3 sc in each corner. Work along three sides, insert the 16 inch pillow form, then work the fourth side. Join with a sl st to the first sc. (Each side: 3 x 19 + 2 = 59 sc. Total 4 x 59 + 12 = 248 sc)
Round 2: *Skip next 3 sc, 7 dc in next sc, skip next 3 sc, sl st in next sc; repeat from * around, 31 times in total. Fasten off. (31 shells, 217 dc; 248 sc divided by 8 = 31)

Assembly Instructions

  1. Make 242 granny squares: 224 for the bed cover and 18 for the two pillow covers.
  2. Block each square lightly and lay them out on the floor in a 14 by 16 grid, with all caramel centers facing the same way.
  3. Join the squares into 16 strips of 14, using cream and a slip stitch through the back loops only.
  4. Join the 16 strips to each other, matching the corners so four squares always meet in one point.
  5. Block the whole cover to about 77 by 88 inches and let it dry flat.
  6. Work Edge Round 1 of 1,208 single crochet around the cover, then Round 2 of 151 scalloped shells.
  7. Join the pillow squares into four 3 by 3 panels, then work the pillow edge through both layers around the pillow form.

Common Mistakes & How to Fix Them

Pulling the puff stitches too tight in Round 2 makes the petals sit flat. Keep your loops loose and even so the petals stay round.

Skipping a ch-1 sp in Round 3 or 4 throws off the corners. Count your corner ch-2 sps (4 per square) before you cut the yarn.

Joining squares through the front loops makes a thin, wobbly seam. Use the back loops only so the seams stay raised and neat.

Making some squares in a looser hand creates a wavy cover. Check that every square measures about 5.5 inches and block them before joining.


Denise

Denise designs cozy crochet home decor patterns with clear instructions and friendly tips for makers of every level.


Important Notes

Gauge: Rounds 1 to 5 should measure about 5.5 inches (14 cm) square with a 4.5 mm hook. If yours is smaller or larger, change the hook size instead of changing the number of squares.

Yarn amounts are estimated from the photo, so test-swatch one square, weigh it, and then multiply to check your total before you buy the full amount.

Block the cover and the pillow panels flat with pins before you add the edge, so the scallops lay smoothly.

Wash on a gentle cycle in cool water with a color catcher, because dark caramel and cream cotton can bleed. Dry flat.


I hope you enjoy making this cover as much as I enjoyed designing it. Start with one square, and before long you will have a whole bed to show for it. Tell me how your first few squares turn out.

Crochet Abbreviations

01 ch — chain
02 sl st — slip stitch
03 sc — single crochet
04 dc — double crochet
05 sp — space
06 sps — spaces
07 st — stitch
08 sts — stitches
09 yo — yarn over
10 puff — puff stitch (see the Granny Square section)

You Ask, We Answer

What size is the finished bed cover?

It is about 82 by 93 inches with the scalloped edge, which fits a queen bed with a generous drop. For a smaller bed, make fewer squares and keep the same edge method, recalculating the stitch total so it still divides by 8.

Can I use a different yarn weight?

Yes. Sport weight makes smaller squares and a lighter cover, while a bulky yarn makes larger squares and fewer are needed. Use the hook size that gives a soft fabric and recalculate the number of squares for your bed.

How do I wash and care for the cover?

Wash it on a gentle cycle in cool water with a color catcher, then dry it flat. Avoid hot water and tumble drying so the cotton keeps its shape.





