
Cream and Sand Ogee Flower Motif Bedspread Crochet Pattern

You will work puff stitches, a few corner shapings and raised seams, all counted round by round.
Each motif takes under an hour, plus joining and the corded edge.
Pointed and rounded corners turn simple motifs into a graceful ogee pattern across the bed.
About This Cream and Sand Ogee Flower Motif Bedspread Crochet Pattern Pattern
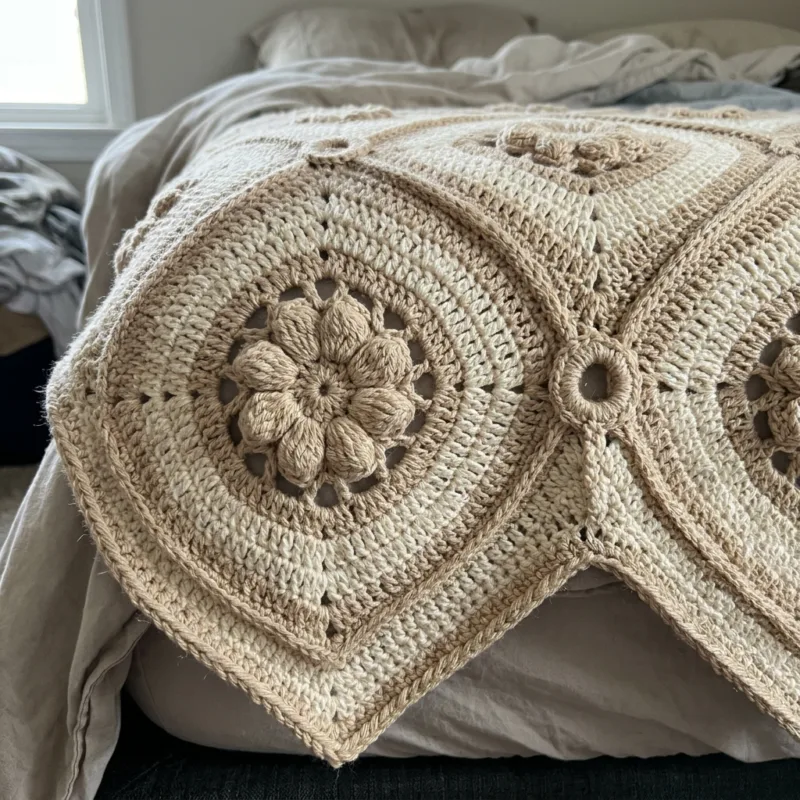
This bedspread is made from one hundred and twenty-eight motifs in two gentle neutrals, a warm cream and a soft sand beige. Each motif starts with a sand beige flower: a small ring, a round of puff stitches and a round of rounded petals. Around the flower, a cream frame opens with little windows, then fills in solid, and the shape becomes a square with two pointed corners and two rounded ones. A ridged sand band, an outer cream band and a sand outline finish each piece. When the motifs are set on point and joined with raised beige seams, the pointed and rounded corners create the graceful ogee shapes you see, like the tile patterns of a Moroccan courtyard.
The finished bedspread measures about 102 by 114 inches (259 by 290 cm) from point to point. The motifs are arranged in nine long rows of 8 motifs, with eight shorter rows of 7 motifs nestled in between, so each motif touches four neighbors along its sides. Each motif is about 9 inches along each side and about 12.5 inches from point to point after blocking. On a queen mattress the cover drapes about 21 inches on each side and at the foot, and the pointed motifs along the edges hang down like a row of soft pennants. That pointed edge is part of the charm, so there is no separate border to make, only a corded finishing round.
The stitches are chain, slip stitch, single crochet, half double crochet, double crochet and treble crochet, plus the puff stitch and reverse single crochet. The puff stitch is three loops pulled up in the same place and closed together, and it gives the flower its soft, rounded petals. The sand band is worked in the back loops only, which leaves a little ridge on the right side and gives the motif a carved look. The pointed and rounded corners are simply different stitch heights in the corner spaces of Round 8, so the shaping is all done by counting, not by guesswork.
The motifs are joined with sand beige single crochet on the right side, worked through both pieces at once. That makes the raised beige lines that outline every ogee shape and tie the whole lattice together. Where four motif points meet, a little chain crossing makes the small rings you can see at each junction. Once everything is joined, a round of single crochet and a round of corded reverse single crochet go all the way around the zigzag edge, giving every point a neat, rope-like finish.
In worsted weight cotton the bedspread feels substantial, smooth and cool, with a lovely weight in the drape. The puff flowers add a soft texture under your hand, and the open windows around them keep the piece from feeling heavy. The cream and sand palette is calm and timeless, and it suits warm wood, linen, white walls, olive branches and every shade of oatmeal. It is the kind of bedspread that makes a room feel like a quiet country inn, restful and gently elegant.
I rate this pattern as intermediate. You need to be comfortable working in the round, changing colors, working into back loops and counting carefully on every round. The on-point layout takes a little thought the first time, so I suggest laying out a few rows on the floor before you join. It suits a patient maker who likes a portable project and enjoys watching a pattern appear as the pieces come together. If you have made a granny square bedspread before, this is a beautiful next step, and every round is written out with its stitch count.
Why You'll Love This Cream and Sand Ogee Flower Motif Bedspread Crochet Pattern Pattern
I have loved ogee patterns ever since I saw them on old tiles and wallpapers in a little guest house years ago. When I realized I could make that same flowing shape with crochet, I could not wait to start. The trick is so simple: two pointed corners and two rounded ones, set on point. The first time I joined four motifs and saw the curved lattice appear, I had to call my sister to show her. It felt like discovering a secret.
The puff flower in the middle is my favorite part of every motif. It is only three rounds, but those soft beige puffs look like the petals of a little rose or a dahlia. Then the cream frame opens with tiny windows around it, and the flower seems to sit in a lacy frame. I love that each round changes the look so much, because it keeps me curious and makes each motif fun right to the end.
I also love the color choice. Cream and sand are the colors of linen, oatmeal, driftwood and fresh bread, and they make a room feel warm without shouting. In our bedroom they sit with a wooden headboard, a dark nightstand and a chunky cream rug, and the whole space feels calm and finished. The beige seams outline every shape, so even from across the room you can see the lattice clearly. Guests often stop in the doorway to look at it.
Here is why I keep coming back to this design:
- Each motif is small and quick enough to finish in one sitting.
- The neutral colors suit almost any bedroom.
- The raised seams make the joining part of the design.
- The pointed edge forms itself, with no border to plan.
- The ogee lattice looks far harder than it really is.
Making this bedspread taught me a lot too. I learned that working the sand band in the back loops gives a lovely carved ridge, and I now use that trick in other projects. I learned to keep my motifs in a basket sorted by row, so the layout never confused me. And I learned that blocking each motif with pins in the pointed corners makes the ogee shapes crisp. Those lessons made the joining calm and even enjoyable.
Most of all, I love that this is a bedspread for life. Cotton in these soft colors can be washed again and again and will only get softer. It suits every season, light enough for summer over a sheet and cozy over a blanket in winter. I hope it will be on a bed in our family long after I have put down my hook, and that someone will run a finger along the beige seams and smile at all those little flowers.
Switch Things Up
The easiest change is the color. Keep one shade for the flower, the band, the outline and the seams, and a lighter shade for the frame, and the ogee lattice will always show. Sage green with cream looks fresh and calm, while dusty blue with ivory feels like a seaside cottage. Terracotta with oatmeal is warm and earthy for a desert-style room, and soft gray with white is clean and modern. For a romantic look, try dusty rose with blush.
You can change the size by changing the number of rows and motifs. Each motif adds about 12.5 inches across a long row, and each long row adds about 12.5 inches to the length. The short rows always have one motif fewer than the long rows and sit between them. Here are some starting points that include a drop on the sides and foot.
- Twin: 6 long rows of 7 and 5 short rows of 6 (72 motifs), about 89 by 76 inches across and down from point to point, so turn it with the long rows running down the bed
- Full: 7 long rows of 8 and 6 short rows of 7 (98 motifs), about 102 by 89 inches
- Queen: 9 long rows of 8 and 8 short rows of 7 (128 motifs), about 102 by 114 inches
- King: 9 long rows of 10 and 8 short rows of 9 (162 motifs), about 127 by 114 inches
A sofa throw is a lovely smaller version. Make 5 long rows of 4 and 4 short rows of 3, which is 32 motifs, for a throw of about 50 by 63 inches from point to point. It takes around thirty hours and about a quarter of the yarn. The pointed edge looks especially pretty draped over the arm of a sofa or the back of a chair. It is a good way to try the pattern before you start the full bedspread.
For a baby blanket, use a soft baby cotton or cotton blend in DK weight with a 4 mm hook, and the motifs come out at about 7 inches on each side. Four long rows of 4 and three short rows of 3 give a blanket of about 40 by 40 inches from point to point. Pale mint with white, or soft lemon with cream, are sweet for a nursery. The pointed edge has no loose loops, but use it with an adult nearby and keep crochet blankets out of the crib for young babies.
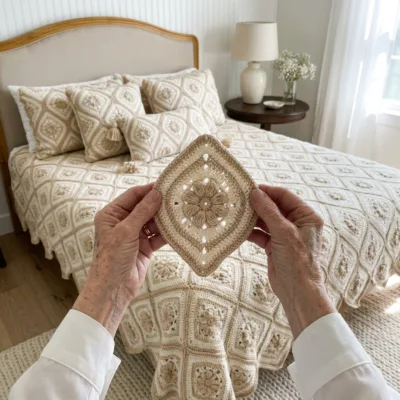
Matching pillows tie the whole bed together, as you can see in my photos. Four motifs joined into a diamond with four half triangles filled in at the edges make a square cushion front, or you can simply sew motifs onto a plain linen cover in the same sand color. A row of three motifs joined point to point makes a pretty lumbar pillow. Add a sand tassel at each end for a relaxed boho touch. A single motif also makes a lovely table mat under a vase.
If you would like a straight edge instead of points, you can fill the gaps along the sides. Make half motifs by working the flower and frame rounds in rows across one half of the shape, then join them into the triangle gaps along all four sides. After that, work three rounds of single crochet around the whole bedspread and a round of reverse single crochet. The result looks more tailored and fits neatly under a bed with a footboard.
You can also play with the yarn weight. In DK cotton with a 4 mm hook, each motif is about 7 inches per side, so you need more of them, but the bedspread is lighter and drapes beautifully. In aran weight with a 5.5 mm hook, motifs grow to about 10 inches per side, and you can cover a queen bed with fewer pieces. Acrylic or a cotton blend works too and is lighter and warmer. Always make one test motif in your new yarn and measure it before you buy the rest.
Finally, try making the flowers in different colors. Keep the cream frames and sand bands, seams and edge the same, but work each flower center in a different leftover shade, such as soft pinks, blues, yellows and greens. The steady neutral lattice holds everything together, so the bed looks like a garden behind a carved screen. It is a lovely way to use up small amounts of yarn from other projects.
Materials Needed
— Main Fabric
— Tools Required
The Free Pattern
0% complete
— Ogee Flower Motif (Make 128, cream and sand beige) :
— Layout (9 long rows of 8, 8 short rows of 7, 128 motifs) :
— Raised Seam Join (Color B) :
— Corded Pointed Edge (Color B) :
Assembly Instructions
- Make 128 Ogee Flower Motifs and weave in the ends of each one as you finish it.
- Block every motif to 9 inches per side, pinning the pointed corners out sharply and easing the rounded corners into curves.
- Lay the motifs on point following the Layout section: 9 long rows of 8 with 8 short rows of 7 nestled between them.
- Join every side where two motifs meet with the Raised Seam Join, working in long diagonal lines, wrong sides together.
- Work the second set of diagonal seams, making a ch 2 across each crossing to form the small rings.
- Work Rounds 1 and 2 of the Corded Pointed Edge around the whole bedspread.
- Weave in the last ends and give the finished bedspread a final light blocking on a clean floor, pinning out every point.
Common Mistakes & How to Fix Them
Mixing up the pointed and rounded corners. Round 8 has two pointed corners and two rounded corners, and they must sit opposite each other. If you work two pointed corners side by side, the motif becomes a lopsided teardrop, and it will not fit into the ogee lattice. This usually happens when you join the yarn in a random corner and lose track. Before Round 8, put one colored marker in each pointed corner and a different color in each rounded corner. Join A in a pointed corner every time, and check that the corners alternate before you fasten off.
Puffs that look flat or uneven. The flower only looks soft and full when every loop of the puff is pulled up to the same height. If some loops are short, those puffs look skinny, and the petals of Round 3 sit unevenly around them. Pull each loop up to about half an inch, keep the loops loose on the hook, and close the puff with one smooth pull. If one puff looks small, undo just that stitch and redo it. After Round 3, lay the flower flat and check that all twelve petals are the same size.
Working the sand band in both loops. Round 7 is worked in the back loops only, which leaves the front loops of Round 6 as a little ridge on the right side. If you work through both loops, the ridge disappears and the motif looks flat, and it will not match motifs made correctly. Look at the top of each stitch before you insert the hook and choose the loop farther from you. If you notice halfway round that you slipped into both loops, it is worth undoing the round, because the difference shows clearly on the bed.
Placing short-row motifs the wrong way up. Every motif must sit with its pointed corners at the top and bottom of the bed. If a short-row motif is turned a quarter, its rounded corners point up and down, the ogee curve breaks, and the seams do not line up with the neighbors. It is easy to do when you pick motifs from the basket in a hurry. Lay out each short row on the floor with the pointed corners marked by a pin before joining, and step back to check that the curves flow before you start the seams.

You Might Also Like






Important Notes
Gauge and motif size matter in this pattern. With worsted weight cotton and a 5 mm hook, Rounds 1 to 6 should measure about 6.5 inches (17 cm) per side, and the finished motif should block to 9 inches (23 cm) per side. Make one motif and block it before you buy all your yarn. If it is smaller, go up a hook size. If it is larger, go down a size, and keep the same hook for every motif.
Block every motif before you join. Pin the two pointed corners out sharply, ease the two rounded corners into soft curves, and keep the sides straight. Spray with water and let each motif dry completely. Blocking is what makes the ogee shapes crisp and the motifs fit together without stretching. You can block several at once on foam mats. Block the finished bedspread once more after the edge is done.
This bedspread uses about 2,600 grams of cream and 2,500 grams of sand for the queen size. Buy all of it at once, and check that every ball of the same color has the same dye lot number. Neutrals can look very different from lot to lot, especially in daylight, and a slightly yellower cream will show across a large bed. Buy one or two extra balls of each color, so you do not run short on the seams and edge.
Wash the bedspread on a gentle cold cycle in a large machine, or by hand in a bathtub, with a mild detergent. Cream and sand are close in tone, but sand cotton can still release a little dye, so add a color catcher sheet to the first few washes. Do not wring or twist it. Press out the water with towels and lay it flat to dry, pinning out the points if needed. Avoid the dryer and avoid bleach, which can yellow cream cotton.
I hope this bedspread brings the same quiet, gentle feeling to your bedroom that it brings to mine. It is a big project, but it is made of small, lovely moments: a ring of puffs, a frame of windows, a sharp little point pinned on a blocking mat. Do not let the number one hundred and twenty-eight worry you. You do not have to make them all today. You only have to make the first motif.
So pick up your cream and your sand, settle into a comfortable chair with a good cup of tea, and start with a single flower. Block it, set it on your bed and picture the lattice growing around it. Then make another. Before you know it, you will have a basket full of motifs, and one day soon an heirloom bedspread you will love for years. Happy crocheting, my friends.
Crochet Abbreviations
You Ask, We Answer
What is the finished size of this bedspread?
The bedspread in the photos measures about 102 by 114 inches (259 by 290 cm) from point to point. It is made from 128 motifs: nine long rows of 8 and eight short rows of 7 set between them. Each motif measures about 9 inches per side and about 12.5 inches from point to point after blocking. On a standard queen mattress, which is 60 by 80 inches, this size gives a drop of about 21 inches on each side and at the foot, so the points hang down toward the floor. If your bed is taller or lower, measure from the top of the mattress to the floor and add or remove motifs to suit, keeping one motif fewer in each short row than in the long rows. Always measure your first blocked motif before buying all your yarn, since the final size depends on your gauge. The variations section lists layouts for twin, full and king beds too.
Can I use a different yarn weight or make it smaller?
Yes. The motif works in any yarn weight, but its size will change, so you need to adjust the number of motifs. In DK cotton with a 4 mm hook, motifs come out at about 7 inches per side, and you would need about 11 long rows of 10 for the same queen size. In aran weight with a 5.5 mm hook, motifs grow to about 10 inches per side, and 8 long rows of 7 cover a queen bed. To make a smaller piece, simply make fewer rows: 32 motifs make a sofa throw, and about 25 make a baby blanket in DK yarn. The rounds and stitch counts of the motif stay exactly the same in every case, and so do the seams and the edge method. Count your free sides, points and notches for the edge round, and always make one test motif first.
How do I wash and care for the bedspread?
Cotton is easy to care for, but a bedspread this size is heavy when wet, so treat it gently. Wash it on a cold, gentle cycle in a large capacity machine, or by hand in the bathtub with a mild wool or baby detergent. Add a color catcher sheet for the first few washes in case the sand releases a little dye onto the cream. Never use bleach, because it weakens cotton and can turn cream yarn yellow over time. Do not hang it wet from a line, since the weight will stretch the motifs and pull the points long. Instead, press out the water with towels and lay it flat to dry, shaping the points as you go. Between seasons, fold it loosely and store it in a cotton bag, not plastic, with a sachet of lavender or cedar to keep moths away and keep the cream fresh.
Success!
Thanks for subscribing — check your inbox for a welcome note.
Abbreviations
- A — Color A, warm cream
- B — Color B, sand beige
- ch — chain
- sl st — slip stitch
- sc — single crochet
- hdc — half double crochet
- dc — double crochet
- tr — treble crochet
- puff st — puff stitch
- beg puff — beginning puff stitch
- reverse sc — reverse single crochet (crab stitch), worked from left to right
- sc2tog — single crochet 2 together
- yo — yarn over
- st(s) — stitch(es)
- sp(s) — space(s)
- rep — repeat