
Emerald Petal Flower Motif Bedspread Crochet Pattern
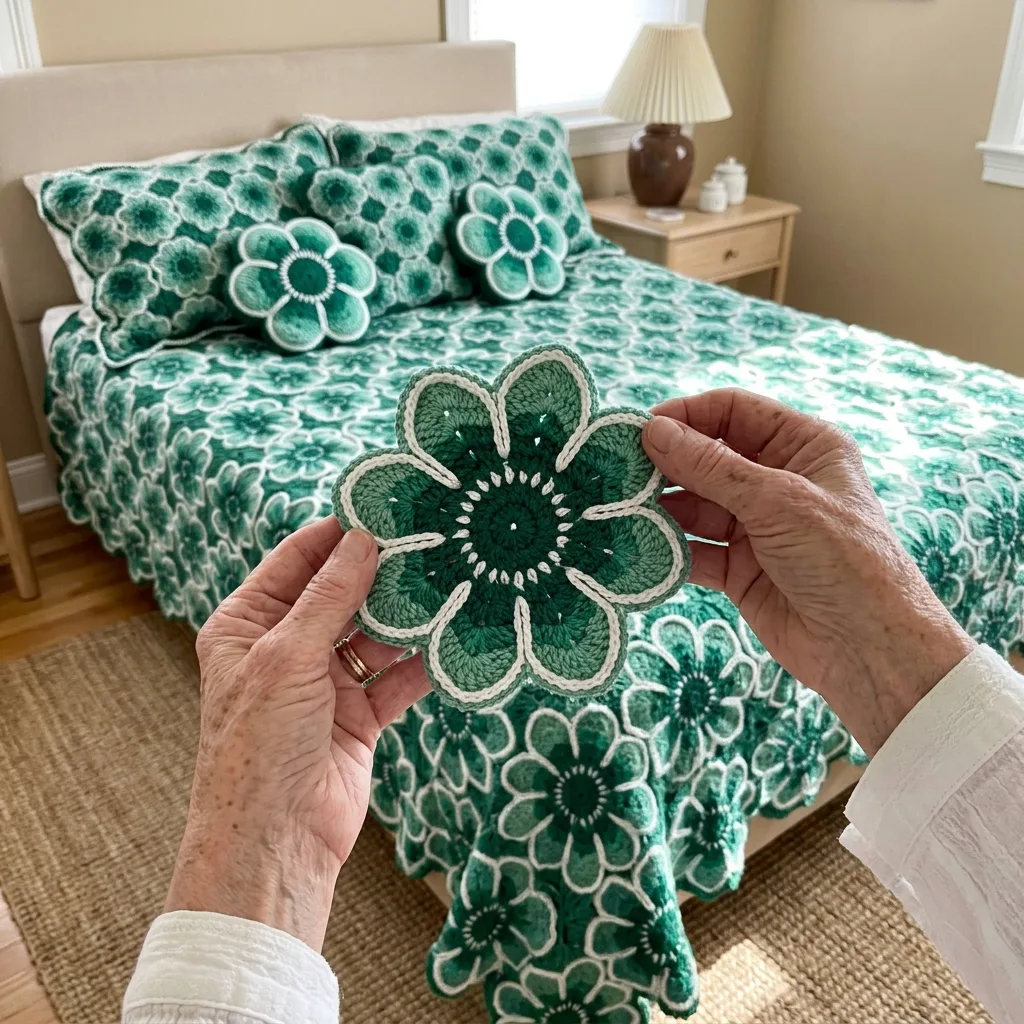
You will use spike stitches, short petal rows and a corded reverse single crochet outline.
Each flower takes a little over an hour, plus the small gap fillers and the edge.
The flowers join at their petal tips while you work the last round, so there is no sewing.
About This Emerald Petal Flower Motif Bedspread Crochet Pattern Pattern
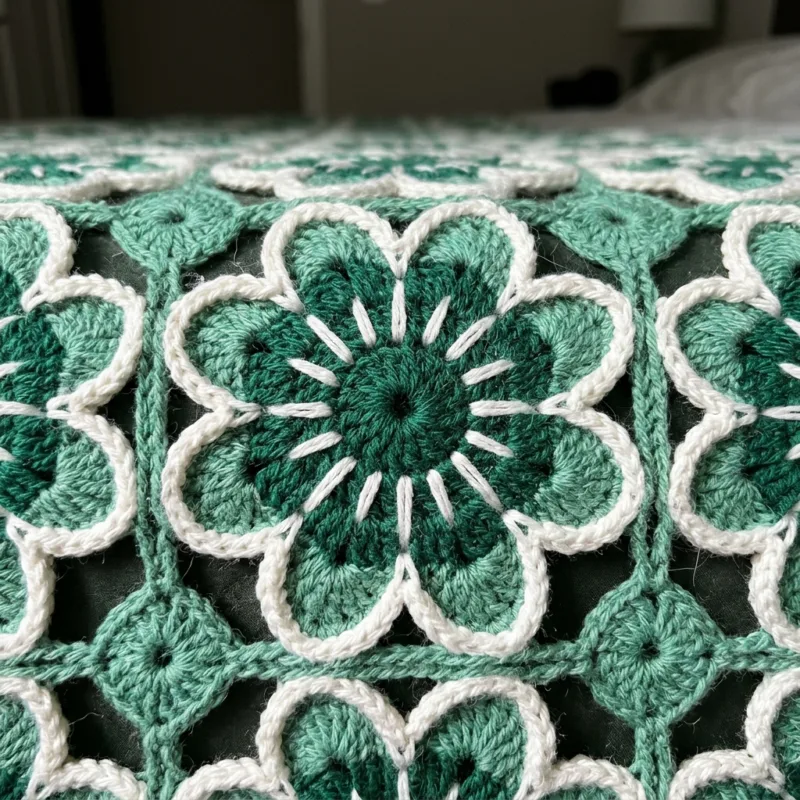
This bedspread is a whole garden of big green flowers. It is made from one hundred and ten eight-petal flower motifs, each one about 11 inches across from petal tip to petal tip. Every flower starts with a solid dark emerald center, worked in four rounds of double crochet. Around that center, a ring of white spike stitches reaches down into the earlier rounds and makes little white rays, like the stamens of a real flower. Then eight petals grow out in short rows, dark emerald at the base and fresh jade green at the tip. Finally, a raised white corded outline wraps around every petal, and that crisp white line is what makes each flower stand out so clearly on the bed.
The finished bedspread measures about 103 by 113 inches (262 by 287 cm). That is a grid of 10 flowers across and 11 flowers down, plus small jade filler circles that close the gaps where four flowers meet. On a queen mattress this gives a drop of about 21 inches on both sides and at the foot, so the flowers tumble down toward the floor. The outer petals form their own soft scalloped edge, so there is no separate border to crochet, only a little picot round to finish it. Every flower is the same, so once you have made one you know the whole pattern.
The stitches are chain, slip stitch, single crochet, half double crochet and double crochet, plus three that may be newer to you: the spike stitch, simple decreases and reverse single crochet. A spike stitch is just a single crochet worked into a round further down, so the yarn makes a long white line over the green. Reverse single crochet, sometimes called crab stitch, is worked from left to right and gives the thick, rope-like outline. Both are easy to learn and quickly become fun. The petals are worked in short rows with simple increases and decreases, so you shape each one by counting, not guessing.
The best part of this design is that you never sew anything. The flowers join to each other at the petal tips while you work the final outline round. You simply pause at a petal tip, slip stitch into the matching tip of the flower beside it, and carry on. Each flower joins its neighbors with two petals on each side, so the bedspread holds together firmly. When all the flowers are joined, the little filler circles go into the gaps, and they also join as you go. The result is a cover where the bed underneath stays hidden.
In worsted weight cotton the bedspread has real weight and a lovely three-dimensional texture. The white outlines sit up from the green like piping, and the petals catch the light at slightly different angles, so the whole bed seems to shimmer as you walk past. The greens feel fresh and calm, like a garden after rain, and they suit warm wood, beige walls, jute rugs and brass. It is a statement piece, but the soft colors keep it restful enough for a bedroom.
I rate this pattern as intermediate. You should be comfortable working in the round, counting stitches, changing colors and turning short rows. The join-as-you-go needs a bit of attention at first, so I suggest joining your first few flowers on a table where you can see the layout. It suits a maker who loves color and texture and enjoys watching a project bloom piece by piece. If you have made a flower motif or a mandala before, you will find this very satisfying, and the steps are all spelled out round by round.
Why You'll Love This Emerald Petal Flower Motif Bedspread Crochet Pattern Pattern
I have always wanted a bedspread that felt like a garden, and this is the one. When I lay the first ten flowers side by side on the table, I actually clapped my hands. The white outlines make each flower look drawn with a pen, and the greens shade from deep forest to fresh jade just like real leaves in the sun. It is a joy to make and an even bigger joy to sleep under. Every morning it makes me smile.
I love how each flower is a little project of its own. The center goes quickly, and then comes my favorite moment: the white spike stitches. You reach down into the earlier rounds, pull up the long white loops, and suddenly the plain green circle has a sparkling white ring around it. Then the petals grow one by one, and by the time you finish the eighth petal you have a whole flower in your hands. That feeling never gets old, not even on the hundredth flower.
I also love that there is no sewing at the end. I used to dread the weeks of joining that came after a big motif project. With this pattern, the flowers join as you work the white outline, so when the last flower is done, the bedspread is nearly done too. It feels like a gift to my future self. And watching the cover grow across the bed, flower by flower, kept me going through the long winter evenings.
Here is why this pattern has stolen my heart:
- Each flower is portable and finished in about an hour.
- The colors look fresh and calm in any light.
- The joining happens as you go, with no sewing at the end.
- The petals make their own scalloped edge.
- Every flower is the same, so the rhythm becomes relaxing.
This project changed our bedroom. We had beige walls, wood furniture and a jute rug, and the room was cozy but plain. Now the green flowers bring in the feeling of a garden, even in the middle of winter. In the evening, when the lamp is on, the white outlines glow softly and the room feels warm and peaceful. Friends who come to visit always want to touch it, and then they always ask how long it took.
Making it also taught me a few things. I learned that the spike stitches look best when they are loose, so I now pull each long loop up gently and never tug it tight. I learned to count the stitches up each petal side, because a petal with uneven sides throws off the join. And I learned to lay out each new row of flowers before joining, so the colors and the petal tips line up perfectly. Those small habits made the whole project calm instead of stressful.
Most of all, I love that it is a true heirloom. A cotton bedspread like this can be washed and used for decades, and the flowers will still look fresh. I like to imagine one of my grandchildren spreading it over their own bed one day and telling their children that great-grandma made every petal by hand. That is the kind of legacy I want to leave, one flower at a time.
Switch Things Up
The easiest change is the color. Keep the same idea of a dark center, a lighter petal tip and a white outline, and the flowers will always pop. Navy shading to cornflower blue looks beautiful and cool, while deep plum shading to lilac feels romantic. Burnt orange shading to marigold makes a warm autumn bedspread, and rose shading to blush pink is sweet and gentle. For a calmer look, try charcoal shading to silver gray with a cream outline instead of white.
You can change the size by changing the number of flowers. Each joined flower adds about 10 inches across, and the outer petals add a little more. The sizes below include a drop on the sides and foot. Remember to make one filler for every place where four flowers meet, which is one less than the flowers across, times one less than the flowers down.
- Twin: 7 by 9 flowers (63), 48 fillers, about 72 by 92 inches
- Full: 9 by 10 flowers (90), 72 fillers, about 92 by 103 inches
- Queen: 10 by 11 flowers (110), 90 fillers, about 103 by 113 inches
- King: 12 by 11 flowers (132), 110 fillers, about 123 by 113 inches
A sofa throw is a lovely smaller version. Make 5 by 6 flowers, thirty in total, with twenty fillers, for a throw of about 52 by 62 inches. It uses about a quarter of the yarn and takes around forty to fifty hours. It is a wonderful way to try the pattern before you commit to a whole bedspread. Draped over the arm of a sofa, the flowers look like a little garden in the living room.
For a baby, make 3 by 4 flowers with six fillers in soft baby cotton for a pram cover of about 32 by 42 inches. Pale mint shading to white with a white outline looks fresh and sweet, and soft yellow shading to cream is lovely too. The spike stitches and outlines are firm, but the gaps between petals can catch tiny fingers, so I keep a piece like this for the pram or as a keepsake, used with an adult nearby, rather than as loose bedding in a crib.
Matching pillows pull the whole bed together, just like in my photos. For a flower-shaped pillow, make two flowers, hold them wrong sides together and join them with white reverse single crochet around the petals, stuffing as you go. For a square sham, join four flowers in a 2 by 2 block with one filler in the middle, and sew it onto a plain green pillow cover. A row of three flowers sewn onto a long cushion makes a pretty lumbar pillow.
The same flower makes lovely smaller pieces for the home. A single flower in a sturdy cotton makes a beautiful trivet or a table mat. A row of seven flowers joined at the tips makes a table runner of about 72 inches. Three by four flowers make a tablecloth for a small table, and the scalloped petal edge hangs prettily over the sides. These are quick ways to use up the leftover yarn from the bedspread.
If you prefer a straighter edge, you can fill the half gaps along the sides of the bedspread. Make half fillers by working the filler center in rows instead of rounds, and join them into the gaps between the outer flowers. Then work three rounds of white single crochet around the whole bedspread for a clean, straight border. For a softer look, add a little picot on every petal tip instead of only the outer ones.
You can also play with yarn weight. In DK cotton with a 4 mm hook, each flower comes out at about 9 inches, so you need more of them, but the bedspread is lighter and drapes more. In a bulky cotton with a 6 mm hook, flowers grow to about 14 inches, and 8 by 8 flowers cover a queen bed much faster. Acrylic works too and is lighter and warmer, though cotton keeps the outlines crisper. Always make one test flower in your new yarn and measure it before you buy the rest.
Materials Needed
— Main Fabric
— Tools Required
The Free Pattern
0% complete
— Emerald Petal Flower (Make 110, dark emerald, jade and white) :
— Layout and Join As You Go (10 x 11 grid, 110 flowers) :
— Jade Gap Filler (Make 90, jade and white) :
— Picot Edge (Color C) :
Assembly Instructions
- Make 110 Emerald Petal Flowers through Round 7, weaving in the petal ends as you go.
- Work Round 8 of each flower following the Layout and Join As You Go section, joining each new flower at its petal tips to the flower on the left and the flower above.
- Lay each new row of flowers on a table before joining it, so the petal tips line up and nothing twists.
- Make 90 Jade Gap Fillers and join one into each gap where four flowers meet while you work Round 2.
- Work the Picot Edge around the outer petals of the whole bedspread.
- Weave in the last ends, then block the finished bedspread on a clean floor, pinning out the outer petals.
Common Mistakes & How to Fix Them
Spike stitches pulled too tight. The white rays in Round 5 only look right when the long loops are relaxed and reach the round below without tension. If you tug them, the green center puckers and curls, and the flower will never lie flat on the bed. It usually happens because the long loop feels loose and we instinctively tighten it. Pull each loop up slowly until it lies flat against the green, then finish the stitch without pulling. Check the center after Round 6 by laying it on the table. If it cups, undo Round 5 and work it more loosely.
Petals that come out lopsided. Each petal starts on exactly 4 stitches of Round 6, with 1 free stitch on each side. If you start one stitch early or late, the petal leans, the white base shows unevenly, and the tips will not meet their neighbors when you join. Before you start the petals, count 6 stitches per section and place markers on the first and last stitch of each petal. Count every petal row too: 8, 10, 10, 8, 6 and 3 stitches. Uneven petals are easy to spot once all eight are done, so compare them before outlining.
Uneven outline counts. Round 7 asks for 10 sc up each petal side, and it is tempting to just work along the edge without counting. Then some petals get 8 stitches on a side and others get 12, the outline waves, and the corded reverse single crochet looks bumpy. Work 2 sc into the side of each double crochet row and 1 sc into the side of each shorter row, which gives 10. If a side looks stretched, add a stitch on the next petal, but keep the total at 26 per section so the counts match in Round 8.
Joining the wrong petal tips. The flowers must face each other with two petals each, not one petal pointing straight at the neighbor. If one flower is rotated, its joins land in the wrong tips, the gaps between flowers become uneven, and the fillers no longer fit. Always turn a new flower so that its two facing tips sit opposite the two tips of its neighbor before you start Round 8. Lay the whole row out on a table first. If you do join a wrong tip, cut the slip stitch carefully, rejoin it, and weave in the ends.

You Might Also Like






Important Notes
Gauge and flower size matter in this pattern. With worsted weight cotton and a 5 mm hook, Rounds 1 to 4 should measure about 4.5 inches (11 cm), and the finished flower should measure about 11 inches (28 cm) from tip to opposite tip. Make one flower and block it before you buy all your yarn. If it is smaller, go up a hook size. If it is larger, go down a size, and keep the same hook for every flower.
Block each flower before you join it, or at least after each row is joined. Pin the center flat, then pin each petal tip out evenly in a star shape and spray with water. Let it dry completely. Blocking opens the petals, straightens the white outline and makes the tips line up easily. After the bedspread is finished, block it once more on a clean floor, pinning out the outer petals of the edge.
This bedspread uses about 1,700 grams of dark emerald, 1,000 grams of jade and 1,900 grams of white for the queen size. Buy all of it at once, and check that every ball of the same color has the same dye lot number. Greens in particular can vary from lot to lot, and the change will show across a big bed. Buy one or two extra balls of each color, so you do not run short in the last rows.
Wash the bedspread on a gentle cold cycle in a large machine, or by hand in a bathtub, with a mild detergent. Because dark emerald sits right next to white, add a color catcher sheet to every wash, at least for the first several times. Never use bleach, even on the white. Do not wring it. Press out the water with towels and lay it flat to dry, shaping each outer petal. Avoid the dryer, which can shrink the cotton and flatten the outlines.
I hope this bedspread brings a little garden into your home, the way it did into mine. It is a big project, but it is made of small, beautiful moments: a white spike ring here, a jade petal there, a tip that clicks into place beside its neighbor. Do not let the number one hundred and ten worry you. You do not have to make them all today. You only have to make the first flower.
So gather your greens and your white, find a sunny chair and a good cup of tea, and start with one center. Watch it bloom petal by petal, and lay it on your bed to imagine the rest. Then make another. Before you know it, your bed will be covered in flowers, and you will have an heirloom to treasure for years. Happy crocheting, my friends.
Crochet Abbreviations
You Ask, We Answer
What is the finished size of this bedspread?
The bedspread in the photos measures about 103 by 113 inches (262 by 287 cm). It is made from 110 flowers in a grid of 10 across and 11 down, with 90 small fillers in the gaps where four flowers meet. Each flower measures about 11 inches from tip to tip, and once the flowers overlap at their joined petals, each one adds about 10 inches to the width and length. On a standard queen mattress, which is 60 by 80 inches, this size gives a drop of about 21 inches on each side and at the foot, so the flowers reach close to the floor. If your bed is taller or lower, measure from the top of the mattress to the floor and add or remove flowers to suit. Always measure your first blocked flower before buying all your yarn, because the final size depends on your gauge. The variations section lists flower and filler counts for twin, full and king beds too.
Can I use a different yarn weight or make it smaller?
Yes. The flower works in any yarn weight, but its size will change, so you need to adjust the number of flowers. In DK cotton with a 4 mm hook, flowers come out at about 9 inches, and you would need about 12 by 13 flowers for the same queen size. In a bulky cotton with a 6 mm hook, flowers grow to about 14 inches, and 8 by 8 flowers cover a queen bed. To make a smaller piece, simply make fewer flowers: thirty flowers in a 5 by 6 grid make a sofa throw, and twelve flowers make a pram cover. The rounds, petal rows and stitch counts stay exactly the same in every case, and so do the join and the fillers. Just remember the filler count is always one less than the flowers across, times one less than the flowers down, and make one test flower first.
How do I wash and care for the bedspread?
Cotton is easy to care for, but a bedspread this size is heavy when wet, so treat it gently. Wash it on a cold, gentle cycle in a large capacity machine, or by hand in the bathtub with a mild detergent. Always add a color catcher sheet, because the dark emerald sits right against the white outlines, and even a little loose dye would show. Never use bleach, not even on the white, as it weakens cotton and can turn the greens patchy. Do not hang it wet from a line, since the weight will stretch the petals and pull the joins. Instead, press out the water with towels and lay it flat to dry, shaping the outer petals as you go. Between seasons, fold it loosely and store it in a cotton bag, not plastic, with a sachet of lavender or cedar to keep moths away.
Success!
Thanks for subscribing — check your inbox for a welcome note.
Abbreviations
- A — Color A, dark emerald green
- B — Color B, jade green
- C — Color C, white
- ch — chain
- sl st — slip stitch
- sc — single crochet
- hdc — half double crochet
- dc — double crochet
- spike sc — spike single crochet, worked into a round below
- reverse sc — reverse single crochet (crab stitch), worked from left to right
- sc2tog — single crochet 2 together
- hdc2tog — half double crochet 2 together
- dc2tog — double crochet 2 together
- yo — yarn over
- st(s) — stitch(es)
- sp(s) — space(s)
- rep — repeat