
Forest Green and Cream Diamond Granny Curtain Crochet Pattern
A classic four-round granny motif in chain, slip stitch, single and double crochet, with no color changes at all.
Each little diamond takes about 18 minutes, so five a day gets the whole door curtain done in about a month.
Slim columns with diamond gaps between them let the daylight pour through while still softening the view.
About This Forest Green and Cream Diamond Granny Curtain Crochet Pattern Pattern
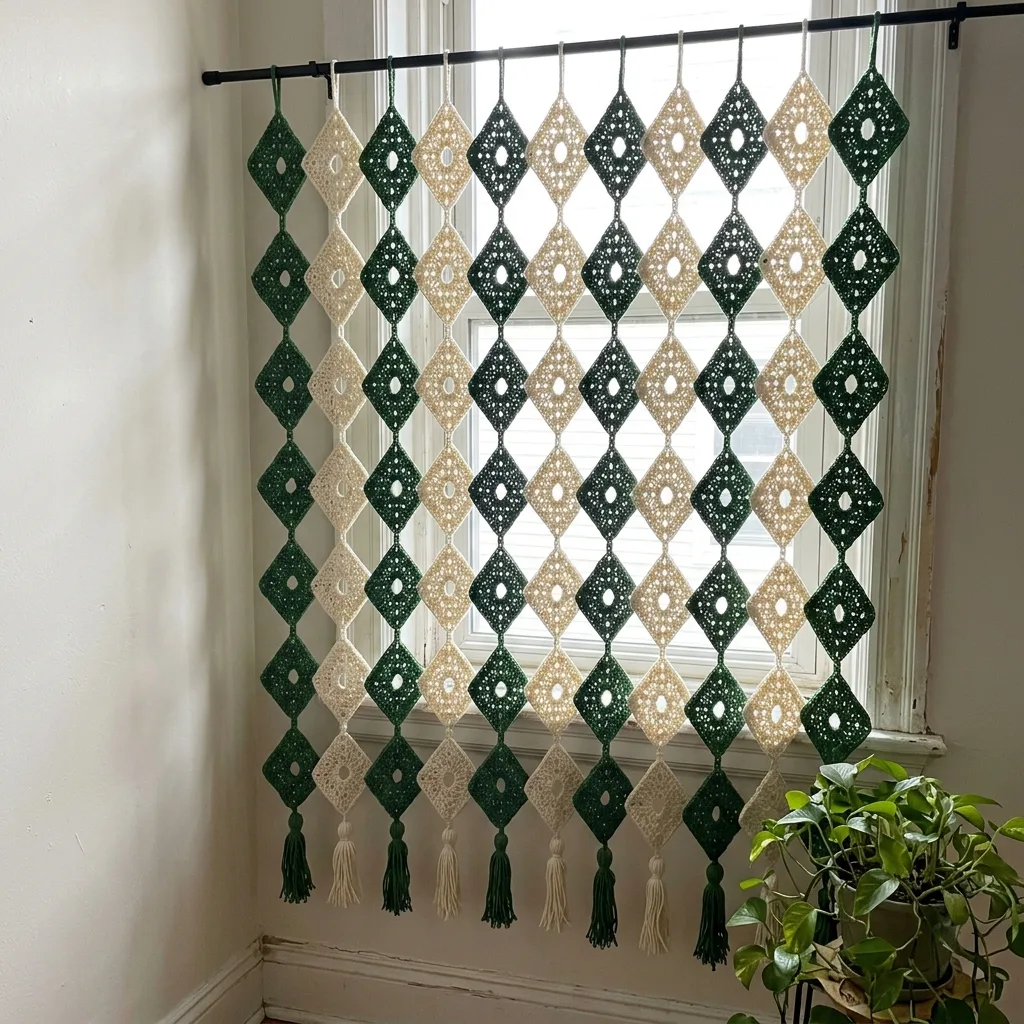
This curtain is made of long, slim strings of little diamonds, and it is one of the simplest and most striking things I have ever hung in a doorway. It has eleven columns, and each column is a single color, either deep forest green or soft cream. The columns alternate across the rod and start and end with green, so the dark strings frame the light ones on both sides. From a distance it looks like a rain of green and cream gems, and up close every diamond is a tiny lacy square with an open heart.
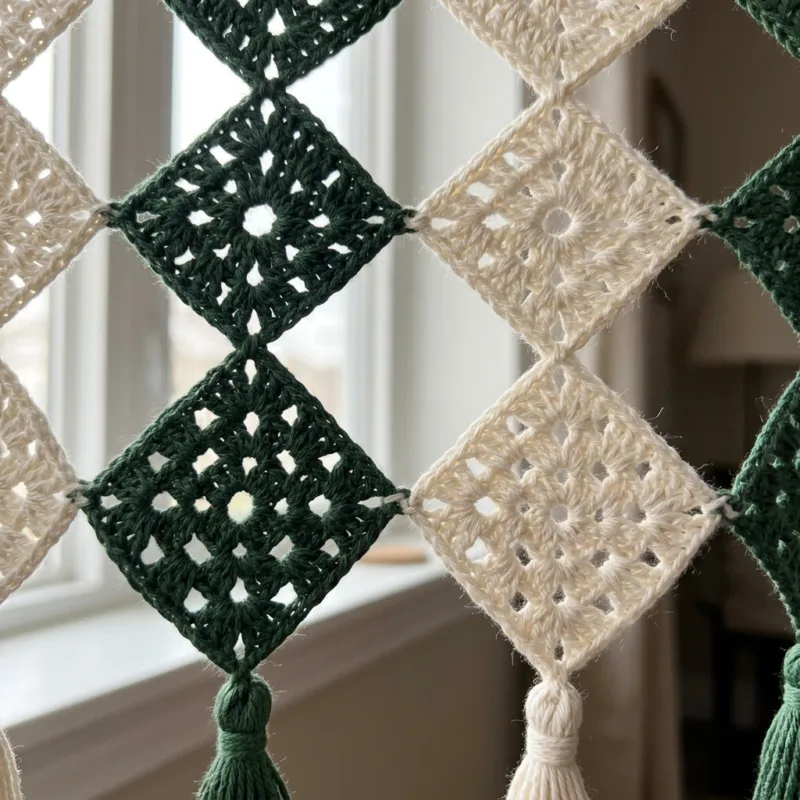
The motif is a classic four-round granny square, the kind many of us learned first. You start with a ring and four little clusters of three double crochet, then add clusters round by round, with a chain two at each corner and a chain one between the side clusters. The fourth round is a tidy border of single crochet that sharpens the edges and leaves a small chain space at each corner. When you turn the finished square on its point, those corner spaces become the top and bottom of the diamond, and the open center lets the light shine through like a little window.
The motifs are joined point to point with very short chain links, so short that the diamonds almost touch. I work each link as three chains and then slip stitch back along them, which makes a firm little knot of yarn about half an inch long. Fourteen diamonds make one column, and the columns hang about five inches apart, so their side points nearly meet. The spaces left between the columns are diamonds of pure light, and they are just as much a part of the design as the crochet.
Each column hangs from a small yarn loop covered in single crochet, worked in the column color and slipped over a slim black metal rod. At the bottom, every column ends in a small tassel about three inches long, again in the column color. The finished curtain measures about 55 inches wide and 81 inches long from the rod to the tassel tips, which fits a glass door or a tall window beautifully. Each motif blocks to 3.5 inches square, about 5 inches from point to point when it hangs.
I used a DK weight cotton with a 3.5 mm hook, because the slimmer yarn keeps the diamonds small and delicate and makes the columns look light and graceful. Cotton holds the points well and does not stretch much, which matters when fourteen motifs hang from one loop. There are no color changes inside the motifs, so every square is worked from start to finish in one color. That makes this a wonderful project for anyone who wants to relax and let their hands work without thinking too hard.
This curtain suits a beginner who knows the granny square, and it is a happy, mindless project for experienced makers who want something to work on in front of a film. The number of motifs is large, but each one takes only about eighteen minutes and fits in your palm. Hung in a glass door, it gives a gentle screen from the garden or the street, it moves softly when the door opens, and in the afternoon it throws a pattern of little diamond shadows across the floor.
Why You'll Love This Forest Green and Cream Diamond Granny Curtain Crochet Pattern Pattern
I love this curtain because it is so honest and simple. It is just granny squares, the first motif my grandmother taught me, turned on their points and strung together. There is something very comforting about making a pattern I could almost do in my sleep, and yet the finished curtain looks fresh and modern. It reminds me that the oldest stitches can still surprise us when we use them in a new way.
I also love how portable it is. Each little diamond is smaller than my palm, so I carried a small bag with a hook and two balls of yarn everywhere for weeks. I made squares at the doctor's office, at my grandson's football practice and on the porch in the morning. Because each motif is finished in one short sitting, I never lost my place, and every finished square went straight into the basket for its color. On quiet evenings I set myself a goal of five squares, and that small, steady rhythm carried me through the whole project without it ever feeling heavy or rushed at any point along the way.
Here is why this pattern is special to me:
- It is one easy granny motif with no color changes.
- Each column is a single color, so the layout is very easy.
- It uses up spare green and cream cotton beautifully.
- It works in a glass door, a tall window or as a room divider.
- It moves gently every time the door opens.
There is a quiet joy in watching the strings grow. I joined each column as soon as I had fourteen squares of one color, and I hung the finished columns on the rod one by one. For a few weeks the curtain was only half there, a few green strings and a few cream ones, and every new column made the doorway look more finished. That slow growth kept me excited right to the last tassel, and it meant the joining never felt like a big job.
This curtain makes a lovely gift for a new home, especially for someone with a glass door to the garden. You can choose colors to match their kitchen or their plants, and because each column hangs on its own loop, it fits any rod and can be made wider or narrower by adding or removing columns. Even a few columns hung in a small window make a sweet, thoughtful present that will be used every day.
I learned a few things while making it. I learned to measure every tenth square, because a tiny change in size adds up over fourteen motifs in a column. I learned that very short links look neat but must be worked firmly, or the column slowly stretches. And I learned that a curtain with single color columns is the most forgiving design for a busy season, because you can make the green ones and the cream ones in any order. I hope my little lessons help your curtain come together smoothly too.
Switch Things Up
This pattern is easy to change, because the motif is small and each column is just one color. My first idea is always a new palette. Forest green and cream feel calm and natural, but red and white columns make a cheerful kitchen door, blue and white looks fresh and coastal, and pink and white is sweet for a girl's bedroom. A softer green and cream, with sage instead of forest green, gives a gentle cottage feel. Keep one dark and one light color so the stripes of columns stay clear from across the room.
You can also mix the colors inside the columns. Try a checkerboard, where the colors trade places in every row, or an ombre, where the columns slowly change from dark green through sage to cream across the rod. For a special touch, make white with golden details by working the border round of every white square with a fine gold metallic thread held together with your yarn. It sparkles softly in evening light and looks lovely in a dining room.
Changing the size is simple. Each column adds about 5 inches of width, and each motif with its link adds about 5.5 inches of length. The top loop and the tassel add about 4.5 inches together. Here are the sizes I use:
- Narrow window, about 25 by 43 inches: 5 columns of 7 motifs, 35 motifs.
- Standard window, about 45 by 70 inches: 9 columns of 12 motifs, 108 motifs.
- Door, about 55 by 81 inches: 11 columns of 14 motifs, 154 motifs.
- Room divider, about 75 by 92 inches: 15 columns of 16 motifs, 240 motifs.
A short cafe curtain is one of my favorite ways to use this pattern. Hang it on a tension rod halfway up a kitchen window and make each column only 5 motifs long. That gives about 32 inches of drop with the loops and tassels, which covers the lower half of the glass and keeps the top open for light. It needs only about 55 squares for a standard kitchen window, so it is a quick and satisfying first project before you take on a full door.
For a busy doorway between two rooms, I like to space the columns about 6 inches apart instead of 5, so the strings part easily when people walk through. Make the top loops a little bigger, with 16 chains instead of 12, so the columns slide along the rod as people push past. Keep the links extra firm, because a doorway curtain gets touched many times a day. It looks wonderful between a kitchen and a hallway, and it keeps the light flowing from one room to the next.
The tassels can change the mood too. These small 3 inch tassels look neat and modern. Longer tassels of 6 to 8 inches feel more relaxed and dramatic, and they are lovely on a window curtain that does not need to clear the floor. You could also mix both colors in every tassel to tie the columns together, or replace the tassels with a small pompom or a wooden bead for a rustic finish.
Finally, you can change the yarn weight. In worsted cotton with a 5 mm hook, each motif comes out about 4.5 inches square and about 6.4 inches point to point, so 9 columns of 11 motifs cover the same door. In chunky cotton with a 6.5 mm hook, each motif grows to about 6 inches square and about 8.5 inches point to point, and 7 columns of 8 motifs cover a door. Always make a test square, block it and measure it before you plan your layout.
Materials Needed
— Main Fabric
— Tools Required
The Free Pattern
0% complete
— Diamond Granny Motif (Make 154: 84 forest green, 70 cream) :
— Layout :
— Chain Links and Joining :
— Tassels (Make 11: 6 forest green, 5 cream) :
— Top Loops and Hanging (Make 11: 6 forest green, 5 cream) :
Assembly Instructions
- Make all 154 Diamond Granny Motifs, 84 in forest green and 70 in cream, and block each one to 3.5 inches square.
- Following the Layout, sort the motifs into 11 single color columns of 14, alternating green and cream with green at both edges.
- Join the motifs of each column point to point with the Chain Links, 13 links per column and 143 in total.
- Work a Top Loop on the top point of each of the 11 columns in the column color.
- Make the 11 Tassels and sew each one to the bottom point of the column in the same color.
- Slide the loops onto the rod about 5 inches apart, mist the columns lightly and let them hang overnight so the links settle.
- Trim all the tassels together to an even 3 inches once the curtain has settled on the rod.
Common Mistakes & How to Fix Them
The most common problem with this curtain is squares that slowly change size. With 154 motifs made over several weeks, tension shifts with mood, tiredness and the chair you sit in, and a tiny change of an eighth of an inch per square adds almost two inches over a column of fourteen. The result is columns that end at different heights and tassels that do not line up. Measure every tenth square against your first blocked one, and change hook size half a step if it drifts. Blocking all squares to the same pinned size also evens out small differences.
Another mistake is mixing up the corners in Round 4. If you work (sc, ch 2, sc) into a side ch-1 space by accident, or forget the ch 2 at a corner, the square comes out lopsided and the diamond hangs crooked. Without a clean corner space, there is also nothing neat to join the link into. It usually happens when you are chatting or watching something exciting. Mark all four corner spaces of Round 3 before you start the border, remove each marker as you work that corner, and count to 52 sc before fastening off.
Loose links are the next trap, and they show more here than in many curtains because the motifs almost touch. If the ch 3 is loose or the slip stitches back along it are skipped, the link stretches under the weight of the squares below and opens a big gap in the column. Over thirteen links, the column can also grow longer than its neighbors. Keep your chains snug, always work the three slip stitches back, and anchor both ends firmly. When a column is finished, hang it and compare its length with the first column.
The last common mistake is hanging the columns in the wrong order or too close together. Two green columns side by side break the rhythm of the design, and columns hung less than 5 inches apart overlap and tangle, which spoils the clean diamond gaps between them. It happens when the loops are slid onto the rod in a hurry. Lay the columns out on the floor in order before you hang them, slide them on from left to right, and use a measuring tape to space the loops evenly before you trim the tassels.

You Might Also Like






Important Notes
Gauge decides the length of every column. With DK cotton and a 3.5 mm hook, Rounds 1 to 3 should measure about 3 inches across, and the finished motif after Round 4 and blocking should measure 3.5 inches square, about 5 inches from point to point. If your square is bigger, go down half a hook size. If it is smaller, go up. Make and block one test square in each color before you buy all your yarn.
Block every square before joining. Pin each one to your mats with straight sides and sharp corners, mist it with water and let it dry completely. Cotton keeps the shape you give it, so blocked squares hang flat and the corner spaces stay open for joining. After all the columns are on the rod, mist the links lightly and let the curtain hang overnight so every column settles to the same length before trimming.
You need about 1,200 yards of forest green, roughly 480 g, and about 1,000 yards of cream, roughly 400 g, including the motifs, links, loops, tassels and a little spare. Buy all the yarn for each color at once and check that every ball carries the same dye lot number. In a sunny door, a slightly different shade in one column will be easy to see, and running short with a new dye lot is hard to fix.
The finished curtain weighs about 900 g, so fix the rod with proper brackets. To wash it, place it in a large mesh bag on a gentle cold cycle, or hand wash it in the bathtub. Because the deep forest green and the pale cream are washed together, add a color catcher sheet every time. Never wring the columns. Lay them flat on towels to dry, reshape every diamond and comb the tassels before hanging.
I hope this curtain brings as much calm and light to your home as mine has brought to my garden door. It may look like a big project, with all those little diamonds, but every single one is the same easy granny square, worked in one color from start to finish. Square by square and column by column, it comes together almost without you noticing.
So pick up your hook, choose your two favorite colors and make your first little square tonight. Block it, hold it up to the window by one corner and watch the light come through its center. I think that one small diamond will be all the encouragement you need to make the next one hundred and fifty-three. Happy crocheting, my friends.
Crochet Abbreviations
You Ask, We Answer
How big is the finished curtain, and how do I make it fit my door or window?
The curtain as written is about 55 inches wide and 81 inches long, measured from the rod to the tips of the tassels. That comes from 11 columns of 14 motifs, with each motif blocked to 3.5 inches square, or about 5 inches from point to point, plus a short half inch link between motifs, about 1.5 inches for the top loop and 3 inches for the tassel. To fit your own door or window, divide the width you want to cover by 5 to find the number of columns. For the length, measure from the rod to where you want the tassel tips to end, subtract 4 inches for the loop and tassel, and divide what is left by 5.5 to get the number of motifs per column. An odd number of columns keeps the same color at both edges, just like mine. Always plan with your own blocked test square, because every hand crochets a little differently.
Can I use a different yarn weight or make the diamonds bigger?
Yes, the pattern works the same way in any weight, and only the size changes. In worsted cotton with a 5 mm hook, each square comes out about 4.5 inches across, so you will need fewer squares per column and fewer columns. In chunky cotton with a 6.5 mm hook, the squares grow to about 6 inches and the curtain will look bolder and more rustic. I recommend cotton or a cotton blend for curtains, because it holds the diamond points and does not stretch much in a long column. Acrylic works too, but it can stretch over time, so keep the links firm. Whatever you choose, make one square, block it and measure it from point to point. Then redo the column and motif math from the first question. Bigger squares also call for slightly longer tassels, so try 4 or 5 inches to keep everything in balance.
How do I wash and care for the curtain?
I wash mine about twice a year, or whenever it looks dusty in the sun. Take it off the rod and slip the columns into a large mesh laundry bag, or two bags so they have room to move. Wash on a gentle cold cycle with a mild detergent, or hand wash in the bathtub, which is kinder to the short links. Always add a color catcher sheet, because the forest green is a deep shade and the cream can pick up a tint if the green bleeds. Do not wring or twist. Press the water out with a towel, lay each column flat and straighten every diamond with your fingers so the points are sharp again. Let everything dry fully before hanging. To store the curtain, lay the columns side by side and roll them loosely around a cardboard tube, then keep the roll in a cotton pillowcase, never in plastic.
Success!
Thanks for subscribing — check your inbox for a welcome note.
Abbreviations
- ch — chain
- sl st — slip stitch
- sc — single crochet
- dc — double crochet
- st — stitch
- sp — space
- rep — repeat
- * — repeat the instructions after the asterisk as directed