
Orange and Cream Flower Lace Bed Cover Crochet Pattern
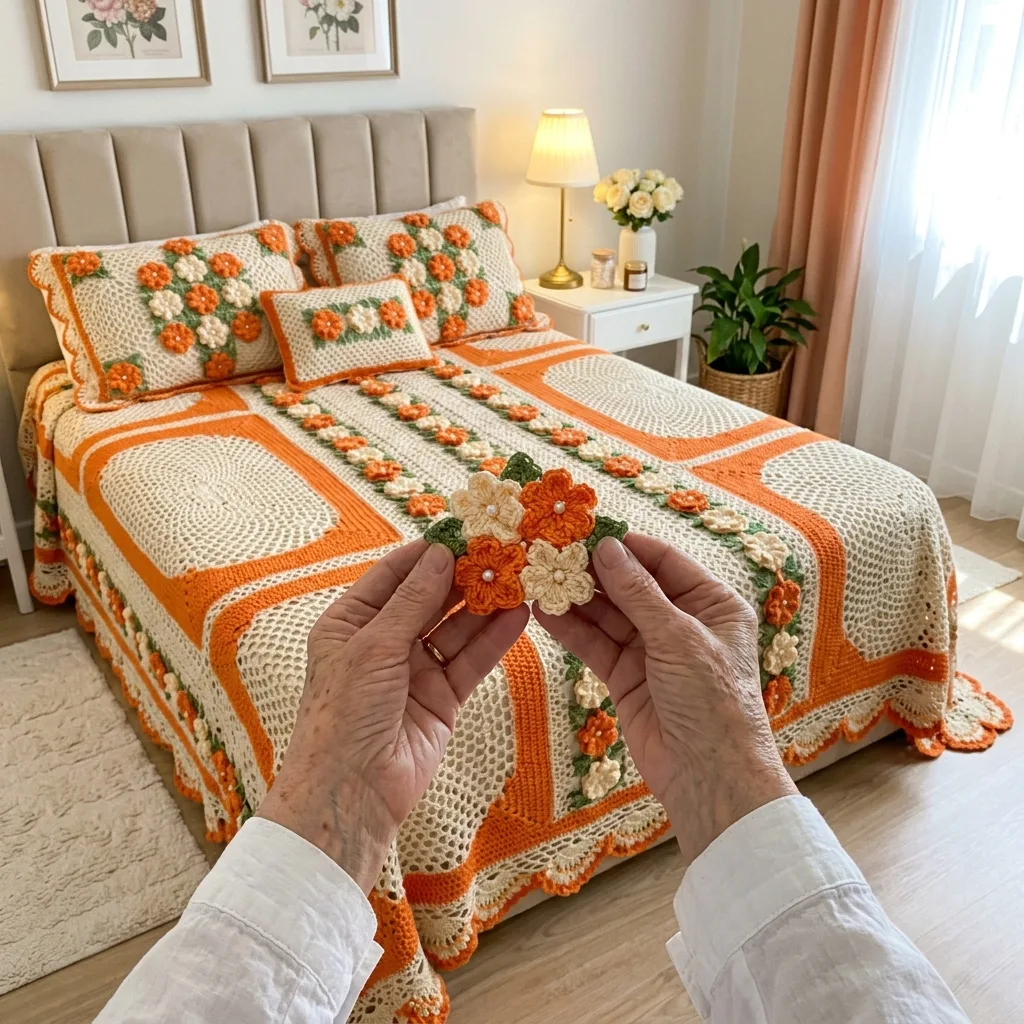
Simple mesh and flower stitches, plus careful counting on the big lace panels.
Each panel with its flowers takes about five and a half hours, so one or two panels a week finishes the cover in a few months.
Raised orange and cream flowers with pearl centers bloom down the middle of every panel like little bouquets.
About This Orange and Cream Flower Lace Bed Cover Crochet Pattern Pattern
This bed cover is pure sunshine. It is made from twenty large lace panels in soft cream, each one built from a radial mesh that spreads out from the center like the spokes of a wheel. Every panel is framed in a wide band of bright orange, and down the middle of each one runs a strip of raised flowers: three orange and two cream, each with a white pearl at its heart and a pair of green leaves tucked underneath. Where the rounded corners of four panels meet, a small cream pearl flower fills the gap. The whole cover is finished with a scalloped edge of cream fans outlined in orange, so it looks cheerful, warm and a little bit vintage.
The finished size is about 76 by 94 inches including the border. Each panel measures about 18 inches across, and the layout is 4 panels across and 5 panels down. That covers the top of a full or queen bed and drapes down both sides with a generous drop at the foot. I worked mine in DK weight cotton, which keeps the mesh crisp and the flowers firm and gives the cover a cool, smooth feel. Because the panels are open lace, the cover is lighter than it looks, and it is lovely on its own in summer or layered over a cream quilt in winter.
Each panel starts with a small ring of double crochet. On the next round, the ring splits into sixteen spokes of two double crochets each, with chain spaces between them. Every round after that, the spokes stay the same and one more mesh space is added in each section, so the circle grows evenly and the spokes form those pretty lines that radiate across the panel. Near the end, the four corners are worked with treble crochet and longer chains, which pulls the circle into a soft square with rounded corners. Three rounds of orange then frame the panel with a wide, solid band.
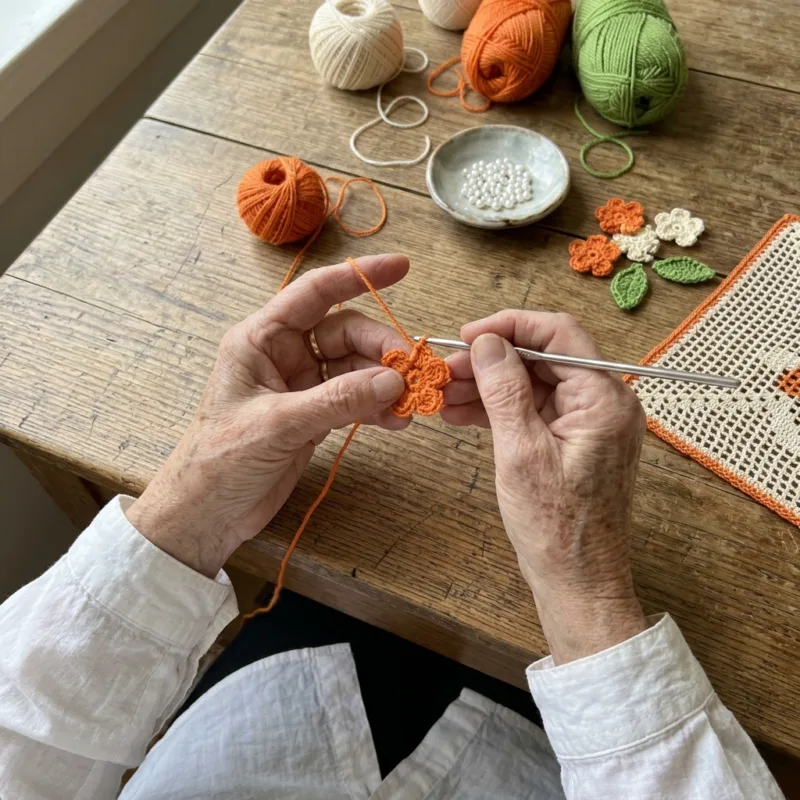
The flowers are small and quick. Each one is a simple five petal flower worked in three rounds, with a magic ring center, a round of chain loops, and a petal of double crochets in each loop. The leaves are worked on a short chain, with stitches that rise to double crochet in the middle and a tiny pointed tip. You sew five flowers and ten leaves down the center of each panel, then sew a pearl bead into the middle of every flower. The flowers stand up off the lace, which gives the cover its lovely raised, three dimensional look.
The panels are joined with slip stitches through the middle part of each orange side, leaving the rounded corners open. Those open corners create small diamond shaped gaps, and each gap is filled with a cream connector flower with a pearl center, sewn to the panels around it. The border is three simple rounds: a round of chain loops, a round of cream fans worked into every other loop, and a round of orange single crochet that outlines each fan and gives the scallops their two tone look.
I rate this pattern Intermediate. The stitches are basic, but the panels are big, so you need patience and good counting to keep the sixteen spokes straight. Making a hundred and twenty six flowers and two hundred leaves takes time too, but they are small, portable and relaxing, perfect for evenings in front of the television. This project suits a maker who loves color, enjoys a little sewing, and wants a bed cover that feels like a garden in full bloom.
Why You'll Love This Orange and Cream Flower Lace Bed Cover Crochet Pattern Pattern
I love this bed cover because it makes me happy every time I walk into the room. Orange and cream is such a warm, cheerful pair. The orange feels like marigolds and late summer sunsets, while the cream keeps it soft and calm. With the little green leaves and the white pearls, the whole bed looks like it is covered in tiny bouquets. Even on a gray, rainy day, this bed cover brings sunshine into the bedroom, and it always gets a smile from anyone who sees it.
I also love that this project has two very different kinds of work. The big lace panels are rhythmic and soothing. Once the spokes are set up, each round is the same steady pattern, and my hands find a peaceful rhythm. The flowers and leaves are the opposite: small, quick and fun, finished in a few minutes each. When I get tired of the big panels, I switch to flowers, and when I have a pile of flowers, I go back to the lace. That variety kept me excited about this cover from the first stitch to the last.
The flowers are wonderfully portable. I kept a little tin with small balls of orange, cream and green, a hook, a few pearls and a needle, and I made flowers everywhere: in waiting rooms, on the porch with my tea, and on car rides. By the time I finished the panels, I had a bowl full of flowers and leaves ready to sew on. There is something so satisfying about pouring out a heap of little orange and cream flowers and arranging them on the lace.
Here is what I learned while making it:
- A marker on every spoke keeps the sixteen sections even on the big panels.
- Making all the flowers of one color at once speeds things up a lot.
- Pinning the flower strip in place before sewing keeps it perfectly straight.
- Sewing the pearls on with doubled thread makes them strong enough for washing.
This bed cover also makes a meaningful gift. The flowers make it feel festive and joyful, so it would be perfect for a wedding, a housewarming, or a special birthday. I can picture it on the bed of a summer cottage or in a guest room that greets visitors with warmth. When I give a handmade piece like this, I add a small card with the yarn names, the hook size and the care notes, so it can be enjoyed for years and passed down.
Finally, I love how it pulls a room together. Paired with a beige headboard, white furniture, a vase of cream roses and some green plants, the bed cover becomes the bright heart of the room. The matching pillows with their flower strips finish the look. When the lamps glow in the evening and the pearls catch the light, it feels like a little garden is resting on the bed, and I am reminded of every happy hour that went into it.
Switch Things Up
Try a new color story. The design works with any frame color as long as the lace stays light. Cream with dusty pink frames and pink flowers feels romantic, cream with sky blue frames and blue flowers feels fresh and coastal, and cream with deep red frames and red flowers feels warm and festive for the holidays. For a calm, elegant look, try cream with sage green frames and white flowers. Keep the leaves green in every version, because they make the flowers look real and alive.
Make it in other bed sizes. Each panel is about 18 inches, so planning a new size is simple. Measure the top of the mattress, add the drop you want on each side, and divide by 18. The border works on chain loops, so it fits any grid. Here are some grids to start from:
- Twin: 3 x 5 panels, 15 panels, about 58 x 94 inches.
- Full: 4 x 5 panels, 20 panels, about 76 x 94 inches.
- Queen: 5 x 6 panels, 30 panels, about 94 x 112 inches.
- King: 6 x 6 panels, 36 panels, about 112 x 112 inches.
Make a baby blanket. Four panels joined 2 by 2 make a baby blanket of about 40 inches square with the border. For a baby, leave out every pearl bead, because beads can come loose and are a choking hazard. Instead, make each flower center with a tiny bobble or a few French knots in a contrasting yarn. Soft colors like pale peach, mint or lemon with cream look sweet in a nursery, and a soft cotton blend keeps it gentle on new skin.
Make a throw or a table topper. Six panels joined 2 across and 3 down make a throw of about 40 by 58 inches, lovely over the back of a sofa. A single panel with its orange frame and flower strip makes a beautiful round topper for a side table, and two panels side by side make a centerpiece for a dining table. These smaller pieces are perfect for using leftover yarn and make quick, cheerful gifts.
Add matching pillows. My shams are each made from a panel worked to Rnd 14 with the orange frame, sewn to a back panel of plain cream double crochet, and finished with the same fan border. For a small rectangular pillow, make a strip of cream mesh about 8 by 16 inches, frame it in orange, and sew a short bouquet of three flowers and six leaves in the center. Matching pillows turn the cover into a complete bedding set.
Change the flower layout. Instead of a vertical strip, arrange the flowers in a ring around the center of each panel, or place a single bouquet of five flowers in the middle like the little cluster I hold in my video. You could also add a flower to each rounded corner of the panels instead of using separate connector flowers. Each layout changes the mood of the cover while using the same panels and flowers.
Change the yarn weight. In sport weight cotton with a 3.5 mm hook, each panel comes out about 15 inches, so you need more panels but the lace looks finer. In worsted cotton with a 5.0 mm hook, panels grow to about 21 inches and the flowers become larger and bolder. Always make one test panel and one flower in your yarn, measure them, and plan your grid and yarn amounts from those real sizes.
Skip the beads or change them. If you prefer a softer, simpler look, leave out the pearls and work the flower centers in a contrasting yarn color, such as orange centers on cream flowers and cream centers on orange flowers. You can also swap the white pearls for small gold beads for a warmer glow, or for clear crystal beads that sparkle in the lamplight. The flowers look lovely in every version.
Materials Needed
— Main Fabric
— Tools Required
The Free Pattern
0% complete
— Lace Panel (Make 20, cream A with orange B frame) :
— Five Petal Flower (Make 126: 60 orange B, 66 cream A) :
— Leaf (Make 200, green C) :
— Flower Strips :
— Layout and Joining :
— Border :
Assembly Instructions
- Make 20 Lace Panels, weave in all ends and block each one to 18 x 18 inches.
- Make 126 Five Petal Flowers and 200 Leaves, and sew a pearl bead into the center of every flower.
- Sew a Flower Strip of 5 flowers and 10 leaves down the center of each panel.
- Arrange the panels 4 across and 5 down and join them with B over the middle 120 sts of each shared side.
- Sew the 26 cream connector flowers into the gaps between the rounded corners.
- Work the three Border rounds around the whole cover.
- Weave in the last ends, mist the cover lightly and pin the fan scallops flat until dry.
Common Mistakes & How to Fix Them
Losing a spoke or a mesh space on the big panels. With sixteen sections and a growing number of spaces, it is easy to skip a spoke or work an extra space, especially late in the evening. One mistake makes one section wider than the others, and the panel starts to ruffle or cup instead of lying flat. Place a stitch marker in the first dc of every spoke and move it up each round. Count the spaces in one section after each round: Rnd 6 has 5 spaces per section and Rnd 12 has 11. If one section is off, fix it right away.
Working the corner rounds in the wrong sections. In Rnds 13 and 14, only the eight corner sections get treble crochet and chain 3 spaces. If you work tall stitches in the side sections instead, the panel turns into a diamond or a lopsided shape and will not join neatly to its neighbors. Before Rnd 13, count the sections from the start of the round and place a contrasting marker in the first spoke of sections 2, 6, 10 and 14. Each corner covers that section and the next one, so you always know where the tall stitches begin and end.
A crooked flower strip. If you sew the flowers on without pinning them first, the strip often drifts to one side or curves, and once all twenty panels are joined, the crooked strips are very noticeable. Lay each blocked panel flat, find the center line by folding it gently in half, and pin all five flowers and ten leaves in place before sewing. Step back and look at the panel from a distance. Sew through the back of the petals and leaves only, so the stitches do not show on the front and the flowers stay raised.
Loose pearls. Pearls are the first thing to come off in the wash if they are sewn with a single strand of thread or tied with a weak knot. A lost pearl leaves a flower looking unfinished, and loose beads can be a hazard. Sew each pearl with doubled sewing thread, passing through the bead and the flower center at least four times, and knot it firmly on the back. Check every pearl after the first wash and tighten any that wobble. For homes with babies or small children, skip the pearls and use French knots instead.

You Might Also Like






Important Notes
Gauge matters on big lace panels. Make one full panel, block it and measure it. It should be about 18 x 18 inches. If it is smaller, go up half a hook size, and if it is larger, go down half a size. Make one flower too, which should be about 2.5 inches across. Recheck every fifth panel, because tension drifts over long rounds.
Block each panel before sewing on the flowers. Pin it to 18 x 18 inches, rounding the corners and straightening the spokes, then mist with water and let it dry fully. Do not press the flowers or leaves flat once they are sewn on. After the border is finished, mist the whole cover lightly and pin the fan scallops so they lie even all the way around.
Buy all your yarn at once and check that every ball of each color has the same dye lot number. Bright orange especially can vary from lot to lot, and a slightly different frame will stand out in daylight. The amounts in the materials list are generous estimates for the 4 x 5 size, but buy one extra ball of each color as insurance.
Hand wash the cover in cool water with a mild detergent, or machine wash it on a gentle cold cycle inside a large mesh laundry bag to protect the flowers and pearls. Because orange and green sit right next to cream, add a color catcher sheet to every wash. Never wring it. Roll it in towels, dry it flat, and fluff the flowers with your fingers.
Thank you for spending this time with me and my orange flowers. This bed cover is a long and joyful project, but it is made of small, happy pieces: a panel here, a handful of flowers there, a pearl sewn on with a cup of tea. You do not need to think about the whole bed today. All you need to begin is a magic ring and a bit of orange yarn.
Start with one flower this week, then make a leaf to go with it, and see how cheerful they look together. I think you will want to make a whole bouquet. Before long you will have a bowl full of flowers and a stack of lace panels, and soon a bed blooming with sunshine. Happy crocheting, my friends.
Crochet Abbreviations
You Ask, We Answer
How big is the finished bed cover?
The finished bed cover measures about 76 by 94 inches including the border. Each blocked panel is about 18 inches, joined 4 across and 5 down, which gives about 72 by 90 inches, and the three border rounds with the fan scallops add about 2 inches on every side. On a full bed this covers the top and drapes generously down both sides. On a queen it covers the top with a shorter side drop. If you want the cover to reach the floor on both sides, measure the mattress width plus twice the height from the mattress top to the floor, then divide by 18 to find how many panels you need across. Do the same for the length, adding one drop for the foot. The border is worked into chain loops, so it fits any grid. Remember to add one connector flower for every new gap.
Can I use a different yarn or leave out the pearls?
Yes to both. DK cotton gives crisp lace and firm flowers, but you can use sport weight cotton with a 3.5 mm hook for finer, 15 inch panels, or worsted cotton with a 5.0 mm hook for bold, 21 inch panels and bigger flowers. Acrylic is softer and lighter but the mesh will not block as crisply, so steam it gently instead of misting. Make one test panel and one flower in your yarn and measure them before planning your grid. The pearls are completely optional. Without them, the cover is simpler and safer for homes with babies or small children. You can work the flower centers in a contrasting yarn, add a tiny bobble, or embroider three French knots in the middle of each flower. Gold or crystal beads are another pretty choice if you want a little extra sparkle.
How do I wash and care for the bed cover?
Treat it gently and it will stay bright for years. The safest way is to hand wash it in a bathtub of cool water with a mild detergent, pressing the water through the lace without rubbing. If you use a machine, place the cover in a large mesh laundry bag and use a gentle cold cycle to protect the flowers and pearls. Add a color catcher sheet to every wash, because orange and green can release dye into the cream lace. Never wring the cover. Press out the water, roll it in big towels, then lay it flat on a clean sheet to dry, fluffing each flower and straightening each leaf as it dries. Avoid the dryer. Between washes, shake it out and air it near a window. Store it folded loosely in a cotton bag away from direct sun, and check the pearls now and then, resewing any that feel loose.
Success!
Thanks for subscribing — check your inbox for a welcome note.
Abbreviations
- A — color A, cream
- B — color B, bright orange
- C — color C, leaf green
- MR — magic ring
- ch — chain
- sl st — slip stitch
- sc — single crochet
- hdc — half double crochet
- dc — double crochet
- tr — treble crochet
- st(s) — stitch(es)
- sp(s) — space(s)
- RS — right side
- WS — wrong side
- rep — repeat
- Rnd — round