
Sage Green and Cream Hourglass Diamond Bed Cover Crochet Pattern
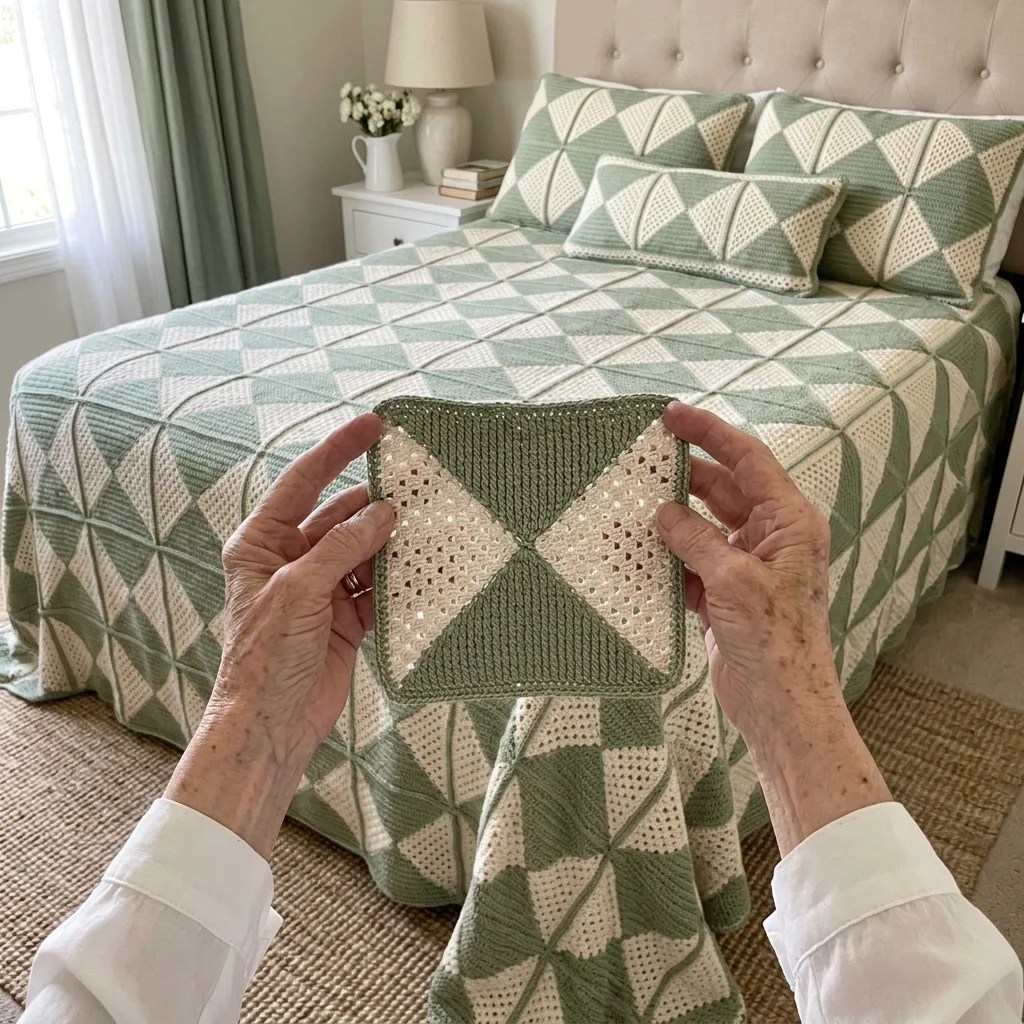
The stitches are simple, but steady counting keeps every triangle the same size so the points meet neatly.
The whole cover is made of small triangles you can finish in fifteen to twenty minutes at a time.
Squares set the same way join into rows of sage green and cream diamonds across the whole bed.
About This Sage Green and Cream Hourglass Diamond Bed Cover Crochet Pattern Pattern
This bed cover is made from simple squares in sage green and cream, and every square is split by an X into four triangles. The top and bottom triangles are solid sage green with a soft ridged texture. The left and right triangles are cream, with little clusters of double crochet and small open holes between them. When you join the squares side by side, all facing the same way, each triangle meets its neighbor and turns into a diamond. Cream diamonds and green diamonds take turns across the whole bed, and the eye reads one big, calm pattern instead of many small pieces.
Each triangle is worked flat in rows, starting at the long base and shrinking to a point. The green ones use plain double crochet worked in the back loop only, which gives the fine horizontal lines you can see in the photos. The cream ones use groups of three double crochet set into the spaces of the row below, the same easy rhythm you know from a classic granny square, so the fabric stays light and airy. Four triangles are stitched together with their points meeting in the center. Then two rounds of green single crochet frame the square, hide the seam ends and give every square a crisp outline.
The finished square measures about 9 inches after blocking. Ninety-nine squares, set in 9 columns and 11 rows, make a cover of about 81 by 99 inches before the edge, and about 83 by 101 inches once the green border is on. That is a generous queen size with plenty of drop over the sides and the foot of the bed. The border is three rounds of single crochet and one round of reverse single crochet. It gives a firm, rounded rope edge that holds its shape, does not curl and frames the diamonds like a picture.
The stitches are all basic: chain, single crochet, double crochet, slip stitch and two simple decreases. What makes this an intermediate project is the counting and the consistency, not any tricky technique. Every triangle has to finish the same height so the points meet neatly in the middle. Every square has to be the same size so the diamonds line up in straight rows from one side of the bed to the other. None of this is hard, but it rewards a little care, and I give you stitch counts at the end of every row so you always know you are on track.
I designed the triangles so the shape comes from the stitch counts, not from guesswork. The green triangle loses four stitches every row, and the cream triangle loses exactly one cluster group every row. That means if your counts are right, the slopes come out at the same angle on both colors, and the seams in the middle of each square lie flat. It also means you can memorize the pattern after two or three triangles and work the rest from memory, which is a real joy on a long project like this.
The feel of the finished bed cover is lovely. The green triangles are dense and a little weighty, the cream ones are soft and open, and together they drape over the edge of the mattress like a heavy quilt with small lace windows in it. In worsted cotton it is cool and breathable in summer, and in winter it looks just as good layered over a warm blanket. The sage green and cream palette is fresh and restful. It sits beautifully with natural wood, beige headboards, linen curtains and green plants.
I would suggest this pattern to anyone who already knows how to make a granny square and can follow a simple decreasing row. It is a long project, around 150 to 190 hours, but it is built from small pieces, so you never feel stuck in the middle of a huge blanket. If you enjoy steady, repeatable work that you can pick up for twenty minutes at a time, you will love it. If you are newer to crochet, start with four squares for a cushion, and you will have learned everything you need for the full bed cover.
Why You'll Love This Sage Green and Cream Hourglass Diamond Bed Cover Crochet Pattern Pattern
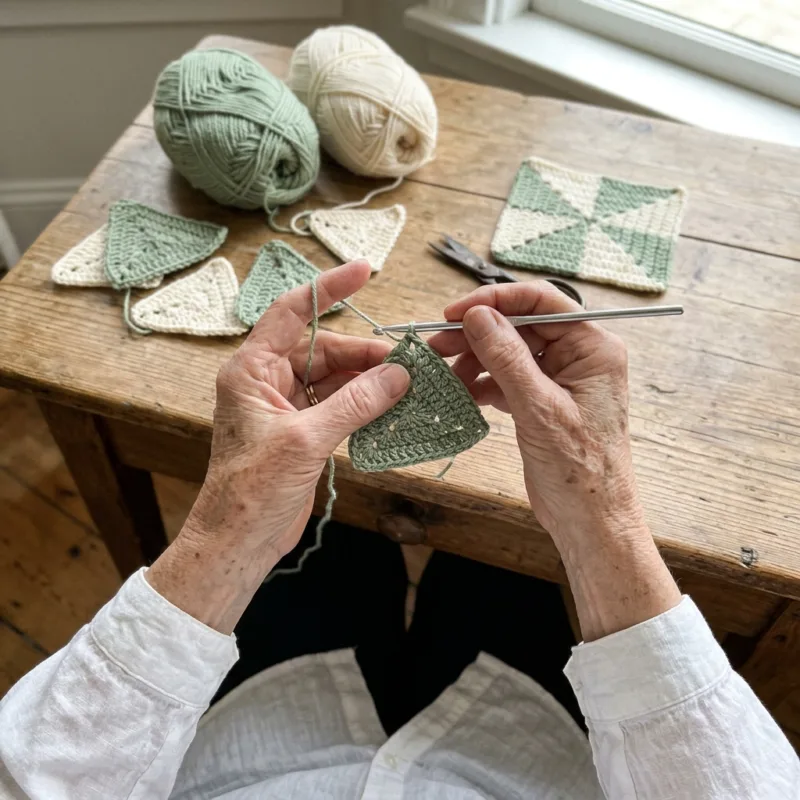
I love projects that grow quietly in a basket, and this one is exactly that. One triangle takes me about fifteen to twenty minutes, so I can finish two while my tea goes cold and feel that I have done something real. After a week the basket fills with little green and cream wedges, and after a month I have a stack of squares that already looks like the start of something special. That slow, steady progress keeps me going far better than one huge piece that never seems to change. I can always see how far I have come.
The moment I like best is sewing the first four triangles together. Until then they are just shapes, and a bit odd on their own. Then you lay them with the points in the middle, stitch them up, add the green border, and suddenly you hold a crisp little square with a bold X across it. Put two squares side by side and a cream diamond appears where they meet. I still smile every time that happens, even after dozens and dozens of squares. It never gets old.
I also love how portable it is. Each triangle needs only a small ball of yarn, a hook and a stitch marker, so it travels in a zip bag to the doctor's waiting room, on the bus, or out to the garden bench on a sunny afternoon. I keep one bag of green and one bag of cream and make the triangles in batches. Then on a quiet evening at home I sit at the kitchen table and do all the seaming and borders in one cozy session with a favorite program playing in the background.
The colors matter to me too. Sage green feels like fresh leaves and calm mornings, and cream keeps it light so the room never feels heavy or dark. When this bed cover went on the bed, the whole bedroom changed. It looked pulled together, soft and welcoming, like a room in a little country guest house where someone has thought about every detail. It is the kind of piece that makes you want to make the bed every morning, just to see it smooth and neat and full of diamonds.
Here are a few things I learned while making it, and I wish someone had told me at the start:
- Measure your first green and your first cream triangle side by side before you make any more.
- Make triangles in batches of one color so your tension stays even.
- Weave in ends as you go, two at a time, so the finishing never piles up.
- Block a few squares early so you know their true size.
I also love that this bed cover uses only two colors. There is no long list of shades to match and no complicated color chart to follow. You simply know that green goes at the top and bottom of every square and cream goes on the sides. That simplicity frees your mind, and I found it one of the most relaxing projects I have ever made, even though it is one of the biggest.
Finally, I love that it makes such a meaningful gift. A bed cover like this takes real time, and the person who receives it knows that the moment they unfold it. I have made smaller versions as wedding gifts and as a throw for my daughter's first home, and each one became a favorite that gets used every day. If you keep this one for yourself, you deserve it just as much.
Switch Things Up
Try a new color pair. The design only needs two colors, one darker and one lighter, so it is easy to change the whole mood of the room. Dusty rose and cream feels soft and romantic, navy and white looks crisp and coastal, and mustard with oatmeal is warm and cheerful for autumn. Terracotta and sand suits a room full of wood and clay pots. Keep the solid triangles in the darker shade and the cluster triangles in the lighter one so the little holes still glow.
Make it for any bed. Every square is about 9 inches, so planning a new size is simple multiplication. Add or remove columns for width and rows for length, and keep every square facing the same way. These counts give a cover that drapes well over the sides, measured before the border:
- Twin: 7 by 11 squares, 77 squares, about 63 by 99 inches
- Full: 8 by 11 squares, 88 squares, about 72 by 99 inches
- Queen: 9 by 11 squares, 99 squares, about 81 by 99 inches
- King: 11 by 11 squares, 121 squares, about 99 by 99 inches
Make a sofa throw. A throw of 6 by 7 squares, 42 squares in all, finishes at about 56 by 65 inches once the border is on. It is a lovely way to try the pattern without committing to a whole bed, and it uses a little over 40 percent of the yarn. Work the same four border rounds, simply with fewer stitches on each side. It drapes over the arm of a sofa beautifully and makes a fine housewarming gift.
Make a baby blanket. Four columns by five rows, 20 squares, gives a blanket of about 38 by 47 inches with the border. Choose a soft cotton blend or a good baby acrylic that can go in a warm wash. Pale mint and white, or soft peach and cream, look sweet in a nursery. Weave every end in very securely, at least two inches in two directions, because little fingers love to find loose tails.
Add matching pillow covers. Four squares sewn 2 by 2 make the front of an 18 inch cushion, and six squares sewn 2 by 3 make a standard sham front of about 18 by 27 inches. For the back, use the same number of squares or a plain panel of green ridged double crochet. Close it with three buttons along one side so you can wash the cover. This is exactly how I made the shams that sit on the bed in my photos.
Swap or turn the squares. If you make the solid triangles in cream and the cluster triangles in green, the light diamonds become solid and the green diamonds turn lacy, which gives a softer look. You can also turn every other square a quarter turn. Then green meets cream at every seam and the diamonds turn into a lively checkerboard of crosses. Lay out a few squares on the floor first to see which look you prefer before you start sewing.
Change the edge. The plain single crochet border with a reverse single crochet finish is classic and sturdy, but you can make it your own. Replace the last round with small shells for a softer edge, or add a picot every few stitches for a vintage touch. You could also work a wider border in alternating rounds of green and cream. For any repeating edge, count the stitches on each side first and add or skip a stitch near the corners so each side is a multiple of your repeat.
Change the yarn weight. In DK cotton with a 4 mm hook, the same triangles make squares of about 7.5 inches, so a queen cover needs about 11 by 13 squares, 143 in all. In bulky yarn with a 6.5 mm hook, the squares grow to about 11 inches, and a queen needs only 7 by 9 squares, 63 in all, for a heavier cover that grows much faster. Always make and block one square first, measure it, and divide your bed size by that number.
Materials Needed
— Main Fabric
— Tools Required
The Free Pattern
0% complete
— Green Solid Triangle (Make 198, sage green) :
— Cream Cluster Triangle (Make 198, cream) :
— Square Seaming and Square Border (Make 99 squares) :
— Layout and Joining :
— Border :
Assembly Instructions
- Make the first green triangle and the first cream triangle, compare them, and adjust your hook until both are about 8.5 inches across and 4.25 inches tall.
- Make all 198 green triangles and 198 cream triangles, weaving in the cream ends as you go and keeping a long green tail for seaming.
- Lay out four triangles with the bases facing outward and the points meeting in the center, green at top and bottom and cream at left and right, then whipstitch the sloped edges together.
- Work the two green border rounds around each square, then pin and block every square to 9 by 9 inches and let it dry completely.
- Lay out the 99 squares in 9 columns and 11 rows, all facing the same way, so the triangles form rows of green and cream diamonds.
- Whipstitch the squares into columns through the back loops with green, then join the columns together, matching every corner.
- Work the four border rounds around the whole bed cover, weave in all remaining ends and give the finished piece a light final blocking.
Common Mistakes & How to Fix Them
Letting the green and cream triangles end at different heights. The green triangles are dense double crochet and the cream ones are open clusters, so they can grow at different speeds, and if one comes out taller the points will not meet in the center and the X looks bent. This usually comes from a tighter or looser hand on one color. Make one of each first and lay them base to base: both should be about 4.25 inches tall and 8.5 inches across. If the cream one is taller, go down half a hook size for cream only. Fix it before you make more, never after.
Counting the ch 2 as a stitch in the green triangles. In this pattern the ch 2 at the start of each green row does not count, and the first decrease is worked into the very first stitch. If you count the chain or skip the first stitch, you gain or lose a stitch at one edge and the decreases stop being even. After a few rows the triangle leans to one side and its sloped edge no longer matches the cream neighbor. Count your stitches at the end of every row against the number in brackets, and place a marker in the first and last stitch so the edge is always clear.
Adding or losing a group in the cream triangles. Each cream row must have exactly one group less than the row before it. A common slip is to work into the edge space beside the turning chain, which adds a group, or to slip stitch too far at the start of the row, which drops two. Either way the triangle comes out lopsided and the point lands off center, so the seam will not lie flat. Remember that from Row 3 on you only work into the spaces between groups. Count your groups at the end of every row: nine, eight, seven and so on down to one.
Turning squares the wrong way in the layout. Every square must face the same way, with green triangles at the top and bottom and cream at the left and right. It is very easy to turn one square a quarter turn when you pick it up to sew, and then a cream diamond breaks into two green triangles and the whole row looks wrong. Before you sew each column, lay it out on the floor or the bed and check it from a step back. I put a small safety pin in the top green triangle of every square, which makes the direction obvious even when I am tired or sewing late at night.

You Might Also Like






Important Notes
Gauge matters more here than in a single blanket because nearly four hundred triangles have to match. With a 5 mm hook, 14 double crochet and 8 rows should measure about 4 inches. Each triangle should be about 8.5 inches across the base and 4.25 inches tall, and each finished square about 9 inches after blocking. If your square comes out a little smaller or larger, that is fine, but every square must be the same. You may then need more or fewer squares to reach your bed size.
Block the squares before you join them. Pin each one to a blocking mat at 9 by 9 inches, spray it with water until it is damp through, and let it dry completely before you unpin it. This straightens the diagonal seams, opens the cream clusters so the little holes show, and makes all the squares the same size so the joins lie flat. Block the finished bed cover once more, lightly, after the border is on, paying extra attention to the corners, which like to pull in.
The yarn amounts in the materials list are estimates for the queen size, and they include the joining and the border. Buy all of the green and all of the cream at once, from the same dye lot, and keep the labels in a safe place. A different lot of sage green can look grey or yellow next to the first one, and on a bed this size the change shows as a straight line across the diamonds. I always buy one extra skein of each color for safety.
Wash the finished bed cover on a gentle cold cycle in a large mesh bag or a zipped duvet cover, with a mild detergent. Because sage green and cream sit side by side, add a color catcher sheet to the first few washes in case the green bleeds into the cream. Never wring or twist it. Press out the water, lay it flat on towels or over a clean drying rack, and reshape it while damp. A cotton cover this size is heavy when wet, so do not hang it from a line.
Thank you for making this sage green and cream bed cover with me. I hope you enjoy every little triangle, every seam and that happy moment when the first diamond appears between two squares. It is a big project, but it is made of small, friendly steps, and each one brings you closer to a bed that looks calm, fresh and full of your own handwork.
So pick up your hook, wind a ball of green and a ball of cream, and start with just one triangle today. Then make its partner, sew your first square and set it on the bed to admire. Before you know it, you will have a whole stack, and soon after that, a bed cover you will treasure for years.
Crochet Abbreviations
You Ask, We Answer
How big is the finished bed cover, and how many squares do I need?
Following the pattern exactly, each square measures about 9 inches after blocking. The queen size uses 99 squares set in 9 columns and 11 rows, which gives about 81 by 99 inches before the border and about 83 by 101 inches after it. On a standard queen mattress of 60 by 80 inches, that leaves a drop of about 11 inches on each side and a long drape at the foot. If your bed is tall or you want the cover to reach the floor, add one column for width and one row for length. The best way to plan is to measure your own bed: take the mattress width plus twice the drop you want, then the mattress length plus one drop, and divide both numbers by 9. Round up to whole squares. The twin, full and king counts in the variations section are a good starting point, and you can always add one more column later.
Can I use a different yarn weight, fiber or hook size?
Yes. I recommend worsted cotton because it shows the ridges and clusters clearly, washes well and drapes with a nice weight. A cotton and acrylic blend makes a lighter, softer cover that is a little warmer, and a good acrylic works too if you prefer easy care. Wool is cozy but usually needs hand washing, which is hard for a piece this big. The shape of every triangle comes from the stitch counts, not the gauge, so the pattern works with any yarn weight. Only the size changes. In DK with a 4 mm hook, squares come out about 7.5 inches, and in bulky with a 6.5 mm hook about 11 inches. Make and block one full square with your chosen yarn, measure it, and divide your bed size by that number to find how many squares you need. Then adjust the yarn amounts in the same proportion before you buy.
How do I care for and store the bed cover so it lasts?
Wash it only when it really needs it, on a gentle cold cycle in a large mesh bag with mild detergent, and add a color catcher to the first few washes. Dry it flat and reshape it while damp. Avoid a hot dryer, because cotton can shrink and the squares may pull out of shape. Between washes, shake it out and let it air near an open window, out of strong direct sun, since sage green can fade over time in bright light. To store it, fold it loosely and keep it in a cotton bag or an old pillowcase, never in plastic, which traps moisture. A cedar block nearby keeps moths away. Refold it along different lines every few months so no crease sets in. If a seam ever comes loose, simply stitch it closed again with a little green yarn, and gently remove any pilling with a fabric shaver.
Success!
Thanks for subscribing — check your inbox for a welcome note.
Abbreviations
- ch — chain
- sc — single crochet
- dc — double crochet
- sl st — slip stitch
- dc2tog — double crochet 2 stitches together (1 stitch decreased)
- dc3tog — double crochet 3 stitches together (2 stitches decreased)
- rev sc — reverse single crochet, also called crab stitch
- BLO — back loop only
- st(s) — stitch(es)
- sp(s) — space(s)
- rep — repeat
- Rnd — round
- RS — right side