
Amanda's Creative Corner Crochet · Kitchen
Free Crochet Patterns Handmade with Love

Terracotta Lace Flower Square Bed Cover Crochet Pattern
Jump to Pattern
Terracotta Lace Flower Square Bed Cover Crochet Pattern
150-200 Hours 0 made this
Intermediate Level

You need double crochet, simple mesh and careful stitch counting.

Square by Square

Each 12 inch square takes about 2 to 3 hours, so the cover grows in small steps.

Warm Lace Texture

Terracotta lace with open mesh gives a bedroom a warm, airy look.

About This Terracotta Lace Flower Square Bed Cover Crochet Pattern Pattern

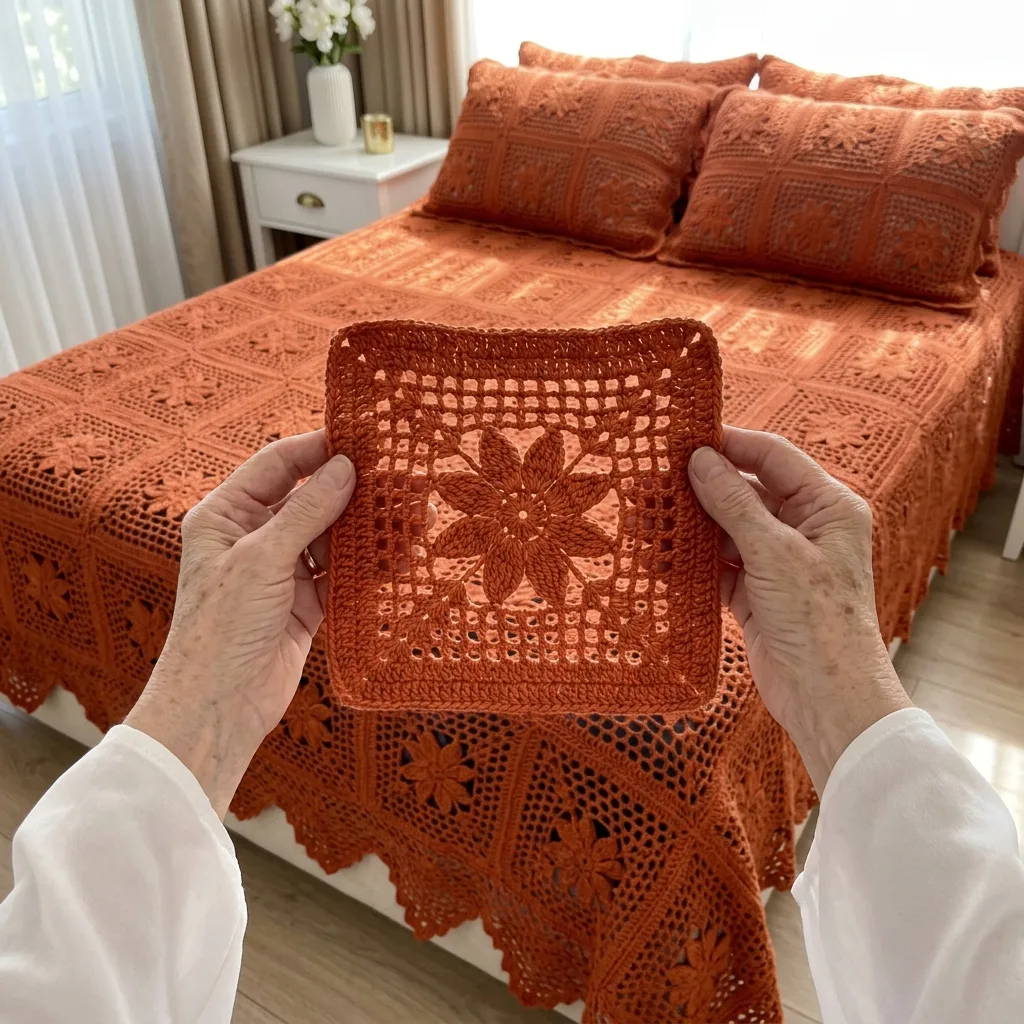
This bed cover is made from 64 lace flower squares. Each square starts with a radiating eight petal star, then grows through three open mesh rounds and thick double crochet bands. The squares are joined edge to edge and finished with a shell scalloped edge.

It measures about 96 by 96 inches before the edge and about 99 by 99 inches with it, so it drapes over a queen bed with a generous drop. It suits crocheters who are comfortable with double crochet and ready for a long, rewarding project.

Terracotta Lace Flower Square Bed Cover Crochet Pattern step detail

Why You'll Love This Terracotta Lace Flower Square Bed Cover Crochet Pattern Pattern

I love a project that comes in small pieces. Each square has its own little star at the center, so I get the joy of a new start every few hours, and I can carry one in my bag.

I also love how the light shines through the open mesh. The warm terracotta color makes the bedroom feel cozy at any time of year.

Switch Things Up

Try dusty rose, sage green, mustard or cream. For a sofa throw, make 4 x 5 squares (about 48 x 60 inches). Join two squares for a matching pillow cover. For a simpler finish, swap the shell edge for a round of single crochet.


Materials Needed

— Main Fabric

01 Worsted weight (4) cotton yarn in terracotta: about 4,950 g (about 9,900 yd) for the full 96 x 96 inch cover.
02 Squares: about 70 g (140 yd) each, so about 4,480 g for 64 squares.
03 Joining and edge: about 470 g (940 yd).
04 Buy all yarn from one dye lot and add about 10 percent extra, so the color stays even.

— Tools Required

05 4.5 mm (US 7) crochet hook
06 Yarn needle
07 Stitch markers (4 are useful for the outer corners of the edge)
08 Scissors
09 Blocking mats and rustproof pins
10 Measuring tape

The Free Pattern

Intermediate 150-200 Hours

0% complete

— Lace Flower Square (Make 64, terracotta) :

Ch 3 at the start of a round counts as a dc. Petal: (sc, hdc, 3 dc, hdc, sc) in the same arch. Mesh rounds work dc, ch 1, sk 1 in a row, so every mesh round starts and ends with a dc on each side.
Round 1: Make a magic ring. Ch 3, 15 dc in the ring. Pull the ring tight and join with sl st to the top of the beginning ch 3. (16 dc)
Round 2: Ch 1, sc in the same st, ch 5, sk 1 st. *Sc in the next st, ch 5, sk 1 st. Rep from * 6 more times. Join with sl st to the first sc. (8 sc, 8 ch-5 arches)
Round 3: Sl st into the first ch-5 arch. Ch 1, (sc, hdc, 3 dc, hdc, sc) in the same arch. *(Sc, hdc, 3 dc, hdc, sc) in the next arch. Rep from * 6 more times. Join with sl st to the first sc. (8 petals of 7 sts, 56 sts)
Round 4: Ch 1, sc in the same st as the join. Sc in each st around, working 3 sc in the center dc of petals 1, 3, 5 and 7 (these are the 4 corners). Join with sl st to the first sc. (64 sc: 4 corner center sc, with 15 sc between each pair of corner center sc)
Round 5 (mesh): Sl st in each of the next 4 sc to reach the center sc of the first corner. Ch 3, ch 2, dc in the same sc (first corner made). *Dc in the next sc, [ch 1, sk 1 sc, dc in the next sc] 7 times, (dc, ch 2, dc) in the center sc of the next corner. Rep from * 2 more times. Dc in the next sc, [ch 1, sk 1 sc, dc in the next sc] 7 times. Join with sl st to the 3rd ch of the beginning ch 3. (40 dc, 28 ch-1 sps, 4 corner ch-2 sps; 8 dc and 7 ch-1 sps on each side between the corners)
Round 6: Sl st into the first corner ch-2 sp. Ch 3, dc, ch 2, 2 dc in the same sp. *Dc in each of the next 17 sts (dc and ch-1 sps), (2 dc, ch 2, 2 dc) in the next corner ch-2 sp. Rep from * 2 more times. Dc in each of the next 17 sts. Join with sl st to the top of the beginning ch 3. (84 dc, 4 corner ch-2 sps; 21 dc between the corner ch-2 sps)
Round 7 (mesh): Sl st in the next dc and into the corner ch-2 sp. Ch 3, ch 2, dc in the same sp. *Dc in the next dc, [ch 1, sk 1 st, dc in the next st] 10 times, (dc, ch 2, dc) in the next corner ch-2 sp. Rep from * 2 more times. Dc in the next dc, [ch 1, sk 1 st, dc in the next st] 10 times. Join with sl st to the 3rd ch of the beginning ch 3. (52 dc, 40 ch-1 sps, 4 corner ch-2 sps; 11 dc and 10 ch-1 sps on each side between the corners)
Round 8: Sl st into the corner ch-2 sp. Ch 3, dc, ch 2, 2 dc in the same sp. *Dc in each of the next 23 sts (dc and ch-1 sps), (2 dc, ch 2, 2 dc) in the next corner ch-2 sp. Rep from * 2 more times. Dc in each of the next 23 sts. Join with sl st to the top of the beginning ch 3. (108 dc, 4 corner ch-2 sps; 27 dc between the corner ch-2 sps)
Round 9 (mesh): Sl st in the next dc and into the corner ch-2 sp. Ch 3, ch 2, dc in the same sp. *Dc in the next dc, [ch 1, sk 1 st, dc in the next st] 13 times, (dc, ch 2, dc) in the next corner ch-2 sp. Rep from * 2 more times. Dc in the next dc, [ch 1, sk 1 st, dc in the next st] 13 times. Join with sl st to the 3rd ch of the beginning ch 3. (64 dc, 52 ch-1 sps, 4 corner ch-2 sps; 14 dc and 13 ch-1 sps on each side between the corners)
Round 10: Sl st into the corner ch-2 sp. Ch 3, dc, ch 2, 2 dc in the same sp. *Dc in each of the next 29 sts (dc and ch-1 sps), (2 dc, ch 2, 2 dc) in the next corner ch-2 sp. Rep from * 2 more times. Dc in each of the next 29 sts. Join with sl st to the top of the beginning ch 3. (132 dc, 4 corner ch-2 sps; 33 dc between the corner ch-2 sps)
Round 11: Sl st in the next dc and into the corner ch-2 sp. Ch 3, dc, ch 2, 2 dc in the same sp. *Dc in each of the next 33 dc, (2 dc, ch 2, 2 dc) in the next corner ch-2 sp. Rep from * 2 more times. Dc in each of the next 33 dc. Join with sl st to the top of the beginning ch 3. (148 dc, 4 corner ch-2 sps; 37 dc between the corner ch-2 sps)
Round 12: Sl st in the next dc and into the corner ch-2 sp. Ch 3, dc, ch 2, 2 dc in the same sp. *Dc in each of the next 37 dc, (2 dc, ch 2, 2 dc) in the next corner ch-2 sp. Rep from * 2 more times. Dc in each of the next 37 dc. Join with sl st to the top of the beginning ch 3 and fasten off. (164 dc, 4 corner ch-2 sps; 41 dc between the corner ch-2 sps)
Weave in the ends and block each square to 12 x 12 inches, pinning the mesh open. Each side should have 41 dc.

— Layout :

All 64 squares are the same terracotta. Arrange them in 8 columns and 8 rows, all in the same direction. The finished cover measures 96 x 96 inches before the edge.
Lay out all squares on a bed or the floor first and check that the star flowers face the same way and the color looks even.

— Joining :

Place two squares side by side with the right sides up. With a yarn needle and terracotta yarn, whip stitch through the back loops only, picking up the 41 dc along the side and the corner ch-2 sps at each end.
Join 8 squares into a strip (7 seams). Make 8 strips. Then join the 8 strips with 7 long seams, matching the corners at every crossing.

— Edge (Round E1 and Round E2) :

Round E1: Join yarn in any outer corner ch-2 sp of the cover. Ch 1, 3 sc in the same sp (corner made). *Sc in each dc of the square. At every seam, work 1 sc through both corner ch-2 sps together. On each side, work 2 sc in the last dc of the 4th square (this is the only increase). After the 8th square, work 3 sc in the outer corner ch-2 sp. Rep from * around, ending with the 4th side. Join with sl st to the first sc. (1,356 sc: 336 sc on each side, plus 3 sc in each of the 4 corners)
Round E2: Do not turn. Sl st in the first sc of the corner, 7 dc in the center sc of the corner, sl st in the third sc of the corner. *Sk 2 sc, 5 dc in the next sc, sk 2 sc, sl st in the next sc. Rep from * 56 times along the side (336 sc used). At the next corner, sl st in the first corner sc, 7 dc in the center sc, sl st in the third corner sc. Repeat for all 4 sides. Join with sl st to the first sl st and fasten off. (224 shells of 5 dc, 4 corner shells of 7 dc)
Each side has 8 squares x 41 dc = 328 dc, plus 7 seam sc, plus 1 extra sc = 336 sc, which is exactly 56 repeats of 6. For any other size with n squares along a side, the side count is 42 x n, which is always divisible by 6.

Assembly Instructions

  1. Make all 64 lace flower squares and weave in the ends.
  2. Wet block each square to 12 x 12 inches, pinning the mesh open, and let it dry flat so every square is the same size.
  3. Lay the squares out in 8 columns and 8 rows and check that the star flowers face the same way.
  4. Whip stitch 8 squares into a strip through the back loops, and repeat to make 8 strips.
  5. Join the 8 strips with 7 long seams, matching the corners at every crossing.
  6. Work Round E1 evenly around the whole cover, placing 3 sc in each outer corner.
  7. Work Round E2 to add the shell scalloped edge, then weave in the last ends and give the cover a light final block.

Common Mistakes & How to Fix Them

Losing count in the mesh rounds shifts the corners. Count 8 dc and 7 ch-1 sps per side in Round 5, 11 dc and 10 ch-1 sps in Round 7, and 14 dc and 13 ch-1 sps in Round 9.

Skipping the blocking leaves the mesh closed and the squares uneven. Pin each square open to exactly 12 inches.

Making the ch-5 arches in Round 2 too tight pulls the petals out of shape. Keep them loose, about the length of 3 dc.

Joining with a tight seam makes the cover stiff. Stitch the seams loosely, about as tight as the stitches themselves.


Denise

Denise designs cozy, easy to follow crochet patterns for the home, from small gifts to full bedspreads.


Important Notes

Gauge: 41 dc across one finished side measures 12 inches. If your square is smaller or larger, change your hook size and swatch again.

Yarn amounts are estimates. Weigh your first square and multiply by 64 before you buy the rest.

Machine wash cold on a gentle cycle and dry flat. A cover this size is heavy when wet, so support it fully.


Take it one square at a time and enjoy every star. I would love to see your bed cover when it is done.

Crochet Abbreviations

01 ch — chain
02 sl st — slip stitch
03 sc — single crochet
04 hdc — half double crochet
05 dc — double crochet
06 sp — space
07 st(s) — stitch(es)
08 sk — skip
09 rep — repeat

You Ask, We Answer

How big is the finished bed cover?

It is about 96 x 96 inches before the edge and about 99 x 99 inches with the edge. That covers a queen bed with about a 16 inch drop at the foot. Add a column or a row of squares for a longer drop.

Can I use a different yarn weight or make a smaller size?

Yes. A lighter yarn gives a smaller square, so swatch first and recalculate the number of squares. For a throw, make 4 x 5 squares, and use 42 x n sc per side (168 and 210 sc) so the edge repeat of 6 still fits.

How do I wash and care for the cover?

Use cold water on a gentle cycle, or hand wash it, and lay it flat to dry. Do not hang it wet, because the weight of the cotton can stretch the lace.





