
Cream and Brown Fan Strand Curtain Panels Crochet Pattern
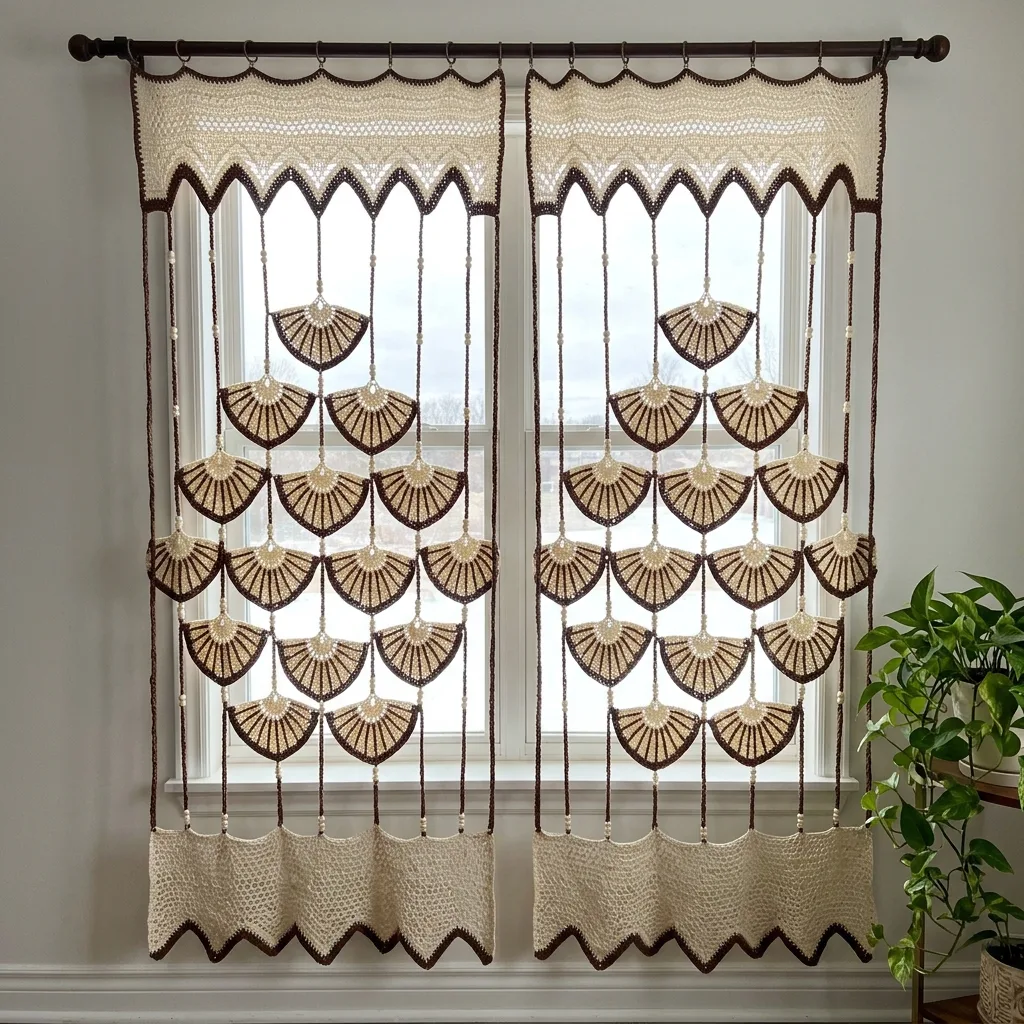
You need filet mesh, a simple fan worked in rows, color changes, bead chaining and careful counting.
Sixty four fans, sixteen beaded strands and four lace bands make a pair of panels you build one fan at a time.
The fans sit at alternating heights, so the strands form a staggered diamond design that glows when the sun comes through.
About This Cream and Brown Fan Strand Curtain Panels Crochet Pattern Pattern
These panels are the most elegant curtain I have ever made, and they are built from some of the simplest pieces. There are two panels, one for each side of the window, worked in a soft cream and a deep chocolate brown cotton. At the top of each panel sits a cream lace valance with a brown zigzag edge. From every point of that zigzag hangs a brown chain strand, and each strand carries round cream beads and four large cream fans outlined in brown. At the bottom, a second lace band with a pointed brown edge ties all the strands together and gives the panel a neat, finished hem.
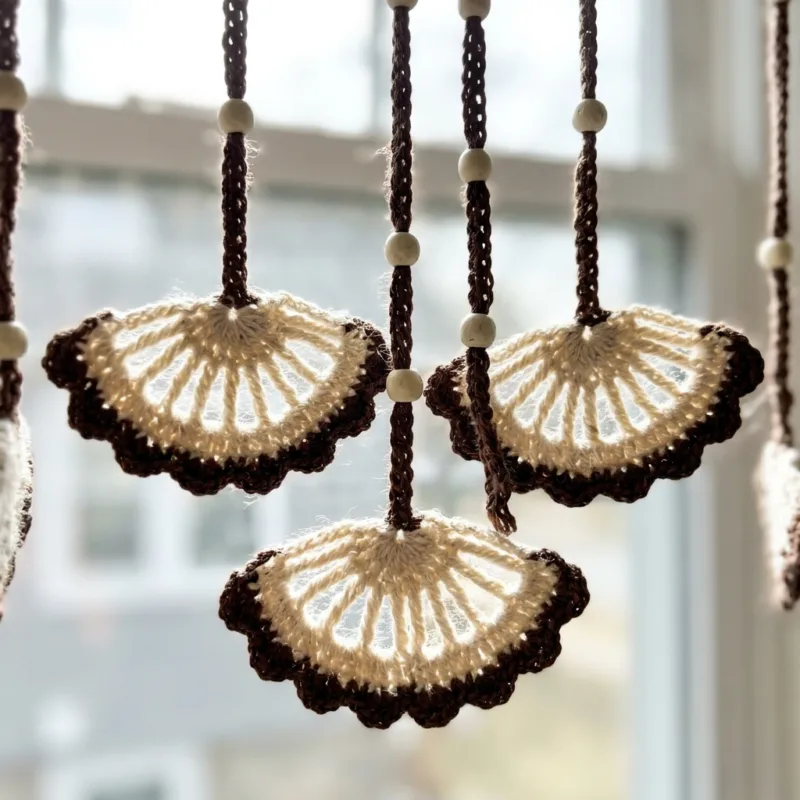
The fan is the heart of the design. You start it in a magic ring and work it flat in rows of cream double crochet and chain spaces, so it opens out like a little palm leaf. A round of brown then runs all the way around it, with a scalloped picot edge across the top and neat single crochet down the sides. Last, you work a few brown surface slip stitches up the spokes, which gives each fan those dark rays you can see in the photo. A finished fan is about 6 inches (15 cm) wide and 4 inches (10 cm) tall.
What makes the panels so special is the way the fans are placed. Each panel has eight strands, and the fans on the even strands hang half a step lower than the fans on the odd strands. Because the fans are wider than the space between the strands, they nest into each other and form a staggered diamond pattern across the whole panel. From a distance it looks like one large lace design, but up close you can see that every fan hangs on its own strand and moves on its own.
The strands are made with bead chaining. Before you work each section of chain, you thread its round cream beads onto the brown yarn. Then, while you chain, you slide one bead up to the hook whenever the pattern says, and chain around it to lock it in place. There are fourteen beads on every strand, and they sit between the fans like little pearls on a necklace. Using wooden beads keeps the panels light and gives them a warm, natural look that suits the cotton.
The two lace bands are identical pieces. Each one is a simple filet mesh, 32 squares wide and four rows deep, with eight stepped points worked below it and a brown edging that outlines the zigzag. The valance hangs from the rod by nine small metal rings clipped to its brown top edge, and the bottom band sits upside down, with the strands joined to its straight edge and its points hanging loose. Using the same piece for the top and the bottom keeps the whole panel balanced and makes the pattern easier to learn.
Each finished panel is about 26 inches (66 cm) wide and about 76 inches (193 cm) long from the top of the valance to the tips of the bottom points. That is a lovely length for a tall window or a pair of glass doors. When the sun comes through, the cream fans glow and the brown outlines turn almost black, so the pattern looks like it is drawn in ink on the light. In the evening, with a lamp in the room, the panels look warm and cozy from both sides.
I call this pattern intermediate. Nothing here is difficult on its own, but there are many pieces, two colors and a lot of counting, and the strands need to be worked carefully so they all end at the same length. It suits someone who enjoys a long project and likes to see a big design come together from small parts. Plan on about 80 to 90 hours for the pair, spread over a season of evenings, with the fans as your portable project and the strands and bands as your sit at the table work.
Why You'll Love This Cream and Brown Fan Strand Curtain Panels Crochet Pattern Pattern
I love this curtain because it feels like something you would find in an old European house, and yet every piece of it is something I can make in an evening. A fan takes me about fifty minutes, from the magic ring to the last brown spoke. I make them two or three at a time, sitting in my favorite chair, and I keep them in a flat box so the scallops stay neat. After a few weeks, I had a box full of little cream palms, and I knew the curtain was really going to happen.
The two colors make me happy every single time I look at them. Cream and chocolate brown are such a classic pair, warm and calm at the same time. The brown outlines make every fan crisp, and the cream keeps the whole panel light and soft. I love that the colors work in almost any room, from a farmhouse kitchen to a more formal living room, and that they look good in both summer sun and winter lamp light.
There is a special joy in watching the diamond pattern appear. For a long time you only have loose fans and a pile of beads, and it is hard to imagine the finished panel. Then you hang the valance on a chair, work the first two strands, and suddenly the fans nest into each other and the pattern starts to show. By the fourth strand I was so excited that I worked late into the night just to see a little more of it.
These panels changed my dining room completely. The window used to have heavy fabric curtains that blocked most of the light. Now the light comes in through the open strands, and the room feels twice as big. The fans also throw pretty shadows across the table on sunny afternoons, which my grandchildren love to trace with their fingers. It is a small thing, but it makes the room feel special every day.
They make a wonderful heirloom gift, the kind that gets passed down. I would make a pair for:
- a son or daughter buying a first house
- a couple celebrating a big anniversary
- a friend who loves vintage and antique style
- anyone with tall windows or a pair of glass doors
This pattern is also kind to your stash. The fans use only a few yards each, so leftover balls of cream cotton can turn into fans as long as the shade matches. The brown edging uses small amounts too, and if you have several browns of the same weight, you can even use a slightly lighter one for the spokes. I always save the bigger, brand new skeins for the lace bands and the strands, where an even color matters most.
Making these panels taught me a lot. I learned that blocking every fan is what makes the diamond pattern look tidy. I learned to string the beads for one section at a time, so I never had a long tangle of yarn and beads on my lap. And I learned that counting the chains, not measuring them, is the only way to make sixteen strands that end at exactly the same line. I put all of those lessons into the pattern for you.

Switch Things Up
Red and white. Work the fans and lace bands in white and the edging, spokes and strands in a deep red. The red outlines make the fans look like little Christmas ornaments, so this version is wonderful for the winter months. Green and cream is the calm choice: keep the cream fans and use a forest or olive green for all the brown parts. It looks beautiful next to houseplants and natural wood.
Blue and white, or pink and white. For a seaside or cottage look, use white fans with navy edging and navy strands, which makes the panels look like blue and white china. For a nursery or a bedroom, white fans with a rose pink edging are soft and sweet. White with golden details is my pick for an elegant dining room: white fans, white bands and mustard gold edging, spokes and strands, with natural wooden beads.
A narrow window. For a window about 36 inches (91 cm) wide, make each panel 24 squares wide with 6 strands instead of 8. The foundation chain is then 77 (3 x 24 + 5), each band has 6 points, and the top edge has 73 sc, so you place 7 rings every 12 stitches. Keep the same fan placement, with odd strands short and even strands long at the top. A pair of narrow panels needs 48 fans and 168 beads.
A standard window or a glass door. The pattern as written, two panels of 32 squares and 8 strands each, frames a standard window or a pair of French doors of about 48 to 60 inches (122 to 152 cm). If you want the panels to meet in the middle and cover the glass, simply hang them closer together on the rod. For a single glass door, one panel is usually enough, and you can add a second rod through the bottom band so it stays flat when the door swings.
A doorway curtain. For an open doorway, make one wide panel 40 squares wide with 10 strands. The foundation chain is 125 (3 x 40 + 5), each band has 10 points and the top edge has 121 sc, so 11 rings fit every 12 stitches. Add one more fan unit to every strand for a full door height of about 90 inches (229 cm). People can walk through the strands easily, and the fans swing softly behind them.
A room divider. For a wide opening, hang three or four panels side by side from one long ceiling rod, leaving a small gap between them. Four panels of 8 strands cover about 104 inches (264 cm). Use the full length or add a fan unit to each strand so the bottom band sits just above the floor. In cream and brown, a divider looks like an antique carved screen, but it still lets the light and conversation through.
A shorter cafe curtain. For the lower half of a kitchen window, make each strand with only 2 fans and leave out the middle segments, which gives panels about 36 inches (91 cm) long including both bands. It takes about a third of the time and still shows the staggered pattern. Tassels are another easy addition: the photo has none, but you can tie a short 3 inch (8 cm) brown tassel to every point of the bottom band, or use 5 inch (13 cm) tassels for a more dramatic hem.
A different yarn weight. The fans, bands and strands grow or shrink with your yarn, so you can change the size without changing a single stitch count. Choose wooden beads with holes big enough for your yarn. Here is roughly what to expect for one panel:
- DK cotton with a 3.5 mm hook: fans about 4.75 in (12 cm) wide, panels about 20 in (51 cm) wide and 60 in (152 cm) long
- Worsted cotton with a 4.5 mm hook, as written: fans about 6 in (15 cm) wide, panels about 26 in (66 cm) wide and 76 in (193 cm) long
- Aran cotton with a 5 mm hook: fans about 6.5 in (16.5 cm) wide, panels about 29 in (74 cm) wide and 84 in (213 cm) long
Materials Needed
— Main Fabric
— Tools Required
The Free Pattern
0% complete
— Layout :
— Lace Band (Make 4, cream with brown edging: 2 valances, 2 bottom bands) :
— Fan Motif (Make 64, cream with brown edging and spokes) :
— Chain Links and Joining (Make 16 strands: 8 odd, 8 even, chocolate brown) :
— Tassels (optional, not shown in the photo) (Make 16, chocolate brown) :
— Top Loops and Hanging :
Assembly Instructions
- Make the 4 lace bands with their points and brown edgings, and make all 64 fans with their brown edging and spokes.
- Block the bands and fans flat and let them dry completely.
- For each panel, lay one valance at the top and one bottom band below it, points down, with 32 fans arranged in the staggered layout between them.
- Following the Layout, work the beaded chain links of all 8 strands, joining each valance point to its first fan, each fan to the next, and the last fan to the bottom band.
- Add the optional tassels to the points of the bottom bands if you want them.
- Clip 9 metal rings to the top edge of each valance, slide them onto the rod and let the panels hang for a day before you straighten the strands.
Common Mistakes & How to Fix Them
Fans that are not all the same size. With sixty four fans made over many weeks, your tension can change from one evening to the next, and some fans come out a little wider or taller. In the staggered layout, a fan that is too big pushes into its neighbors, and one that is too small leaves a gap in the diamond pattern. Measure every fan after Row 6 against your first one, and keep the same hook for the whole project. Block all the fans together on one mat with pins at the same marks, so they dry to exactly the same shape.
Strands that end at different lengths. This is the most common problem with strand curtains, and it happens when you measure the chains with a tape instead of counting them. A few extra chains in one link add up, and then one strand pulls or sags at the bottom band. Count every chain, including the bead chains, and follow the link counts exactly. Before you join the last link of each strand, lay the panel flat on the floor with the bottom band in place and check that every strand reaches its join point without stretching or bunching.
Beads that slip or bunch together. If you chain loosely around a bead, it can slide along the chain and end up resting against the next bead or a fan. Over time, the even spacing of the beads disappears and the strands look messy. Make each bch firm, with the bead snug against the hook before you yarn over. Thread only the beads for one link at a time, so the extra beads do not rub and loosen the chain. If a bead slips, a few stitches of matching sewing thread through the chain on each side will hold it in place.
Brown edging that ruffles or pulls the fan. The brown Row 6 goes around the whole fan, and if you work too many stitches in the sides, the fan curls at the edges, while too few stitches make it cup and pull in. Work exactly 2 sc in the side of each dc row and 1 sc in the side of Row 5, as the pattern says. Keep the tension of the brown yarn the same as the cream. Lay the fan flat after you finish the edging, and if the sides wave, rip back the side and work it again before you move on.

You Might Also Like





Important Notes
My gauge is one blocked fan of about 6 in (15 cm) wide and 4 in (10 cm) tall, and 5 mesh squares to 4 in (10 cm) in the lace bands, in worsted cotton with a 4.5 mm hook. Make one fan and a small mesh swatch before you buy all your yarn. If your fan is bigger, go down a hook size, and if it is smaller, go up one. Keep that hook for every fan and both bands.
Block all the fans and the four lace bands before you join anything. Pin each fan flat with a pin in every picot and at the point, and pin the bands with the points sharp and the top edge straight. Mist with water and let everything dry completely. Do not wet block the strands with their wooden beads, just let them hang. Never press with a hot iron, as it flattens the spokes and picots.
The pair uses about 750 yd (686 m) of cream and 750 yd (686 m) of chocolate brown in worsted cotton, plus 224 wooden beads. Buy all of each color at once and check that the dye lot number on every label is the same. Brown shades in particular can change a lot between lots, and a slightly different outline on a few fans would show clearly against the light. Keep one label of each color until both panels are finished.
The finished pair weighs about 1.1 kg with the beads, so each panel is about 550 g. Use a solid wooden rod with strong brackets and spread the rings evenly. To wash, lay each panel in a tub of cool water with mild soap, swish gently, press the water out with towels and dry it flat with the strands straight. Because dark brown and light cream are used together, always add a color catcher sheet to the wash.
I hope these panels bring as much warmth and light into your home as mine have brought into my dining room. They look like a grand project when you see them hanging, but they are really just sixty four little fans, a handful of beads and a lot of happy evenings. Take your time, enjoy each fan and do not worry if your first one is a little crooked. Blocking will help, and every fan you make will be better than the one before.
So find your cream and your brown tonight and make just one fan. Outline it, add the brown spokes, and hold it up to the window to see how the light comes through. Before long you will have a box full of them and a pair of panels you will love for many years. Happy crocheting, my friend.
Crochet Abbreviations
You Ask, We Answer
What is the finished size of the panels?
As written, each panel is about 26 inches (66 cm) wide and about 76 inches (193 cm) long from the top of the valance to the tips of the bottom points. The valance and the bottom band are each about 5 inches (13 cm) deep, and the strands with their four fans fill the rest. These sizes are for worsted cotton with a 4.5 mm hook and my gauge of one 6 inch fan. The pair frames a standard window or a pair of French doors of about 48 to 60 inches (122 to 152 cm). To fit your own window, measure from the rod to where you want the panels to end. Each fan unit, one fan plus one middle link, adds or removes about 14 inches (36 cm) of length. For width, add or remove 4 squares of mesh and one strand at a time, which changes the panel by about 3.2 inches. Always count chains rather than measure them.
Can I use a different yarn weight or make the panels bigger or smaller?
Yes, and you do not need to change any stitch counts. The fans, bands and strands all grow or shrink with the yarn and hook. In DK cotton with a 3.5 mm hook, the fans are about 4.75 inches wide and a panel is about 20 inches wide and 60 inches long, which suits a smaller window. In aran cotton with a 5 mm hook, the fans grow to about 6.5 inches and a panel reaches about 29 inches wide and 84 inches long. Remember to change the beads too. Thinner yarn looks best with smaller beads of about 10 mm, and thicker yarn needs beads with larger holes. To change the size without changing the yarn, add or remove strands for width, or add or remove fan units for length. I recommend cotton or a cotton blend, because acrylic can stretch under the weight of the fans and the strands would grow.
How do I wash and care for the panels?
Cotton panels are easy to care for, but I treat these gently because of the long strands and the wooden beads. Most of the time, a light shake outdoors every few weeks is all they need. When they need a real wash, take them down, remove the rings and wash one panel at a time. Lay it flat in a bathtub of cool water with a little mild soap and swish it gently, without twisting or wringing the strands. Rinse it the same way until the water runs clear. Add a color catcher sheet, because the dark brown sits right next to cream. Press the water out with large towels, then lay the panel flat on dry towels with every strand straight and every fan opened. Let it dry fully before you hang it, and keep it out of the dryer and strong direct sun, which can fade the brown and dry out the wooden beads.
Success!
Thanks for subscribing — check your inbox for a welcome note.
Abbreviations
- ch — chain
- sl st — slip stitch
- sc — single crochet
- sc3tog — single crochet 3 together
- dc — double crochet
- bch — bead chain: slide a bead up to the hook and ch 1 around it
- sp — space
- st(s) — stitch(es)
- RS — right side
- picot — ch 3, sl st in 3rd ch from hook
- in — inch or inches
- cm — centimeters
- mm — millimeters
- yd — yards
- m — meters
- g — grams
- kg — kilograms