Amanda's Creative Corner Crochet · Kitchen
Free Crochet Patterns Handmade with Love

Blue Layered Flower Square Bedspread Crochet Pattern
Jump to Pattern
Blue Layered Flower Square Bedspread Crochet Pattern
120-150 Hours 2 made this
Intermediate Level

Round by round petals with a simple slip stitch join.

120-150 Hours

Each square takes about 40 minutes, so progress is steady.

Layered Blue Flowers

Three rings of puffy petals in soft shades of blue and white.

About This Blue Layered Flower Square Bedspread Crochet Pattern Pattern

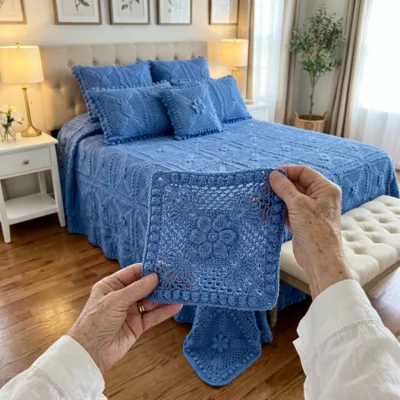
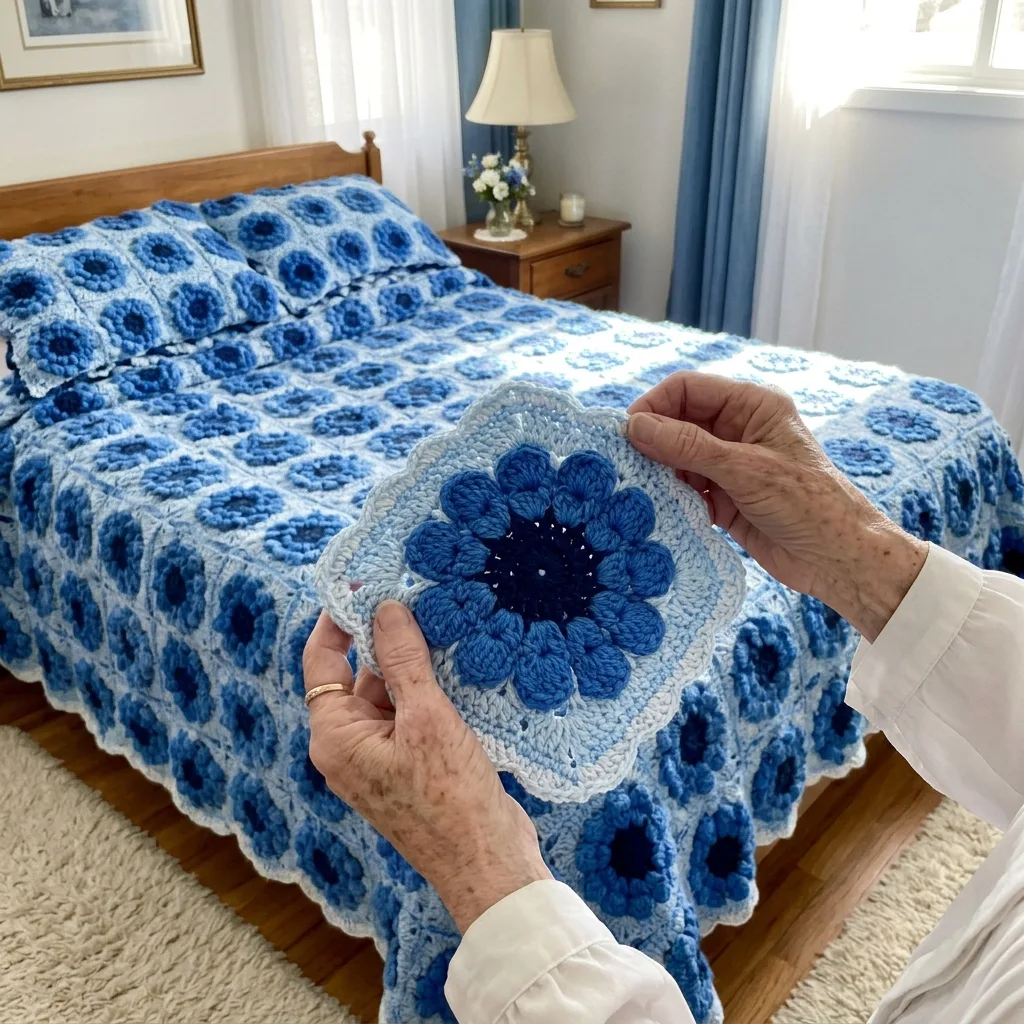
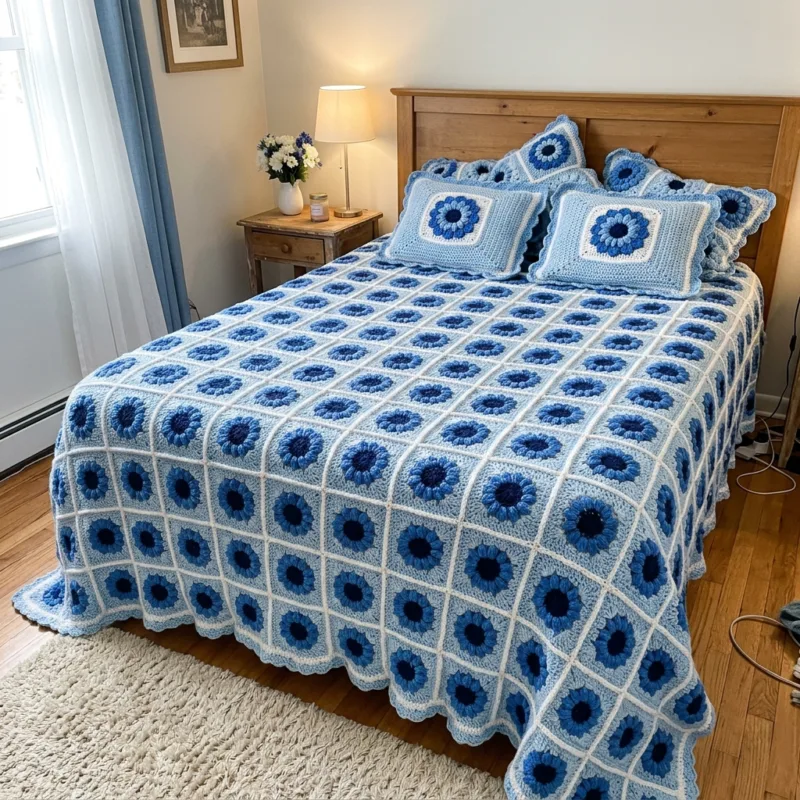
This bedspread is made from 195 identical flower squares. Each one has a navy blue center and three rings of puffy petals in royal, medium and light blue, framed by a pale sky blue background and a white outline. The squares are joined with raised white seams and finished with a scalloped edge.

The finished size is about 78 by 90 inches (198 by 229 cm), made in worsted weight cotton. You need to be comfortable with working in rounds, chain loops and petals, so it suits an adventurous beginner or any intermediate crocheter.
Blue Layered Flower Square Bedspread Crochet Pattern step detail

Why You'll Love This Blue Layered Flower Square Bedspread Crochet Pattern Pattern

I love this project because every square is small and easy to carry. You can finish one in an evening and watch the flower grow ring by ring.

The blues and white feel calm and fresh in a bedroom. Once the squares are joined, the white seams frame every flower like a little window.


Switch Things Up

Try three shades of pink with a cream outline, or sage green petals with a white edge. Make 8 by 10 squares for a throw, or 6 by 8 squares for a baby blanket. You can also join four squares into a matching pillow cover, or finish the cover with a plain round of single crochet instead of the shell edge.


Materials Needed

— Main Fabric

01 Worsted weight (size 4) cotton yarn in navy blue: about 400 g (800 yd) for the flower centers
02 Worsted weight cotton yarn in royal blue: about 1,000 g (2,000 yd) for the first petal ring
03 Worsted weight cotton yarn in medium blue: about 1,000 g (2,000 yd) for the second petal ring
04 Worsted weight cotton yarn in light blue: about 1,200 g (2,400 yd) for the third petal ring
05 Worsted weight cotton yarn in pale sky blue: about 1,400 g (2,800 yd) for the square backgrounds and the shell edge
06 Worsted weight cotton yarn in white: about 1,400 g (2,800 yd) for the outlines, seams and edge rounds

— Tools Required

07 4.0 mm (G-6) crochet hook
08 Yarn needle
09 Stitch markers
10 Scissors
11 Blocking mats and pins
12 Measuring tape

The Free Pattern

Intermediate 120-150 Hours

0% complete

— Layered Flower Square (Make 195, five blues and white) :

Each square measures about 6 in (15 cm) after Round 10. The petal rounds are worked in front of the work, and the loop rounds are worked from the back so the petals stand out in layers.
Round 1 (navy): Make a magic ring. Ch 1, work 16 sc in the ring. Pull the ring tight and sl st to the first sc. Fasten off. (16 sc)
Round 2 (royal blue): Join royal blue in any sc. Ch 1, sc in the same st, ch 2, skip the next st. *Sc in the next st, ch 2, skip the next st; repeat from * 6 more times. Sl st to the first sc. (8 sc, 8 ch-2 sps)
Round 3 (royal blue): Sl st into the first ch-2 sp. *(Sc, hdc, 3 dc, hdc, sc) in the ch-2 sp, sl st in the next sc; repeat from * 7 more times. Fasten off. (8 petals, 56 sts, 8 sl st)
Round 4 (medium blue): Turn the work so the back faces you. Join medium blue with a sl st in any sc of Round 2. Ch 4, sl st in the next sc of Round 2, and repeat until you have made 8 loops, with the last sl st landing back in the first sc. Turn the work to the front and push the royal petals forward so the loops stay behind them. (8 ch-4 sps)
Round 5 (medium blue): Sl st into the first ch-4 sp. Ch 1. *(Sc, hdc, 4 dc, hdc, sc) in the ch-4 sp, sl st in the next sl st; repeat from * 7 more times. Fasten off. (8 petals, 64 sts, 8 sl st)
Round 6 (light blue): Turn the work so the back faces you. Join light blue with a sl st in any sc of Round 2. Ch 5, sl st in the next sc of Round 2, and repeat until you have made 8 loops, with the last sl st landing back in the first sc. Turn the work to the front and push the petals forward. (8 ch-5 sps)
Round 7 (light blue): Sl st into the first ch-5 sp. Ch 1. *(Sc, hdc, 5 dc, hdc, sc) in the ch-5 sp, sl st in the next sl st; repeat from * 7 more times. Fasten off. (8 petals, 72 sts, 8 sl st)
Round 8 starts in one of the sl st gaps between two light blue petals. Every second gap is a corner, so the 8 gaps give you 4 corners and 4 sides.
Round 8 (pale sky blue): Join pale sky blue with a sl st in any sl st between two light blue petals (this is a corner gap). Ch 3 (counts as dc), 2 dc in the same st, ch 2, 3 dc in the same st. *Ch 5, skip the next petal, 3 dc in the next gap (side), ch 5, skip the next petal, (3 dc, ch 2, 3 dc) in the next gap (corner); repeat from * 2 more times. Ch 5, skip the next petal, 3 dc in the next gap (side), ch 5, skip the last petal, sl st to the top of the beginning ch-3. (36 dc, 4 ch-2 corner sps, 8 ch-5 sps)
Round 9 (pale sky blue): Sl st in each of the next 2 dc and into the first corner ch-2 sp. Ch 1, (sc, ch 2, sc) in the corner sp. *Sc in each of the next 3 dc, 5 sc in the ch-5 sp, sc in the next dc, 2 sc in the next dc, sc in the next dc, 5 sc in the next ch-5 sp, sc in each of the next 3 dc, (sc, ch 2, sc) in the next corner sp; repeat from * 2 more times. Work the side once more (3 sc, 5 sc, 4 sc, 5 sc, 3 sc), then sl st to the first sc. Fasten off. (88 sc: 20 sc on each side between corner sps, 4 ch-2 corner sps)
Round 10 (white): Join white in any corner ch-2 sp. Ch 1, (sc, ch 2, sc) in the same sp. *Sc in each sc across to the next corner sp, (sc, ch 2, sc) in the corner sp; repeat from * 2 more times. Sc in each sc across the last side, sl st to the first sc and fasten off. (96 sc: 22 sc on each side between corner sps, 4 ch-2 corner sps)
Block every square to 6 in (15 cm) and pin out the corners. Squares that match in size make the seams line up.

— Layout and Joining :

Layout: arrange the 195 squares in 15 rows of 13 squares (13 across, 15 down). All squares are identical, so keep every flower upright. The finished top is about 78 by 90 in (198 by 229 cm). The headboard end is one of the 13-square short sides.
Seam: Place two squares with wrong sides together. With white, work a sl st through the corner ch-2 sps of both squares, then sl st through the back loops of both squares in each of the 22 sc along the side, and end with a sl st through both corner ch-2 sps. The seam makes a raised white ridge on the right side. (22 sl st per seam)
Four-square junctions: Where four squares meet, work 1 sl st through all four corner ch-2 sps to close the center. (1 sl st per junction, 168 junctions)
Join the squares into 15 strips of 13 squares first (12 seams per strip), then join the strips together (13 seams between each pair of strips). That makes 362 seams in total.

— Scalloped Edge :

Round 1 (white): Hold the cover right side up with a short side at the top. Join white in the top left cover corner ch-2 sp. Ch 1, 3 sc in the corner sp. Along each side, work 1 sc in each of the 22 sc of every square, and 1 sc in each of the two neighboring corner ch-2 sps where two squares meet. Work 3 sc in each cover corner ch-2 sp. Sl st to the first sc. (1,348 sc: 310 along each 13-square side, 358 along each 15-square side, plus 12 corner sc)
Round 2 (pale sky blue): Join pale sky blue in the middle sc of any 3-sc corner. Ch 3 (counts as dc), 2 dc, ch 2, 3 dc in the same st. *Skip 1 st, 5 dc in the next st, skip 1 st, sc in the next st; repeat across the side until you reach the middle sc of the next corner, then work (3 dc, ch 2, 3 dc) in that corner sc. Repeat for each side, then sl st to the top of the beginning ch-3. (336 shells, 336 sc, 4 corner groups of 6 dc with a ch-2 sp, 78 shells on each short side and 90 on each long side)
Round 3 (white): Sl st into the nearest corner ch-2 sp. Ch 1, (sc, ch 2, sc) in the corner sp. *Sc in each st across to the next corner sp, working every dc and every sc as a sc, (sc, ch 2, sc) in the next corner sp; repeat from * 2 more times. Sc in each st across the last side, sl st to the first sc and fasten off. (2,048 sc: 474 between corner sps on each short side, 546 on each long side, plus 8 corner sc)
Pull the shells gently into shape while the cover is damp so the scallops lie evenly.

Assembly Instructions

  1. Make 195 Layered Flower Squares and weave in all the ends.
  2. Block every square to 6 inches (15 cm) so the pieces match.
  3. Follow the Layout and Joining section: lay out 15 rows of 13 squares with all flowers upright.
  4. Join the squares into 15 strips with the raised white slip stitch seam, then join the strips together.
  5. Close each four-square junction with one slip stitch through all four corner spaces.
  6. Work the three Scalloped Edge rounds around the whole cover and check your stitch counts against the totals.
  7. Weave in the last ends and steam block the cover lightly.
  8. Let the cover dry flat and shape the scallops by hand.

Common Mistakes & How to Fix Them

Working the loop rounds from the front hides the layers. Turn the work to the back for Rounds 4 and 6 and push the petals forward afterwards.

Skipping the blocking step leaves squares in different sizes and the seams pucker. Block every square to 6 inches before you join.

Pulling the ch-5 loops in Round 8 too tight makes the corners curl. Keep your chains relaxed and pin the corners flat when you block.

Missing a corner ch-2 space in the border rounds throws off the stitch counts. Mark each cover corner with a stitch marker.


Denise

Denise is a crochet designer who loves turning classic flower motifs into cozy pieces for the home.


Important Notes

Gauge is not critical, but each finished square should measure about 6 inches (15 cm). If yours is smaller, go up a hook size.

Yarn amounts are estimates for the size given, so buy an extra ball of each color to be safe.

Wash a test square first. Because dark blue and white cotton are used together, use a color catcher and wash cold on a gentle cycle.

Dry the cover flat and reshape the scallops by hand while it is damp.


I hope this bedspread brings a calm, fresh feeling to your bedroom. Take it one flower at a time, and enjoy watching the blues come together.

Crochet Abbreviations

01 ch — chain
02 sc — single crochet
03 hdc — half double crochet
04 dc — double crochet
05 sl st — slip stitch
06 sp — space
07 sps — spaces
08 st — stitch
09 sts — stitches

You Ask, We Answer

What size is the finished bedspread?

With 195 squares in 15 rows of 13, it measures about 78 by 90 inches (198 by 229 cm). Add or remove rows and columns to fit your bed.

Can I use a different yarn weight?

Yes. Lighter yarn gives smaller squares, so you will need more of them. Make a test square and compare it to 6 inches before you decide how many to make.

How do I wash and care for the finished cover?

Machine wash cold on a gentle cycle with a color catcher, then dry flat. Reshape the scalloped edge while the cover is still damp.