Amanda's Creative Corner Crochet · Kitchen
Free Crochet Patterns Handmade with Love

Lime Green Granny Square Bedspread Crochet Pattern
Jump to Pattern
Lime Green Granny Square Bedspread Crochet Pattern
130-160 Hours 0 made this
Intermediate Level

You should be comfortable with double crochet, puff stitches and joining squares.

130 to 160 Hours

Each square takes about two hours, so the cover grows one bright square at a time.

Bold and Cheerful

Green, orange and white make a happy bedroom that looks great in daylight.

About This Lime Green Granny Square Bedspread Crochet Pattern Pattern

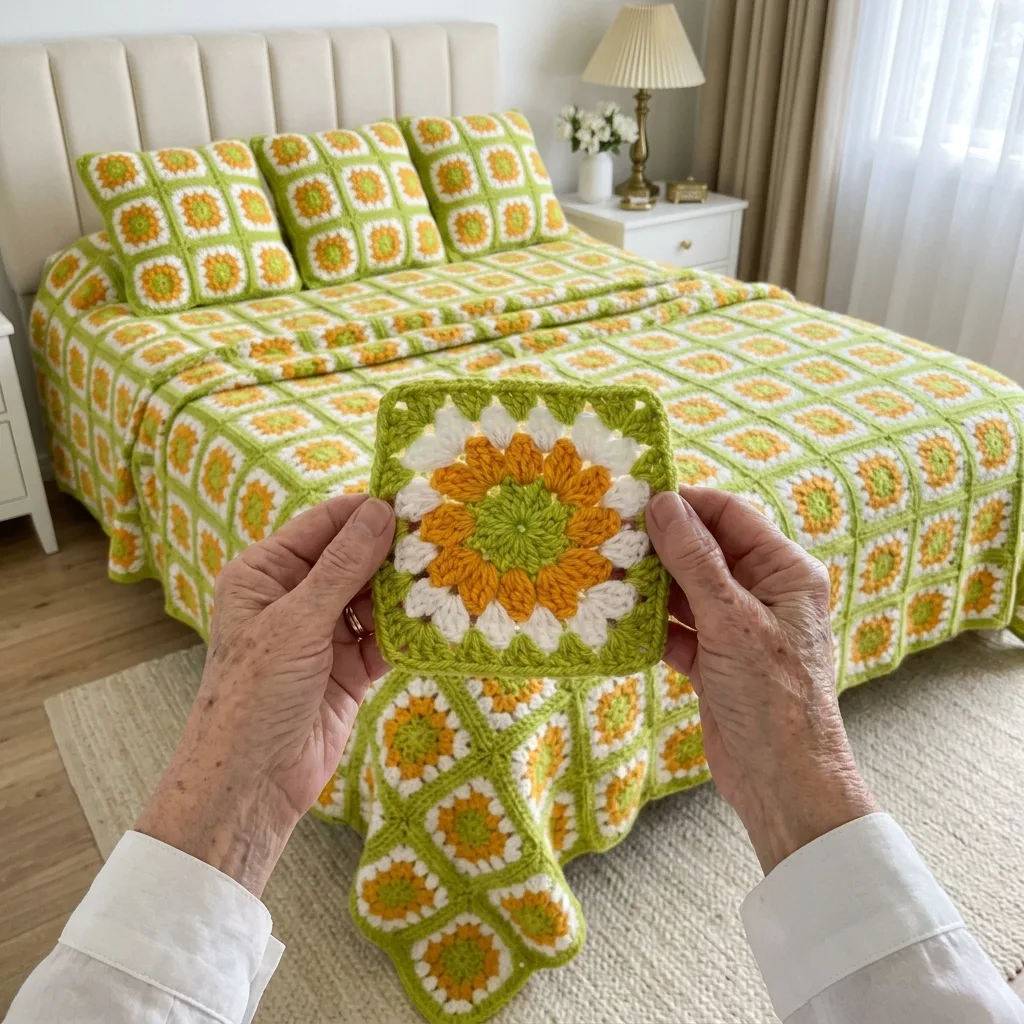
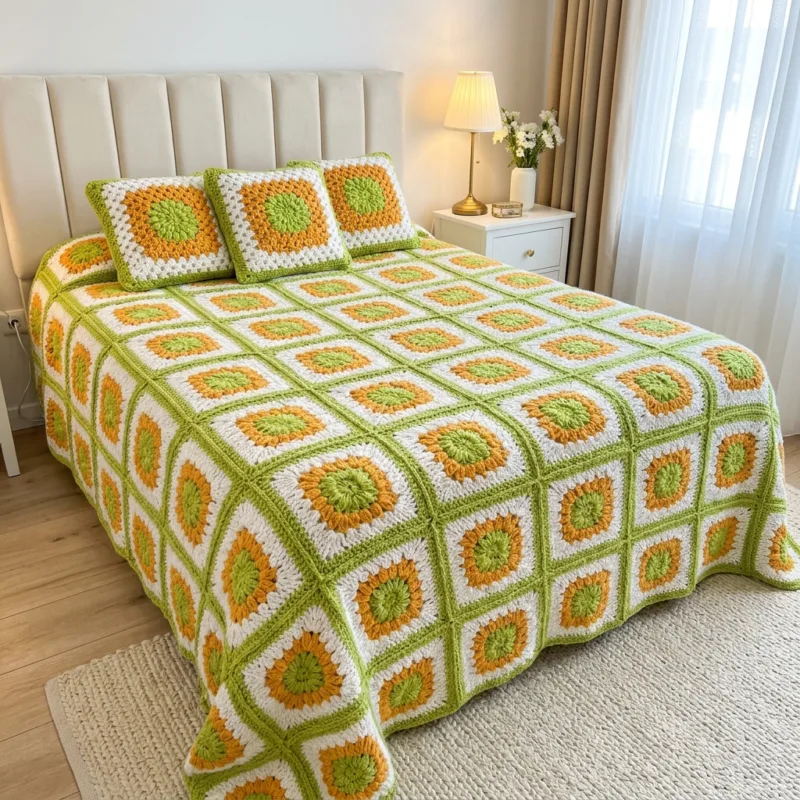
This bedspread is made from 63 chunky granny squares. Each square has a lime green puff flower in the center, a ring of orange puff petals, two thick white rounds and a lime green border. The squares are joined with a raised green seam that frames every flower.

It measures about 72 by 92 inches with the edge, so it suits a queen bed with a short drop at the sides and a longer drop at the foot. You can add or remove a row of squares to fit your own bed.
Lime Green Granny Square Bedspread Crochet Pattern step detail

Why You'll Love This Lime Green Granny Square Bedspread Crochet Pattern Pattern

I love this project because every square is small and easy to carry. You can make one on the sofa, in the car or at a friend's house, and by the end of the week you have a stack of flowers.

It is also a lovely way to use up bright cotton. When the cover is done, the green seams pull the whole bed together and the room feels fresh and sunny.

Switch Things Up

Try pink petals with a navy border, or soft yellow and sage for a quieter bedroom. For a sofa throw, make 3 by 4 squares and skip the edge. One extra square, joined with green, makes a matching pillow cover, and you can make a whole set of three like the ones on the bed.


Materials Needed

— Main Fabric

01 Lime green chunky (5) cotton yarn, about 1,650 yd (1,510 m), used for the flower centers, borders, joining and edge
02 White chunky (5) cotton yarn, about 1,000 yd (915 m), used for Rounds 3 and 4
03 Marigold orange chunky (5) cotton yarn, about 400 yd (365 m), used for the petals in Round 2
04 These amounts are estimates, so buy about 10 percent extra and weigh your first square before you buy the rest

— Tools Required

05 6 mm (J-10) crochet hook, or the size that gives you the gauge
06 Yarn needle for weaving in ends
07 Stitch markers
08 Scissors
09 Blocking mats and rust-proof pins
10 Measuring tape

The Free Pattern

Intermediate 130-160 Hours

0% complete

— Puff Flower Granny Square (Make 63, green center, orange petals, white rounds, green border) :

Puff st: [yo, insert hook, yo and pull up a loop] 4 times in the same sp (9 loops on hook), yo and pull through all 9 loops. Beg puff: ch 2, [yo, insert hook, yo and pull up a loop] 3 times in the same sp (7 loops on hook), yo and pull through all 7 loops. Keep the puffs loose so they sit plump and round.
Round 1 (lime green): Make a magic ring. Beg puff in the ring, ch 2, (puff in the ring, ch 2) 7 times. Join with sl st to the top of the beg puff. Pull the ring snug. (8 puffs, 8 ch-2 sps)
Round 2 (marigold orange): Join orange with a sl st in any ch-2 sp. This is the first corner sp, and every other ch-2 sp is a corner sp. In this sp work beg puff, ch 2, puff. *Ch 1, puff in the next ch-2 sp, ch 1, (puff, ch 2, puff) in the next ch-2 sp. Repeat from * 2 more times. Ch 1, puff in the last ch-2 sp, ch 1. Join with sl st to the top of the beg puff. Fasten off. (12 puffs, 4 ch-2 corner sps, 8 ch-1 sps)
Round 3 (white): Join white with a sl st in any ch-2 corner sp. Ch 3 (counts as dc), 2 dc, ch 2, 3 dc in the same sp. *Ch 1, 3 dc in the next ch-1 sp, ch 1, 3 dc in the next ch-1 sp, ch 1, (3 dc, ch 2, 3 dc) in the next corner sp. Repeat from * 2 more times. Ch 1, 3 dc in the next ch-1 sp, ch 1, 3 dc in the next ch-1 sp, ch 1. Join with sl st to the top of ch 3. (16 clusters, 48 dc, 4 ch-2 corner sps, 12 ch-1 sps)
Round 4 (white): Sl st in the next 2 dc and into the next ch-2 corner sp. Ch 3 (counts as dc), 2 dc, ch 2, 3 dc in the same sp. *(Ch 1, 3 dc in the next ch-1 sp) 3 times, ch 1, (3 dc, ch 2, 3 dc) in the next corner sp. Repeat from * 2 more times. (Ch 1, 3 dc in the next ch-1 sp) 3 times, ch 1. Join with sl st to the top of ch 3. Fasten off. (20 clusters, 60 dc, 4 ch-2 corner sps, 16 ch-1 sps)
Round 5 (lime green): Join green with a sl st in any ch-2 corner sp. Ch 3 (counts as dc), dc, ch 2, 2 dc in the same sp. *Dc in each of the next 19 sts (1 dc in each dc and in each ch-1 sp), (2 dc, ch 2, 2 dc) in the next corner sp. Repeat from * 2 more times. Dc in each of the last 19 sts. Join with sl st to the top of ch 3. (92 dc, 23 dc on each side between the corner sps, 4 ch-2 corner sps)
Round 6 (lime green): Ch 1, sc in each dc around, working 3 sc in each ch-2 corner sp. Join with sl st to the first sc. Fasten off and weave in the ends. (104 sc: 23 sc on each side between the corners and 3 sc in each of the 4 corners)
Block every square to about 10 by 10 inches before joining. Make all 63 squares the same, since the color order is the same in every square.

— Layout and Joining :

Layout: 7 squares across and 9 squares down, 63 squares in all, every square identical. Lay them out on a bed or floor before joining. Use lime green for all joining so the seams look like the border in the photo.
Strip (Make 9): Place 2 squares with wrong sides together. Working through the back loops of both squares, sl st in the center sc of the corner, in each of the 25 sc along the edge, and in the center sc of the next corner. Join 7 squares this way. (6 seams, 27 sl st each, 162 sl st per strip)
Strip Seams (Make 8): Place 2 strips with wrong sides together. Working through the back loops of both strips, sl st in each of the 25 sc along every square, and once in each of the 8 places where the corners meet. (7 squares x 25 sc + 8 corner points, 183 sl st per seam, 1,464 sl st in all)
Keep your seam tension loose and check that the corners meet neatly where four squares come together.

— Outer Edge (lime green) :

The outer edge has 175 sc along each top and bottom edge and 225 sc along each side, not counting the 3 sc worked in each outer corner. These totals are counted from the squares: 23 sc per square side, plus 2 sc at each seam, plus 1 sc at each end next to the corner.
Round 1: With the right side facing, join green in the tip sc of any outer corner. Ch 1, 3 sc in the same sc. Work 1 sc in each sc along the outer edge. At every seam where 2 squares meet, work 1 sc in the last corner sc of the square you leave and 1 sc in the first corner sc of the next square, skipping the tip sc of both squares. Work 3 sc in the tip sc of each of the other 3 outer corners. Join with sl st to the first sc. (175 sc on each top and bottom edge, 225 sc on each side, 3 sc in each of 4 corners, 812 sc)
Round 2: Ch 1, do not turn. Rev sc in each sc around. Join with sl st to the first rev sc. Fasten off and weave in the ends. (812 rev sc)

Assembly Instructions

  1. Make 63 puff flower granny squares and weave in all the ends.
  2. Wet block every square to about 10 by 10 inches and let them dry flat.
  3. Lay the squares out in 7 columns and 9 rows so the cover looks balanced.
  4. Join 7 squares into a strip with 27 sl st per seam, and make 9 strips.
  5. Join the 9 strips with 183 sl st per seam, working through the back loops with green yarn.
  6. Work the sc round and the reverse sc round around the outer edge of the whole cover.
  7. Steam the seams lightly and weave in the last ends.

Common Mistakes & How to Fix Them

Tight puff stitches look flat and make the square cup, so pull each loop up loosely and keep the hook size the same all the way through.

Miscounting at the corners is easy, so check that every corner has 3 dc, ch 2, 3 dc in the white rounds and 2 dc, ch 2, 2 dc in the green round.

Joining through the front loops instead of the back loops makes the seam hard to see, so keep the wrong sides together and use the back loops.

Skipping the blocking step makes the squares different sizes and the grid will not line up.


Denise

Denise designs cozy home decor crochet patterns with clear instructions for makers of every level.


Important Notes

Gauge: Rounds 1 and 2 should measure about 4.5 inches across, and the finished square about 10 inches after blocking.

The finished cover is about 72 by 92 inches with the edge. Each extra row or column of squares changes the size by about 10 inches.

Yarn amounts are estimates, so weigh your first square and multiply to check before you buy all the yarn.

Wash gently in cool water and use a color catcher, because the green and orange can bleed onto the white. Dry the cover flat.


I hope this cheerful bedspread brings as much color to your room as it did to mine. Send me a photo of your first square, I would love to see it.

Crochet Abbreviations

01 ch — chain
02 sc — single crochet
03 dc — double crochet
04 sl st — slip stitch
05 sp(s) — space(s)
06 st(s) — stitch(es)
07 yo — yarn over
08 puff — puff stitch: [yo, insert hook, yo and pull up a loop] 4 times in the same sp, yo and pull through all 9 loops
09 beg puff — beginning puff stitch: ch 2, [yo, insert hook, yo and pull up a loop] 3 times in the same sp, yo and pull through all 7 loops
10 rev sc — reverse single crochet, worked from left to right

You Ask, We Answer

What size is the finished bedspread?

It is about 72 by 92 inches with the edge. Each square measures about 10 inches, so you can add or remove a row or column to fit a twin, full or king bed.

Can I use a thinner yarn?

Yes, but the squares will be smaller. With worsted weight cotton and a 4.5 mm hook each square is about 7.5 inches, so you would need around 10 squares across and 12 down for the same size.

How do I wash it?

Wash it gently in cool water on a delicate cycle or by hand, with a color catcher, and dry it flat. Do not hang it wet, because the cotton is heavy and will stretch.