Amanda's Creative Corner Crochet · Kitchen
Free Crochet Patterns Handmade with Love

Marigold Spiderweb Bed Cover Crochet Pattern
Jump to Pattern
Marigold Spiderweb Bed Cover Crochet Pattern
140-180 Hours 2 made this
Intermediate Level

You should be comfortable with chain loops, granny square rounds and whipstitch seams.

140 to 180 Hours

Each square is a small project, so the cover grows a few squares at a time.

Cozy Halloween Yellow

Sunny marigold with black webs keeps the spooky theme warm and cheerful.

About This Marigold Spiderweb Bed Cover Crochet Pattern Pattern

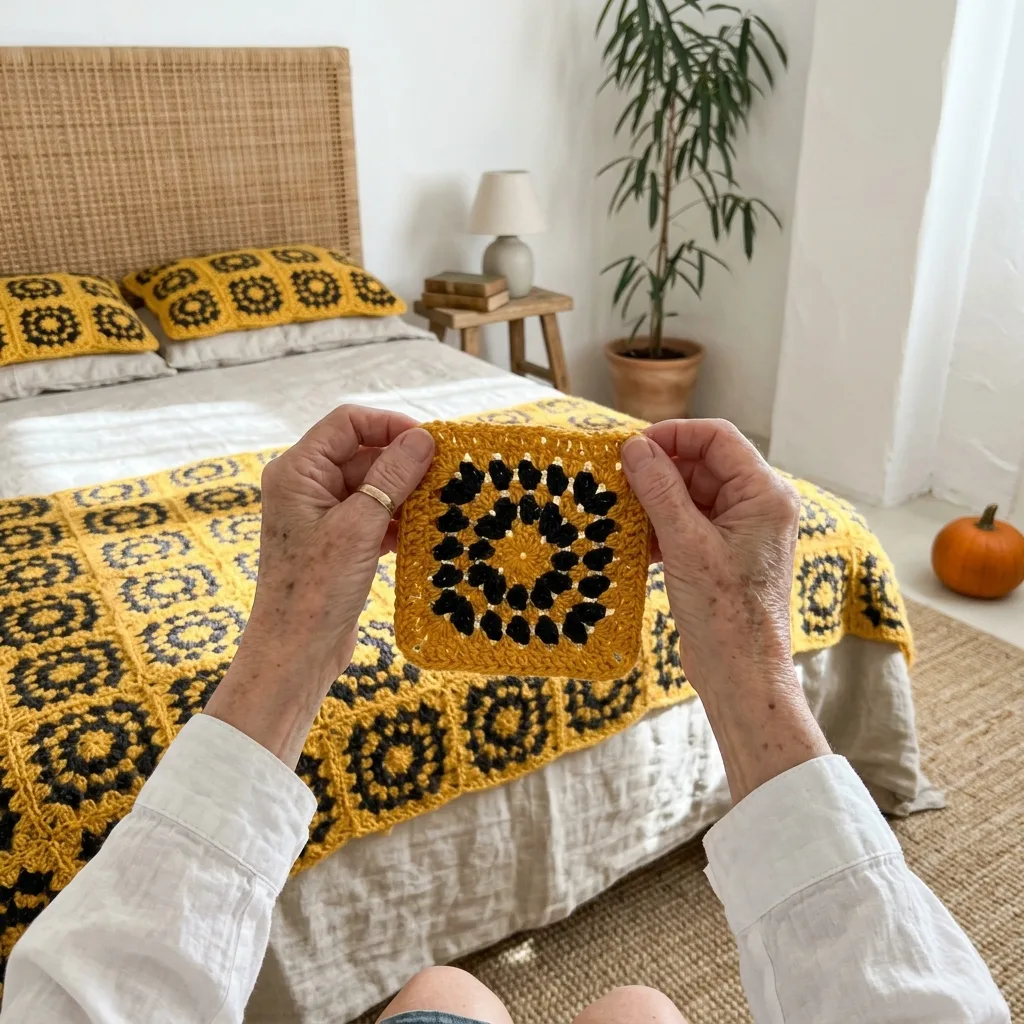
This bed cover is made from 165 granny squares in marigold yellow, each with a charcoal-black spiderweb center. The squares are joined in a grid of 11 across and 15 down and finished with a scalloped shell border. It measures about 70 by 95 inches.

You work in matte worsted cotton with a 3.5 mm hook, using chain loops, single crochet and double crochet, then whipstitch the squares together. It suits crocheters who know the basic granny square and want a big seasonal project they can build one square at a time.

Marigold Spiderweb Bed Cover Crochet Pattern step detail

Why You'll Love This Marigold Spiderweb Bed Cover Crochet Pattern Pattern

I love Halloween projects that still feel cozy, and yellow does that so well. The black web in each center is the only spooky touch, and it stays small enough that the cover can stay on the bed after October.

The squares are easy to carry, so I made them in waiting rooms, in the car and in front of the television. Seeing the pile grow keeps me going until the last seam.


Switch Things Up

Try orange squares with black webs for a bolder look, or black squares with white webs for a classic Halloween palette. For a throw, make 6 squares across and 8 down (about 36 by 48 inches) with the same border. You can also make matching pillow covers from 3 by 2 squares, or swap the shell border for a plain round of single crochet.


Materials Needed

— Main Fabric

01 Worsted weight (4) matte cotton yarn in marigold yellow, about 4,500 yards (about 2,650 g) in total for the full size
02 Worsted weight (4) matte cotton yarn in charcoal black for the web centers, about 750 yards (about 440 g)
03 Squares: about 24 yards of yellow and 4 yards of black per square, for 165 squares
04 Border: about 330 yards of yellow, included in the total above
05 Buy a few extra skeins from the same dye lot so the color stays even

— Tools Required

06 3.5 mm (E-4) crochet hook
07 Yarn needle
08 Stitch markers
09 Scissors
10 Blocking mats and rustproof pins
11 Measuring tape

The Free Pattern

Intermediate 140-180 Hours

0% complete

— Spiderweb Square (Make 165, yellow with black center) :

Each square measures about 6 inches (15 cm) after blocking. Rounds 1 to 3 are worked in black and Rounds 4 to 7 in yellow. Keep your tension firm so the web holds its shape.
Round 1: With black, ch 6, join with sl st to form a ring. Ch 1, work 16 sc in the ring, join with sl st to the first sc. (16 sc)
Round 2: Ch 1, sc in the same sc. *Ch 6, sk 1 sc, sc in the next sc; repeat from * 6 more times. Ch 6, sk the last sc, join with sl st to the first sc. (8 sc and 8 ch-6 loops)
Round 3: Sl st into the first ch-6 loop, ch 1, sc in the same loop. *Ch 4, sc in the next ch-6 loop; repeat from * 6 more times. Ch 4, join with sl st to the first sc. Fasten off black. (8 sc and 8 ch-4 sp)
Round 4: Join yellow in any ch-4 sp. Ch 3 (counts as dc), 2 dc in the same sp, ch 2, 3 dc in the same sp for the first corner. *Ch 1, 3 dc in the next ch-4 sp, ch 1, (3 dc, ch 2, 3 dc) in the next ch-4 sp; repeat from * 2 more times. Ch 1, 3 dc in the next ch-4 sp, ch 1, join with sl st to the top of the beginning ch 3. (36 dc, 4 ch-2 corner sp and 8 ch-1 sp)
Round 5: Sl st in each of the next 2 dc and in the corner ch-2 sp. Ch 3 (counts as dc), 2 dc in the same sp, ch 2, 3 dc in the same sp for the first corner. *Ch 1, 3 dc in the next ch-1 sp, ch 1, 3 dc in the next ch-1 sp, ch 1, (3 dc, ch 2, 3 dc) in the next corner sp; repeat from * 2 more times. Ch 1, 3 dc in the next ch-1 sp, ch 1, 3 dc in the next ch-1 sp, ch 1, join with sl st to the top of the beginning ch 3. (48 dc, 4 ch-2 corner sp and 12 ch-1 sp)
Round 6: Sl st in each of the next 2 dc and in the corner ch-2 sp. Ch 3 (counts as dc), 2 dc in the same sp, ch 2, 3 dc in the same sp for the first corner. *[Ch 1, 3 dc in the next ch-1 sp] 3 times, ch 1, (3 dc, ch 2, 3 dc) in the next corner sp; repeat from * 2 more times. [Ch 1, 3 dc in the next ch-1 sp] 3 times, ch 1, join with sl st to the top of the beginning ch 3. (60 dc, 4 ch-2 corner sp and 16 ch-1 sp)
Round 7: Sl st in each of the next 2 dc and in the corner ch-2 sp. Ch 3 (counts as dc), 2 dc in the same sp, ch 2, 3 dc in the same sp for the first corner. *Dc in each of the next 3 dc, [dc in the next ch-1 sp, dc in each of the next 3 dc] 4 times, (3 dc, ch 2, 3 dc) in the next corner sp; repeat from * 2 more times. Dc in each of the next 3 dc, [dc in the next ch-1 sp, dc in each of the next 3 dc] 4 times, join with sl st to the top of the beginning ch 3. Fasten off and leave a 12 inch tail for joining. (100 dc and 4 ch-2 corner sp)
Each side of a finished square has 25 dc between the corner spaces. Count one side on your first square so you know it is correct before you make the rest.

— Layout :

Arrange the 165 squares in 15 rows of 11 squares. Turn every square the same way, with the same side facing up, so the black webs all sit evenly.
Join the squares into 15 strips of 11, then join the strips into one cover. Squares on the outer edge keep their corner ch-2 spaces open for the border.
The cover before the border is 11 squares by 15 squares, about 66 by 90 inches. The border adds about 2 to 3 inches on every side.

— Border (yellow) :

The border is worked in the round on the right side of the assembled cover, in yellow.
Round 1: Join yarn in any outer corner ch-2 sp, ch 1, 3 sc in the same sp. *Work 1 sc in each dc and 1 sc in each seam where two squares meet along the edge, then 3 sc in the next outer corner sp; repeat from * around. Check as you go: each top and bottom edge should have 285 sc between the corners and each side edge should have 389 sc between the corners. Join with sl st to the first sc. (1,360 sc)
Round 2: Sl st in the next sc (the middle sc of the corner), ch 1, sc in the same sc. *Sk 3 sc, 7 dc in the next sc, sk 3 sc, sc in the next sc; repeat from * around, working a sl st in the first sc of the round instead of the final sc. Each shell fans over 7 stitches, and the corner sc sits between two shells. (170 shells and 170 sc)
Round 3: *Sc in each of the 7 dc of the shell, sl st in the next sc of Round 2; repeat from * around. The last sl st goes into the corner sc where Round 2 began, which closes the round. Fasten off and weave in the end. (170 scallops and 1,190 sc)

Assembly Instructions

  1. Weave in all yarn ends on the squares, then block each square to 6 inches (15 cm) by pinning it flat and spritzing it with water.
  2. Lay out the 165 squares in 15 rows of 11 and take a photo, so you can check the arrangement as you sew.
  3. Join the squares in each row with a whipstitch seam through the back loops only, matching corner to corner and using the long tail of each square.
  4. Join the 15 rows the same way, and make sure the corners of four squares meet in the same spot, with a few firm stitches to hold them.
  5. Weave in any remaining ends along the seams, then lay the cover flat and check that the edges are straight.
  6. Work Border Round 1 around the outer edge, counting the stitches on each edge.
  7. Work Border Rounds 2 and 3 to form the shells and the scalloped edge.
  8. Block the whole cover, pinning out the scallops so every one lies flat and even.

Common Mistakes & How to Fix Them

Uneven square sizes make the seams ripple, so check each square against 6 inches after blocking and set aside any that are clearly bigger or smaller.

Pulling the black chain loops in Round 2 too tight makes the web cup upward, so keep each ch-6 loop relaxed and even.

Skipping the ch-1 spaces between groups in Rounds 4 to 6 shifts the corners, so check that every side has the right number of groups.

Skipping the stitch count on Border Round 1 leaves the shells out of step at the corners, so check the 285 and 389 counts before moving on.


Denise

Denise designs cozy crochet patterns for the home, with round by round instructions and stitch counts you can follow with confidence.


Important Notes

Gauge is the square size: each square should measure 6 inches (15 cm) after blocking, and you can change hook size by 0.25 mm to match.

Yarn amounts are estimates for the full size, so buy extra from the same dye lot.

Block the squares before joining, because blocked squares are much easier to line up and sew.

Wash gently in cool water and lay flat to dry to keep the web centers and scallops crisp.


Thank you for crocheting along with me. Take it one square at a time, and soon you will have a cover you can be proud of. Happy hooking!

Crochet Abbreviations

01 ch — chain
02 sl st — slip stitch
03 sc — single crochet
04 dc — double crochet
05 sk — skip
06 sp — space

You Ask, We Answer

What size is the finished bed cover?

The finished cover measures about 70 by 95 inches (178 by 241 cm) with the border, and the squares alone make about 66 by 90 inches.

Can I use a different yarn weight or make a different size?

Yes. A thinner cotton with a smaller hook gives a smaller square, so you would need more squares. For a different size, change the grid. Border Round 2 works best when each edge has 3, 7, 11, 15 or 19 squares, since the shells then fit evenly.

How do I wash and care for the cover?

Machine wash gently in cool water or hand wash, then lay it flat to dry. Reshape the scallops while it is damp, and avoid hot dryers, which can pull the squares out of shape.