
Rose and Raspberry Leaf Square Bed Cover Crochet Pattern
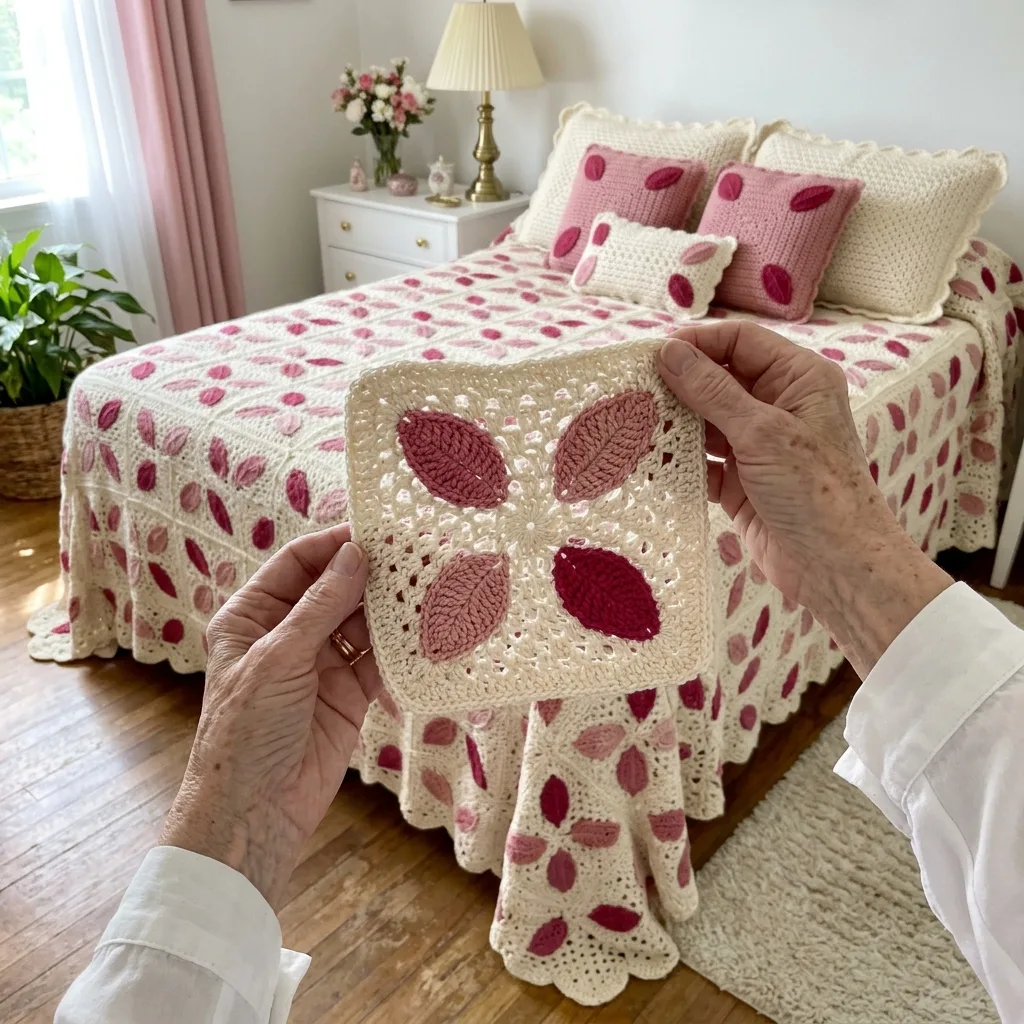
A classic granny square, four quick leaves and a little sewing, with careful counting for the border.
Each square with its four leaves takes about two hours, so the cover grows one evening at a time.
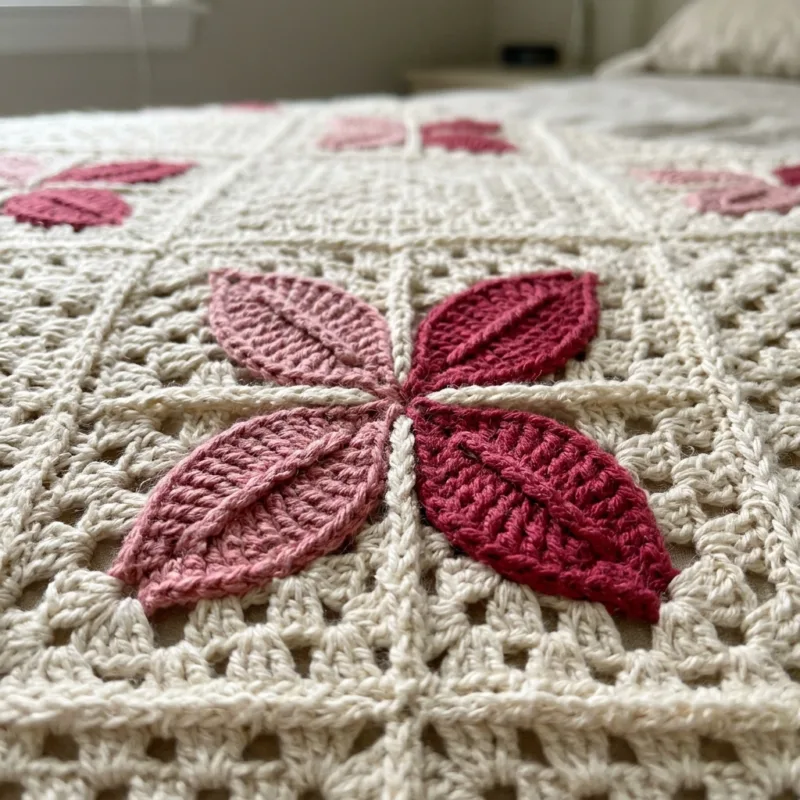
Where four squares meet, their leaf tips join into a pink flower, so the bed blooms twice over.
About This Rose and Raspberry Leaf Square Bed Cover Crochet Pattern Pattern
This bed cover is a garden of pink leaves on a cream lace background. Each square is a cream granny square with four ribbed leaves that start in the middle and point out to the four corners. Two leaves are a soft rose pink and two are a deep raspberry, with matching colors sitting opposite each other, so every square looks like a little pinwheel in two shades of pink. Between the leaves, the cream granny clusters show through in a cross shape, with small open holes that keep the cover light and lacy.
The magic happens when you join the squares. Because every leaf points to a corner, the tips of four leaves meet wherever four squares come together. Two rose leaves and two raspberry leaves touch at each meeting point, and together they form a second, larger four-petal flower. So the cover has two patterns at once: pinwheels inside every square and flowers on every corner. From across the room the bed looks covered in blossoms, and up close you can admire every rib and vein of the leaves.
The background is a classic ten-round granny square in cream, followed by two rounds of single crochet that give it a firm, straight edge and neat corner holes. The leaves are made separately. Each one is worked around a short foundation chain, growing from single crochet at the ends to treble crochet in the middle, which gives it a pointed leaf shape. A second round in the back loop only leaves a line of ridges around the edge and a clear center vein down the middle, like a real leaf. You then sew the four leaves onto the square along the diagonals.
I chose to sew the leaves on rather than work them into the square because it keeps everything simple and flat. The granny squares are quick and relaxing, the leaves are tiny and portable, and you can lay the leaves on the square and move them until they sit exactly right before you sew. It also means you can make all the squares first, all the leaves next, and then enjoy a calm evening of sewing with a basket of pink leaves beside you.
Each finished square measures about 10 inches. The queen size uses 80 squares, set in 8 columns and 10 rows, and 320 leaves, half rose and half raspberry. The squares are joined with a whipstitch through the back loops, so the seams lie flat and almost disappear into the cream. The cover finishes at about 80 by 100 inches before the border and about 82 by 102 inches after it, with a generous drop over the sides and the foot of a queen bed.
The border is a round of single crochet and a round of little picot shells. I worked out the counts so the shells fall evenly on every side for any size of cover, with a fuller shell turning each corner. The stitches used are chain, slip stitch, single crochet, half double crochet, double crochet and treble crochet, all familiar ones. What makes this pattern intermediate is the number of pieces and the care needed to place the leaves the same way on every square.
The finished cover is soft, pretty and very feminine, with a gentle weight from all those granny clusters. The leaves stand up slightly from the background, so the cover has a lovely texture you can feel with your fingertips. Rose, raspberry and cream suit a romantic bedroom, a girl's room, a cottage guest room or any space with white furniture and fresh flowers. If you enjoy granny squares and want something with more personality, this is a wonderful project to make.
Why You'll Love This Rose and Raspberry Leaf Square Bed Cover Crochet Pattern Pattern
I love projects where the pieces are small and the result is big, and this bed cover is exactly that. A single leaf takes me about ten minutes. I make them in little batches, five rose and five raspberry, while I wait for the kettle or sit in the garden in the afternoon. They pile up in a basket like a heap of fallen petals, and every time I look at that basket I feel happy. It is such a gentle way to make progress on a large project.
The two pinks are a big part of why I love it. Rose pink is soft and sweet, and raspberry is deep and rich, almost like a ripe berry. Side by side they make each other look even better, and on the cream background both colors glow. I chose to keep matching leaves opposite each other, so every square has a calm balance, but the cover still looks lively because the colors alternate in the flowers where the corners meet.
My favorite moment is joining the first four squares. Until then, each square is a pretty pinwheel, but nothing more. Then you stitch four of them together, and suddenly a big pink flower appears right in the middle, made from the tips of four leaves. I remember laughing out loud the first time it happened, because I had planned it and it still felt like a surprise. Every new row adds a whole line of these flowers.
Here are a few habits that made this project smooth for me:
- Make one complete square with its leaves first, so you can check the size and the look.
- Leave a long tail on every leaf; you will use it to sew the leaf on.
- Pin all four leaves before you sew any of them.
- Keep a finished square nearby as your guide, so every square matches.
I also love how restful the granny squares are. After the leaves, which need a little counting, the cream squares are pure comfort. Three double crochet, a chain, three more, around and around, and the corners come almost by themselves. I can make a granny square while chatting or watching a film, and I barely look at my hands. That mix of easy rounds and small detailed leaves keeps the project interesting from start to finish.
This cover changes a bedroom completely. It brings warmth and a sense of spring, even on a grey winter day. With pink curtains, fresh flowers on the nightstand and a soft cream rug, the room feels like a little rose garden. Yet the cream background keeps it light and calm, so it never feels too sweet. It is the kind of bed you want to climb into with a good book and a cup of tea.
Finally, I love it as a gift. A friend's daughter received one for her first apartment, and she told me it made the new place feel like home from the very first night. A bed cover like this carries many hours of care, and the person who receives it can feel that in every leaf. If you make it for your own bed, enjoy every flower, because you have earned each one.

Switch Things Up
Choose new leaf colors. The design looks lovely in many palettes. Sage and olive green leaves on cream look like real foliage and suit a calm, natural bedroom. Rust and mustard leaves feel warm and autumnal, while two shades of blue on white are fresh and coastal. Lavender and plum make a soft, dreamy cover. Keep the two leaf colors one light and one dark, and keep the background in a pale neutral so the leaves stand out clearly.
Make it for any bed. Each square is about 10 inches, so new sizes are simple to plan. Add or remove columns for the width and rows for the length, and remember that every square needs four leaves. These sizes are before the border:
- Twin: 6 by 10 squares, 60 squares and 240 leaves, about 60 by 100 inches
- Full: 7 by 10 squares, 70 squares and 280 leaves, about 70 by 100 inches
- Queen: 8 by 10 squares, 80 squares and 320 leaves, about 80 by 100 inches
- King: 10 by 10 squares, 100 squares and 400 leaves, about 100 by 100 inches
The border works for every size, because each side of Border Rnd 1 always has 44 stitches per square plus 1, which divides evenly into the 4-stitch shell repeat.
Make a sofa throw. Five columns by six rows, 30 squares and 120 leaves, makes a throw of about 52 by 62 inches with the border. It uses a little under 40 percent of the yarn, so it is a good way to try the leaves and the joining before committing to a full bed. Folded over the arm of a sofa, the pink flowers at the corners show beautifully, and it makes a lovely Mother's Day or birthday gift.
Make a baby blanket. Three columns by four rows, 12 squares and 48 leaves, gives a blanket of about 32 by 42 inches. For a baby, choose a soft cotton blend or a washable baby yarn, and sew every leaf down all the way around its edge, not just at the base and tip, so tiny fingers cannot pull them. Pale pink and peach leaves on white, or mint and sage on cream, look sweet in a nursery.
Add matching pillows. One square makes a small 10 inch pillow, four squares joined 2 by 2 make a 20 inch cushion, and six squares joined 3 by 2 make a standard sham front. You can also make a solid pink pillow in rows of single crochet and sew one raspberry leaf in the middle, which is how the pink pillows on my bed were made. Work the picot shell border around each pillow front to tie it to the cover.
Change the leaf arrangement. Instead of matching opposite leaves, you can make all four leaves on a square the same color and alternate rose squares with raspberry squares like a checkerboard. You can also turn the leaves so they point to the middle of each side instead of the corners. Then the leaf tips meet along the seams instead of the corners and form a chain of diamonds across the bed. Lay out a few squares before you decide.
Change the edge. The picot shells are pretty and soft, but you can make the edge your own. Work the border in rose pink for a colorful frame, or add a round of raspberry single crochet before the shells. For a simpler finish, stop after Border Rnd 1 and work one round of reverse single crochet for a rounded rope edge. Any edge with a 4-stitch repeat fits the counts exactly.
Change the yarn weight. In DK cotton with a 4 mm hook, each square comes out about 8 inches, so a queen cover needs about 10 by 12 squares, 120 in all. In bulky yarn with a 6 mm hook, the squares grow to about 12 inches, and a queen needs only 7 by 8 squares, 56 in all. The leaves grow or shrink with the yarn, so they still fit their squares. Always make one complete square first and measure it before you buy yarn.
Materials Needed
— Main Fabric
— Tools Required
The Free Pattern
0% complete
— Cream Granny Square (Make 80, cream) :
— Ribbed Leaf (Make 320: 160 rose pink and 160 deep raspberry) :
— Sewing the Leaves (80 squares, 4 leaves each) :
— Layout and Joining :
— Border :
Assembly Instructions
- Make one complete square with its four leaves sewn on, measure it and check that it is about 10 inches before you go on.
- Make all 80 cream granny squares and all 320 leaves, 160 in rose pink and 160 in deep raspberry.
- Pin four leaves onto each square along the diagonals, rose pink at top left and bottom right, raspberry at top right and bottom left, then sew them on all around their edges.
- Lightly block every square to 10 by 10 inches, smoothing the leaves flat.
- Lay the squares out in 8 columns and 10 rows, all facing the same way, so four leaf tips meet as a flower at every inner corner.
- Whipstitch the squares into columns through the back loops with cream, then join the columns together the same way.
- Work the two border rounds around the whole cover, weave in all remaining ends and give the finished bed cover a light final blocking.
Common Mistakes & How to Fix Them
Placing the leaf colors differently from square to square. The corner flowers only work if every square has the same layout: rose pink at top left and bottom right, raspberry at top right and bottom left. If one square is turned or sewn with the colors swapped, its corners will meet the neighbors with two raspberry leaves side by side, and that flower will look broken. With hundreds of leaves, it is easy to grab the wrong color. Keep one finished square as your guide, and mark the top of every square with a small pin while you sew. Check each finished square against the guide before you put it in the pile.
Leaves that do not lie flat. If the leaf is worked too tightly, especially in the treble crochet section, it curls up at the sides and looks like a boat instead of a leaf. If it is worked too loosely, it ruffles and wrinkles when you sew it down. Block your first few leaves by pinning them flat, spraying them with water and letting them dry, and compare them with the square. A good leaf is about 4.5 inches long and lies flat on the table. If yours curls, go up half a hook size for the leaves only.
Sewing the leaves too tightly. When you sew a leaf on with tight stitches, it pulls the granny clusters together underneath, and the square puckers around the leaf and loses its straight edges. The square may then be smaller than its neighbors, which makes the seams wavy. Use small, relaxed running stitches about 1/4 inch in from the edge of the leaf, and catch only the top of the granny clusters. After each leaf, lay the square flat and smooth it with your hand. If you see a ripple, loosen the sewing stitches with the tip of your needle.
Losing count along the border. The border has more than 1,500 stitches in the first round, and missing a sc2tog at a seam or adding an extra stitch in a corner throws off the shell repeat on that side. Then the last shell before the corner comes out crowded or with a gap. Count each side of Border Rnd 1 before you start the shells: 353 on the short sides and 441 on the long sides. Place a stitch marker every 44 stitches, which is one square, so you can check your count in small sections instead of counting the whole side at once.

You Might Also Like


Important Notes
Gauge matters because 80 squares and 320 leaves have to fit together. With a 5 mm hook, the first four rounds of the granny square should measure about 4 inches, the finished square about 10 inches and each leaf about 4.5 inches long. A small difference is fine as long as everything matches. Measure your first five squares and leaves, then check one in every ten. If your leaves come out longer than half the diagonal of the square, use a smaller hook for the leaves.
Block the squares after the leaves are sewn on, and block the whole cover once more after the border. Pin each square to 10 by 10 inches on a blocking mat, spray it with water until damp, gently flatten the leaves and straighten the edges, and let it dry completely. Blocking evens out the granny clusters, opens the little holes between them and helps the leaves settle into the background, so the finished cover lies smooth.
The yarn amounts in the materials list are estimates for the queen size, including the leaf sewing tails, joining and border. Buy all of the cream, rose pink and raspberry at once, from the same dye lots, and keep the labels. Pinks in particular can vary noticeably between lots, and a slightly different shade of rose would show as a band of mismatched flowers across the bed. Buy one extra skein of each color for safety and for repairs.
Wash the finished cover on a gentle cold cycle in a large mesh bag or a zipped duvet cover, with mild detergent. Deep raspberry sits directly on cream, so always add a color catcher, and for the very first wash you can soak the cover in cold water with a splash of vinegar first. Never wring or twist it. Press out the water, lay it flat on towels or a clean drying rack, smooth the leaves and edges, and let it dry fully.
Thank you for making this rose and raspberry leaf bed cover with me. I hope you enjoy every part of it: the calm rhythm of the cream granny squares, the little leaves piling up in your basket, and that wonderful moment when four squares meet and a pink flower appears in the corner. It is a big project, but it is made of small, happy steps.
So find your cream yarn and your two pinks, and make your first granny square and four leaves today. Sew them on, lay the square on your bed and admire it. Then make another, and soon you will be joining rows of flowers into a bed cover that will bring a bit of spring to your bedroom for many years.
Crochet Abbreviations
You Ask, We Answer
How big is the finished bed cover, and how many squares and leaves do I need?
Following the pattern exactly, each finished square measures about 10 inches. The queen size uses 80 squares in 8 columns and 10 rows, with 320 leaves, half rose pink and half deep raspberry. It measures about 80 by 100 inches before the border and about 82 by 102 inches after it. On a standard queen mattress of 60 by 80 inches, that gives a drop of about 11 inches on each side and a long drape at the foot. For a tall bed, add one column for the width and one row for the length. To plan any size, measure the mattress width plus twice the drop you want, and the mattress length plus one drop, then divide each by 10 and round up. Multiply the number of squares by four for the leaves. The border math works for any number of squares, so you never need to change it.
Can I work the leaves into the square instead of sewing them, or use another yarn?
Sewing is the method I recommend, because it keeps the granny square simple and flat and lets you place each leaf exactly where you want it before you commit. Working leaves into the rounds of a square would mean changing colors many times in every round, which is slower and much harder to keep neat. For the yarn, worsted cotton gives crisp ribbed leaves and clear granny clusters, and it washes well. A cotton and acrylic blend makes a softer, lighter cover, and a smooth acrylic works if you want easy care. DK yarn with a 4 mm hook gives squares of about 8 inches, and bulky yarn with a 6 mm hook gives squares of about 12 inches. The leaves change size with the yarn, so they still fit. Make one full square with leaves first and measure it before you plan the rest.
How do I care for and store the bed cover so it lasts?
Wash it only when it really needs it, on a gentle cold cycle in a large mesh bag with mild detergent, and always use a color catcher because the deep raspberry leaves sit right on cream yarn. Lay it flat to dry and smooth the leaves while it is damp, so they dry flat against the squares. Never use a hot dryer, which can shrink cotton and make the leaves curl. Between washes, shake the cover out and air it by an open window, away from strong direct sunlight, which can fade the pinks over time. To store it, fold it loosely with tissue paper between the layers and keep it in a cotton bag or a large pillowcase, not plastic. Refold it along different lines every few months. Once a year, check the leaf edges and resew any spot that has loosened.
Success!
Thanks for subscribing — check your inbox for a welcome note.
Abbreviations
- ch — chain
- sl st — slip stitch
- sc — single crochet
- sc2tog — single crochet 2 together (here worked over 2 corner spaces at a seam)
- hdc — half double crochet
- dc — double crochet
- tr — treble crochet
- picot — ch 3, sl st in 3rd ch from hook
- BLO — back loop only
- st(s) — stitch(es)
- sp(s) — space(s)
- rep — repeat
- Rnd — round
- RS — right side